2003 YAMAHA WR 250F brake
[x] Cancel search: brakePage 258 of 860

3 - 67
INSP
ADJ
3. Install:
Protector (rear brake)
Diaphragm
Brake master cylinder cap
EC362040FRONT BRAKE ADJUSTMENT
1. Check:
Brake lever position
a
2. Remove:
Brake lever cover
3. Adjust:
Brake lever position
4. Install:
Brake lever cover
NOTE:If bleeding is difficult, it may be
necessary to let the brake fluid sys-
tem stabilize for a few hours.
Repeat the bleeding procedure
when the tiny bubbles in the sys-
tem have disappeared.
j. Add brake fluid to the level line
on the reservoir.
WARNING
Check the operation of the brake
after bleeding the brake system.
Brake lever position a:
Standard
positionExtent of
adjustment
95 mm (3.74 in)76 ~ 97 mm
(2.99 ~ 3.82 in)
Brake lever position adjust-
ment steps:
Loosen the locknut
1.
Turn the adjusting bolt
2 until
the lever position
a is within
specified position.
Tighten the locknut.
T R..
Locknut:
5 Nm
(0.5 m kg, 3.6 ft lb)
CAUTION:
Be sure to tighten the locknut,
as it will cause poor brake per-
formance.
3. Monter:
Protection (frein arrière)
Diaphragme
Couvercle de maître-cylindre de
frein
REGLAGE DE FREIN AVANT
1. Contrôler:
Position du levier de frein a
2. Déposer:
Cache du levier de frein
3. Régler:
Position du levier de frein
4. Monter:
Cache du levier de frein
N.B.:
Si la purge est difficile, il peut être
nécessaire de laisser le système du
liquide de freinage se stabiliser pen-
dant quelques heures. Répéter la pro-
cédure de purge quand les bulles du
système ont disparu.
j. Remettre à niveau le fluide de
frein dans le réservoir.
AVERTISSEMENT
Vérifier le fonctionnement du frein
après avoir purgé le circuit de frei-
nage.
Position du levier de frein
a:
Position standard Plage de réglage
95 mm (3,74 in)76 à 97 mm
(2,99 à 3,82 in)
Etapes du réglage de la position du
levier de frein:
Desserrer le contre-écrou 1.
Tourner le boulon de réglage 2
jusqu’à ce que la position du levier
a soit conforme aux spécifica-
tions.
Serrer le contre-écrou.
T R..
Contre-écrou:
5 Nm
(0,5 m kg, 3,6 ft lb)
ATTENTION:
S’assurer que le contre-écrou est
bien serré, sinon le freinage ne sera
pas efficace.
CHASSIS
PARTIE CYCLE
Page 260 of 860

3 - 69
INSP
ADJ
EC364002REAR BRAKE ADJUSTMENT
1. Check:
Brake pedal height
a
Out of specification
→ Adjust.
2. Adjust:
Brake pedal height
Brake pedal height a:
5 mm (0.20 in)
Pedal height adjustment steps:
Loosen the locknut
1.
Turn the adjusting nut
2 until
the pedal height
a is within
specified height.
Tighten the locknut.
WARNING
Adjust the pedal height
between the maximum È and
the minimum É as shown. (In
this adjustment, the bolt 3
end b should protrude out of
the threaded portion 4 but
not be less than 2 mm
(0.08 in) c away from the
brake pedal 5).
After the pedal height adjust-
ment, make sure that the rear
brake does not drag.
ÈÉ
FRONT BRAKE PAD INSPECTION
AND REPLACEMENT
1. Inspect:
Brake pad thickness
a
Out of specification
→
Replace as a set.
Brake pad thickness:
4.4 mm (0.17 in)
1.0 mm (0.04 in)
2. Replace:
Brake pad
Brake pad replacement steps:
Remove the pad pin plug
1.
REGLAGE DU FREIN ARRIERE
1. Contôler:
Hauteur de la pédale de frein a
Hors spécification → Régler.
2. Régler:
Hauteur de la pédale de frein
Hauteur de la pédale de
frein a:
5 mm (0,20 in)
Etapes de réglage de la hauteur de
la pédale de frein:
Desserrer le contre-écrou 1.
Tourner l’écrou de réglage 2
jusqu’à ce que la hauteur de la
pédale a soit comme spécifiée.
Serrer le contre-écrou.
AVERTISSEMENT
Régler la hauteur de la pédale
entre le maximum È et le mini-
mum É de la manière indiquée.
(Dans ce réglage, l’extrémité b
du boulon 3 doit sortir de la
partie filetée 4, mais pas de plus
de 2 mm (0,08 in) c de la pédale
de frein 5.)
Après le réglage de la hauteur de
la pédale, s’assurer que le frein
arrière ne frotte pas.
CONTROLE ET CHANGEMENT
DES PLAQUETTES DE FREIN
AVANT
1. Contôler:
Epaisseur de plaquette de frein a
Hors spécification → Remplacer
la paire.
Epaisseur de plaquette de
frein:
4,4 mm (0,17 in)
1,0 mm (0,04 in)
2. Remplacer:
Plaquette de frein
Etapes de remplacement de pla-
quette de frein:
Déposer le bouchon de goupille de
plaquette 1.
CHASSIS
PARTIE CYCLE
Page 262 of 860

3 - 71
INSP
ADJ
3. Inspect:
Brake fluid level
Refer to “BRAKE FLUID
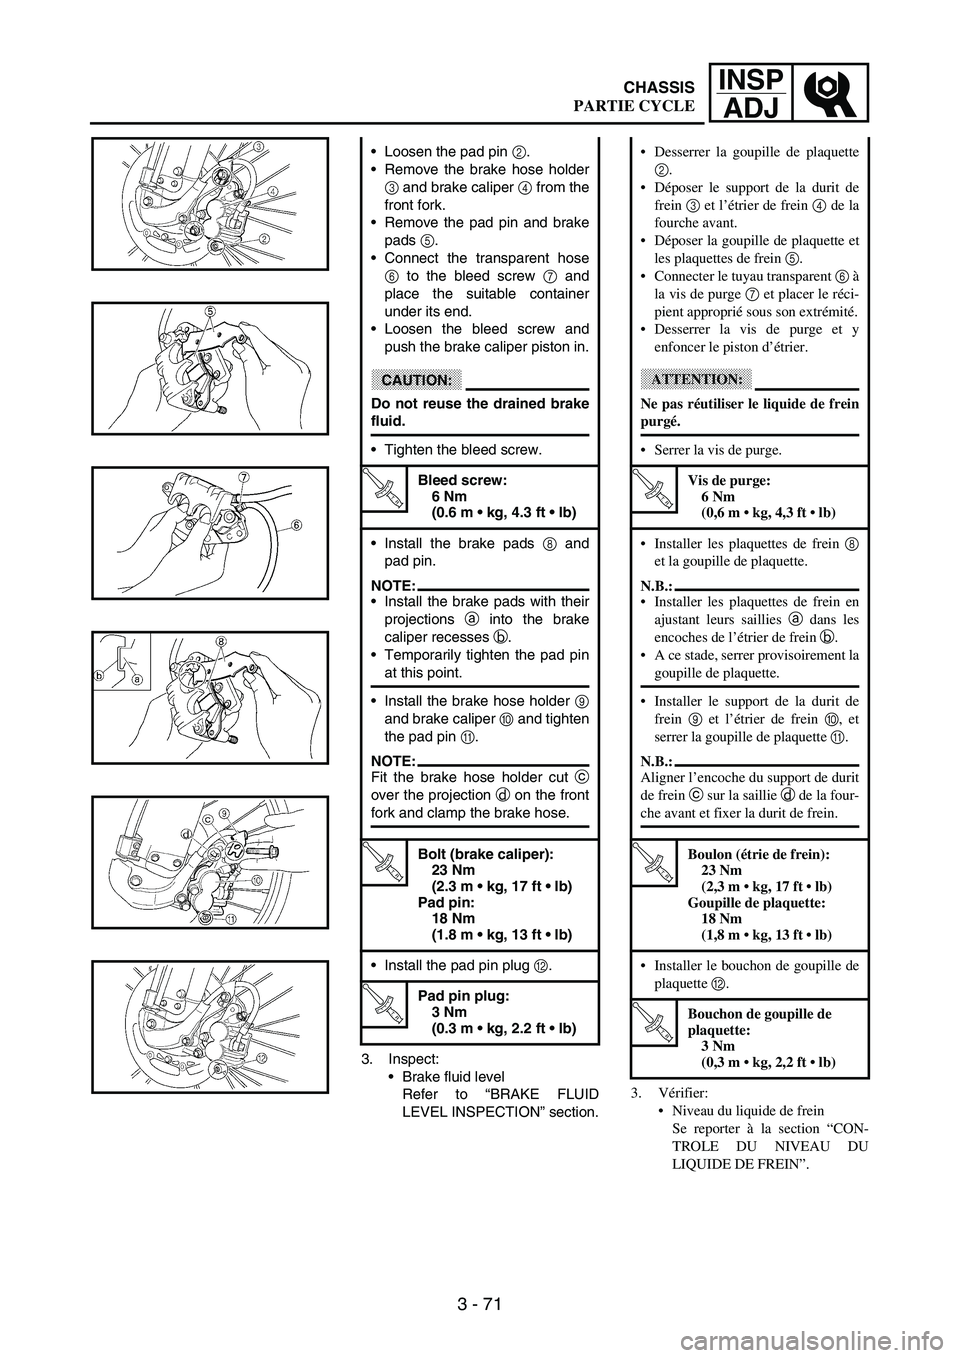
LEVEL INSPECTION” section. Loosen the pad pin
2.
Remove the brake hose holder
3 and brake caliper
4 from the
front fork.
Remove the pad pin and brake
pads
5.
Connect the transparent hose
6 to the bleed screw
7 and
place the suitable container
under its end.
Loosen the bleed screw and
push the brake caliper piston in.
CAUTION:
Do not reuse the drained brake
fluid.
Tighten the bleed screw.
T R..
Bleed screw:
6 Nm
(0.6 m kg, 4.3 ft lb)
Install the brake pads
8 and
pad pin.
NOTE:Install the brake pads with their
projections
a into the brake
caliper recesses
b.
Temporarily tighten the pad pin
at this point.
Install the brake hose holder
9
and brake caliper
0 and tighten
the pad pin
A.
NOTE:Fit the brake hose holder cut
c
over the projection
d on the front
fork and clamp the brake hose.
T R..
Bolt (brake caliper):
23 Nm
(2.3 m kg, 17 ft lb)
Pad pin:
18 Nm
(1.8 m kg, 13 ft lb)
Install the pad pin plug
B.
T R..
Pad pin plug:
3 Nm
(0.3 m kg, 2.2 ft lb)
3. Vérifier:
Niveau du liquide de frein
Se reporter à la section “CON-
TROLE DU NIVEAU DU
LIQUIDE DE FREIN”. Desserrer la goupille de plaquette
2.
Déposer le support de la durit de
frein 3 et l’étrier de frein 4 de la
fourche avant.
Déposer la goupille de plaquette et
les plaquettes de frein 5.
Connecter le tuyau transparent 6 à
la vis de purge 7 et placer le réci-
pient approprié sous son extrémité.
Desserrer la vis de purge et y
enfoncer le piston d’étrier.
ATTENTION:
Ne pas réutiliser le liquide de frein
purgé.
Serrer la vis de purge.
T R..
Vis de purge:
6 Nm
(0,6 m kg, 4,3 ft lb)
Installer les plaquettes de frein 8
et la goupille de plaquette.
N.B.:
Installer les plaquettes de frein en
ajustant leurs saillies a dans les
encoches de l’étrier de frein b.
A ce stade, serrer provisoirement la
goupille de plaquette.
Installer le support de la durit de
frein 9 et l’étrier de frein 0, et
serrer la goupille de plaquette A.
N.B.:
Aligner l’encoche du support de durit
de frein c sur la saillie d de la four-
che avant et fixer la durit de frein.
T R..
Boulon (étrie de frein):
23 Nm
(2,3 m kg, 17 ft lb)
Goupille de plaquette:
18 Nm
(1,8 m kg, 13 ft lb)
Installer le bouchon de goupille de
plaquette B.
T R..
Bouchon de goupille de
plaquette:
3 Nm
(0,3 m kg, 2,2 ft lb)
CHASSIS
PARTIE CYCLE
Page 264 of 860

3 - 73
INSP
ADJ
4. Check:
Brake lever operation
A softy or spongy feeling
→
Bleed brake system.
Refer to “BRAKE SYSTEM
AIR BLEEDING” section.
REAR BRAKE PAD INSPECTION
AND REPLACEMENT
1. Inspect:
Brake pad thickness
a
Out of specification
→
Replace as a set.
Brake pad thickness:
6.4 mm (0.25 in)
1.0 mm (0.04 in)
2. Replace:
Brake pad
Brake pad replacement steps:
Remove the protector
1 and
pad pin plug
2.
Loosen the pad pin
3.
Remove the rear wheel
4 and
brake caliper
5.
Refer to “FRONT WHEEL AND
REAR WHEEL” section in the
CHAPTER 5.
Remove the pad pin
6 and
brake pads
7.
Connect the transparent hose
8 to the bleed screw
9 and
place the suitable container
under its end.
Loosen the bleed screw and
push the brake caliper piston in.
CAUTION:
Do not reuse the drained brake
fluid.
Tighten the bleed screw.
T R..
Bleed screw:
6 Nm
(0.6 m kg, 4.3 ft lb)
4. Contrôler:
Fonctionnement du levier de frein
Sensation de mollesse → Purger
le circuit de freinage.
Se reporter à la section “PURGE
DE L’AIR DU SYSTEME DE
FREINAGE”.
CONTROLE ET CHANGEMENT
DES PLAQUETTES DE FREIN
ARRIERE
1. Contôler:
Epaisseur de plaquette de frein a
Hors spécification → Remplacer
la paire.
Epaisseur de plaquette de
frein:
6,4 mm (0,25 in)
1,0 mm (0,04 in)
2. Changer:
Plaquette de frein
Etapes de changement de plaquette
de frein:
Déposer la protection 1 et le bou-
chon de la goupille de plaquette 2.
Desserrer la goupille de plaquette
3.
Déposer la roue arrière 4 et
l’étrier de frein 5.
Se reporter à la section “ROUE
AVANT ET ROUE ARRIERE” au
CHAPITRE 5.
Déposer la goupille de plaquette 6
et les plaquettes de frein 7.
Connecter le tuyau transparent 8 à
la vis de purge 9 et placer un réci-
pient approprié sous son extrémité.
Desserrer la vis de purge et y
enfoncer le piston d’étrier de frein.
ATTENTION:
Ne pas réutiliser le liquide de frein
purgé.
Serrer la vis de purge.
T R..
Vis de purge:
6 Nm
(0,6 m kg, 4,3 ft lb)
CHASSIS
PARTIE CYCLE
Page 266 of 860

3 - 75
INSP
ADJ
3. Inspect:
Brake fluid level
Refer to “BRAKE FLUID
LEVEL INSPECTION” section.
4. Check:
Brake pedal operation
A softy or spongy feeling
→
Bleed brake system.
Refer to “BRAKE SYSTEM
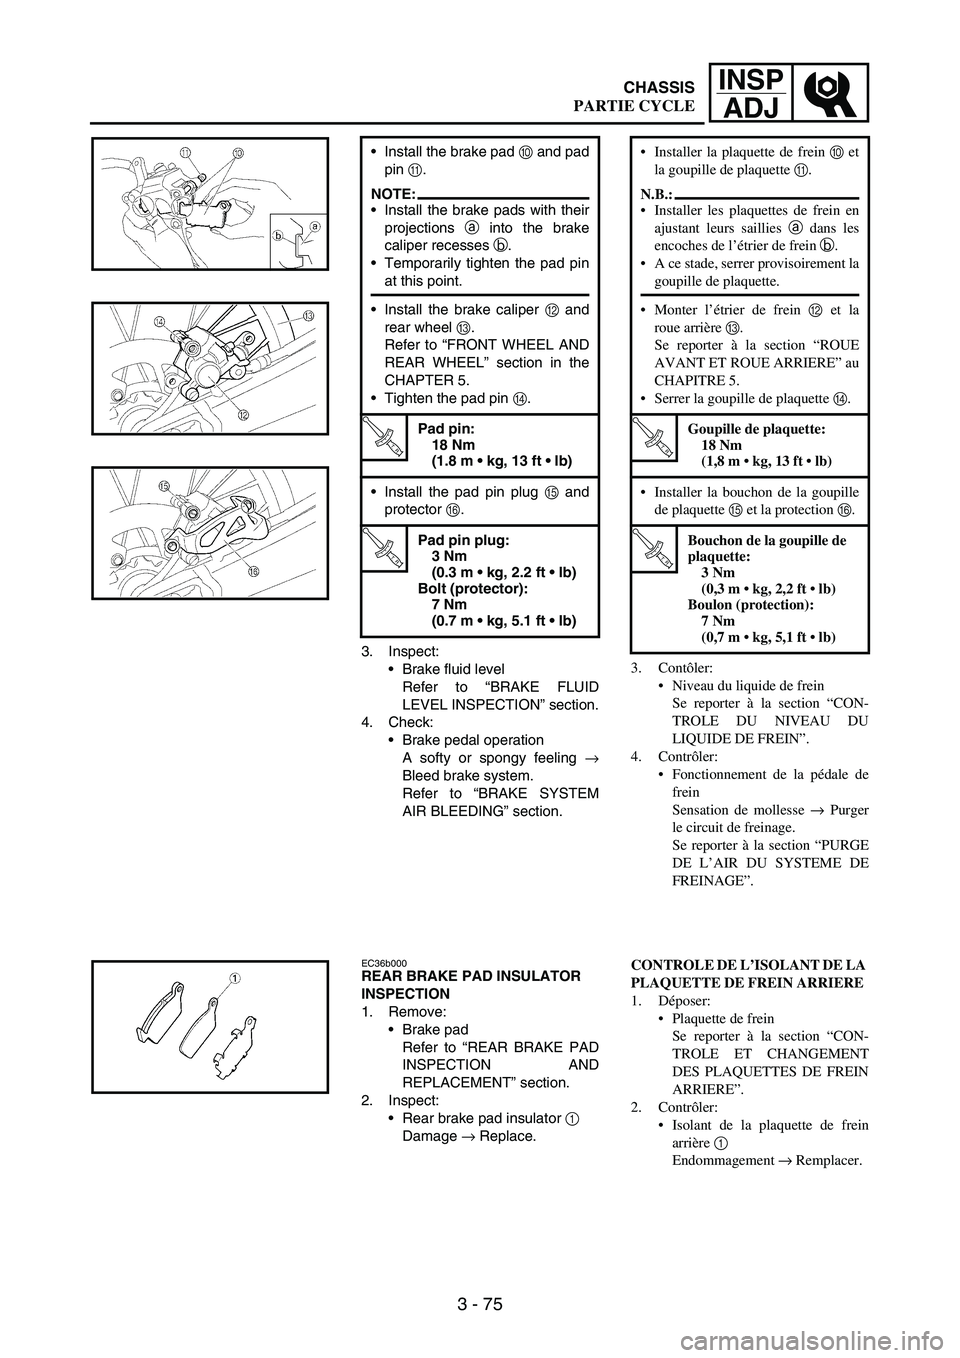
AIR BLEEDING” section. Install the brake pad
0 and pad
pin
A.
NOTE:Install the brake pads with their
projections
a into the brake
caliper recesses
b.
Temporarily tighten the pad pin
at this point.
Install the brake caliper
B and
rear wheel
C.
Refer to “FRONT WHEEL AND
REAR WHEEL” section in the
CHAPTER 5.
Tighten the pad pin
D.
T R..
Pad pin:
18 Nm
(1.8 m kg, 13 ft lb)
Install the pad pin plug
E and
protector
F.
T R..
Pad pin plug:
3 Nm
(0.3 m kg, 2.2 ft lb)
Bolt (protector):
7 Nm
(0.7 m kg, 5.1 ft lb)
EC36b000REAR BRAKE PAD INSULATOR
INSPECTION
1. Remove:
Brake pad
Refer to “REAR BRAKE PAD
INSPECTION AND
REPLACEMENT” section.
2. Inspect:
Rear brake pad insulator
1
Damage
→ Replace.
3. Contôler:
Niveau du liquide de frein
Se reporter à la section “CON-
TROLE DU NIVEAU DU
LIQUIDE DE FREIN”.
4. Contrôler:
Fonctionnement de la pédale de
frein
Sensation de mollesse → Purger
le circuit de freinage.
Se reporter à la section “PURGE
DE L’AIR DU SYSTEME DE
FREINAGE”. Installer la plaquette de frein 0 et
la goupille de plaquette A.
N.B.:
Installer les plaquettes de frein en
ajustant leurs saillies a dans les
encoches de l’étrier de frein b.
A ce stade, serrer provisoirement la
goupille de plaquette.
Monter l’étrier de frein B et la
roue arrière C.
Se reporter à la section “ROUE
AVANT ET ROUE ARRIERE” au
CHAPITRE 5.
Serrer la goupille de plaquette D.
T R..
Goupille de plaquette:
18 Nm
(1,8 m kg, 13 ft lb)
Installer la bouchon de la goupille
de plaquette E et la protection F.
T R..
Bouchon de la goupille de
plaquette:
3 Nm
(0,3 m kg, 2,2 ft lb)
Boulon (protection):
7 Nm
(0,7 m kg, 5,1 ft lb)
CONTROLE DE L’ISOLANT DE LA
PLAQUETTE DE FREIN ARRIERE
1. Déposer:
Plaquette de frein
Se reporter à la section “CON-
TROLE ET CHANGEMENT
DES PLAQUETTES DE FREIN
ARRIERE”.
2. Contrôler:
Isolant de la plaquette de frein
arrière 1
Endommagement → Remplacer.
CHASSIS
PARTIE CYCLE
Page 268 of 860

3 - 77
INSP
ADJ
BRAKE FLUID LEVEL
INSPECTION
1. Place the brake master cylinder
so that its top is in a horizontal
position.
2. Inspect:
Brake fluid level
Fluid at lower level
→ Fill up.
aLower level
ÈFront
ÉRear
WARNING
Use only designated quality
brake fluid to avoid poor brake
performance.
Refill with same type and brand
of brake fluid; mixing fluids
could result in poor brake per-
formance.
Be sure that water or other con-
taminants do not enter master
cylinder when refilling.
Clean up spilled fluid immedi-
ately to avoid erosion of painted
surfaces or plastic parts.
Recommended brake
fluid:
DOT #4
ÈÉ
SPROCKETS INSPECTION
1. Inspect:
Sprocket teeth
a
Excessive wear
→ Replace.
NOTE:Replace the drive sprocket, rear
wheel sprocket and drive chain as a
set.
CONTROLE DU NIVEAU DU
LIQUIDE DE FREIN
1. Placer le maître-cylindre pour que
son extrémité soit en position hori-
zontale.
2. Contôler:
Niveau de liquide de frein
Liquide au niveau inférieur →
Remettre à niveau.
a
Niveau inférieur
È
Avant
É
Arrière
AVERTISSEMENT
Utiliser uniquement le liquide
recommandé pour éviter une perte
de puissance de freinage.
Ne rajouter que du liquide de même
marque et de même qualité. Le
mélange de différents liquides peut
se traduire par une perte de puis-
sance de freinage.
Ne pas laisser entrer d’eau ou
d’autres corps étrangers dans le
maître-cylindre lors du remplissage.
Essuyer immédiatement tout liquide
renversé pour éviter d’endommager
les surfaces peintes ou les pièces en
matière plastique.
Liquide de frein
recommandé:
DOT n°4
CONTROLE DES PIGNONS
1. Contrôler:
Dents de pignon
a
Usure excessive → Remplacer.
N.B.:
Remplacer le pignon d’entraînement, la
couronne arrière et la chaîne de transmis-
sion en un ensemble.
CHASSIS
PARTIE CYCLE
Page 274 of 860

3 - 83
INSP
ADJ
3. Adjust:
Drive chain slack
Drive chain slack adjustment
steps:
Loosen the axle nut
1 and
locknuts
2.
Adjust the drive chain slack by
turning the adjusters
3.
To tighten → Turn the adjuster
3 counterclockwise.
To loosen → Turn the adjuster
3 clockwise and push wheel
forward.
Turn each adjuster exactly the
same amount to maintain cor-
rect axle alignment. (There are
marks
a on each side of the
drive chain puller alignment.)
NOTE:Turn the adjuster so that the drive
chain is in line with the sprocket,
as viewed from the rear.
CAUTION:
Too small drive chain slack will
overload the engine and other
vital parts; keep the slack
within the specified limits.
Tighten the axle nut while push-
ing down the drive chain.
T R..
Axle nut:
125 Nm
(12.5 m kg, 90 ft lb)
Tighten the locknuts.
T R..
Locknut:
16 Nm
(1.6 m kg, 11 ft lb)
EC36C000FRONT FORK INSPECTION
1. Inspect:
Front fork smooth action
Operate the front brake and
stroke the front fork.
Unsmooth action/oil leakage
→ Repair or replace.
3. Régler:
Flèche de la chaîne de transmis-
sion
Etapes de réglage de flèche de la
chaîne de transmission:
Desserrer l’écrou d’axe 1 et les
contre-écrous 2.
Régler la flèche de chaîne de trans-
mission en tournant les dispositifs
de réglage 3.
Pour tendre → Tourner le
dispositif de réglage 3 à gauche.
Pour détendre → Tourner le
dispositif de réglage 3 à droite
et pousser le roue vers l’avant.
Tourner chaque dispositif exacte-
ment du même nombre de tours
pour conserver l’alignement cor-
rect de la roue. (Les repères a
figurent de chaque côté sur les ten-
deurs de chaîne de transmission.)
N.B.:
Tourner le tendeur pour que la chaîne
de transmission soit alignée avec la
couronne, vue par l’arrière.
ATTENTION:
Une chaîne de transmission trop
tendue impose des efforts excessifs
au moteur et aux organes de trans-
mission; maintenir la tension de la
chaîne dans les limites spécifiées.
Serrer l’écrou de l’axe tout en
enfonçant la chaîne de transmis-
sion.
T R..
Ecrou d’axe:
125 Nm
(12,5 m kg, 90 ft lb)
Serrer les contre-écrous.
T R..
Contre-écrou:
16 Nm
(1,6 m kg, 11 ft lb)
CONTROLE DE LA FOURCHE
AVANT
1. Contrôler:
Action régulière de la fourche
avant
Actionner le frein avant et donner
un coup à la fourche avant.
Action irrégulière/fuites d’huile
→ Réparer ou remplacer.
CHASSIS
PARTIE CYCLE
Page 296 of 860

3 - 105
INSP
ADJ
GRAISSAGE
Pour assurer le bon fonctionnement de
tous les organes, graisser la machine lors
du montage, après le rodage et après cha-
que course.
1
Tous les câbles de commande
2
Pivot de levier d’embrayage
3
Pivot de pédale de changement de
vitesse
4
Pivots de repose-pied
5
Surface de contact entre le guidon et la
poignée des gaz
6
Chaîne de transmission
7
Partie d’enroulement du câble dans le
guide de tube
8
Extrémité de câble des gaz
9
Extrémités des câbles d’embrayage
0
Extrémité du câble de démarreur à chaud
È
Mettre du lubrifiant Yamaha pour câbles,
ou équivalent sur ces parties.
É
Utiliser de l’huile moteur SAE 10W-30
ou un lubrifiant pour chaînes adéquat.
Ê
Lubrifier les emplacements suivants à
l’aide d’un détergent gras léger à base de
lithium et de haute qualité.
ATTENTION:
Eliminer tout excès de graisse, et évi-
ter d’enduire de graisse les disques de
frein.
CHASSIS
PARTIE CYCLE
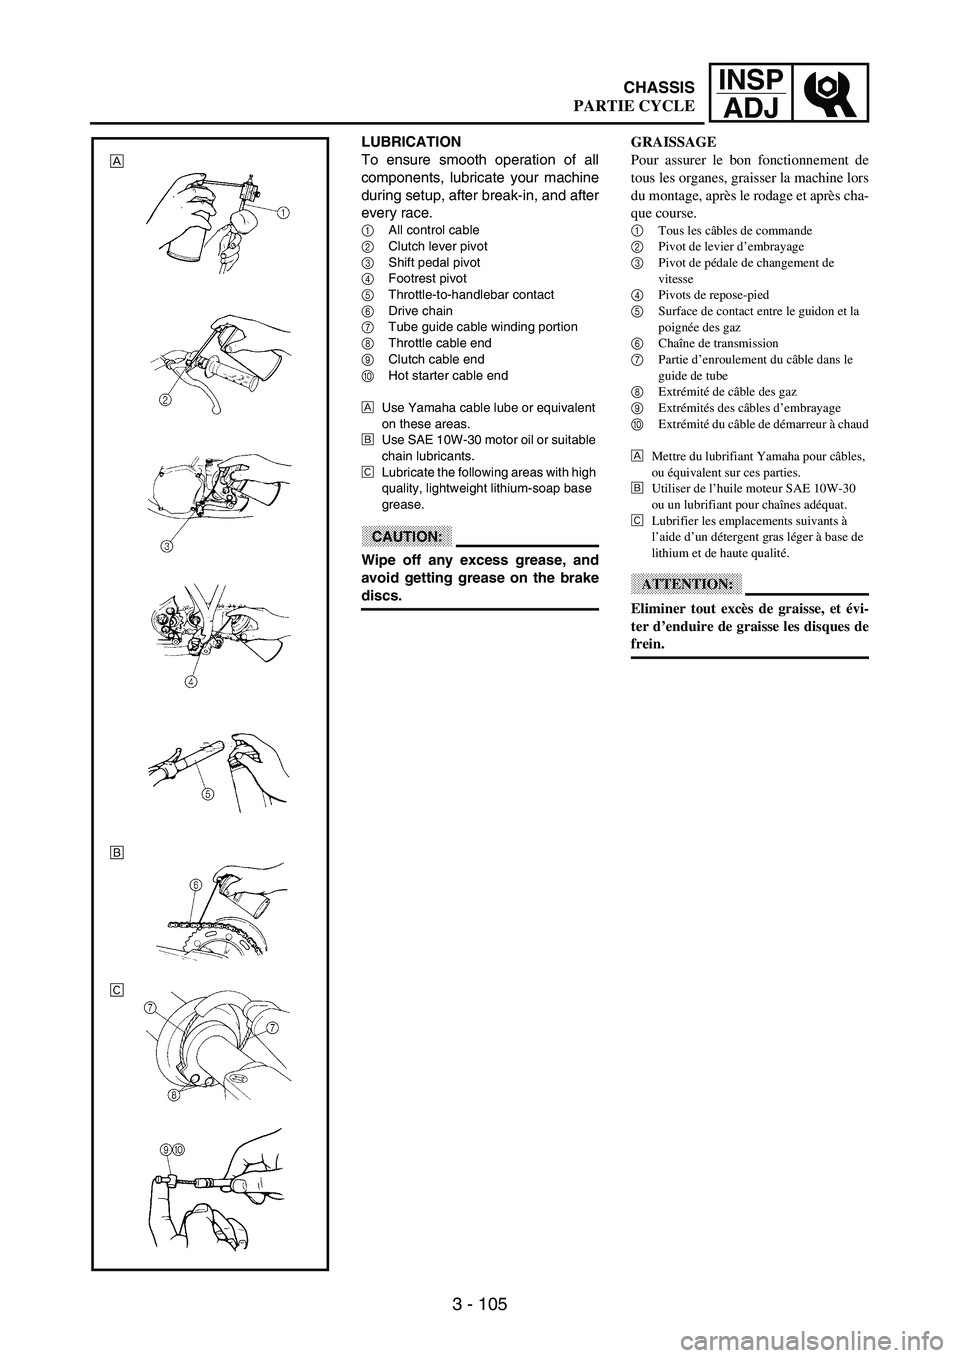
LUBRICATION
To ensure smooth operation of all
components, lubricate your machine
during setup, after break-in, and after
every race.
1All control cable
2Clutch lever pivot
3Shift pedal pivot
4Footrest pivot
5Throttle-to-handlebar contact
6Drive chain
7Tube guide cable winding portion
8Throttle cable end
9Clutch cable end
0Hot starter cable end
ÈUse Yamaha cable lube or equivalent
on these areas.
ÉUse SAE 10W-30 motor oil or suitable
chain lubricants.
ÊLubricate the following areas with high
quality, lightweight lithium-soap base
grease.
CAUTION:
Wipe off any excess grease, and
avoid getting grease on the brake
discs.
È
É
Ê