2003 YAMAHA MAJESTY 250 ABS
[x] Cancel search: ABSPage 14 of 116

2-1
EAU00026
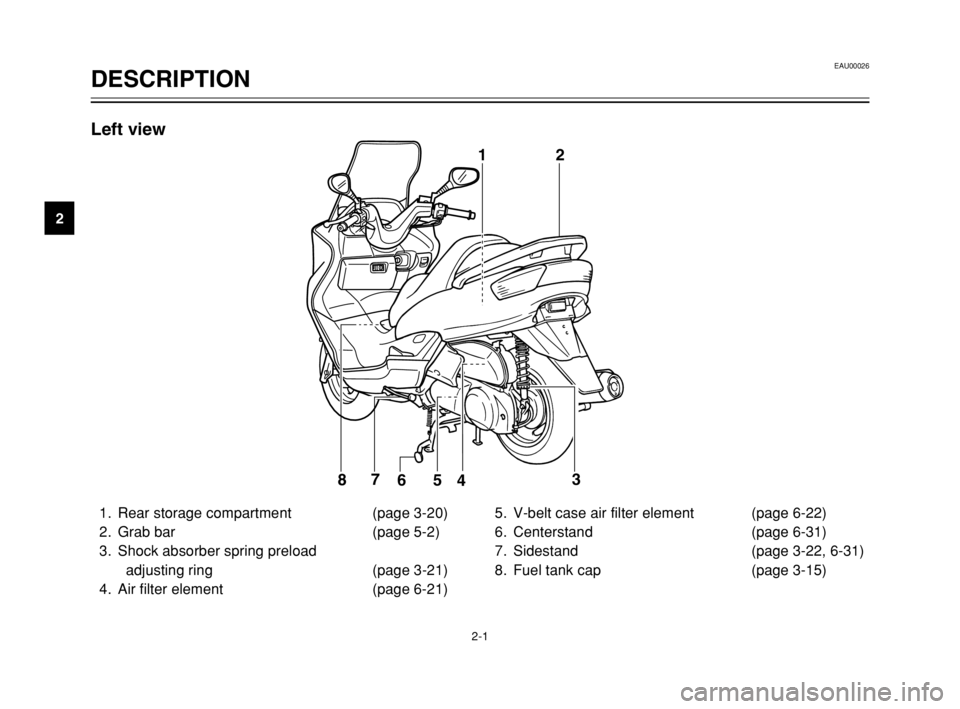
DESCRIPTIONPart locations
2
1. Rear storage compartment (page 3-20)
2. Grab bar (page 5-2)
3. Shock absorber spring preload
adjusting ring (page 3-21)
4. Air filter element (page 6-21)5. V-belt case air filter element (page 6-22)
6. Centerstand (page 6-31)
7. Sidestand (page 3-22, 6-31)
8. Fuel tank cap (page 3-15)
12
3
4 5 6 7
8
Left view
5SJ-28199-E1 7/11/02 11:03 AM Page 12
Page 17 of 116

INSTRUMENT AND CONTROL FUNCTIONS
Main switch/steering lock ...................................................................3-1
Indicator and warning lights ...............................................................3-2
Speedometer .....................................................................................3-4
Tachometer .......................................................................................3-4
Fuel gauge .........................................................................................3-5
Coolant temperature gauge ...............................................................3-5
Multi-function display .........................................................................3-5
Anti-theft alarm (optional) ................................................................3-10
Handlebar switches .........................................................................3-10
Front brake lever .............................................................................3-11
Rear brake lever ..............................................................................3-12
ABS .................................................................................................3-13
Fuel tank cap ...................................................................................3-15
Fuel ..................................................................................................3-16
Catalytic converter ...........................................................................3-17
Rider seat ........................................................................................3-18
Adjusting the rider seat ....................................................................3-18
Storage compartments ....................................................................3-19
Adjusting the shock absorber assemblies .......................................3-21
Sidestand .........................................................................................3-22
Ignition circuit cut-off system ...........................................................3-22
3
5SJ-28199-E1 7/11/02 11:03 AM Page 15
Page 19 of 116

3-2
INSTRUMENT AND CONTROL FUNCTIONS
3
EAU03733
.(Parking)
The steering is locked, and the tail-
light, license light and auxiliary light
are on, but all other electrical sys-
tems are off. The key can be
removed.
To turn the main switch to “
.”:
1. Turn the key to “LOCK”.
2. Slightly turn the key counter-
clockwise until it stops.
3. While still turning the key coun-
terclockwise, push it in until it
snaps into place.
ECA00043
cC
Do not use the parking position for
an extended length of time, other-
wise the battery may discharge.
EAU04901
ABS warning light “”ABS warning lightECA00019
cC
If the ABS warning light comes on
or flashes while riding, the ABS
may be defective. If this occurs,
have a Yamaha dealer check the
electrical circuit.
See page 3-13 for an explanation of
the ABS.
The electrical circuit of the warning
light can be checked by setting the
engine stop switch to “#” and turning
the key to “ON”.
The warning light should come on for
a few seconds, and then go off. If the
warning light does not come on or
remains on, have a Yamaha dealer
check the electrical circuit.
EAU03034
Indicator and warning lightsIndicator and warning lightsEAU04121
Turn signal indicator lights “4”
and “6”
Turn signal indicator lightsThe corresponding indicator light
flashes when the turn signal switch is
pushed to the left or right.
13
45
2
1. Left turn signal indicator light “4”
2. ABS warning light “”
3. High beam indicator light “&”
4. Oil change indicator light “
7”
5. Right turn signal indicator light “6”
5SJ-28199-E1 7/11/02 11:03 AM Page 17
Page 20 of 116

3-3
EWA00069
w
When the ABS warning light
comes on or flashes while riding,
the brake system reverts to con-
ventional braking. Therefore, be
careful not to cause the wheel to
lock during emergency braking.
NOTE:
The ABS warning light may come on
while pushing the start switch and
while accelerating the engine with the
scooter on its centerstand, but this
does not indicate a malfunction.
EAU00063
High beam indicator light “&”High beam indicator lightThis indicator light comes on when
the high beam of the headlight is
switched on.
INSTRUMENT AND CONTROL FUNCTIONS
3
EAU03734
Oil change indicator light “7”Oil change indicator lightThis indicator light comes on at the
initial 1,000 km and every 3,000 km
thereafter to indicate that the engine
oil should be changed.
If the engine oil is changed before the
oil change indicator comes on (i.e.
before the periodic oil change interval
has been reached), the indicator light
must be reset after the oil change for
the next periodic oil change to be
indicated at the correct time. (See
page 6-17 for the resetting proce-
dure.)
The electrical circuit of the indicator
light can be checked according to the
following procedure.
1. Set the engine stop switch to “#”
and turn the key to “ON”.
2. Check that the indicator comes
on for a few seconds and then
goes off.
3. If the indicator light does not
come on, have a Yamaha dealer
check the electrical circuit.
NOTE:
The oil change indicator light may
flash when the engine is revved with
the scooter on the centerstand, but
this does not indicate a malfunction.
5SJ-28199-E1 7/11/02 11:03 AM Page 18
Page 30 of 116

3-13
EAU03631
ABSABSThe Yamaha ABS (Anti-lock Brake
System) features a dual electronic
control system, which acts on the
front and rear brakes independently.
The ABS securely controls wheel
lockup during emergency braking on
changing road surfaces and under
various weather conditions, thereby
maximizing tire adhesion and perfor-
mance while providing a smooth
braking action. The ABS is monitored
by an ECU (Electronic Control Unit),
which will have recourse to manual
braking if a malfunction occurs.
INSTRUMENT AND CONTROL FUNCTIONS
3
EW000020
w
8 8
The ABS performs best on
long braking distances.
8 8
On certain (rough or gravel)
roads, the braking distance
may be longer with than with-
out the ABS. Therefore, always
keep a sufficient distance to
the vehicle ahead to match the
riding speed.
NOTE:
8When the ABS is activated, the
brakes are operated in the usual
way. A pulsating action may be
felt at the brake levers, but this
does not indicate a malfunction.
8This ABS has a test mode which
allows the owner to experience
the pulsating at the brake levers
when the ABS is operating.
However, special tools are
required, so please consult your
Yamaha dealer when performing
this test.
5SJ-28199-E1 7/11/02 11:03 AM Page 28
Page 31 of 116

3-14
INSTRUMENT AND CONTROL FUNCTIONS
3 ABS components
1
2
3
4
5
6
7
8
9
10 11 12 13 14 15
1. Front brake hose
2. Rear brake hose
3. ABS warning light
4. Fail-safe relay
5. ECU (Electronic Control Unit)
6. Stop relay
7. Hydraulic Unit (HU)
8. Front brake hose
9. Front wheel sensor rotor
10.Front wheel sensor
11.Fuse boxes
12.ABS test coupler
13.Rear brake hose
14.Rear wheel sensor rotor
15.Rear wheel sensor
5SJ-28199-E1 7/11/02 11:03 AM Page 29
Page 38 of 116

3-21
EAU04552
Adjusting the shock
absorber assemblies
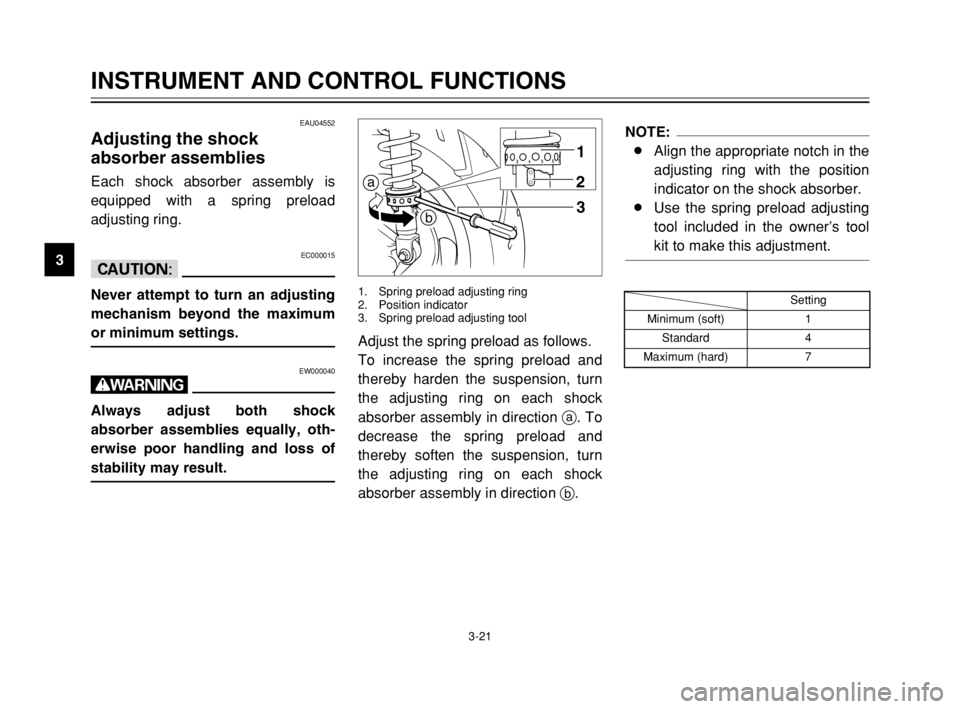
Shock absorber assemblies, adjustingEach shock absorber assembly is
equipped with a spring preload
adjusting ring.
EC000015
cC
Never attempt to turn an adjusting
mechanism beyond the maximum
or minimum settings.
EW000040
w
Always adjust both shock
absorber assemblies equally, oth-
erwise poor handling and loss of
stability may result.
INSTRUMENT AND CONTROL FUNCTIONS
3
Adjust the spring preload as follows.
To increase the spring preload and
thereby harden the suspension, turn
the adjusting ring on each shock
absorber assembly in direction a. To
decrease the spring preload and
thereby soften the suspension, turn
the adjusting ring on each shock
absorber assembly in direction b.
a
b1
2
3
1. Spring preload adjusting ring
2. Position indicator
3. Spring preload adjusting tool
NOTE:
8Align the appropriate notch in the
adjusting ring with the position
indicator on the shock absorber.
8Use the spring preload adjusting
tool included in the owner’s tool
kit to make this adjustment.
Setting
Minimum (soft) 1
Standard 4
Maximum (hard) 7
5SJ-28199-E1 7/11/02 11:03 AM Page 36
Page 46 of 116

3
2
1
1. Start switch
2. Front brake lever
3. Rear brake lever
5-1
EAU00372
OPERATION AND IMPORTANT RIDING POINTS
5
EAU01118
w
8 8
Become thoroughly familiar
with all operating controls and
their functions before riding.
Consult a Yamaha dealer
regarding any control or func-
tion that you do not thorough-
ly understand.
8 8
Never start the engine or oper-
ate it in a closed area for any
length of time. Exhaust fumes
are poisonous, and inhaling
them can cause loss of con-
sciousness and death within a
short time. Always make sure
that there is adequate ventila-
tion.
8 8
For safety, always start the
engine with the centerstand
down.
EAU03616*
Starting the engineStarting the engineEC000046
cC
See page 5-4 for engine break-in
instructions prior to operating the
vehicle for the first time.
In order for the ignition circuit cut-off
system to enable starting, the side-
stand must be up.
EW000054
w
8 8
Before starting the engine,
check the function of the igni-
tion circuit cut-off system
according to the procedure
described on page 3-23.
8 8
Never ride with the sidestand
down.
1. Turn the key to “ON” and make
sure that the engine stop switch
is set to “#”.
ECA00068
cC
When the key is turned to “ON”,
the ABS warning light should
come on for a few seconds, and
then go off. If the ABS warning
light does not come on or remains
on, have a Yamaha dealer inspect
the electrical circuit.
5SJ-28199-E1 7/11/02 11:03 AM Page 44