2003 YAMAHA MAJESTY 250 engine oil
[x] Cancel search: engine oilPage 81 of 116

6-30
PERIODIC MAINTENANCE AND MINOR REPAIR
6 8Refill with the same type of brake
fluid. Mixing fluids may result in a
harmful chemical reaction and
lead to poor braking perfor-
mance.
8Be careful that water or dust
does not enter the brake fluid
reservoir when refilling. Water
will significantly lower the boiling
point of the fluid and may result
in vapor lock, and dirt may clog
the ABS hydraulic unit valves.
8Brake fluid may deteriorate paint-
ed surfaces or plastic parts.
Always clean up spilled fluid
immediately.
8As the brake pads wear, it is nor-
mal for the brake fluid level to
gradually go down. However, if
the brake fluid level goes down
suddenly, have a Yamaha dealer
check the cause.
EAU02962
Checking and lubricating the
cables
Cables, checking and lubricatingThe operation of all control cables
and the condition of the cables
should be checked before each ride,
and the cables and cable ends
should be lubricated if necessary. If
a cable is damaged or does not move
smoothly, have a Yamaha dealer
check or replace it.
EW000112
w
Damage to the outer sheath may
interfere with proper cable opera-
tion and will cause the inner cable
to rust. Replace a damaged cable
as soon as possible to prevent
unsafe conditions.
EAU03976
Changing the brake fluidBrake fluid, changingHave a Yamaha dealer change the
brake fluid at the intervals specified in
the NOTE after the periodic mainte-
nance and lubrication chart. In addi-
tion, have the oil seals of the master
cylinders and calipers as well as the
brake hoses replaced at the intervals
listed below or whenever they are
damaged or leaking.
8Oil seals: Replace every two
years.
8Brake hoses: Replace every four
years.Recommended lubricant:
Engine oil
5SJ-28199-E1 7/11/02 11:03 AM Page 79
Page 98 of 116

7-1
EAU03434
SCOOTER CARE AND STORAGE
7
CareCareWhile the open design of a scooter
reveals the attractiveness of the tech-
nology, it also makes it more vulnera-
ble. Rust and corrosion can develop
even if high-quality components are
used. A rusty exhaust pipe may go
unnoticed on a car, however, it
detracts from the overall appearance
of a scooter. Frequent and proper
care does not only comply with the
terms of the warranty, but it will also
keep your scooter looking good,
extend its life and optimize its perfor-
mance.Before cleaning
1. Cover the muffler outlet with a
plastic bag after the engine has
cooled down.
2. Make sure that all caps and cov-
ers as well as all electrical cou-
plers and connectors, including
the spark plug cap, are tightly
installed.
3. Remove extremely stubborn dirt,
like oil burnt onto the crankcase,
with a degreasing agent and a
brush, but never apply such
products onto seals, gaskets and
wheel axles. Always rinse the dirt
and degreaser off with water.Cleaning
ECA00011
cC
8
8
Avoid using strong acidic
wheel cleaners, especially on
spoked wheels. If such prod-
ucts are used on hard-to-
remove dirt, do not leave the
cleaner on the affected area
any longer than instructed.
Also, thoroughly rinse the area
off with water, immediately dry
it, and then apply a corrosion
protection spray.
8 8
Improper cleaning can damage
windshields, cowlings, panels
and other plastic parts. Use
only a soft, clean cloth or
sponge with mild detergent
and water to clean plastic.
5SJ-28199-E1 7/11/02 11:03 AM Page 96
Page 101 of 116

7-4
SCOOTER CARE AND STORAGE
7
StorageStorageShort-term
Always store your scooter in a cool,
dry place and, if necessary, protect it
against dust with a porous cover.
ECA00015
cC
8
8
Storing the scooter in a poorly
ventilated room or covering it
with a tarp, while it is still wet,
will allow water and humidity
to seep in and cause rust.
8 8
To prevent corrosion, avoid
damp cellars, stables (because
of the presence of ammonia)
and areas where strong chemi-
cals are stored.
Long-term
Before storing your scooter for sever-
al months:
1. Follow all the instructions in the
“Care” section of this chapter.
2. Drain the carburetor float cham-
ber by loosening the drain bolt;
this will prevent fuel deposits
from building up. Pour the
drained fuel into the fuel tank.
3. Fill up the fuel tank and add fuel
stabilizer (if available) to prevent
the fuel tank from rusting and the
fuel from deteriorating.
4. Perform the following steps to
protect the cylinder, piston rings,
etc. from corrosion.a. Remove the spark plug cap
and spark plug.
b. Pour a teaspoonful of engine
oil into the spark plug bore.
c. Install the spark plug cap onto
the spark plug, and then place
the spark plug on the cylinder
head so that the electrodes
are grounded. (This will limit
sparking during the next step.)
d. Turn the engine over several
times with the starter. (This
will coat the cylinder wall with
oil.)
e. Remove the spark plug cap
from the spark plug, and then
install the spark plug and the
spark plug cap.
EWA00003
w
To prevent damage or injury from
sparking, make sure to ground the
spark plug electrodes while turn-
ing the engine over.
5SJ-28199-E1 7/11/02 11:03 AM Page 99
Page 104 of 116

8-1
EAU01038
SPECIFICATIONS
8
SpecificationsSpecificationsModel YP250A
Dimensions
Overall length 2,145 mm
Overall width 770 mm
Overall height 1,350 mm
Seat height 730 mm
Wheelbase 1,535 mm
Ground clearance 120 mm
Minimum turning radius 2,700 mm
Basic weight (with oil and full
fuel tank)177 kg
Engine
Engine type Liquid-cooled 4-stroke, SOHC
Cylinder arrangement Forward inclined single
cylinder
Displacement 249 cm
3
Bore ×Stroke 69.0 ×66.8 mm
Compression ratio 10:1
Starting system Electric starter
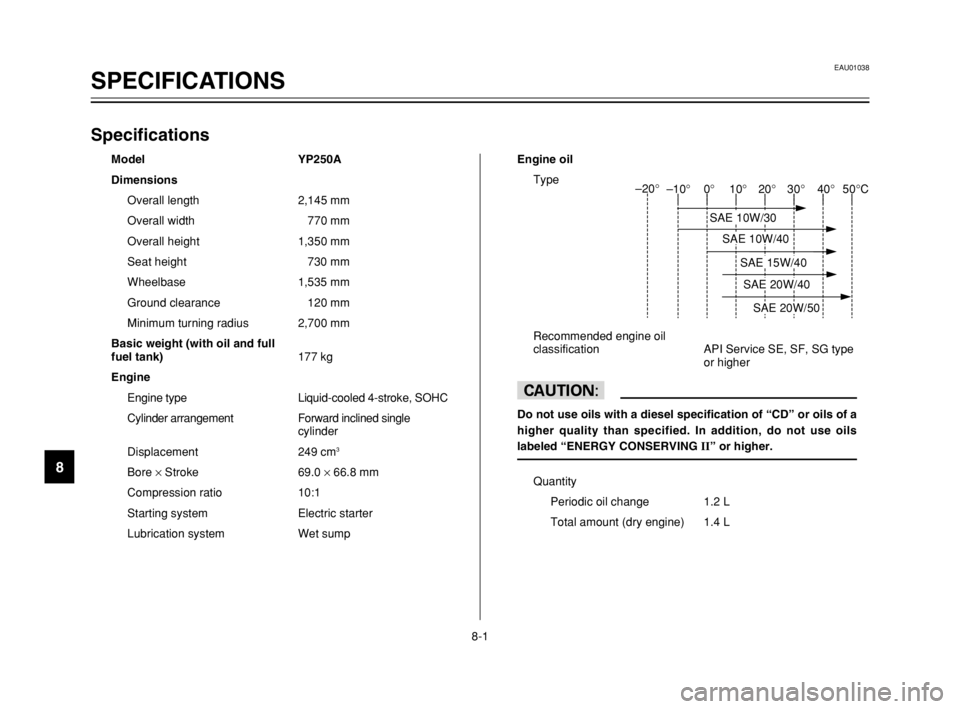
Lubrication system Wet sumpEngine oil
Type
Recommended engine oil
classification API Service SE, SF, SG type
or higher
cC
Do not use oils with a diesel specification of “CD” or oils of a
higher quality than specified. In addition, do not use oils
labeled “ENERGY CONSERVING II” or higher.
Quantity
Periodic oil change 1.2 L
Total amount (dry engine) 1.4 L
–10° 0° 10° 20° 30°
40°
SAE 10W/30
SAE 10W/40
SAE 20W/40
SAE 20W/50
–20°
SAE 15W/40 50°C
5SJ-28199-E1 7/11/02 11:03 AM Page 102
Page 105 of 116

8-2
SPECIFICATIONS
8
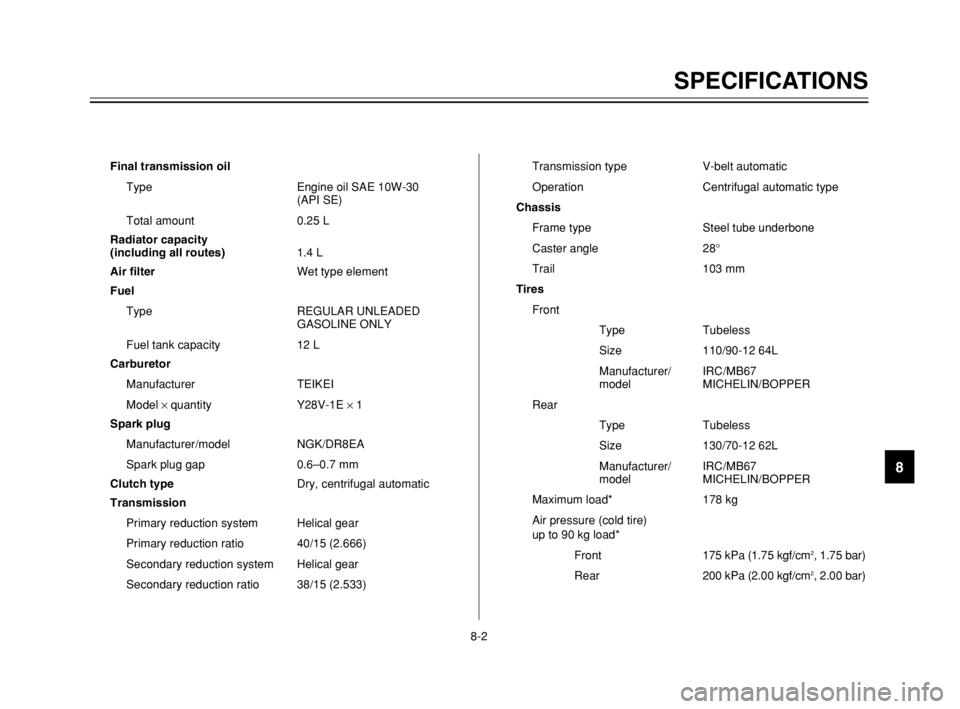
Final transmission oil
Type Engine oil SAE 10W-30
(API SE)
Total amount 0.25 L
Radiator capacity
(including all routes)1.4 L
Air filterWet type element
Fuel
Type REGULAR UNLEADED
GASOLINE ONLY
Fuel tank capacity 12 L
Carburetor
Manufacturer TEIKEI
Model × quantity Y28V-1E × 1
Spark plug
Manufacturer/model NGK/DR8EA
Spark plug gap 0.6–0.7 mm
Clutch typeDry, centrifugal automatic
Transmission
Primary reduction system Helical gear
Primary reduction ratio 40/15 (2.666)
Secondary reduction system Helical gear
Secondary reduction ratio 38/15 (2.533)Transmission type V-belt automatic
Operation Centrifugal automatic type
Chassis
Frame type Steel tube underbone
Caster angle 28°
Trail 103 mm
Tires
Front
Type Tubeless
Size 110/90-12 64L
Manufacturer/ IRC/MB67
model MICHELIN/BOPPER
Rear
Type Tubeless
Size 130/70-12 62L
Manufacturer/ IRC/MB67
model MICHELIN/BOPPER
Maximum load* 178 kg
Air pressure (cold tire)
up to 90 kg load*
Front175 kPa (1.75 kgf/cm
2, 1.75 bar)
Rear 200 kPa (2.00 kgf/cm
2, 2.00 bar)
5SJ-28199-E1 7/11/02 11:03 AM Page 103
Page 112 of 116

INDEX
D
Display, multi-function ............................3-5
E
Engine break-in ......................................5-4
Engine oil ..............................................6-14
F
Final transmission oil ............................6-18
Front and rear brake lever free play,
adjusting ...........................................6-27
Front and rear brake pads, checking ....6-28
Front fork, checking ..............................6-32
Fuel ......................................................3-16
Fuel consumption, tips for reducing .......5-4
Fuel gauge .............................................3-5
Fuel tank cap ........................................3-15
Fuses, replacing ...................................6-36
H
Handlebar switches ..............................3-10
Dimmer switch ..................................3-10
Engine stop switch ............................3-11
Horn switch .......................................3-10
Pass switch .......................................3-10
Start switch .......................................3-11
Turn signal switch .............................3-10
Headlight bulb, replacing ......................6-37I
Identification numbers ............................9-1
Ignition circuit cut-off system ................3-22
Indicator and warning lights ....................3-2
ABS warning light ................................3-2
High beam indicator light .....................3-3
Oil change indicator light .....................3-3
Turn signal indicator lights ...................3-2
K
Key identification number .......................9-1
L
License plate light bulb, replacing ........6-41
M
Main switch/steering lock .......................3-1
Model label .............................................9-2
P
Parking ...................................................5-5
Part locations ..........................................2-1
Periodic maintenance and lubrication
chart .....................................................6-3
Pre-operation check list ..........................4-1
R
Rider seat .............................................3-18
Rider seat, adjusting .............................3-18A
ABS ......................................................3-13
Acceleration and deceleration ................5-3
Air filter and V-belt case air filter
elements, cleaning ............................6-21
Air flow louver .......................................6-23
Anti-theft alarm (optional) .....................3-10
B
Battery ..................................................6-34
Battery cover removal ..........................6-34
Brake fluid level, checking ....................6-29
Brake fluid, changing ............................6-30
Brake lever, front ..................................3-11
Brake lever, rear ...................................3-12
Brake levers, lubricating .......................6-31
Braking ...................................................5-3
C
Cables, checking and lubricating ..........6-30
Care ........................................................7-1
Catalytic converter ................................3-17
Centerstand and sidestand, checking
and lubricating ..................................6-31
Conversion table ....................................8-5
Coolant .................................................6-19
Coolant temperature gauge ....................3-5
Cowlings and panel, removing and
installing ..............................................6-6
5SJ-28199-E1 7/11/02 11:03 AM Page 110