Page 71 of 116

6-20
PERIODIC MAINTENANCE AND MINOR REPAIR
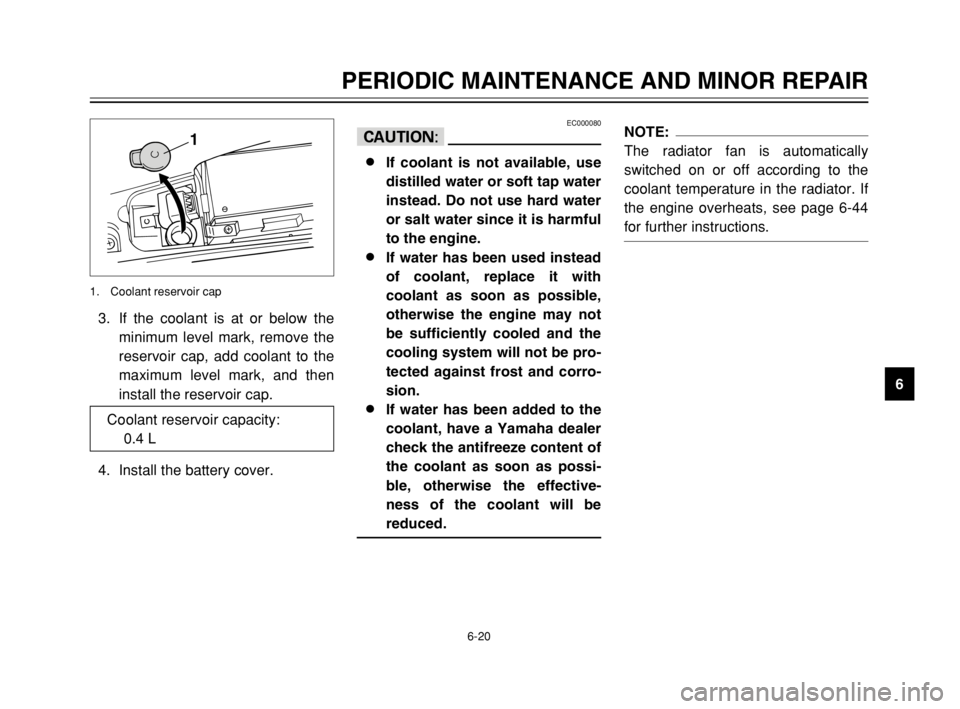
6 3. If the coolant is at or below the
minimum level mark, remove the
reservoir cap, add coolant to the
maximum level mark, and then
install the reservoir cap.
4. Install the battery cover.
1
1. Coolant reservoir cap
NOTE:
The radiator fan is automatically
switched on or off according to the
coolant temperature in the radiator. If
the engine overheats, see page 6-44
for further instructions.EC000080
cC
8
8
If coolant is not available, use
distilled water or soft tap water
instead. Do not use hard water
or salt water since it is harmful
to the engine.
8 8
If water has been used instead
of coolant, replace it with
coolant as soon as possible,
otherwise the engine may not
be sufficiently cooled and the
cooling system will not be pro-
tected against frost and corro-
sion.
8 8
If water has been added to the
coolant, have a Yamaha dealer
check the antifreeze content of
the coolant as soon as possi-
ble, otherwise the effective-
ness of the coolant will be
reduced.
Coolant reservoir capacity:
0.4 L
5SJ-28199-E1 7/11/02 11:03 AM Page 69
Page 85 of 116
6-34
PERIODIC MAINTENANCE AND MINOR REPAIR
6
EAU04417
Removing the battery coverBattery cover removalThe battery cover needs to be
removed to access the battery, the
fuse box and the coolant reservoir
cap.
EAU01271
BatteryBatteryThis scooter is equipped with a
sealed-type (MF) battery, which does
not require any maintenance. There
is no need to check the electrolyte or
to add distilled water.
To charge the battery
Have a Yamaha dealer charge the
battery as soon as possible if it
seems to have discharged. Keep in
mind that the battery tends to dis-
charge more quickly if the scooter is
equipped with optional electrical
accessories.
1
1. Battery
To remove the battery cover, pull up
the right footboard mat as shown,
and then remove the screws and the
battery cover.
2
3
1
1. Right footboard mat
2. Screw (×2)
3. Battery cover
5SJ-28199-E1 7/11/02 11:03 AM Page 83
Page 95 of 116

6-44
PERIODIC MAINTENANCE AND MINOR REPAIR
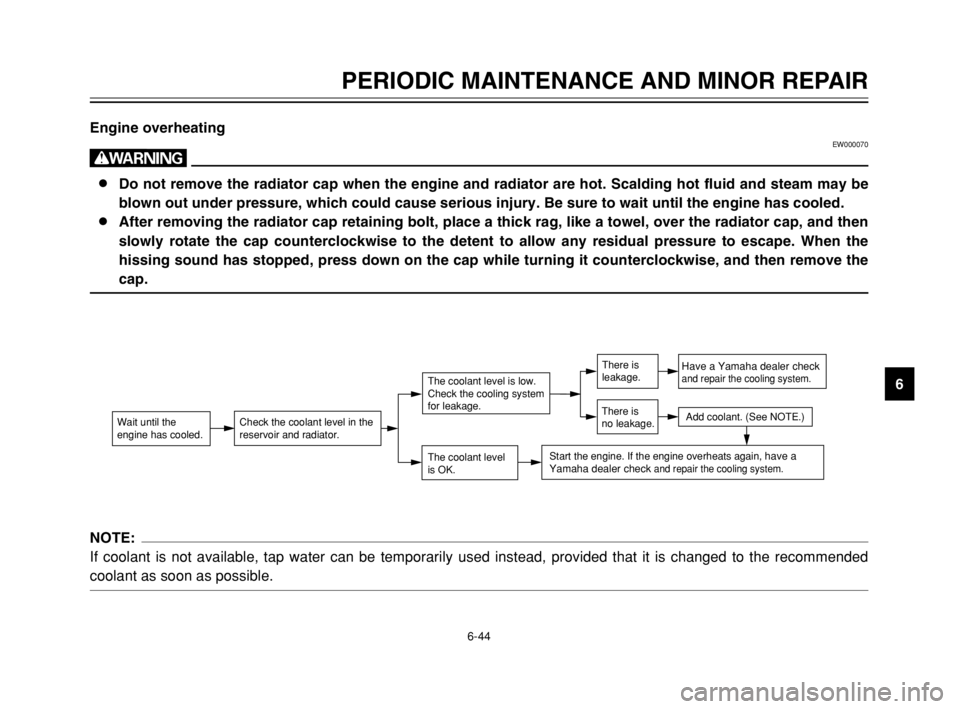
6 Engine overheating
EW000070
w
8 8
Do not remove the radiator cap when the engine and radiator are hot. Scalding hot fluid and steam may be
blown out under pressure, which could cause serious injury. Be sure to wait until the engine has cooled.
8 8
After removing the radiator cap retaining bolt, place a thick rag, like a towel, over the radiator cap, and then
slowly rotate the cap counterclockwise to the detent to allow any residual pressure to escape. When the
hissing sound has stopped, press down on the cap while turning it counterclockwise, and then remove the
cap.
NOTE:
If coolant is not available, tap water can be temporarily used instead, provided that it is changed to the recommended
coolant as soon as possible.
Wait until the
engine has cooled.Check the coolant level in the
reservoir and radiator.
The coolant level
is OK.
The coolant level is low.
Check the cooling system
for leakage.
Have a Yamaha dealer checkand repair the cooling system.
Add coolant. (See NOTE.)
Start the engine. If the engine overheats again, have a
Yamaha dealer check and repair the cooling system.
There is
leakage.
There is
no leakage.
5SJ-28199-E1 7/11/02 11:03 AM Page 93
Page 112 of 116

INDEX
D
Display, multi-function ............................3-5
E
Engine break-in ......................................5-4
Engine oil ..............................................6-14
F
Final transmission oil ............................6-18
Front and rear brake lever free play,
adjusting ...........................................6-27
Front and rear brake pads, checking ....6-28
Front fork, checking ..............................6-32
Fuel ......................................................3-16
Fuel consumption, tips for reducing .......5-4
Fuel gauge .............................................3-5
Fuel tank cap ........................................3-15
Fuses, replacing ...................................6-36
H
Handlebar switches ..............................3-10
Dimmer switch ..................................3-10
Engine stop switch ............................3-11
Horn switch .......................................3-10
Pass switch .......................................3-10
Start switch .......................................3-11
Turn signal switch .............................3-10
Headlight bulb, replacing ......................6-37I
Identification numbers ............................9-1
Ignition circuit cut-off system ................3-22
Indicator and warning lights ....................3-2
ABS warning light ................................3-2
High beam indicator light .....................3-3
Oil change indicator light .....................3-3
Turn signal indicator lights ...................3-2
K
Key identification number .......................9-1
L
License plate light bulb, replacing ........6-41
M
Main switch/steering lock .......................3-1
Model label .............................................9-2
P
Parking ...................................................5-5
Part locations ..........................................2-1
Periodic maintenance and lubrication
chart .....................................................6-3
Pre-operation check list ..........................4-1
R
Rider seat .............................................3-18
Rider seat, adjusting .............................3-18A
ABS ......................................................3-13
Acceleration and deceleration ................5-3
Air filter and V-belt case air filter
elements, cleaning ............................6-21
Air flow louver .......................................6-23
Anti-theft alarm (optional) .....................3-10
B
Battery ..................................................6-34
Battery cover removal ..........................6-34
Brake fluid level, checking ....................6-29
Brake fluid, changing ............................6-30
Brake lever, front ..................................3-11
Brake lever, rear ...................................3-12
Brake levers, lubricating .......................6-31
Braking ...................................................5-3
C
Cables, checking and lubricating ..........6-30
Care ........................................................7-1
Catalytic converter ................................3-17
Centerstand and sidestand, checking
and lubricating ..................................6-31
Conversion table ....................................8-5
Coolant .................................................6-19
Coolant temperature gauge ....................3-5
Cowlings and panel, removing and
installing ..............................................6-6
5SJ-28199-E1 7/11/02 11:03 AM Page 110