Page 194 of 426
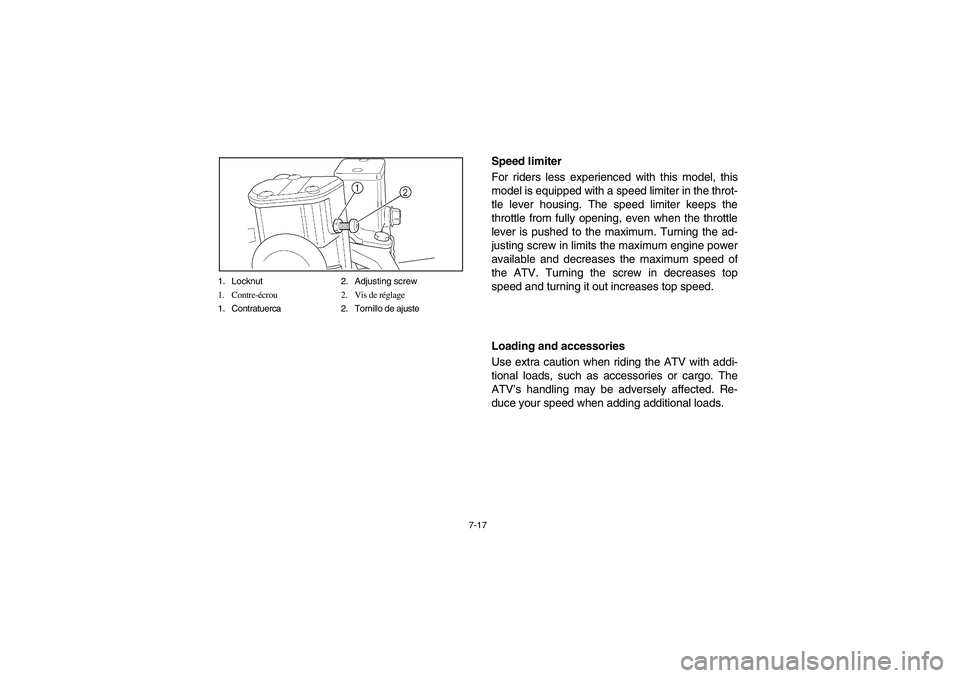
7-17 1. Locknut 2. Adjusting screw
1. Contre-écrou 2. Vis de réglage
1. Contratuerca 2. Tornillo de ajuste
Speed limiter
For riders less experienced with this model, this
model is equipped with a speed limiter in the throt-
tle lever housing. The speed limiter keeps the
throttle from fully opening, even when the throttle
lever is pushed to the maximum. Turning the ad-
justing screw in limits the maximum engine power
available and decreases the maximum speed of
the ATV. Turning the screw in decreases top
speed and turning it out increases top speed.
Loading and accessories
Use extra caution when riding the ATV with addi-
tional loads, such as accessories or cargo. The
ATV’s handling may be adversely affected. Re-
duce your speed when adding additional loads.
U5TE60.book Page 17 Monday, June 10, 2002 8:47 AM
Page 202 of 426
7-25
Exhaust system
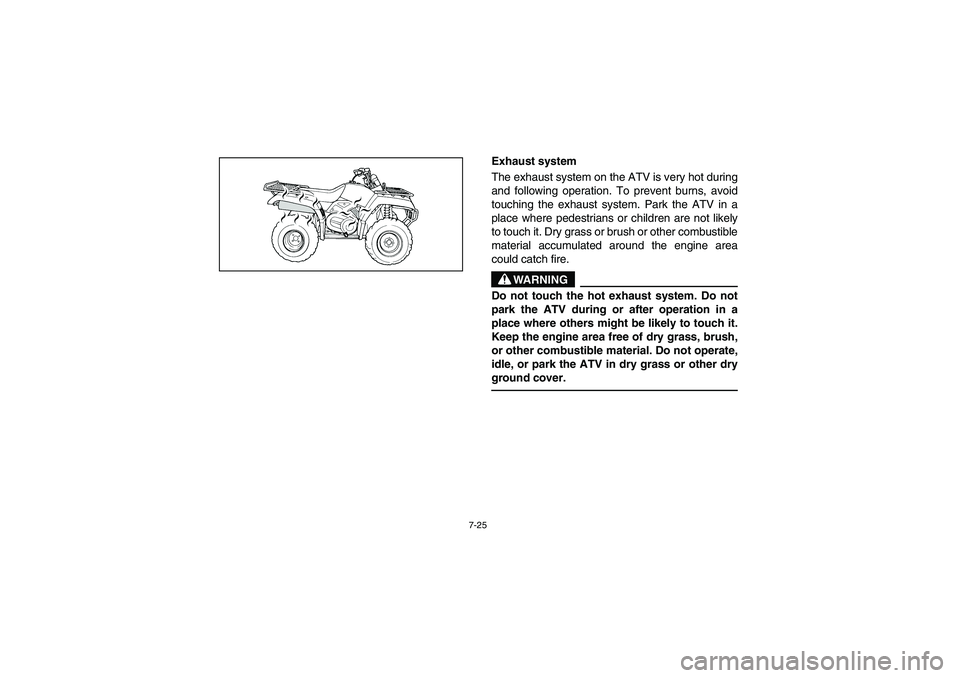
The exhaust system on the ATV is very hot during
and following operation. To prevent burns, avoid
touching the exhaust system. Park the ATV in a
place where pedestrians or children are not likely
to touch it. Dry grass or brush or other combustible
material accumulated around the engine area
could catch fire.
WARNING
_ Do not touch the hot exhaust system. Do not
park the ATV during or after operation in a
place where others might be likely to touch it.
Keep the engine area free of dry grass, brush,
or other combustible material. Do not operate,
idle, or park the ATV in dry grass or other dry
ground cover. _
U5TE60.book Page 25 Monday, June 10, 2002 8:47 AM
Page 212 of 426
7-35
Select a large, flat area off-road to become familiar
with your ATV. Make sure that this area is free of
obstacles and other riders. You should practice
control of the throttle, brakes, and turning tech-
niques in this area before trying more difficult ter-
rain. Always avoid riding on paved surfaces: the
ATV is designed for off-road use only, and han-
dling maneuvers are more difficult to perform on
pavement.
Set the parking brake and follow the instructions
on page 6-3 to start the engine. Once it has
warmed up you are ready to begin riding your
ATV. Remember that the engine and exhaust pipe
will be hot when riding and afterwards; do not al-
low skin or clothing to come in contact with these
components.
U5TE60.book Page 35 Monday, June 10, 2002 8:47 AM
Page 214 of 426
7-37
With the engine idling, shift the drive select lever
into the forward “FWD” position. Apply the throttle
slowly and smoothly. The centrifugal clutch will en-
gage and you will start to accelerate. If the throttle
is applied too abruptly, the front wheels may lift off
the ground resulting in a loss of directional control.
Avoid higher speeds until you are thoroughly famil-
iar with the operation of your ATV.
When slowing down or stopping, release the throt-
tle and apply the brakes smoothly and evenly. Im-
proper use of the brakes can cause the tires to
lose traction, reducing control and increasing the
possibility of an accident.
U5TE60.book Page 37 Monday, June 10, 2002 8:47 AM
Page 232 of 426
7-55
RIDING DOWNHILL
When riding your ATV downhill, shift your weight
as far to the rear and uphill side of the ATV as pos-
sible. Move back on the seat and sit with your
arms straight. Engine compression will do most of
the braking for you. For maximum engine com-
pression braking effect, change to 4WD before be-
ginning to descend the hill. Improper braking may
cause a loss of traction.
Use caution while descending a hill with loose or
slippery surfaces. Braking ability and traction may
be adversely affected by these surfaces. Improper
braking may also cause a loss of traction.
When this ATV is in 4WD, all wheels (front and
rear) are interconnected by the drive train. This
means that applying either the front brake or the
rear brake will brake all wheels. When descending
hills, using either brake lever or the brake pedal
will brake the wheels on the downhill side. Avoid
sudden application of either the front or rear brake
because the wheels on the uphill side could come
off the ground. Apply both the front and rear
brakes gradually.
U5TE60.book Page 55 Monday, June 10, 2002 8:47 AM
Page 258 of 426
8-1
EBU00516
PERIODIC MAINTENANCE AND
ADJUSTMENTPeriodic inspection, adjustment and lubrication will
keep your machine in the safest and most efficient
condition possible. Safety is an obligation of the
machine owner. The most important points of ma-
chine inspection, adjustment and lubrication are
explained on the following pages.
WARNING
Never service an engine while it is running.
Moving parts can catch clothing or parts of the
body, causing injury. Electrical components
can cause shocks or can start fires. Turn off
the engine when performing maintenance un-
less otherwise specified. Have a Yamaha deal-
er perform service if you are not familiar with
machine service.
U5TE60.book Page 1 Monday, June 10, 2002 8:47 AM
Page 264 of 426
8-7
EBU00262
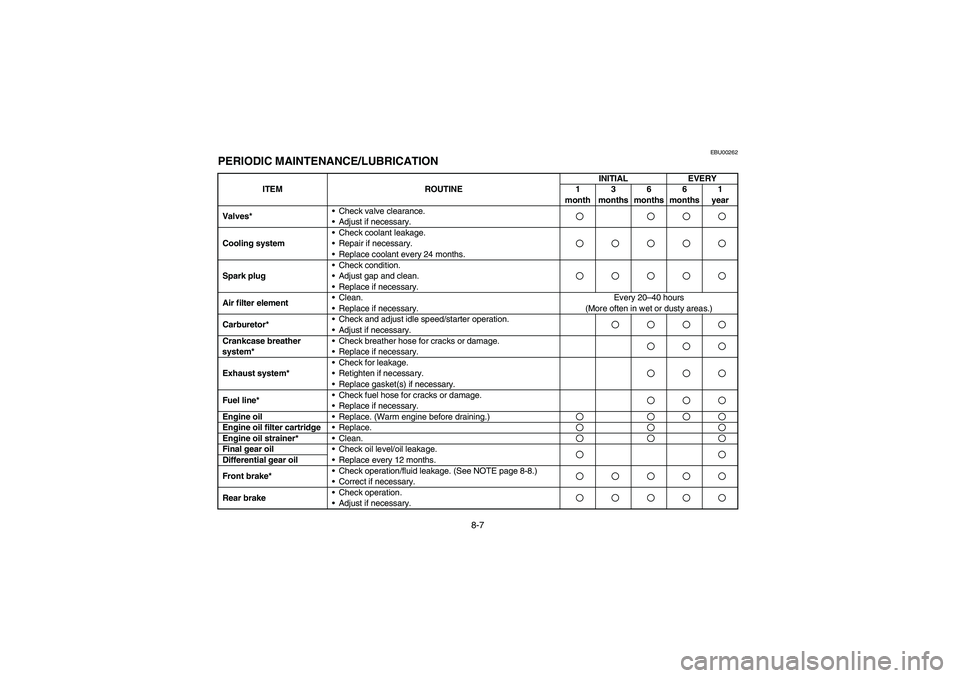
PERIODIC MAINTENANCE/LUBRICATION
ITEM ROUTINEINITIAL EVERY
1
month3
months6
months6
months1
year
Valves*•Check valve clearance.
•Adjust if necessary.
Cooling system•Check coolant leakage.
•Repair if necessary.
•Replace coolant every 24 months.Spark plug•Check condition.
•Adjust gap and clean.
•Replace if necessary.Air filter element•Clean.
•Replace if necessary.Every 20–40 hours
(More often in wet or dusty areas.)
Carburetor*•Check and adjust idle speed/starter operation.
•Adjust if necessary.Crankcase breather
system*•Check breather hose for cracks or damage.
•Replace if necessary.Exhaust system*•Check for leakage.
•Retighten if necessary.
•Replace gasket(s) if necessary.Fuel line*•Check fuel hose for cracks or damage.
•Replace if necessary.Engine oil
•Replace. (Warm engine before draining.)Engine oil filter cartridge
•Replace.Engine oil strainer*
•Clean.Final gear oil
•Check oil level/oil leakage.
•Replace every 12 months.Differential gear oil
Front brake*•Check operation/fluid leakage. (See NOTE page 8-8.)
•Correct if necessary.Rear brake•Check operation.
•Adjust if necessary.U5TE60.book Page 7 Monday, June 10, 2002 8:47 AM
Page 286 of 426
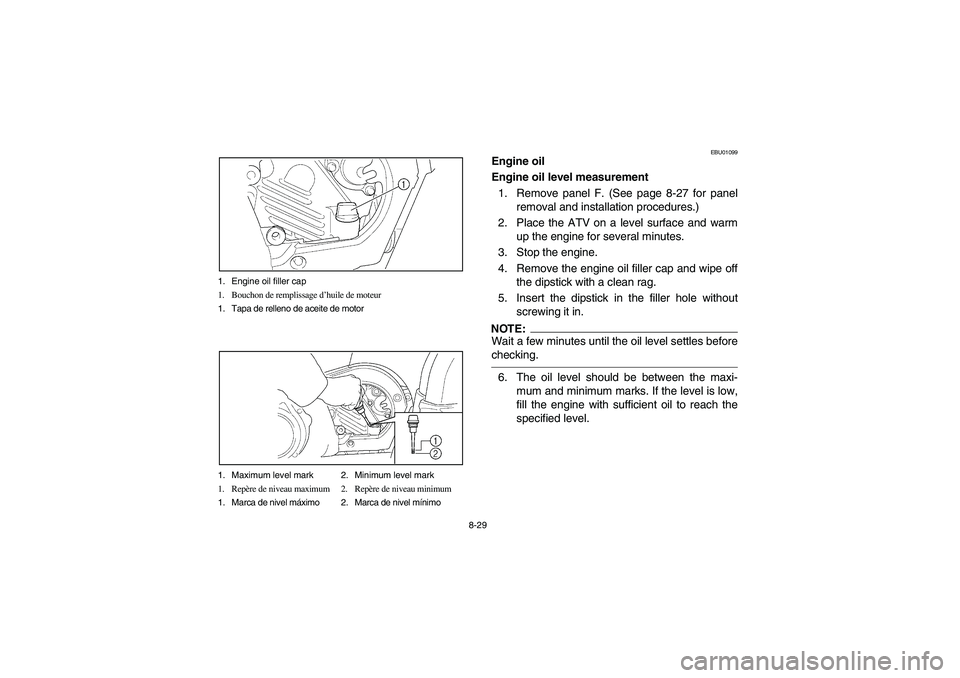
8-29 1. Engine oil filler cap
1. Bouchon de remplissage d’huile de moteur
1. Tapa de relleno de aceite de motor
1. Maximum level mark 2. Minimum level mark
1. Repère de niveau maximum 2. Repère de niveau minimum
1. Marca de nivel máximo 2. Marca de nivel mínimo
EBU01099
Engine oil
Engine oil level measurement
1. Remove panel F. (See page 8-27 for panel
removal and installation procedures.)
2. Place the ATV on a level surface and warm
up the engine for several minutes.
3. Stop the engine.
4. Remove the engine oil filler cap and wipe off
the dipstick with a clean rag.
5. Insert the dipstick in the filler hole without
screwing it in.NOTE:_ Wait a few minutes until the oil level settles before
checking. _6. The oil level should be between the maxi-
mum and minimum marks. If the level is low,
fill the engine with sufficient oil to reach the
specified level.
U5TE60.book Page 29 Monday, June 10, 2002 8:47 AM