Page 265 of 426
 8-8
* It is recommended that these items be serviced by a Yamaha dealer.NOTE:Recommended brake fluid: DOT 4
Brake fluid replacement:
1. When disassembling the master cylinder or caliper, replace the b")
8-8
* It is recommended that these items be serviced by a Yamaha dealer.NOTE:Recommended brake fluid: DOT 4
Brake fluid replacement:
1. When disassembling the master cylinder or caliper, replace the brake fluid. Normally check the brake
fluid level and add fluid as required.
2. On the inner parts of the master cylinder and caliper, replace the oil seals every two years.
3. Replace the brake hoses every four years, or if cracked or damaged.V-belt*•Check operation.
•Check for cracks or damage.Wheels*•Check balance/damage/runout.
•Repair if necessary.Wheel bearing*•Check bearing assemblies for looseness/damage.
•Replace if damaged.Front and rear
suspension*•Check operation.
•Correct if necessary.Steering system*•Check operation./Replace if damaged.
•Check toe-in./Adjust if necessary.Axle boots*•Check operation.
•Replace if damaged.Fittings and Fasteners*•Check all chassis fittings and fasteners.
•Correct if necessary.
ITEM ROUTINEINITIAL EVERY
1
month3
months6
months6
months1
year
U5TE60.book Page 8 Monday, June 10, 2002 8:47 AM
Page 344 of 426
8-87 a. Wear limit: 1 mm
a. Limite d’usure: 1 mm
a. Límite de desgaste: 1 mm
1. Wear limit line 2. Wear indicator
1. Ligne de limite d’usure 2. Indicateur d’usure
1. Línea del límite de desgaste 2. Indicador de desgaste
EBU00312
Front brake pad inspection
Inspect the brake pads for damage and wear. If
the thickness is less than the specified value, have
a Yamaha dealer replace the pads.NOTE:The wheels need to be removed to inspect the
brake pads. See page 8-109 for removal proce-
dures.
EBU00313
Rear brake shoe inspection
A wear indicator is provided on the rear brake.
This indicator allows checking of brake shoe wear
without disassembling the brake. Apply the rear
brake and check the position of the indicator. If the
indicator reaches the wear limit line, ask a
Yamaha dealer to replace shoes as a set.
U5TE60.book Page 87 Monday, June 10, 2002 8:47 AM
Page 354 of 426
8-97 1. Adjusting nut (brake pedal cable)
2. Adjusting nut (brake lever cable)
1.Écrou de réglage (câble de la pédale de frein)
2.Écrou de réglage (câble du levier de frein)
1. Tuerca de ajuste (cable del pedal del freno)
2. Tuerca de ajuste (cable de la palanca del freno)
a. Free play
a. Jeu
a. Juego libre
EBU01268
Rear brake pedal and lever adjustment
Brake pedal free play adjustment
1. Fully loosen the adjusting nut on the brake le-
ver cable at the rear wheel.
2. Turn the adjusting nut on the brake pedal ca-
ble until the free play is 20–30 mm.
U5TE60.book Page 97 Monday, June 10, 2002 8:47 AM
Page 366 of 426
8-109 1. Tapered nut (× 4)
1.Écrou conique (× 4)
1. Tuerca cónica (× 4)
EBU01112
Wheel removal
1. Loosen the wheel nuts.
2. Elevate the ATV and place a suitable stand
under the frame.
3. Remove the nuts from the wheel.
4. Remove the wheel.
U5TE60.book Page 109 Monday, June 10, 2002 8:47 AM
Page 368 of 426
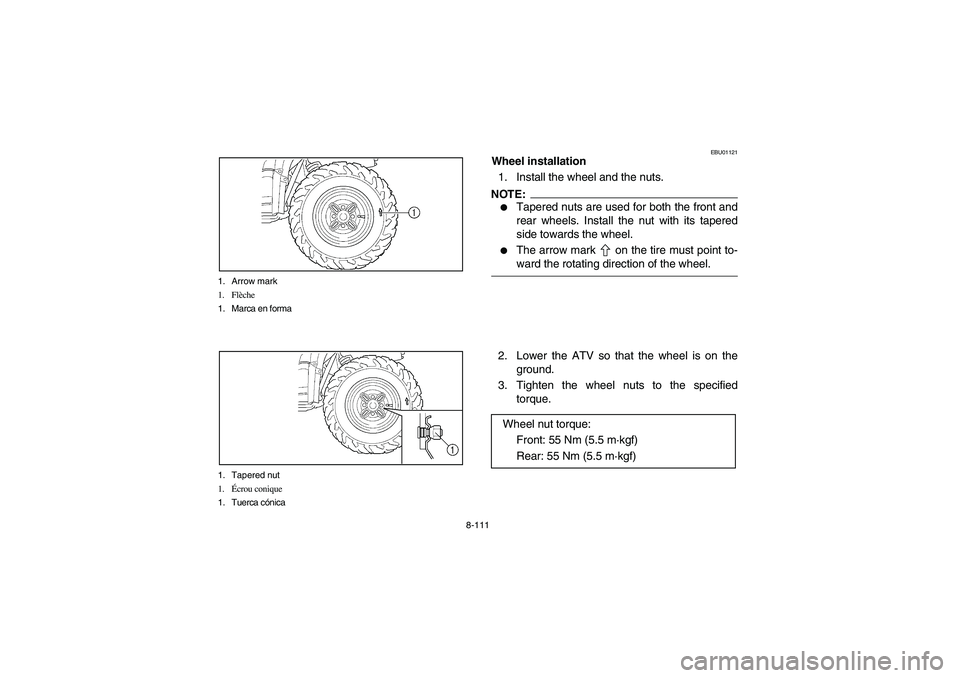
8-111 1. Arrow mark
1. Flèche
1. Marca en forma
1. Tapered nut
1.Écrou conique
1. Tuerca cónica
EBU01121
Wheel installation
1. Install the wheel and the nuts.NOTE:_ �
Tapered nuts are used for both the front and
rear wheels. Install the nut with its tapered
side towards the wheel.
�
The arrow mark on the tire must point to-
ward the rotating direction of the wheel.
_2. Lower the ATV so that the wheel is on the
ground.
3. Tighten the wheel nuts to the specified
torque.
Wheel nut torque:
Front: 55 Nm (5.5 m·kgf)
Rear: 55 Nm (5.5 m·kgf)
U5TE60.book Page 111 Monday, June 10, 2002 8:47 AM
Page 378 of 426
 8-121 1. Headlight fuse
2. Ignition fuse
3. Auxiliary DC jack fuse
4. Four-wheel drive fuse
5. Signaling system fuse
6. Spare fuse (× 3)
1. Fusible de phare
2. Fusible d’allumage
3. Fusible de pris")
8-121 1. Headlight fuse
2. Ignition fuse
3. Auxiliary DC jack fuse
4. Four-wheel drive fuse
5. Signaling system fuse
6. Spare fuse (× 3)
1. Fusible de phare
2. Fusible d’allumage
3. Fusible de prise pour accessoires
4. Fusible du système 4x4
5. Fusible de signalisation
6. Fusible de rechange (× 3)
1. Fusible del faro
2. Fusible del sistema de encendido
3. Fusible de la toma de CC auxiliar
4. Fusible del sistema de tracción en las cuatro ruedas
5. Fusible del sistema de señalización
6. Fusible de repuesto (× 3)
WARNING
Always use a fuse of the specified rating. Nev-
er use any type of material or object in place of
the proper fuse. An improper fuse can cause
damage to the electrical system which could
lead to a fire.CAUTION:
To prevent accidental short-circuiting, turn off
the main switch when checking or replacing a
fuse.Specified fuses:
Main fuse: 30 A
Headlight fuse: 15 A
Ignition fuse: 10 A
Auxiliary DC jack fuse: 10 A
Four-wheel-drive fuse: 3 A
Signaling system fuse: 10 A
U5TE60.book Page 121 Monday, June 10, 2002 8:47 AM
Page 394 of 426
9-1
EBU00420
CLEANING AND STORAGE
A. CLEANING
Frequent, thorough cleaning of your machine will
not only enhance its appearance but will improve
its general performance and extend the useful life
of many components.
1. Before cleaning the machine:
a. Block off the end of the exhaust pipe to pre-
vent water entry. A plastic bag and strong
rubber band may be used.
b. Make sure the spark plug and all filler caps
are properly installed.
2. If the engine case is excessively greasy, ap-
ply degreaser with a paint brush. Do not ap-
ply degreaser to the wheel axles.
3. Rinse the dirt and degreaser off with a garden
hose. Use only enough pressure to do the
job.
U5TE60.book Page 1 Monday, June 10, 2002 8:47 AM
Page 396 of 426
9-3
CAUTION:
Excessive water pressure may cause water
seepage and deterioration of wheel bearings,
brakes, transmission seals and electrical de-
vices. Many expensive repair bills have result-
ed from improper high pressure detergent
applications such as those available in coin-
operated car washers.4. Once the majority of the dirt has been hosed
off, wash all surfaces with warm water and
mild, detergent-type soap. An old toothbrush
or bottle brush is handy for hard-to-get-at
places.
5. Rinse the machine off immediately with clean
water and dry all surfaces with a chamois,
clean towel or soft absorbent cloth.
6. Clean the seat with a vinyl upholstery cleaner
to keep the cover pliable and glossy.
U5TE60.book Page 3 Monday, June 10, 2002 8:47 AM
 8-87 a. Wear limit: 1 mm
a. Limite d’usure: 1 mm
a. Límite de desgaste: 1 mm
1. Wear limit line 2. Wear indicator
1. Ligne de limite d’usure 2. Indicateur d’usure
1. Línea del límite de desga")
 8-97 1. Adjusting nut (brake pedal cable)
2. Adjusting nut (brake lever cable)
1.Écrou de réglage (câble de la pédale de frein)
2.Écrou de réglage (câble du levier de frein)
1. Tuerca de ajuste")
 8-109 1. Tapered nut (× 4)
1.Écrou conique (× 4)
1. Tuerca cónica (× 4)
EBU01112
Wheel removal
1. Loosen the wheel nuts.
2. Elevate the ATV and place a suitable stand
under the frame.
3. Remove t")
 9-1
EBU00420
CLEANING AND STORAGE
A. CLEANING
Frequent, thorough cleaning of your machine will
not only enhance its appearance but will improve
its general performance and extend the useful life
of ma")
 9-3
CAUTION:
Excessive water pressure may cause water
seepage and deterioration of wheel bearings,
brakes, transmission seals and electrical de-
vices. Many expensive repair bills have result-
ed from")