Page 78 of 112

PERIODIC MAINTENANCE AND MINOR REPAIR
6-25
6
EAU03984
Changing the brake and
clutch fluids Have a Yamaha dealer change the
brake and clutch fluids at the intervals
specified in the NOTE after the periodic
maintenance and lubrication chart. In
addition, have the oil seals of the brake
and clutch master cylinders and cali-
pers as well as the brake and clutch
hoses replaced at the intervals listed
below or whenever they are damaged
or leaking.�
Oil seals: Replace every two
years.
�
Brake and clutch hoses: Replace
every four years.
EAU02962
Checking and lubricating the
cables The operation of all control cables and
the condition of the cables should be
checked before each ride, and the ca-
bles and cable ends should be lubricat-
ed if necessary. If a cable is damaged
or does not move smoothly, have a
Yamaha dealer check or replace it.
EW000112
WARNING
_ Damage to the outer sheath may in-
terfere with proper cable operation
and will cause the inner cable to
rust. Replace a damaged cable as
soon as possible to prevent unsafe
conditions. _
EAU04034
Checking and lubricating the
throttle grip and cable The operation of the throttle grip should
be checked before each ride. In addi-
tion, the cable should be lubricated or
replaced at the intervals specified in
the periodic maintenance chart.
Recommended lubricant:
Engine oil
U5JWE2.book Page 25 Wednesday, November 6, 2002 3:32 PM
Page 79 of 112
PERIODIC MAINTENANCE AND MINOR REPAIR
6-26
6
EAU03370
Checking and lubricating the
brake and shift pedals The operation of the brake and shift
pedals should be checked before each
ride, and the pedal pivots should be lu-
bricated if necessary.
Recommended lubricant:
Lithium-soap-based grease
(all-purpose grease)
U5JWE2.book Page 26 Wednesday, November 6, 2002 3:32 PM
Page 80 of 112
PERIODIC MAINTENANCE AND MINOR REPAIR
6-27
6
EAU03164
Checking and lubricating the
brake and clutch levers The operation of the brake and clutch
levers should be checked before each
ride, and the lever pivots should be lu-
bricated if necessary.
EAU03371
Checking and lubricating the
centerstand and sidestand The operation of the centerstand and
sidestand should be checked before
each ride, and the pivots and metal-to-
metal contact surfaces should be lubri-
cated if necessary.
EW000114
WARNING
_ If the centerstand or sidestand does
not move up and down smoothly,
have a Yamaha dealer check or re-
pair it. _
Recommended lubricant:
Lithium-soap-based grease
(all-purpose grease)
U5JWE2.book Page 27 Wednesday, November 6, 2002 3:32 PM
Page 82 of 112

PERIODIC MAINTENANCE AND MINOR REPAIR
6-29
6
EAU02939
Checking the front fork The condition and operation of the front
fork must be checked as follows at the
intervals specified in the periodic main-
tenance and lubrication chart.
To check the condition
EW000115
WARNING
_ Securely support the motorcycle so
that there is no danger of it falling
over. _Check the inner tubes for scratches,
damage and excessive oil leakage.To check the operation
1. Place the motorcycle on a level
surface and hold it in an upright
position.
2. While applying the front brake,
push down hard on the handle-
bars several times to check if the
front fork compresses and re-
bounds smoothly.
EC000098
CAUTION:_ If any damage is found or the front
fork does not operate smoothly,
have a Yamaha dealer check or re-
pair it. _
EAU00794
Checking the steering Worn or loose steering bearings may
cause danger. Therefore, the operation
of the steering must be checked as fol-
lows at the intervals specified in the pe-
riodic maintenance and lubrication
chart.
1. Place a stand under the engine to
raise the front wheel off the
ground.
EW000115
WARNING
_ Securely support the motorcycle so
that there is no danger of it falling
over. _
U5JWE2.book Page 29 Wednesday, November 6, 2002 3:32 PM
Page 85 of 112

PERIODIC MAINTENANCE AND MINOR REPAIR
6-32
6
EC000102
CAUTION:_ �
Always keep the battery
charged. Storing a discharged
battery can cause permanent
battery damage.
�
To charge a sealed-type (MF)
battery, a special (constant-
voltage) battery charger is re-
quired. Using a conventional
battery charger will damage the
battery. If you do not have ac-
cess to a sealed-type (MF) bat-
tery charger, have a Yamaha
dealer charge your battery.
_
EAU05025
Replacing the fuses The fuse box, which contains the fuses
for the individual circuits, is located un-
der panel A. Both the electronic fuel in-
jection fuse and the main fuse are
located under panel D. The main fuse
is located beside the battery. (See pag-
es 6-6 and 6-7 for panel removal and
installation procedures.)
If a fuse is blown, replace it as follows.
1. Turn the key to “OFF” and turn off
the electrical circuit in question.
2. Remove the blown fuse, and then
install a new fuse of the specified
amperage.1. Electronic fuel injection fuse
2. Electronic fuel injection spare fuse
1. Headlight fuse
2. Signaling system fuse
3. Ignition fuse
4. Windshield motor fuse
5. Radiator fan fuse
6. Odometer, clock and immobilizer system fuse
(backup fuse)
7. Spare fuse (× 5)
8. Hazard fuse
9. Anti-lock Brake System fuse
(For FJR1300A only)
10.Parking lighting fuse
E_5jw_Periodic.fm Page 32 Monday, November 11, 2002 10:00 AM
Page 86 of 112

PERIODIC MAINTENANCE AND MINOR REPAIR
6-33
6
EC000103
CAUTION:_ Do not use a fuse of a higher amper-
age rating than recommended to
avoid causing extensive damage to
the electrical system and possibly a
fire. _3. Turn the key to “ON” and turn on
the electrical circuit in question to
check if the device operates.
4. If the fuse immediately blows
again, have a Yamaha dealer
check the electrical system.
EAU04586
Replacing a headlight bulb This motorcycle is equipped with
quartz bulb headlights. If a headlight
bulb burns out, replace it as follows.
1. Remove panel B (if replacing the
left headlight bulb) or panel C (if
replacing the right headlight bulb).
(See page 6-6 for panel removal
and installation procedures.)
2. Disconnect the headlight coupler,
and then remove the headlight
bulb cover.
1. Main fuseSpecified fuses:
Main fuse: 50 A
Headlight fuse: 25 A
Signaling system fuse: 15 A
Ignition fuse: 10 A
Windshield motor fuse: 2 A
Radiator fan fuse: 15 A
Odometer, clock and
immobilizer system fuse
(backup fuse): 10 A
Hazard fuse: 7.5 A
Parking lighting fuse: 10 A
Electronic fuel injection
fuse: 15 A
Anti-lock Brake System
fuse
(For FJR1300A only): 7.5 A
1. Headlight coupler
2. Headlight bulb cover
E_5jw_Periodic.fm Page 33 Monday, November 11, 2002 10:00 AM
Page 89 of 112

PERIODIC MAINTENANCE AND MINOR REPAIR
6-36
6
EAU05019
Replacing a rear turn signal
light bulb or a tail/brake light
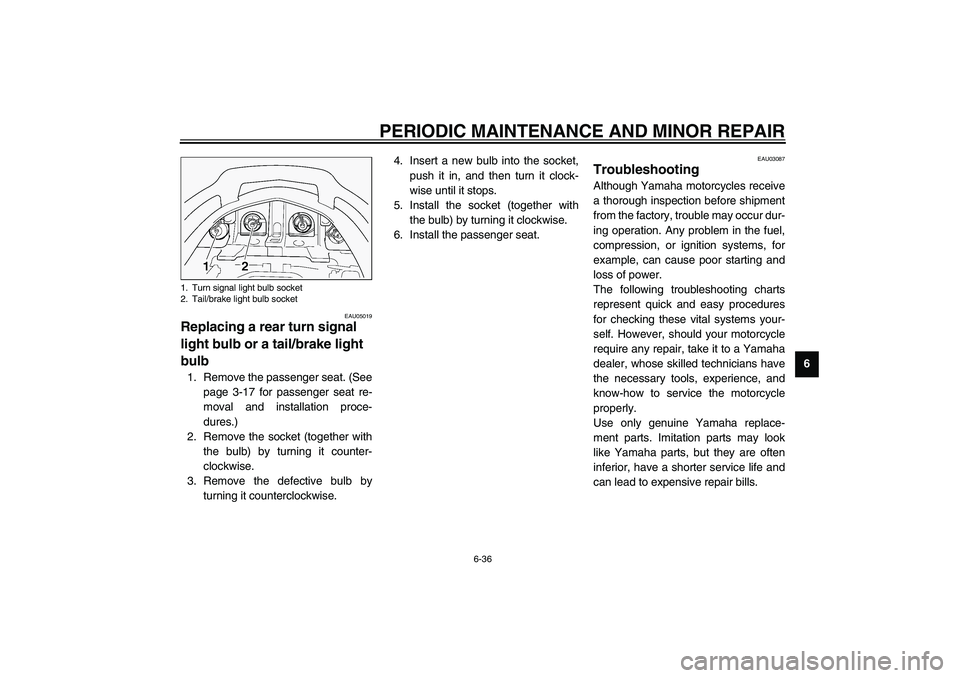
bulb 1. Remove the passenger seat. (See
page 3-17 for passenger seat re-
moval and installation proce-
dures.)
2. Remove the socket (together with
the bulb) by turning it counter-
clockwise.
3. Remove the defective bulb by
turning it counterclockwise.4. Insert a new bulb into the socket,
push it in, and then turn it clock-
wise until it stops.
5. Install the socket (together with
the bulb) by turning it clockwise.
6. Install the passenger seat.
EAU03087
Troubleshooting Although Yamaha motorcycles receive
a thorough inspection before shipment
from the factory, trouble may occur dur-
ing operation. Any problem in the fuel,
compression, or ignition systems, for
example, can cause poor starting and
loss of power.
The following troubleshooting charts
represent quick and easy procedures
for checking these vital systems your-
self. However, should your motorcycle
require any repair, take it to a Yamaha
dealer, whose skilled technicians have
the necessary tools, experience, and
know-how to service the motorcycle
properly.
Use only genuine Yamaha replace-
ment parts. Imitation parts may look
like Yamaha parts, but they are often
inferior, have a shorter service life and
can lead to expensive repair bills.
1. Turn signal light bulb socket
2. Tail/brake light bulb socket
U5JWE2.book Page 36 Wednesday, November 6, 2002 3:32 PM
Page 95 of 112

MOTORCYCLE CARE AND STORAGE
7-2
7
�
Do not use any harsh chemical
products on plastic parts. Be
sure to avoid using cloths or
sponges which have been in
contact with strong or abrasive
cleaning products, solvent or
thinner, fuel (gasoline), rust re-
movers or inhibitors, brake flu-
id, antifreeze or electrolyte.
�
Do not use high-pressure wash-
ers or steam-jet cleaners since
they cause water seepage and
deterioration in the following ar-
eas: seals (of wheel and swing-
arm bearings, fork and brakes),
electric components (couplers,
connectors, instruments,
switches and lights), breather
hoses and vents.
�
For motorcycles equipped with
a windshield: Do not use strong
cleaners or hard sponges as
they will cause dulling or
scratching. Some cleaning
compounds for plastic may
leave scratches on the wind-
shield. Test the product on a
small hidden part of the wind-
shield to make sure that it does
not leave any marks. If the wind-
shield is scratched, use a quali-
ty plastic polishing compound
after washing.
_After normal useRemove dirt with warm water, a mild
detergent, and a soft, clean sponge,
and then rinse thoroughly with clean
water. Use a toothbrush or bottlebrush
for hard-to-reach areas. Stubborn dirt
and insects will come off more easily if
the area is covered with a wet cloth for
a few minutes before cleaning.After riding in the rain, near the sea or
on salt-sprayed roadsSince sea salt or salt sprayed on roads
during winter are extremely corrosive in
combination with water, carry out the
following steps after each ride in the
rain, near the sea or on salt-sprayed
roads.NOTE:_ Salt sprayed on roads in the winter may
remain well into spring. _1. Clean the motorcycle with cold
water and a mild detergent, after
the engine has cooled down.
ECA00012
CAUTION:_ Do not use warm water since it in-
creases the corrosive action of the
salt. _2. After drying the motorcycle, apply
a corrosion protection spray on all
metal, including chrome- and nick-
el-plated, surfaces to prevent cor-
rosion.
U5JWE2.book Page 2 Wednesday, November 6, 2002 3:32 PM