Page 148 of 388
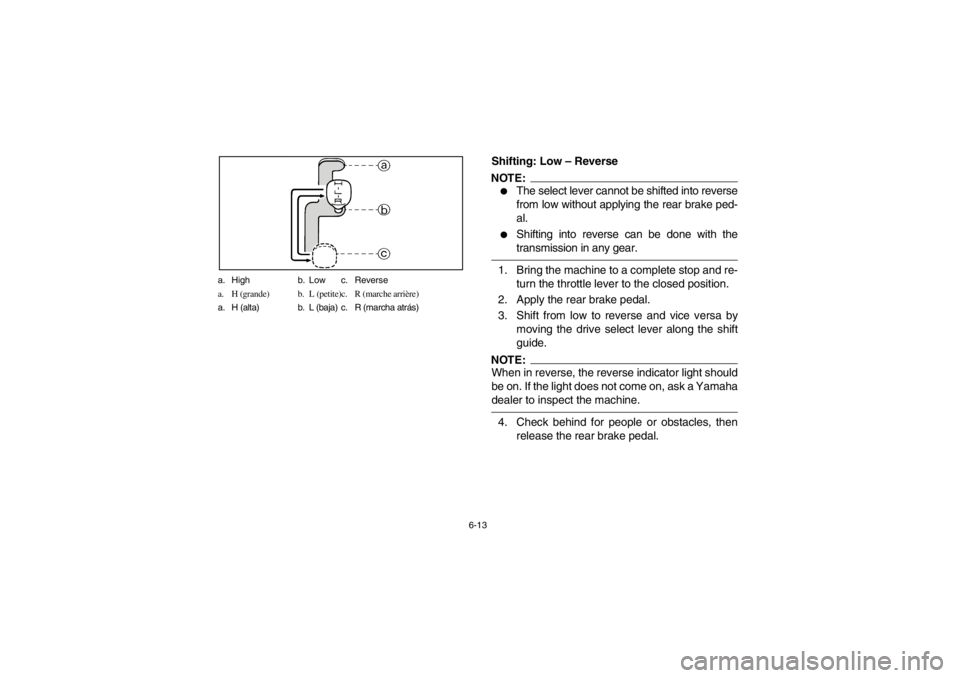
6-13 a. High b. Low c. Reverse
a. H (grande) b. L (petite)c. R (marche arrière)
a. H (alta) b. L (baja) c. R (marcha atrás)
Shifting: Low – ReverseNOTE:_ �
The select lever cannot be shifted into reverse
from low without applying the rear brake ped-
al.
�
Shifting into reverse can be done with the
transmission in any gear.
_1. Bring the machine to a complete stop and re-
turn the throttle lever to the closed position.
2. Apply the rear brake pedal.
3. Shift from low to reverse and vice versa by
moving the drive select lever along the shift
guide.NOTE:_ When in reverse, the reverse indicator light should
be on. If the light does not come on, ask a Yamaha
dealer to inspect the machine. _4. Check behind for people or obstacles, then
release the rear brake pedal.
EE.book Page 13 Monday, June 18, 2001 10:18 AM
Page 216 of 388

7-43 1. Lean towards inside of turn.
2. Support your weight on the outer footrest.
1. Se pencher vers l’intérieur du virage.
2. S’appuyer sur le repose-pied externe.
1. Inclínese hacia el interior del giro.
2. Descanse su peso en el descansapie externo.
As you approach a curve, slow down and begin to
turn the handlebars in the desired direction. As
you do so, put your weight on the footboard to the
outside of the turn (opposite your desired direc-
tion) and lean your upper body into the turn. Use
the throttle to maintain an even speed through the
turn. This maneuver will let the wheel on the inside
of the turn slip slightly, allowing the ATV to make
the turn properly.
This procedure should be practiced at slow speed
many times in a large off-road area with no obsta-
cles. If an incorrect technique is used, your ATV
may continue to go straight. If the ATV doesn’t
turn, come to a stop and then practice the proce-
dure again. If the riding surface is slippery or loose,
it may help to position more of your weight over the
front wheels by moving forward on the seat.
Once you have learned this technique you should
be able to perform it at higher speeds or in tighter
curves.
EE.book Page 43 Monday, June 18, 2001 10:18 AM
Page 234 of 388
7-61
CROSSING A SLOPE
Traversing a sloping surface on your ATV requires
you to properly position your weight to maintain
proper balance. Be sure that you have learned the
basic riding skills on flat ground before attempting
to cross a sloping surface. Avoid slopes with slip-
pery surfaces or rough terrain that may upset your
balance.
As you travel across a slope, lean your body in the
uphill direction. It may be necessary to correct the
steering when riding on loose surfaces by pointing
the front wheels slightly uphill. When riding on
slopes be sure not to make sharp turns either up or
down hill.
EE.book Page 61 Monday, June 18, 2001 10:18 AM
Page 274 of 388
8-21 1. Oil gallery bolt 2. Cloth
1. Boulon de rampe de graissage 2. Chiffon
1. Perno del conducto de aceite 2. Trapo
Oil pressure check
1. Put a cloth around the cylinder.
2. Slightly loosen the oil gallery bolt in the cylin-
der head.
3. Start the engine and keep it idling until oil be-
gins to seep from the oil gallery. If no oil
comes out after one minute, turn the engine
off so it will not seize and check for the cause.
4. Restart the engine and check the oil pres-
sure.
5. After checking, tighten the oil gallery bolt to
specification.CAUTION:_ Be sure to inspect the oil pressure after replac-
ing the engine oil. _6. Install the clamp.Tightening torque:
Oil gallery bolt:
7 Nm (0.7 m·kgf)
EE.book Page 21 Monday, June 18, 2001 10:18 AM
Page 290 of 388

8-37 1. Spark plug cap
1. Capuchon de bougie
1. Tapa de bujía
1. Spark plug wrench
1. Clé à bougie
1. Llave de bujías
EBU00680
Spark plug inspection
Removal
1. Remove the spark plug cap.
2. Use the spark plug wrench in the tool kit to re-
move the spark plug as shown.
Inspection
The spark plug is an important engine component
and is easy to inspect. The condition of the spark
plug can indicate the condition of the engine.
The ideal color on the white insulator around the
center electrode is a medium-to-light tan color for a
ATV that is being ridden normally.
Do not attempt to diagnose such problems your-
self. Instead, take the ATV to a Yamaha dealer.
You should periodically remove and inspect the
spark plug because heat and deposits will cause
the spark plug to slowly break down and erode. If
electrode erosion becomes excessive, or if carbon
and other deposits are excessive, you should re-
place the spark plug with the specified plug.
Specified spark plug:
DR8EA (NGK)
EE.book Page 37 Monday, June 18, 2001 10:18 AM
Page 328 of 388
8-75 1. Rear brake light switch 2. Adjusting nut
1. Contacteur de feu stop sur frein arrière 2.Écrou de réglage
1. Interruptor de la luz de freno trasero 2. Tuerca de ajuste
EBU00834
Adjusting the rear brake light switch
The rear brake light switch, which is activated by
the brake pedal and brake levers, is properly ad-
justed when the brake light comes on just before
braking takes effect. If necessary, adjust the brake
light switch as follows.
Turn the adjusting nut while holding the rear brake
light switch in place. To make the brake light come
on earlier, turn the adjusting nut in direction
a. To
make the brake light come on later, turn the adjust-
ing nut in direction
b.
EE.book Page 75 Monday, June 18, 2001 10:18 AM
Page 342 of 388

8-89 1. Main fuse 2. Spare fuse
1. Fusible principal 2. Fusible de rechange
1. Fusible principal 2. Fusible de repuesto
1. Headlight fuse 2. Ignition fuse
3. Auxiliary DC jack fuse 4. Signal fuse
5. Spare fuse
1. Fusible de phare 2. Fusible d’allumage
3. Fusible de connecteur 4. Fusible de signalisation
pour accessoires
5. Fusible de rechange
1. Fusible del faro 2. Fusible del sistema de encendido
3. Fusible de la toma 4. Fusible señalización
auxiliar de CC
5. Fusible de repuesto
EBU00745*
Fuse replacement
1. The fuse cases are under the seat.
2. If a fuse is blown, turn off the main switch and
the switch of the circuit in question. Then, in-
stall a new fuse of the specified amperage.
Turn on the main switch. If the fuse immedi-
ately blows again, consult a Yamaha dealer.
WARNING
_ Always use a fuse of the specified rating. Nev-
er use any type of material or object in place of
the proper fuse. An improper fuse can cause
damage to the electrical system which could
lead to a fire. _CAUTION:_ To prevent accidental short-circuiting, turn off
the main switch when checking or replacing a
fuse. _
Specified fuses:
Main fuse: 30 A
Headlight fuse: 15 A
Ignition fuse: 10 A
Auxiliary DC jack fuse: 10 A
Signal fuse: 10 A
EE.book Page 89 Monday, June 18, 2001 10:18 AM
Page 344 of 388
8-91 1. Cover
1. Cache
1. Cubierta
1. Bulb holder
1. Douille d’ampoule
1. Portalámparas
EBU00402
Replacing the headlight bulb
If the headlight bulb burns out, replace the bulb as
follows:
1. Remove the cover.
2. Turn the bulb holder counterclockwise and
remove the defective bulb.
WARNING
The headlight bulb is hot when it is on and im-
mediately after it is turned off. Wait for the bulb
to cool before touching or removing it. You can
be burned, or a fire could start if the bulb
touches something flammable.3. Put a new bulb into position and secure it in
place with the bulb holder.
4. Reinstall the cover. Adjust the headlight
beam if necessary.
EE.book Page 91 Monday, June 18, 2001 10:18 AM