Page 122 of 394
5-15
CAUTION:_ �
In order to prevent clutch slippage (since
the engine oil also lubricates the clutch),
do not mix any chemical additives. Do not
use oils with a diesel specification of “CD”
or oils of a higher quality than specified. In
addition, do not use oils labeled “ENERGY
CONSERVING II” or higher.
�
Make sure that no foreign material enters
the crankcase.
_
Oil quantity:
Periodic oil change
(engine oil):
2.4 L
Periodic oil change
(engine oil and transfer gear oil with oil
filter element replacement):
2.8 L
Total amount:
3.7 L
U4SH6A.book Page 15 Thursday, May 30, 2002 1:25 PM
Page 124 of 394
5-17
EBU00495
Final gear oil/Differential gear oil
Make sure the final gear oil/differential gear oil is at
the specified level. Add oil as necessary. (See
pages 8-27–8-35.)
If desired, an SAE 80W90 hypoid gear oil may be
used for all conditions.NOTE:_ GL-4 is a quality and additive rating. GL-5 or GL-6
rated hypoid gear oils may also be used. _
EBU01083
Throttle lever
Check to see that the throttle lever operates cor-
rectly. It must open smoothly and spring back to
the idle position when released. Have a Yamaha
dealer repair as necessary for proper operation.Recommended oil:
SAE 80 API GL-4 Hypoid gear oil
U4SH6A.book Page 17 Thursday, May 30, 2002 1:25 PM
Page 142 of 394
6-7
NOTE:�
If the engine fails to start, release the start
switch, then push the start switch again.
Pause a few seconds before the next attempt.
Each cranking should be as short as possible
to preserve battery energy. Do not crank the
engine more than 10 seconds on each at-
tempt.
�
If the battery is discharged, pull the recoil
starter to start the engine.
7. If the engine is started with the starter (choke)
in position
1, the starter (choke) should be
returned to position
2 to warm up the engine.
If the engine is started with the starter (choke)
in position
2, keep the starter (choke) in this
position to warm up the engine.
8. Continue warming up the engine until it idles
smoothly and return the starter (choke) to po-
sition
3 before riding.CAUTION:
See the “Engine break-in” section prior to op-
erating engine for the first time.
U4SH6A.book Page 7 Thursday, May 30, 2002 1:25 PM
Page 260 of 394

8-7
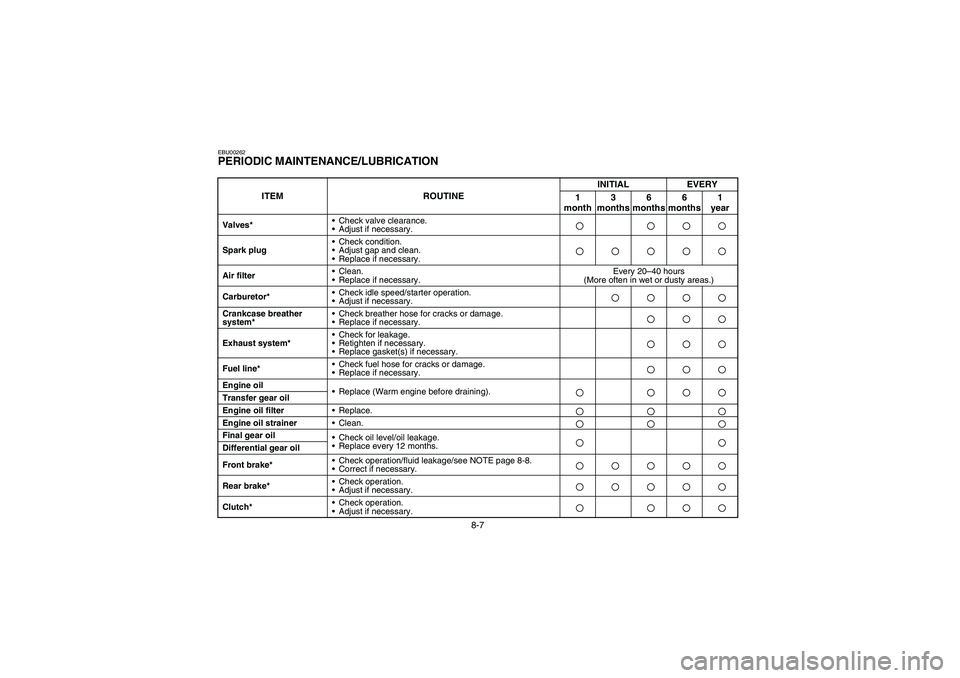
EBU00262PERIODIC MAINTENANCE/LUBRICATION
ITEM ROUTINEINITIAL EVERY
1
month3
months6
months6
months1
year
Valves*•Check valve clearance.
•Adjust if necessary.Spark plug•Check condition.
•Adjust gap and clean.
•Replace if necessary.Air filter•Clean.
•Replace if necessary.Every 20–40 hours
(More often in wet or dusty areas.)
Carburetor*•Check idle speed/starter operation.
•Adjust if necessary.Crankcase breather
system*•Check breather hose for cracks or damage.
•Replace if necessary.Exhaust system*•Check for leakage.
•Retighten if necessary.
•Replace gasket(s) if necessary.Fuel line*•Check fuel hose for cracks or damage.
•Replace if necessary.Engine oil
•Replace (Warm engine before draining).Transfer gear oil
Engine oil filter
•Replace.Engine oil strainer
•Clean.Final gear oil
•Check oil level/oil leakage.
•Replace every 12 months.Differential gear oil
Front brake*•Check operation/fluid leakage/see NOTE page 8-8.
•Correct if necessary.Rear brake*•Check operation.
•Adjust if necessary.Clutch*•Check operation.
•Adjust if necessary.U4SH6A.book Page 7 Thursday, May 30, 2002 1:25 PM
Page 261 of 394

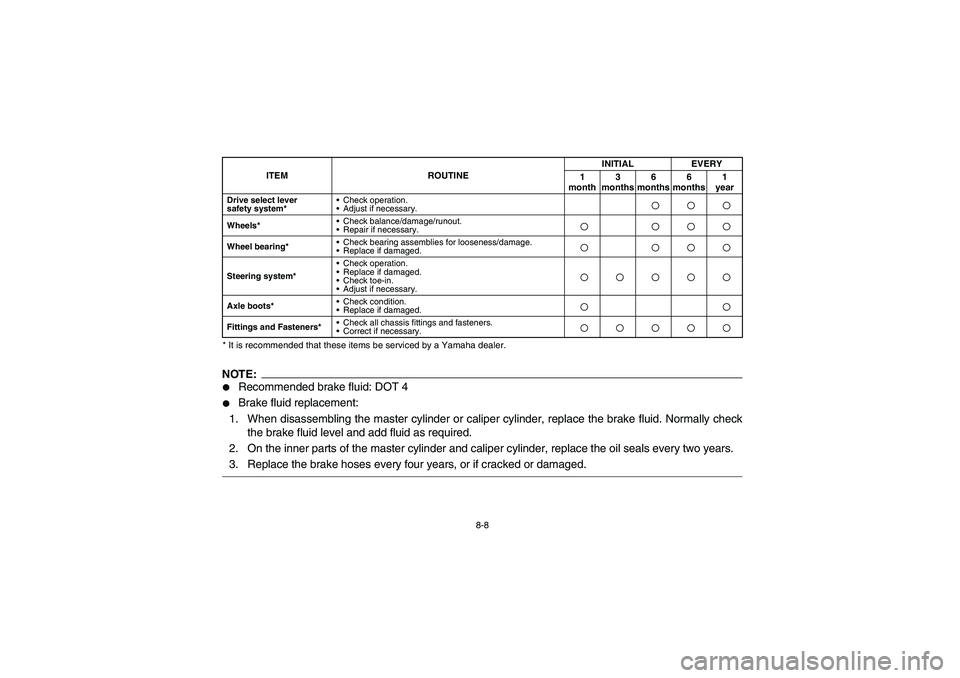
8-8 * It is recommended that these items be serviced by a Yamaha dealer.
NOTE:�
Recommended brake fluid: DOT 4
�
Brake fluid replacement:
1. When disassembling the master cylinder or caliper cylinder, replace the brake fluid. Normally check
the brake fluid level and add fluid as required.
2. On the inner parts of the master cylinder and caliper cylinder, replace the oil seals every two years.
3. Replace the brake hoses every four years, or if cracked or damaged.
Drive select lever
safety system*•Check operation.
•Adjust if necessary.Wheels*•Check balance/damage/runout.
•Repair if necessary.Wheel bearing*•Check bearing assemblies for looseness/damage.
•Replace if damaged.Steering system*•Check operation.
•Replace if damaged.
•Check toe-in.
•Adjust if necessary.Axle boots*•Check condition.
•Replace if damaged.Fittings and Fasteners*•Check all chassis fittings and fasteners.
•Correct if necessary.
ITEM ROUTINEINITIAL EVERY
1
month3
months6
months6
months1
year
U4SH6A.book Page 8 Thursday, May 30, 2002 1:25 PM
Page 266 of 394

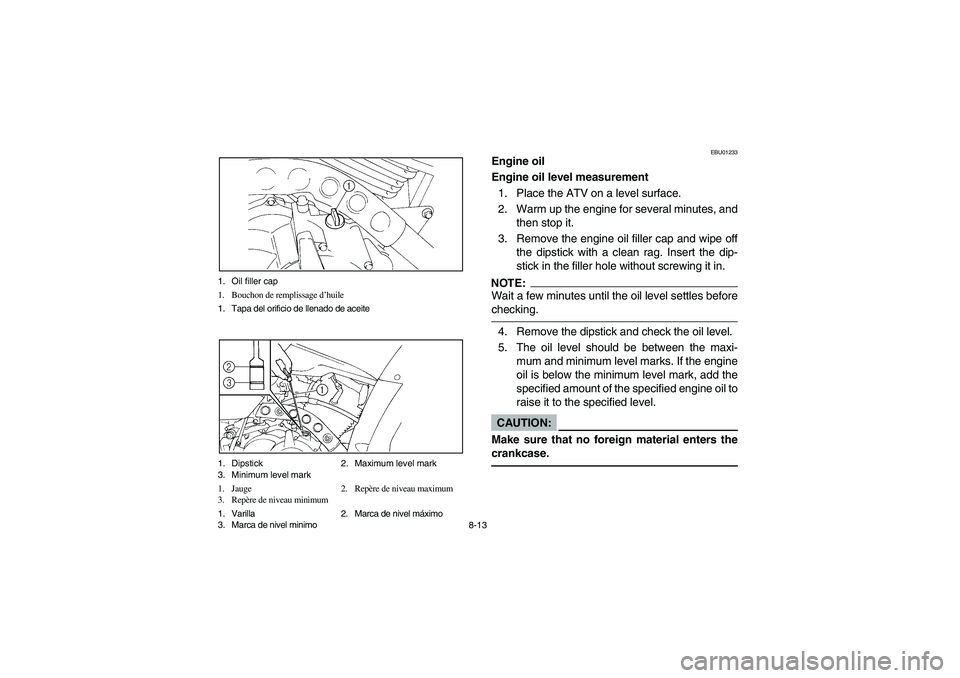
8-13 1. Oil filler cap
1. Bouchon de remplissage d’huile
1. Tapa del orificio de llenado de aceite
1. Dipstick 2. Maximum level mark
3. Minimum level mark
1. Jauge 2. Repère de niveau maximum
3. Repère de niveau minimum
1. Varilla 2. Marca de nivel máximo
3. Marca de nivel minimo
EBU01233
Engine oil
Engine oil level measurement
1. Place the ATV on a level surface.
2. Warm up the engine for several minutes, and
then stop it.
3. Remove the engine oil filler cap and wipe off
the dipstick with a clean rag. Insert the dip-
stick in the filler hole without screwing it in.NOTE:_ Wait a few minutes until the oil level settles before
checking. _4. Remove the dipstick and check the oil level.
5. The oil level should be between the maxi-
mum and minimum level marks. If the engine
oil is below the minimum level mark, add the
specified amount of the specified engine oil to
raise it to the specified level.CAUTION:_ Make sure that no foreign material enters the
crankcase. _
U4SH6A.book Page 13 Thursday, May 30, 2002 1:25 PM
Page 268 of 394
8-15 1. Clamp
1. Bride
1. Mordaza
1. Drain bolt (engine oil) 2. O-ring
3. Compression spring 4. Oil strainer
1. Boulon de vidange (huile de moteur) 2. Joint torique
3. Ressort de compression 4. Crépine à huile
1. Perno de drenaje (aceite del motor) 2. Junta tórica
3. Muelle de compresión 4. Colador de aceite
Engine oil replacement and oil filter cleaning
1. Place the ATV on a level surface.
2. Warm up the engine for several minutes, and
then stop it.
3. Place a container under the engine to collect
the used oil.
4. Remove the clamp by removing the screw.
5. Remove the engine oil filler cap and drain bolt
to drain the oil.CAUTION:_ When removing the drain bolt, the compres-
sion spring, oil strainer and O-ring will fall out.
Take care not to lose these parts. _
U4SH6A.book Page 15 Thursday, May 30, 2002 1:25 PM
Page 270 of 394
8-17 1. Filter cover bolt (× 3)
2. Oil filter cover
1. Boulon de couvercle de filtre (× 3)
2. Couvercle du filtre à huile
1. Perno de la tapa del filtro (× 3)
2. Tapa del filtro de aceite
1. Oil filter 2. O-ring (× 2)
1. Filtre à huile 2. Joint torique (× 2)
1. Filtro de aceite 2. Junta tórica (× 2)
6. Remove the shift pedal by removing the bolt.
7. Remove the oil filter element cover, and then
the oil filter element.
8. Clean the oil strainer and oil filter element
with solvent.
9. Inspect the O-ring and replace it if damaged.
10. Install the oil filter element, O-ring, oil filter el-
ement cover, compression spring, oil strainer
and drain bolt. Tighten the drain bolt to the
specified torque.CAUTION:_ Before installing the drain bolt, be sure to in-
stall the O-ring, compression spring and oil
strainer. _
Tightening torque
Drain bolt (engine):
32 Nm (3.2 m·kgf)
Oil filter element cover bolt:
10 Nm (1.0 m·kgf)
U4SH6A.book Page 17 Thursday, May 30, 2002 1:25 PM