Page 212 of 394
7-39
When slowing down or stopping, release the throt-
tle and apply the brakes smoothly and evenly. As
you slow down, shift to a lower gear. Be sure that
the engine has sufficiently slowed before engaging
a lower gear. Improper use of the brakes or shift-
ing can cause the tires to lose traction, reducing
control and increasing the possibility of an acci-
dent.
WARNING
_ Make sure the engine has sufficiently slowed
before shifting to a lower gear. Engaging a low-
er gear when the engine speed is too high
could cause the wheels to stop rotating. _
U4SH6A.book Page 39 Thursday, May 30, 2002 1:25 PM
Page 228 of 394
7-55
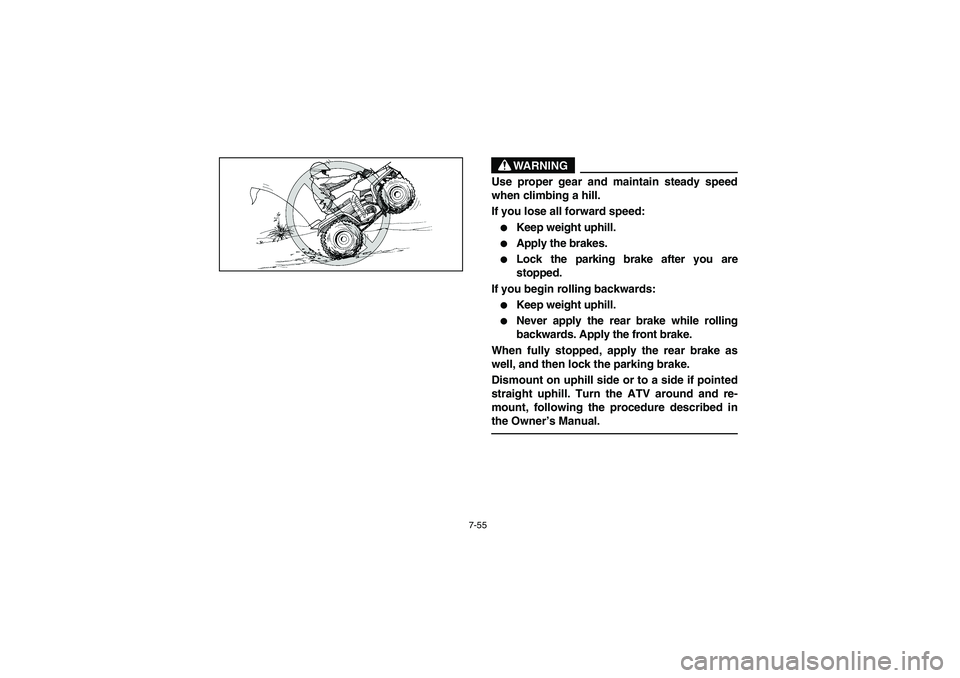
WARNING
_ Use proper gear and maintain steady speed
when climbing a hill.
If you lose all forward speed: �
Keep weight uphill.
�
Apply the brakes.
�
Lock the parking brake after you are
stopped.
If you begin rolling backwards:
�
Keep weight uphill.
�
Never apply the rear brake while rolling
backwards. Apply the front brake.
When fully stopped, apply the rear brake as
well, and then lock the parking brake.
Dismount on uphill side or to a side if pointed
straight uphill. Turn the ATV around and re-
mount, following the procedure described in
the Owner’s Manual.
_
U4SH6A.book Page 55 Thursday, May 30, 2002 1:25 PM
Page 238 of 394
7-65
CROSSING THROUGH SHALLOW WATER
The ATV can be used to cross slow moving, shal-
low water of up to a maximum of 35 cm in depth.
Before entering the water, choose your path care-
fully. Enter where there is no sharp drop off, and
avoid rocks or other obstacles which may be slip-
pery or upset the ATV. Drive slowly and carefully.
WARNING
_ Never operate this ATV in fast flowing water or
in water deeper than that specified in your
Owner’s Manual. Remember that wet brakes
may have reduced stopping ability. Test your
brakes after leaving water. If necessary, apply
them several times to let friction dry out the lin-
ings. If the ATV is operated through deep or
fast flowing water, the tires may float, causing
loss of traction and loss of control, which
could lead to an accident. _
U4SH6A.book Page 65 Thursday, May 30, 2002 1:25 PM
Page 240 of 394
7-67
1. Check hose
1. Flexible de contrôle
1. Manguito de retención
Test your brakes after leaving the water. Do not
continue to ride your ATV without verifying that
you have regained proper braking ability.CAUTION:_ After riding your ATV in water, be sure to drain
the trapped water by removing the check hose
at the bottom of the air filter case. Wash the
ATV in fresh water if it has been operated in
salt water or muddy conditions. _
U4SH6A.book Page 67 Thursday, May 30, 2002 1:25 PM
Page 244 of 394
7-71
SLIDING AND SKIDDING
Care should be used when riding on loose or slip-
pery surfaces since the ATV may slide. If unex-
pected and uncorrected, sliding could lead to an
accident.
To reduce the tendency for the front wheels to
slide in loose or slippery conditions, positioning
your weight over the front wheels will sometimes
help.
If the rear wheels of your ATV start to slide side-
ways, control can usually be regained (if there is
room to do so) by steering in the direction of the
slide. Applying the brakes or accelerating is not
recommended until you have corrected the slide.
U4SH6A.book Page 71 Thursday, May 30, 2002 1:25 PM
Page 248 of 394
7-75
WHAT TO DO IF ...
This section is designed to be a reference guide
only. Be sure to read each section on riding tech-
niques completely.
WHAT TO DO ...�
If your ATV doesn’t turn when you want it to:
Bring the ATV to a stop and practice the turning
maneuvers again. Be sure you are putting your
weight on the footboard to the outside of the
turn. Position your weight over the front wheels
for better control. (See pages 7-41–7-45.)
�
If your ATV begins to tip while turning:
Lean more into the turn to regain balance. If
necessary, gradually let off the throttle and/or
steer to the outside of the turn. (See pages
7-41–7-45.)
�
If your ATV starts to slide sideways:
Steer in the direction of the slide if you have the
room.
Applying the brakes or accelerating is not rec-
ommended until you have corrected the slide.
(See pages 7-71–7-73.)
U4SH6A.book Page 75 Thursday, May 30, 2002 1:25 PM
Page 252 of 394
7-79�
If your ATV encounters shallow water:
Ride slowly and carefully through slow moving
water, watching for obstacles. Be sure to let
water drain from the ATV and CHECK YOUR
BRAKES FOR PROPER OPERATION when
you come out of the water. Do not continue to
ride your ATV until you have regained ade-
quate braking ability. (See pages 7-65–7-67.)
U4SH6A.book Page 79 Thursday, May 30, 2002 1:25 PM
Page 310 of 394
 8-57 1. Wear indicator 2. Wear limit
1. Indicateur d’usure 2. Limite d’usure
1. Indicador de desgaste 2. Límite de desgaste
1. Minimum level mark “LOWER”
1. Repère de niveau minimum “LOWER")
8-57 1. Wear indicator 2. Wear limit
1. Indicateur d’usure 2. Limite d’usure
1. Indicador de desgaste 2. Límite de desgaste
1. Minimum level mark “LOWER”
1. Repère de niveau minimum “LOWER”
1. Marca de nivel mínimo “LOWER”
EBU00313
Rear brake shoe inspection
A wear indicator is provided on the rear brake.
This indicator allows checking of brake shoe wear
without disassembling the brake.
Apply the rear brake and check the position of the
indicator. If the indicator reaches the wear limit
line, ask a Yamaha dealer to replace shoes as a
set.
EBU00755
Brake fluid level inspection
Insufficient brake fluid may let air enter the brake
system, possibly causing the brakes to become in-
effective.
Before riding, check that the brake fluid is above
the lower level and replenish when necessary.
Observe these precautions:
1. When checking the fluid level, make sure the
top of the master cylinder is level by turning
the handlebars.
2. Use only the designated quality brake fluid.
Otherwise, the rubber seals may deteriorate,
causing leakage and poor brake perfor-
mance.
U4SH6A.book Page 57 Thursday, May 30, 2002 1:25 PM
 7-39
When slowing down or stopping, release the throt-
tle and apply the brakes smoothly and evenly. As
you slow down, shift to a lower gear. Be sure that
the engine has sufficiently slowed before eng")
 7-65
CROSSING THROUGH SHALLOW WATER
The ATV can be used to cross slow moving, shal-
low water of up to a maximum of 35 cm in depth.
Before entering the water, choose your path care-
fully. Enter wher")
 7-67
1. Check hose
1. Flexible de contrôle
1. Manguito de retención
Test your brakes after leaving the water. Do not
continue to ride your ATV without verifying that
you have regained proper braking")
 7-71
SLIDING AND SKIDDING
Care should be used when riding on loose or slip-
pery surfaces since the ATV may slide. If unex-
pected and uncorrected, sliding could lead to an
accident.
To reduce the t")