2003 YAMAHA AEROX50 wheel
[x] Cancel search: wheelPage 34 of 84

4
PRE-OPERATION CHECKS
ITEM CHECKS PAGE
• Make sure that operation is smooth.
Throttle grip• Check cable free play.
6-11
• If necessary, have Yamaha dealer adjust cable free play
and lubricate cable and grip housing.
• Check for damage.
Wheels and tires• Check tire condition and tread depth.
6-11 — 6-13
• Check air pressure.
• Correct if necessary.
Brake levers• Make sure that operation is smooth.
6-13, 6-16
• Lubricate lever pivoting points if necessary.
Centerstand• Make sure that operation is smooth.
6-16
• Lubricate pivot if necessary.
Chassis fasteners• Make sure that all nuts, bolts and screws are properly tightened.
—
• Tighten if necessary.
Instruments, lights• Check operation.
3-3, 3-4, 6-20 — 6-22
signals and switches• Correct if necessary.
Battery• Check fluid level.
6-18
• Fill with distilled water if necessary.
4-2
Page 42 of 84

EAU00462
PERIODIC MAINTENANCE AND MINOR REPAIR
Periodic maintenance and lubrication chart ............ 6-2
Removing and installing cowling and panel ............ 6-5
Cowling A ................................................................ 6-5
Panel A .................................................................... 6-5
Checking the spark plug ......................................... 6-6
Final transmission oil .............................................. 6-7
Coolant .................................................................... 6-8
Cleaning the air filter element ................................. 6-9
Adjusting the carburetor ........................................ 6-10
Adjusting the throttle cable free play ..................... 6-11
Tires ...................................................................... 6-11
Wheels .................................................................. 6-13
Adjusting the front and rear brake lever
free play ................................................................ 6-13
Checking the front and rear brake pads ................ 6-14
Checking the brake fluid level ............................... 6-14
6 Changing the brake fluid ....................................... 6-15
Adjusting the autolube pump ................................ 6-15
Checking and lubricating the cables ..................... 6-16
Lubricating the front and rear brakes levers .......... 6-16
Checking and lubricating the centerstand ............. 6-16
Checking the front fork .......................................... 6-17
Checking the steering ........................................... 6-17
Checking the wheel bearings ................................ 6-18
Battery ................................................................... 6-18
Replacing the fuse ................................................ 6-20
Replacing a headlight bulb .................................... 6-20
Replacing tail/brake light bulb ............................... 6-21
Replacing a turn signal light bulb .......................... 6-22
Troubleshooting ..................................................... 6-22
Troubleshooting chart ............................................ 6-23
Engine overheating ............................................... 6-24
Page 44 of 84

PERIODIC MAINTENANCE AND MINOR REPAIR
6
1 * Fuel line• Check fuel hoses and vacuum hose for cracks or damage.√√√√ √
2 Spark plug• Replace.√√√√ √
3 Air filter element• Clean.√√• Replace.√√
4 * Battery• Check electrolyte level and specific gravity.
√√√√ √
• Make sure that the breather hose is properly routed.
• Check operation, fluid level and vehicle for fluid leakage.
√√√√√ √
5 * Front brake(See NOTE on page 6-4.)
• Replace brake pads. Whenever worn to the limit
• Check operation, fluid level and vehicle for fluid leakage.
√√√√√ √
6 * Rear brake(See NOTE on page 6-4.)
• Replace brake pads. Whenever worn to the limit
7 * Brake hoses• Check for cracks or damage.√√√√ √• Replace. (See NOTE on page 6-4.) Every 4 years
8 * Wheels• Check runout and for damage.√√√√
EAU03686
Periodic maintenance and lubrication chart
NOTE :
•The annual checks must be performed every year, except if a kilometer-based maintenance is performed instead.
•From 30,000 km, repeat the maintenance intervals starting from 6,000 km.
•Items marked with an asterisk should be performed by a Yamaha dealer as they require special tools, data and technical skills.
ODOMETER READING (x 1,000 km)
NO. ITEMCHECK OR MAINTENANCE JOB
1
ANNUAL
CHECK
6121824
6-2
Page 45 of 84

PERIODIC MAINTENANCE AND MINOR REPAIR
6
• Check tread depth and for damage.
9 * Tires• Replace if necessary.
√√√√ √
• Check air pressure.
• Correct if necessary.
10 * Wheel bearings• Check bearing for looseness or damage.√√√√
11 * Steering bearings• Check bearing play and steering for roughness.√√√√√• Lubricate with lithium-soap-based grease. Every 24,000 km
12 * Chassis fasteners• Make sure that all nuts, bolts and screws are
√√√√ √
properly tightened.
13 Centerstand• Check operation.
√√√√ √
• Lubricate.
14 * Front fork• Check operation and for oil leakage.√√√√
15 * Shock absorber assembly• Check operation and shock absorber for oil leakage.√√√√
16 * Carburetor• Check starter (chocke) operation.
√√√√√ √
• Adjust engine idling speed.
17 * Autolube pump• Check operation.
√√√√
• Bleed if necessary.
18 Final transmission oil• Check vehicle for oil leakage.√√ √• Change.√√√
19 * V-belt• Replace. Every 10,000 km
20 * Front and rear brake
• Check operation.√√√√√ √
switches
ODOMETER READING (x 1,000 km)
NO. ITEMCHECK OR MAINTENANCE JOB
1
ANNUAL
CHECK
6121824
6-3
Page 49 of 84

PERIODIC MAINTENANCE AND MINOR REPAIR
6
EWA00062
•Make sure that no foreign
material enters the final trans-
mission case.
•Make sure that no oil gets on
the tire or wheel.
7. Check the final transmission case
for oil leakage. If oil is leaking,
check for the cause.
WARNING
EAU04228
Final transmission oil
The final transmission case must be
checked for oil leakage before each
ride. If any leakage is found, have a
Yamaha dealer check and repair the
scooter. In addition, the final transmis-
sion oil must be changed as follows at
the intervals specified in the periodic
maintenance and lubrication chart.
1. Start the engine, warm it up by
riding the scooter for several mi-
nutes, and then stop the engine.2. Place the scooter on the
centerstand.
3. Place an oil pan under the final
transmission case to collect the
used oil.
4. Remove the oil filler cap and drain
bolt to drain the oil from the final
transmission case.
5. Install the final transmission oil
drain bolt, and then tighten it to
the specified torque.
Tightening torque:
Final transmission oil drain bolt:
18 Nm (1.8 m
•kgf)
6. Add the specified amount of the
recommended final transmission
oil, and then install and tighten the
oil filler cap.
Recommended final transmission
oil:
See page 8-1.
Oil quantity:
0.13 L
12ZAUM0273
1. Final transmission oil drain bolt
2. Oil filler cap
6-7
Page 55 of 84

PERIODIC MAINTENANCE AND MINOR REPAIR
6
EAUM0056
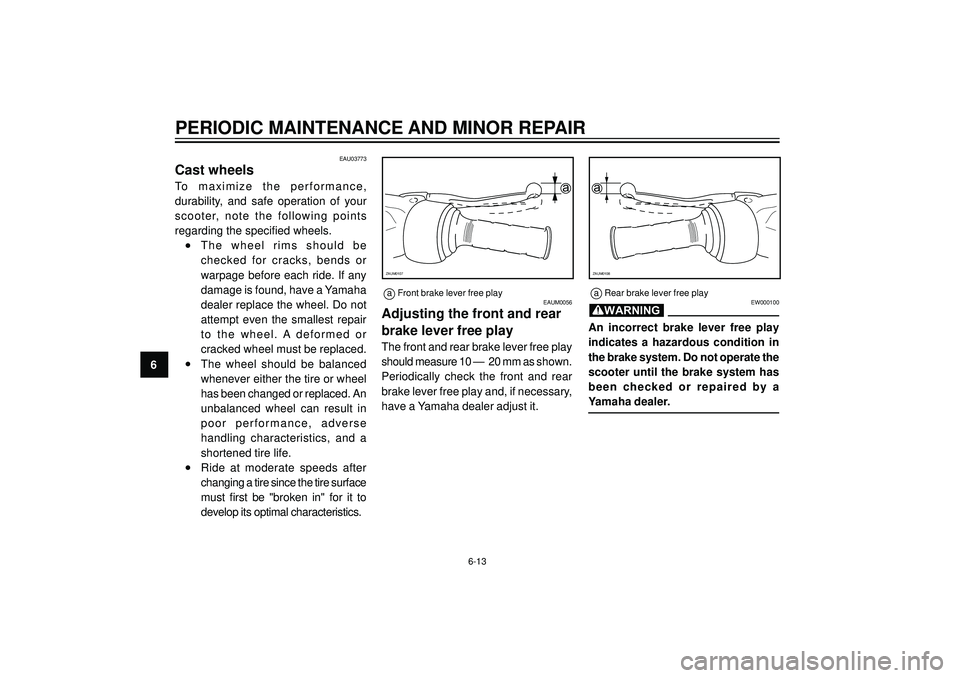
Adjusting the front and rear
brake lever free play
The front and rear brake lever free play
should measure 10 — 20 mm as shown.
Periodically check the front and rear
brake lever free play and, if necessary,
have a Yamaha dealer adjust it.
EW000100
An incorrect brake lever free play
indicates a hazardous condition in
the brake system. Do not operate the
scooter until the brake system has
been checked or repaired by a
Yamaha dealer.
WARNING
a
ZAUM0107
a
ZAUM0108
a Front brake lever free playa Rear brake lever free play
6-13
EAU03773
Cast wheels
To maximize the performance,
durability, and safe operation of your
scooter, note the following points
regarding the specified wheels.
•The wheel rims should be
checked for cracks, bends or
warpage before each ride. If any
damage is found, have a Yamaha
dealer replace the wheel. Do not
attempt even the smallest repair
to the wheel. A deformed or
cracked wheel must be replaced.
•The wheel should be balanced
whenever either the tire or wheel
has been changed or replaced. An
unbalanced wheel can result in
poor performance, adverse
handling characteristics, and a
shortened tire life.
•Ride at moderate speeds after
changing a tire since the tire surface
must first be "broken in" for it to
develop its optimal characteristics.
Page 59 of 84

PERIODIC MAINTENANCE AND MINOR REPAIR
6
EAU02939
Checking the front fork
The condition and operation of the front
fork must be checked as follows at the
intervals specified in the periodic main-
tenance and lubrication chart.
To check the condition
EW000115
Securely support the scooter so that
there is no danger of it falling over.
Check the inner tubes for scratches,
damage and excessive oil leakage.
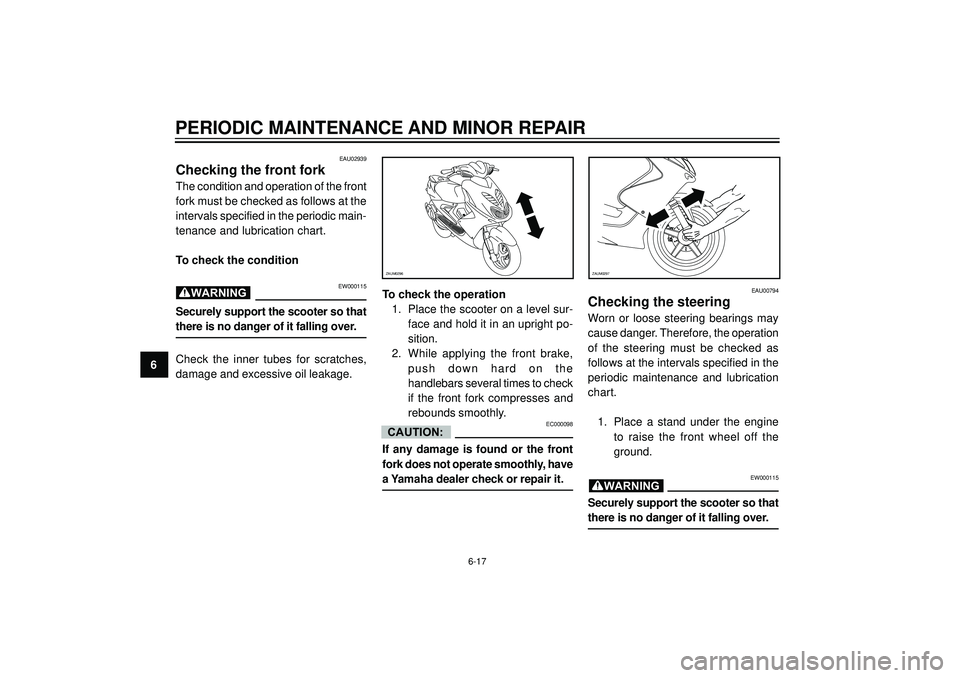
WARNINGTo check the operation
1. Place the scooter on a level sur-
face and hold it in an upright po-
sition.
2. While applying the front brake,
push down hard on the
handlebars several times to check
if the front fork compresses and
rebounds smoothly.
EC000098
If any damage is found or the front
fork does not operate smoothly, have
a Yamaha dealer check or repair it.
CAUTION:
EAU00794
Checking the steering
Worn or loose steering bearings may
cause danger. Therefore, the operation
of the steering must be checked as
follows at the intervals specified in the
periodic maintenance and lubrication
chart.
1. Place a stand under the engine
to raise the front wheel off the
ground.
EW000115
Securely support the scooter so that
there is no danger of it falling over.
WARNING
6-17
ZAUM0296ZAUM0297
Page 60 of 84

PERIODIC MAINTENANCE AND MINOR REPAIR
6
EAU01144
Checking the wheel bearings
The front and rear wheel bearings must
be checked at the intervals specified in
the periodic maintenance and
lubrication chart. If there is play in the
wheel hub or if the wheel does not turn
smoothly, have a Yamaha dealer check
the wheel bearings.
1
ZAUM0281
1. Battery
EAUM0049
Battery
A poorly maintained battery will corrode
and discharge quickly. The electrolyte
level, battery lead connections and
breather hose routing should be
checked before each ride and at the
intervals specified in the periodic main-
tenance and lubrication chart.
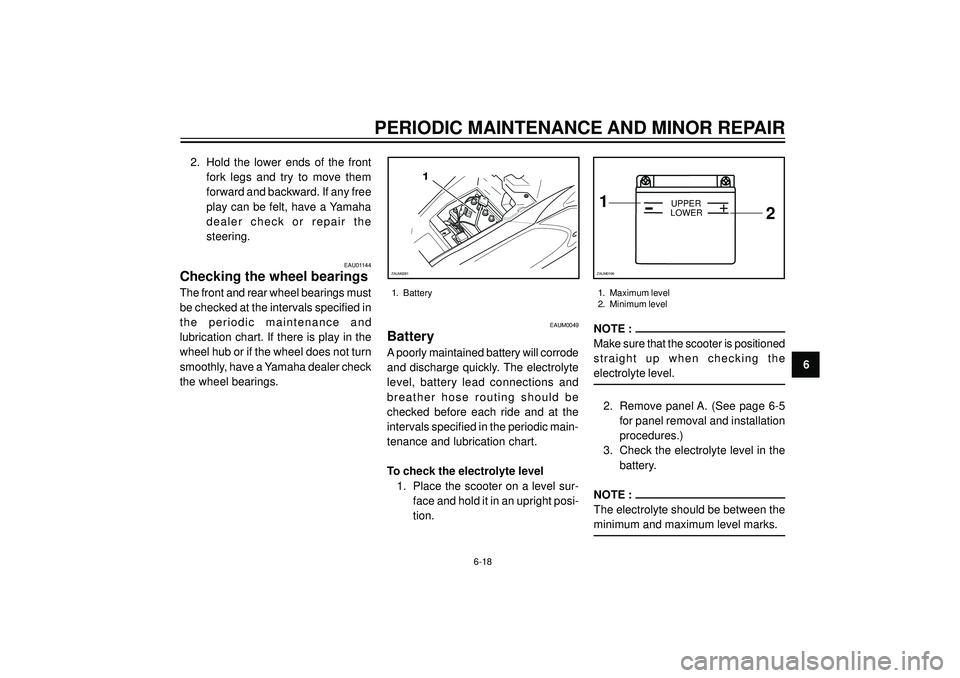
To check the electrolyte level
1. Place the scooter on a level sur-
face and hold it in an upright posi-
tion.
NOTE :
Make sure that the scooter is positioned
straight up when checking the
electrolyte level.
2. Remove panel A. (See page 6-5
for panel removal and installation
procedures.)
3. Check the electrolyte level in the
battery.
NOTE :
The electrolyte should be between the
minimum and maximum level marks.
1
2+UPPER
LOWER
ZAUM0106
1. Maximum level
2. Minimum level
6-18
2. Hold the lower ends of the front
fork legs and try to move them
forward and backward. If any free
play can be felt, have a Yamaha
dealer check or repair the
steering.