2003 VOLVO XC70 spare tire
[x] Cancel search: spare tirePage 48 of 257

2003 VOLVO XC70
3. Not in use
4. Stability Traction Control (STC)*/Dynamic Stability Traction Contro\
l (DSTC)**
Press this switch for at least half a second to turn the Spin Control (\
SC) function of the STC/DSTC system on
or off. An LED in the switch will light up to indicate that the system i\
s on. See
pages 20-21 for more
information on STC/DSTC. The SC function should be switched off if you, \
for any reason, temporarily have
to drive with tires of different dimensions (e.g., spare tire).
To help reduce the risk that the SC function is turned off inadvertently\
, the switch must be held in for at least
half a second to disable this function. " STC/DSTC SPIN CONTROL OFF" wil\
l be displayed in the text
window.
WARNING!
Please be aware that the car's handling characteristics may be affected \
if the Spin Control function is
switched off.
5. Not in use
6. This button is used to temporarily disconnect alarm sensors. See
page 79 for further information.
7. Not in use
8. Auxiliary socket
This 12 volt socket can be used to plug in certain accessories such as c\
ellular telephones, etc. The ignition
key must be in position 1 (or higher) for the auxiliary socket to func\
tion.
NOTE: The auxiliary sockets can also be used for cigarette lighters, which are\
available at your Volvo
retailer.
* Standard on all models except the T5 turbo.
** Standard on the T5 turbo, optional on all other models.
pg. 32 Trip computer (option)
file:///K|/ownersdocs/2003/2003_XC70/03xc70_02a.htm (11 of 13)12/30/20\
06 4:17:53 PM
Page 81 of 257
2003 VOLVO XC70
2 0 0 3
VOLVO XC70
Chapter 4 - Interior
pg. 55 Interior
Front seats (electrically operated) 56
Front seats (manually operated) 58
Storage compartments 59
Storage compartment, front 60
Rear seat and cargo area 63
Spare tire 72
Auxiliary seat in cargo area, Extra handgrip -
XC70 73
Interior lighting 74
pg. 56 Front seats
file:///K|/ownersdocs/2003/2003_XC70/03xc70_04a.htm (1 of 11)12/30/200\
6 4:17:56 PM
Page 103 of 257
2003 VOLVO XC70
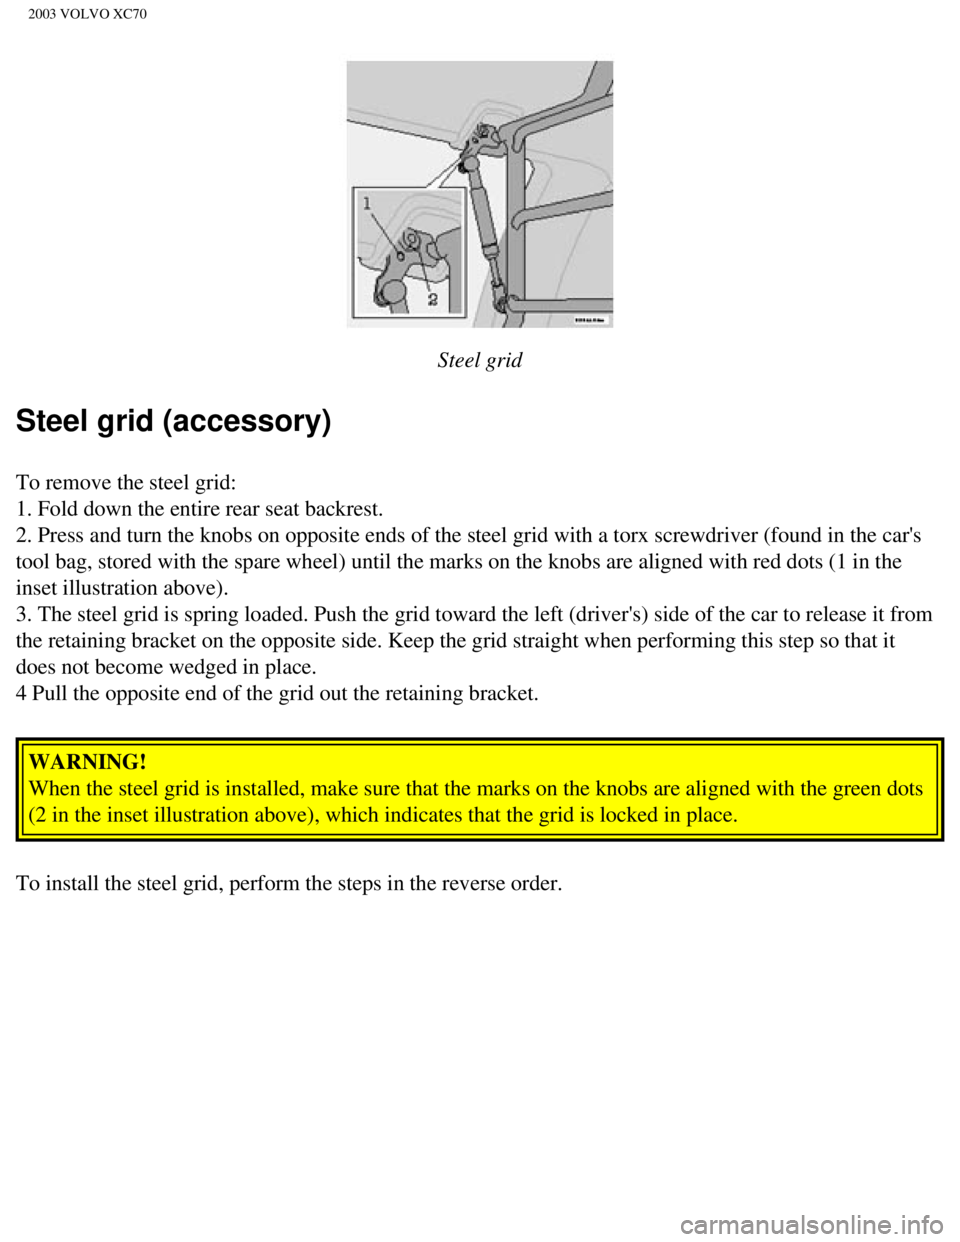
Steel grid
Steel grid (accessory)
To remove the steel grid:
1. Fold down the entire rear seat backrest.
2. Press and turn the knobs on opposite ends of the steel grid with a to\
rx screwdriver (found in the car's
tool bag, stored with the spare wheel) until the marks on the knobs are\
aligned with red dots (1 in the
inset illustration above).
3. The steel grid is spring loaded. Push the grid toward the left (driv\
er's) side of the car to release it from
the retaining bracket on the opposite side. Keep the grid straight when \
performing this step so that it
does not become wedged in place.
4 Pull the opposite end of the grid out the retaining bracket. WARNING!
When the steel grid is installed, make sure that the marks on the knobs \
are aligned with the green dots
(2 in the inset illustration above), which indicates that the grid is \
locked in place.
To install the steel grid, perform the steps in the reverse order.
file:///K|/ownersdocs/2003/2003_XC70/03xc70_04b.htm (12 of 21)12/30/20\
06 4:17:57 PM
Page 107 of 257
2003 VOLVO XC70
Withdraw the cargo area cover, pull it over the luggage compartment and \
hook it in the holes in the rear
cargo area pillars. Removing the cargo area cover:
l Press the end pieces of the cargo area cover inward, pull up and remove.\
l To fit in place: Press the end pieces of the cargo area cover down into \
the holders.
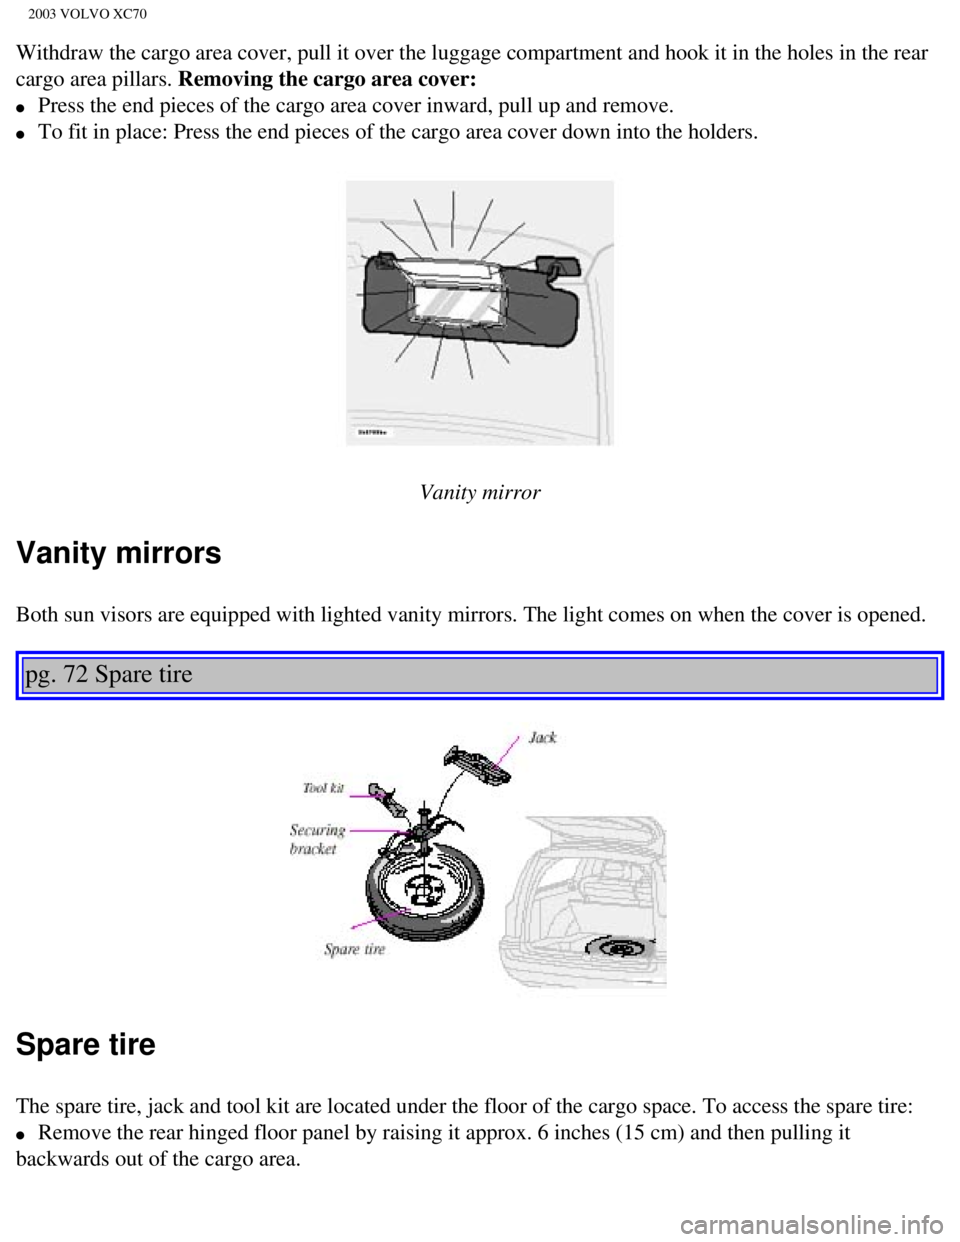
Vanity mirror
Vanity mirrors
Both sun visors are equipped with lighted vanity mirrors. The light come\
s on when the cover is opened.
pg. 72 Spare tire
Spare tire
The spare tire, jack and tool kit are located under the floor of the car\
go space. To access the spare tire:
l Remove the rear hinged floor panel by raising it approx. 6 inches (15 c\
m) and then pulling it
backwards out of the cargo area.
file:///K|/ownersdocs/2003/2003_XC70/03xc70_04b.htm (16 of 21)12/30/20\
06 4:17:57 PM
Page 108 of 257
2003 VOLVO XC70
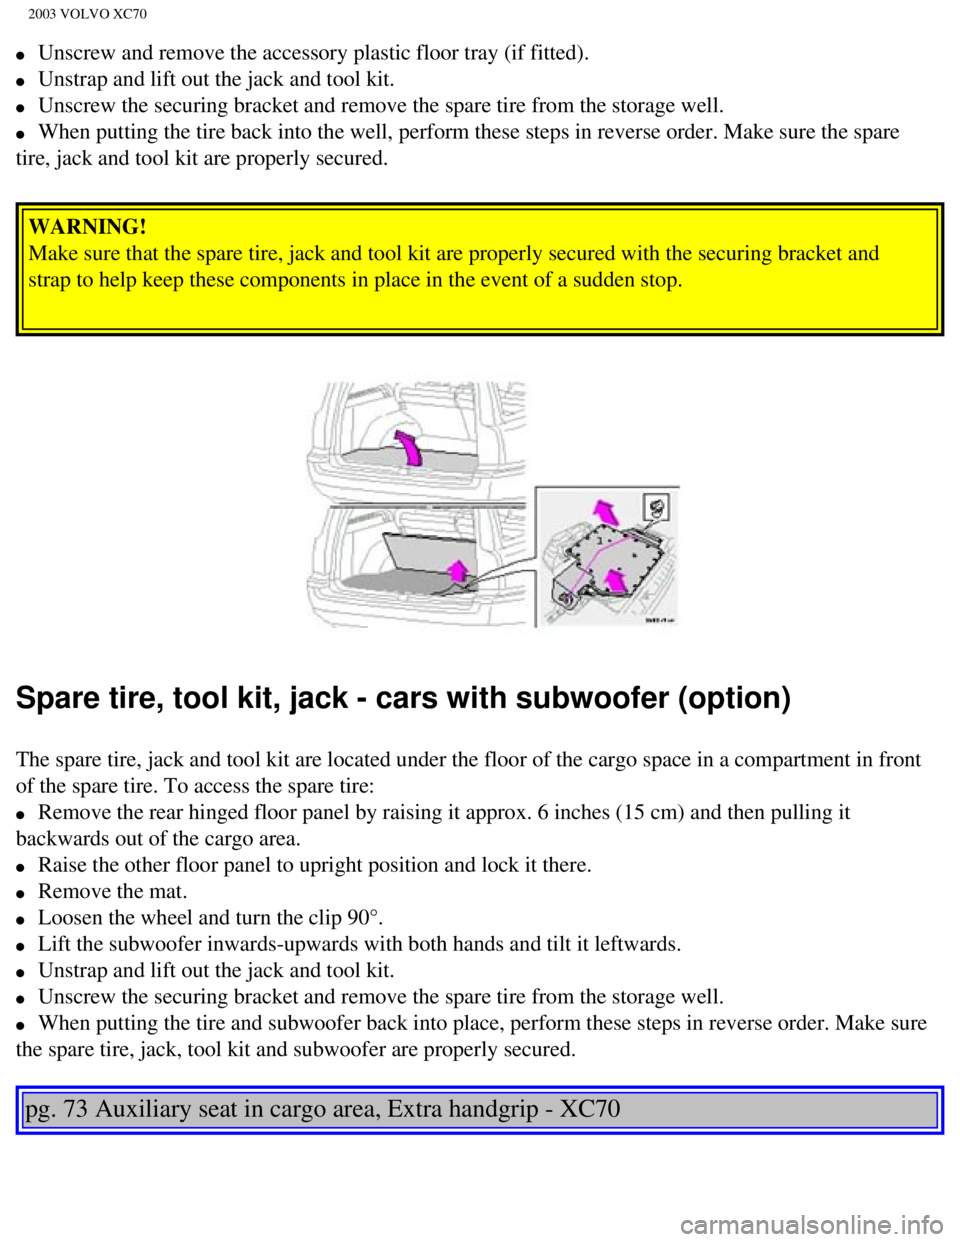
l Unscrew and remove the accessory plastic floor tray (if fitted).
l Unstrap and lift out the jack and tool kit.
l Unscrew the securing bracket and remove the spare tire from the storage \
well.
l When putting the tire back into the well, perform these steps in reverse\
order. Make sure the spare
tire, jack and tool kit are properly secured.
WARNING!
Make sure that the spare tire, jack and tool kit are properly secured wi\
th the securing bracket and
strap to help keep these components in place in the event of a sudden st\
op.
Spare tire, tool kit, jack - cars with subwoofer (option)
The spare tire, jack and tool kit are located under the floor of the car\
go space in a compartment in front
of the spare tire. To access the spare tire:
l Remove the rear hinged floor panel by raising it approx. 6 inches (15 c\
m) and then pulling it
backwards out of the cargo area.
l Raise the other floor panel to upright position and lock it there.
l Remove the mat.
l Loosen the wheel and turn the clip 90°.
l Lift the subwoofer inwards-upwards with both hands and tilt it leftwards\
.
l Unstrap and lift out the jack and tool kit.
l Unscrew the securing bracket and remove the spare tire from the storage \
well.
l When putting the tire and subwoofer back into place, perform these steps\
in reverse order. Make sure
the spare tire, jack, tool kit and subwoofer are properly secured.
pg. 73 Auxiliary seat in cargo area, Extra handgrip - XC70
file:///K|/ownersdocs/2003/2003_XC70/03xc70_04b.htm (17 of 21)12/30/20\
06 4:17:57 PM
Page 139 of 257

2003 VOLVO XC70
pattern, load-, speed-, traction-, temperature-, and treadwear rating. N\
ever drive on mixed tires, except
for brief periods when the temporary spare tire is in use.
Always use properly inflated tires of correct dimensions. Tire size and \
inflation pressures are shown on
the tire pressure label located inside the fuel filler door.
Tire Rotation
Volvo recommends rotating the tires every 7,500 miles (12,000 km). Tir\
es should be rotated front-to-
back/back-to-front only. Tires must maintain the same direction of rotat\
ion throughout their lifetime, and
should never be rotated from one side of the vehicle to the other.
Temporary Spare
The temporary spare tire is for temporary, low-speed, short-distance use\
only. Replace it with a full-
sized tire as soon as possible, in accordance with "Tire Rotation" above\
. Do not drive on the temporary
spare at speeds above 50 m.p.h. (80km/h) or for distances greater than\
50 miles (80 km).
Never install snow chains on a temporary spare.
pg. 95 Driving economy
Economical driving conserves natural resources
Better driving economy may be obtained by thinking ahead, avoiding rapid\
starts and stops and
adjusting the speed of your vehicle to immediate traffic conditions. Obs\
erve the following rules:
l Bring the engine to normal operating temperature as soon as possible by \
driving with a light foot on
the accelerator pedal for the first few minutes of operation. A cold eng\
ine uses more fuel and is subject
to increased wear.
l Whenever possible, avoid using the car for driving short distances. This\
does not allow the engine to
reach normal operating temperature.
l Drive carefully and avoid rapid acceleration and hard braking.
l Do not exceed posted speed limits.
l Avoid carrying unnecessary items (extra load) in the car.
l Maintain correct tire pressure. Check tire pressure regularly (when tir\
es are cold).
l Remove snow tires when threat of snow or ice has ended.
l Note that roof racks, ski racks, etc., increase air resistance and also \
fuel consumption.
l Avoid using automatic transmission kickdown feature unless necessary.
l Avoid using the air conditioning when it is not required. When engaged, \
the conditioner's compressor
places an additional load on the engine. However, at higher driving spee\
ds, fuel consumption will be
file:///K|/ownersdocs/2003/2003_XC70/03xc70_06a.htm (16 of 22)12/30/20\
06 4:18:00 PM
Page 146 of 257
2003 VOLVO XC70
pg. 99 Emergency towing
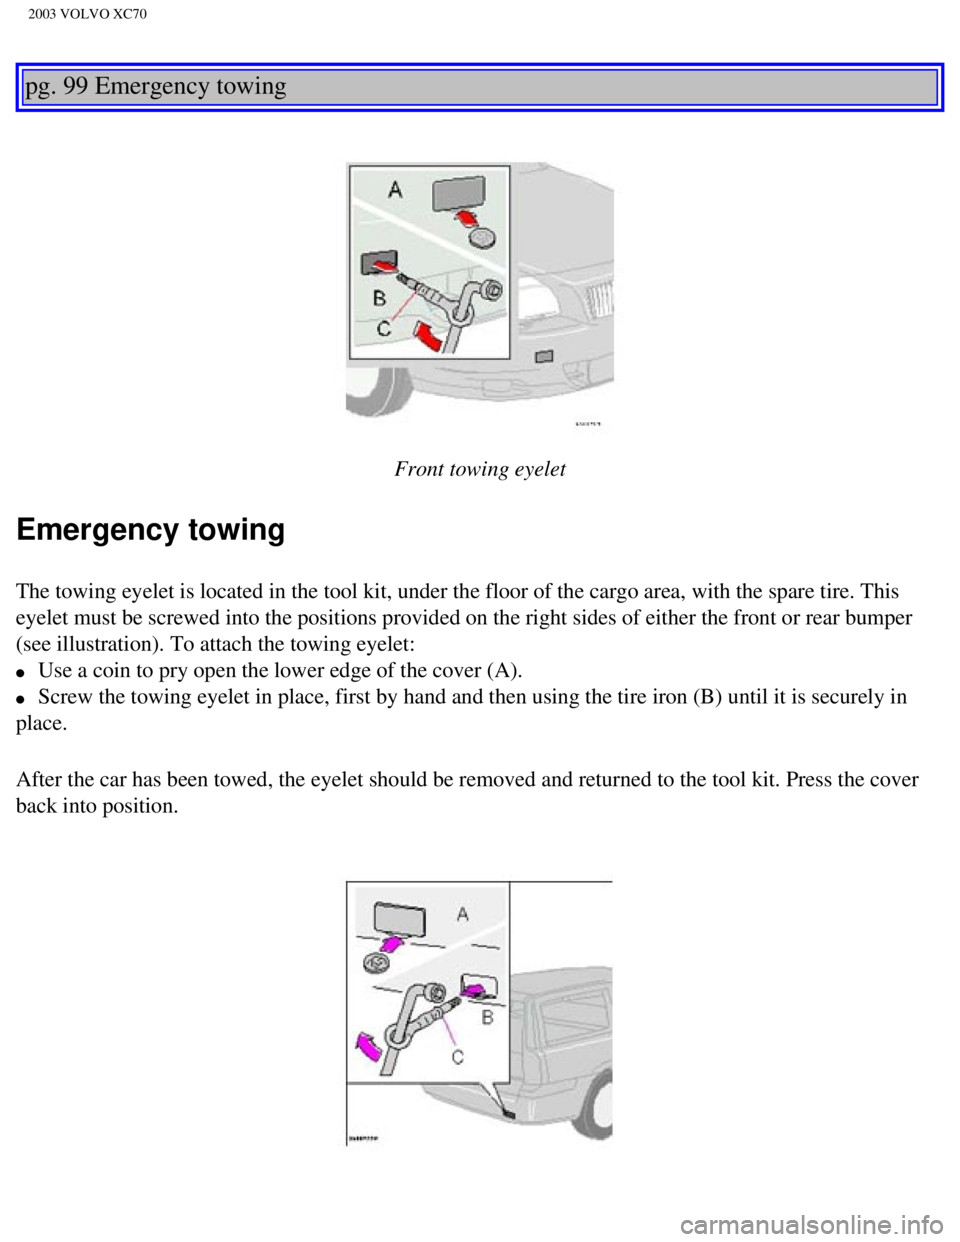
Front towing eyelet
Emergency towing
The towing eyelet is located in the tool kit, under the floor of the car\
go area, with the spare tire. This
eyelet must be screwed into the positions provided on the right sides of\
either the front or rear bumper
(see illustration). To attach the towing eyelet:
l Use a coin to pry open the lower edge of the cover (A).
l Screw the towing eyelet in place, first by hand and then using the tire \
iron (B) until it is securely in
place.
After the car has been towed, the eyelet should be removed and returned \
to the tool kit. Press the cover
back into position.
file:///K|/ownersdocs/2003/2003_XC70/03xc70_06b.htm (1 of 10)12/30/200\
6 4:18:00 PM
Page 148 of 257

2003 VOLVO XC70
Towing cars with all wheel drive/front wheel drive
Volvo recommends the use of flat bed equipment. If wheel lift equipment \
must be used, please use
extreme caution to help avoid damage to the car. In this case, the car should be towed with the rear
wheels on the ground if at all possible.
If it is absolutely necessary to tow the vehicle with the front wheels o\
n the ground, please refer to the
towing information on the previous page.
CAUTION:
l The car must not be driven with wheels of different dimensions/specifica\
tions or with a spare tire
other than the one that came with the car. The use of different size whe\
els can seriously damage your
car's transmission.
l Sling-type equipment applied at the front will damage radiator and air c\
onditioning lines.
l It is equally important not to use sling-type equipment at the rear or a\
pply lifting equipment inside the
rear wheels; serious damage to the rear axle may result.
l If the car is being towed on a flat bed truck, the towing eyelets must n\
ot be used to secure the car on
the flat bed. Consult the tow truck operator.
WARNING!
l Do not use the towing eyelets to pull the car up onto a flat bed tow
truck.
file:///K|/ownersdocs/2003/2003_XC70/03xc70_06b.htm (3 of 10)12/30/200\
6 4:18:00 PM