2003 VOLVO S80 change wheel
[x] Cancel search: change wheelPage 41 of 109

Use the switch on the front door armrests to lock/unlock the car from the inside.WARNING!
If the doors are locked while driving, this may hinder rapid access to the occupants of the car in the event of an
accident. (Also see information on "Child safety locks").
Note: To help prevent accidentally locking the keys in the car, the central locking system is designed to unlock the
doors immediately if the key is left in the ignition switch, the car is locked using the lock button on the door and the
door is then closed. A sound from the lock will be audible at this time.
Please note that this function will not unlock the doors if the engine is running.
Immobilizer (start inhibitor)
Each of the keys supplied with your car contains a coded transmitter. The code in the key is transmitted to an antenna
in the ignition switch where it is compared to the code stored in the start inhibitor module. The car will start only with
a properly coded key.
If you misplace a key, take the other keys to an authorized Volvo retailer for reprogramming as an antitheft measure.
This device complies with part 15 of the FCC rules. Operation is subject to the following condition: (1) This device
may not cause harmful interference, and (2) this device must accept any interference received, including interference
that may cause undesired operation.
Exterior Courtesy lights
Home Safe System
When you leave your car at night, you can make use of the courtesy lighting function:
Remove the key from the ignition switch.
Pull the direction indicator lever towards the steering wheel (as when using the headlight flasher function).
Exit the car and lock the doors.
The headlights, parking lights, license plate lights and the lights in the sideview mirrors will now come on and remain
on for 30, 60 or 90 seconds (the time interval is at your discretion and can be changed by an authorized Volvo retailer).
Approach lighting
When approaching the car at night, press the yellow button in the central locking remote control (see illustration on
page 61
). This lights up the interior courtesy light, parking lights, license plate lights and the lights in the sideview
mirrors.
pg. 61 Remote keyless entry system
ProCarManuals.com
Page 63 of 109

cornering (turning) traction.
TEMPERATURE
The temperature grades are AA (the highest), A, B, and C, representing the tire's resistance to the generation of heat
and its ability to dissipate heat when tested under controlled conditions on a specified indoor laboratory test wheel.
Sustained high temperature can cause the material of the tire to degenerate and reduce tire life, and excessive
temperature can lead to sudden tire failure. The grade C corresponds to a minimum level of performance that all
passenger car tires must meet under the Federal Motor Safety Standard No. 109. Grades B and A represent higher
levels of performance on the laboratory test wheel than the minimum required by law.
WARNING!
The temperature grade for this tire is established for a tire that is properly inflated and not overloaded. Excessive
speed, under-inflation, or excessive loading, either separately or in combination, can cause heat buildup and possible
tire failure.
pg. 96 Changing wheels
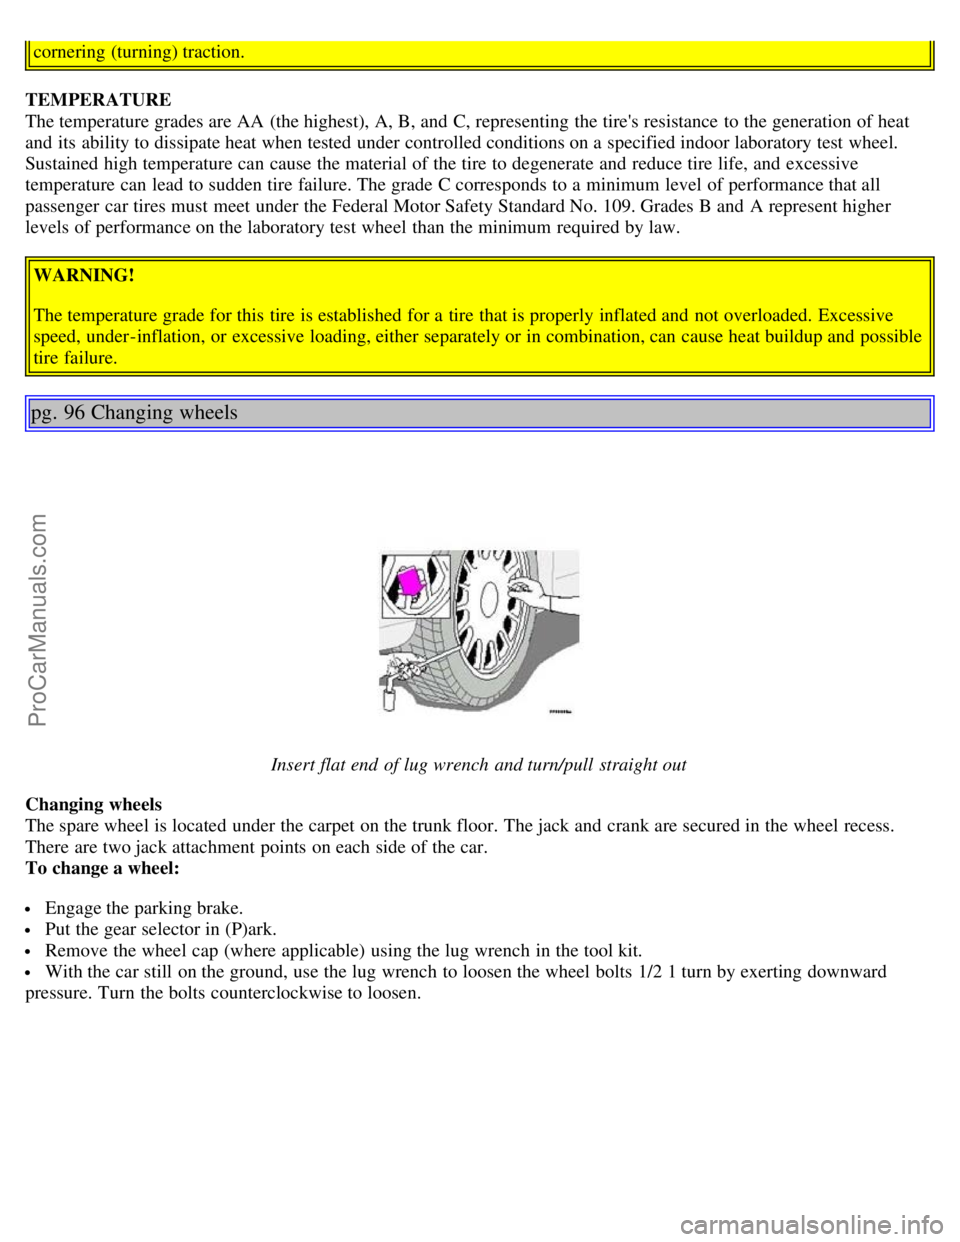
Insert flat end of lug wrench and turn/pull straight out
Changing wheels
The spare wheel is located under the carpet on the trunk floor. The jack and crank are secured in the wheel recess.
There are two jack attachment points on each side of the car.
To change a wheel:
Engage the parking brake.
Put the gear selector in (P)ark.
Remove the wheel cap (where applicable) using the lug wrench in the tool kit.
With the car still on the ground, use the lug wrench to loosen the wheel bolts 1/2 1 turn by exerting downward
pressure. Turn the bolts counterclockwise to loosen.
ProCarManuals.com
Page 64 of 109

Loosen wheel bolts
Position the jack on the bar in the attachment (A in the illustration below) and crank while simultaneously guiding
the base of the jack to the ground. The base of the jack must be flat on a level, firm, non-slippery surface. Before
raising the car, check that the jack is still correctly positioned in the attachment.
Raise the vehicle until the wheel to be changed is lifted off the ground.
Unscrew the wheel bolts completely and carefully remove the wheel so as not to damage the thread on the studs.
Attaching the jack
NOTE: To avoid excessive wear and the necessity of rebalancing, mark and reinstall wheels in the same location and
position as before removal. To lessen the chance of imbalance, each wheel hub is equipped with a guide stud to ensure
that a removed wheel can be reinstalled in its original position (as when changing over to winter tires/wheels).
pg. 97 Changing wheels
Correct tightening order for wheel bolts
Installing the wheel
Clean the contact surfaces on the wheel and hub.
Lift the wheel and place it on the hub. Make sure that you align the wheel with the guide stud on the wheel hub prior
to installation.
ProCarManuals.com
Page 79 of 109

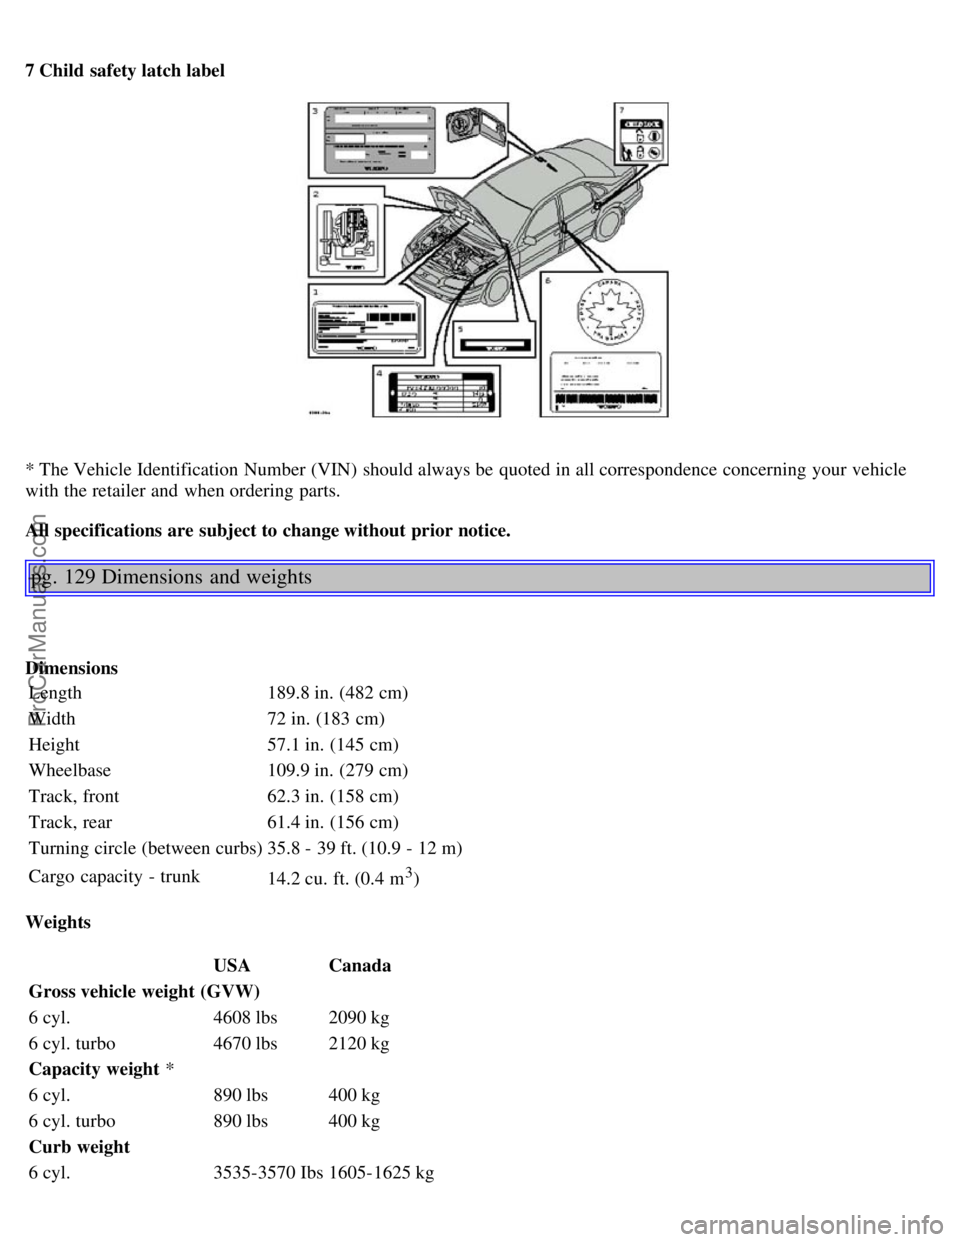
7 Child safety latch label
* The Vehicle Identification Number (VIN) should always be quoted in all correspondence concerning your vehicle
with the retailer and when ordering parts.
All specifications are subject to change without prior notice.
pg. 129 Dimensions and weights
DimensionsLength 189.8 in. (482 cm)
Width 72 in. (183 cm)
Height 57.1 in. (145 cm)
Wheelbase 109.9 in. (279 cm)
Track, front 62.3 in. (158 cm)
Track, rear 61.4 in. (156 cm)
Turning circle (between curbs) 35.8 - 39 ft. (10.9 - 12 m)
Cargo capacity - trunk 14.2 cu. ft. (0.4 m
3)
Weights USACanada
Gross vehicle weight (GVW)
6 cyl. 4608 lbs2090 kg
6 cyl. turbo 4670 lbs2120 kg
Capacity weight *
6 cyl. 890 lbs400 kg
6 cyl. turbo 890 lbs400 kg
Curb weight
6 cyl. 3535-3570 Ibs1605-1625 kg
ProCarManuals.com
Page 82 of 109

DOT 4+ boiling point > 536°F (280° C) P/N 9437433
Volume: 0.6 US qt (0.6 liter)
Climate control system - refrigerant (R 134a)
Oil: PAG
Volume: 2.2 lbs (1000 g) R134a.
Fuel
Minimum octane requirement - AKI 87 (RON 91)
Volume (fuel tank): 21.1 US gals (80 liters)
Washer fluid reservoir
Volume: 6 cyl: 4.7 US qts. (4.5 liters)
All specifications are subject to change without prior notice.
pg. 132 Fuel system, Distributor ignition system, Suspension
Fuel system
The engine is equipped with a multiport fuel injection system.
Distributor ignition system
Firing order: 1-5-3-6-2-4
Distributor ignition setting: Not adjustable
Spark plugs: B 6294 T: P/N 271367-4 (or equivalent)
B 6294 S: P/N 272371-8 (or equivalent)
Spark plug gap: 0.028-0.032" (0.7-0.8 mm)
Tightening torque: 18.4 ft. lbs. (25 Nm)
WARNING!
The distributor ignition system operates at very high voltages. Special safety precautions must be followed to
prevent injury. Always turn the ignition off when:
Replacing distributor ignition components e.g. plugs, coil, etc.
Do not touch any part of the distributor ignition system while the engine is running. This may result in unintended
movements and body injury.
Front suspension
Spring strut suspension with integrated shock absorbers and control arms linked to the support frame. Power-assisted
rack and pinion steering. Safety type steering column.
The alignment specifications apply to an unladen car but include fuel, coolant and spare wheel.
Toe-in measured on the wheel rims: 2.3 mm +/ 0.8 mm
Toe-in measured on tire sides: 2.8 +/ 0.9 mm
Rear suspension
Individual rear wheel suspension with longitudinal support arms, double link arms and track rods.
ProCarManuals.com
Page 88 of 109

6. Selector knob:
Radio
Internal CD changer
CD
Station scan - press
TV (option on certain models)
External CD changer (option)
7. Radio - Station seek up/down
CD - Selecting next/previous track
8. Radio - Manual station selection
CD - Fast forward/backward
9. CD eject
10. Dolby Pro Logic - switching on
11. 2 channel stereo
12 3 channel stereo
13. CD slot
14. CD random play
15. Program type
16. News
17. Traffic information
18. Automatic presetting of radio stations
19. Display
pg. 138 Audio systems HU-611/HU-801
Switch on/off
Press the knob to switch on or turn off the radio.
Volume control
Turn the knob clockwise to increase volume. Volume control is electronic and does not have an end stop. If you have
a key pad in the steering wheel, increase or decrease the volume with the + or- buttons.
Bass
Adjust the bass by pressing the button to extend the control and turning it to the left (less bass) or to the right (more
ProCarManuals.com