Page 16 of 109
2 0 0 3
VOLVO S80
Chapter 2 - Instruments, switches and controls
pg. 21 Instruments, switches and controls
Interior22
Exterior23
Instruments24
Instrument panel25
Indicator and warning lights26
Text information window28
Switches in center console29
Trip computer30
Cruise control31
Light switch panel32
Manually unlocking the fuel filler door33
Turn signals, windshield wipers/washers34
Steering wheel adjustment/lock, ignition switch36
Warning flashers, heated mirrors/rear window/front seats37
Parking brake, auxiliary socket38
Electrically operated windows39
Rearview/sideview/vanity mirrors40
Sun roof41
Sun blinds42
pg. 22 Interior
ProCarManuals.com
Page 17 of 109
A
Locking and unlocking the car63/64
Alarm65
Power windows39
Sideview mirror controls40
B
Glove compartment55
C
Automatic transmission74
Geartronic76
Parking brake38
Center console switches29
D
Power seat adjustment52
Heated seats (option)37
Cleaning upholstery113
E
Folding rear seat58
Panel for long loads56
Folding down head restraint29
Adjusting center head restraint3
Child safety locks67
Integrated booster cushion13
pg. 23 Exterior
ProCarManuals.com
Page 31 of 109
2 0 0 3
VOLVO S80
Chapter 4 - Interior
pg. 51 Interior
Front seats52
Coat hanger53
Interior lighting54
Storage compartments55
Storage compartments in center console56
Spare tire, Cargo net in trunk57
Folding rear seat backrests, Carrying long loads58
pg. 52 Front seats
Electrically operated front seats
From the time the driver's door is unlocked, the driver's seat can be adjusted with the ignition off during a 10 minute
period, if the door remains opened . If the door is closed, the seat can be adjusted for 40 seconds.
1 - Power seat control panel
2 - Lumbar support
Turn the control for softer or firmer lumbar support.
ProCarManuals.com
Page 36 of 109
WARNING!
Packages on the rear window shelf can obscure vision and may become dangerous projectiles in the event of a
sudden stop or an accident.
Anchor any heavy objects to help prevent them from moving during sudden stops.
pg. 56 Storage compartment in center console, Long loads
Storage compartment in center console/cup holders
ProCarManuals.com
Page 37 of 109

Press button A to pop open the cup holder.
Press button B to open the storage space in the center console for cassettes, change holder, etc.
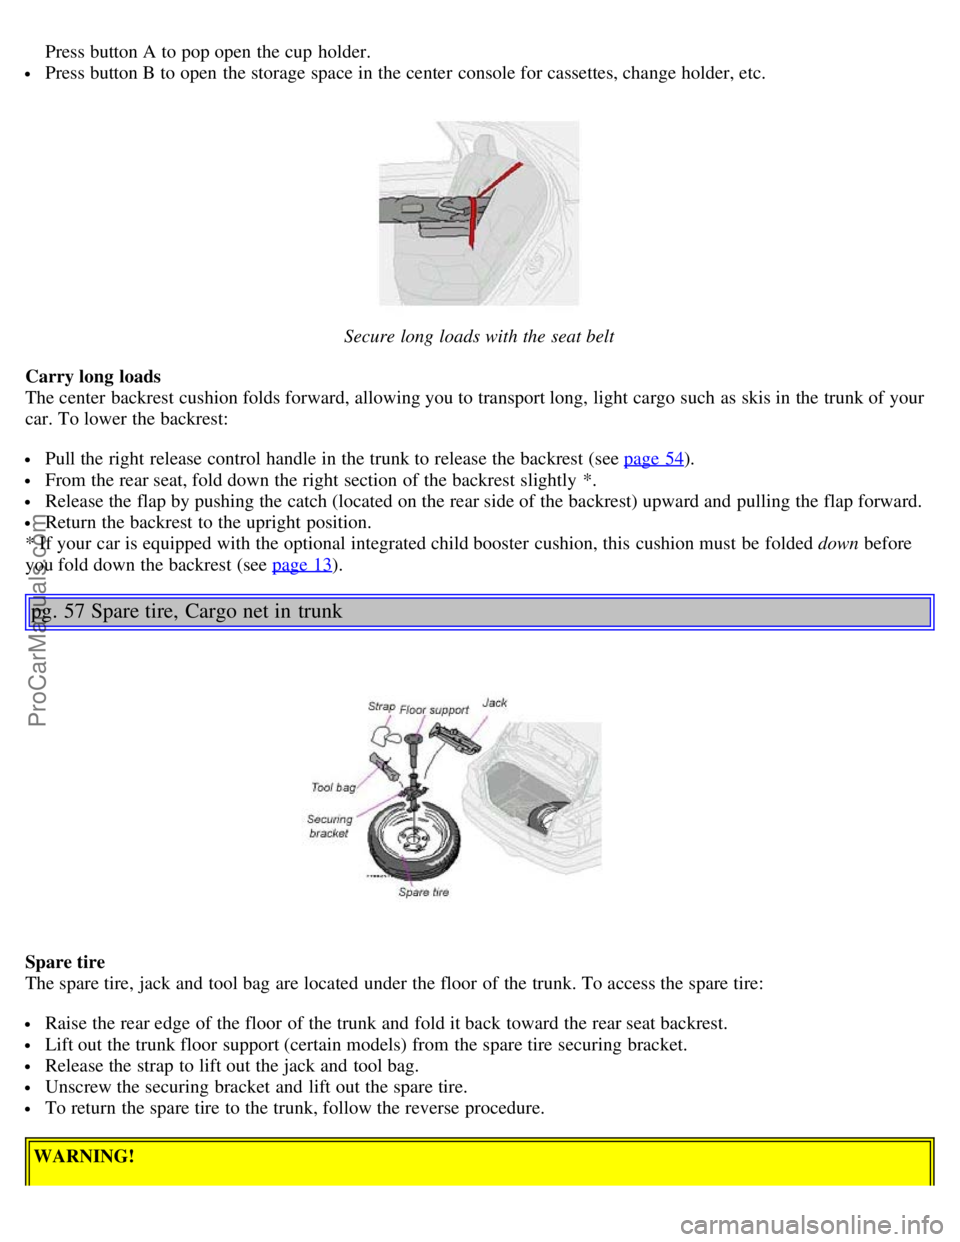
Secure long loads with the seat belt
Carry long loads
The center backrest cushion folds forward, allowing you to transport long, light cargo such as skis in the trunk of your
car. To lower the backrest:
Pull the right release control handle in the trunk to release the backrest (see page 54).
From the rear seat, fold down the right section of the backrest slightly *.
Release the flap by pushing the catch (located on the rear side of the backrest) upward and pulling the flap forward.
Return the backrest to the upright position.
* If your car is equipped with the optional integrated child booster cushion, this cushion must be folded down before
you fold down the backrest (see page 13
).
pg. 57 Spare tire, Cargo net in trunk
Spare tire
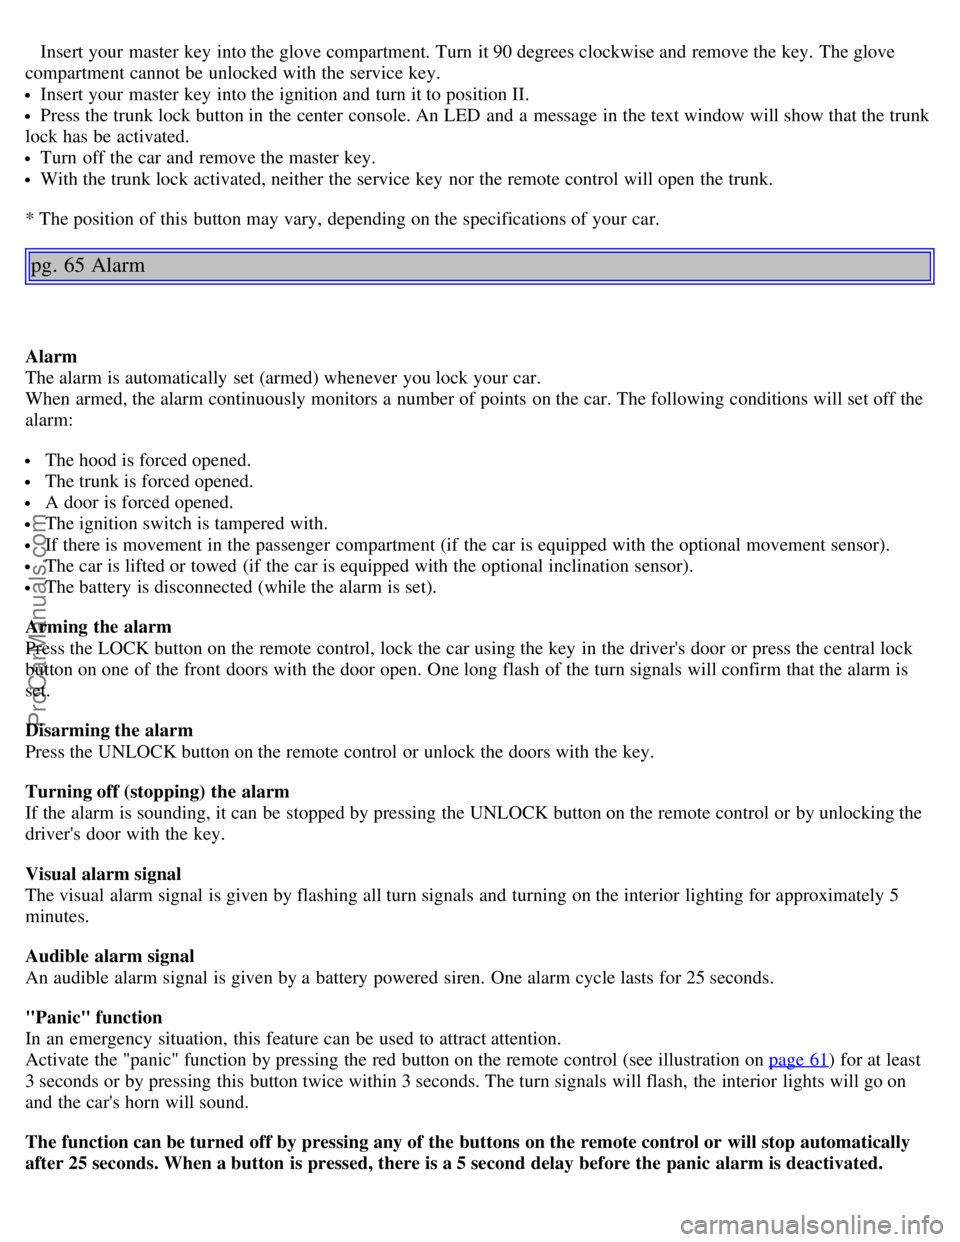
The spare tire, jack and tool bag are located under the floor of the trunk. To access the spare tire:
Raise the rear edge of the floor of the trunk and fold it back toward the rear seat backrest.
Lift out the trunk floor support (certain models) from the spare tire securing bracket.
Release the strap to lift out the jack and tool bag.
Unscrew the securing bracket and lift out the spare tire.
To return the spare tire to the trunk, follow the reverse procedure.
WARNING!
ProCarManuals.com
Page 46 of 109

Insert your master key into the glove compartment. Turn it 90 degrees clockwise and remove the key. The glove
compartment cannot be unlocked with the service key.
Insert your master key into the ignition and turn it to position II.
Press the trunk lock button in the center console. An LED and a message in the text window will show that the trunk
lock has be activated.
Turn off the car and remove the master key.
With the trunk lock activated, neither the service key nor the remote control will open the trunk.
* The position of this button may vary, depending on the specifications of your car.
pg. 65 Alarm
Alarm
The alarm is automatically set (armed) whenever you lock your car.
When armed, the alarm continuously monitors a number of points on the car. The following conditions will set off the
alarm:
The hood is forced opened.
The trunk is forced opened.
A door is forced opened.
The ignition switch is tampered with.
If there is movement in the passenger compartment (if the car is equipped with the optional movement sensor).
The car is lifted or towed (if the car is equipped with the optional inclination sensor).
The battery is disconnected (while the alarm is set).
Arming the alarm
Press the LOCK button on the remote control, lock the car using the key in the driver's door or press the central lock
button on one of the front doors with the door open. One long flash of the turn signals will confirm that the alarm is
set.
Disarming the alarm
Press the UNLOCK button on the remote control or unlock the doors with the key.
Turning off (stopping) the alarm
If the alarm is sounding, it can be stopped by pressing the UNLOCK button on the remote control or by unlocking the
driver's door with the key.
Visual alarm signal
The visual alarm signal is given by flashing all turn signals and turning on the interior lighting for approximately 5
minutes.
Audible alarm signal
An audible alarm signal is given by a battery powered siren. One alarm cycle lasts for 25 seconds.
"Panic" function
In an emergency situation, this feature can be used to attract attention.
Activate the "panic" function by pressing the red button on the remote control (see illustration on page 61
) for at least
3 seconds or by pressing this button twice within 3 seconds. The turn signals will flash, the interior lights will go on
and the car's horn will sound.
The function can be turned off by pressing any of the buttons on the remote control or will stop automatically
after 25 seconds. When a button is pressed, there is a 5 second delay before the panic alarm is deactivated.
ProCarManuals.com
Page 47 of 109

NOTE: This button will NOT unlock the car.
pg. 66 Alarm
Temporarily disconnecting the alarm sensor(s) - option
This button will only be found in cars equipped with the optional inclination and/or movement sensors.
In certain situations it may be desirable to turn off the optional inclination and movement alarm sensors if, for
example, you drive your car onto a ferry where the rocking of the boat could trigger the alarm or if a pet is left in the
car with the doors locked.
To temporarily turn off the inclination and movement alarm sensor from the alarm system:
From the time the ignition key is turned from the Drive position (position II) until you lock the car, you can press the
button in the center console *. The LED in the switch will light up and a message will be displayed in the text window
to indicate that the sensors are disconnected.
The car can then be locked in the usual way to set the alarm.
NOTE: The optional sensors are automatically reconnected to the alarm system the next time the car is unlocked and
then locked again.
LED alarm status signals
The status of the alarm system is indicated by the red LED at the top of the dash:
LED off - the alarm is not armed
LED flashes once per second - the alarm is armed
LED flashes rapidly before the ignition is switched on - the alarm has been triggered
Fault in the alarm system: If a fault has been detected in the alarm system, a message will be displayed in the text
window. Contact a Volvo retailer.
Automatic reset function
If the car is unlocked with the remote, the car will re-lock and the alarm will re-arm after 2 minutes unless a door or
the trunk has been opened.
* The position of this button may vary, depending on the specifications of your car.
pg. 67 Child safety locks - rear doors
ProCarManuals.com
Page 99 of 109

Geartronic..........76, 77
Kickdown..........76
Specifications..........130
Automatic transmission - cold starts..........75
Auxiliary socket..........29, 38
B
Backrests, rear seat - folding..........58
Battery..........87, 133
Battery maintenance..........123 -124
Replacing the battery..........124
Ventilation hose..........124
Blinds - rear/side rear windows..........42
Booster cushion..........13, 15
Booster cushion - integrated..........13
Brake failure warning light ..........26
Brake fluid..........122, 131
Brake system..........16
Bulbs (list)..........133
Bulbs - replacing..........104-110
C
Capacities (oils and fluids)..........127
, 131
Cargo net in trunk..........57
Catalytic converters - three-way..........89
Center console - switches..........29
Center head restraint - rear seat..........3
Central locking buttons..........63
Chains - winter driving..........93
Changing wheels..........96, 97
Child booster cushion ......... 13, 15
Child Restraint Anchorages ........ 12
Child safety..........12 -15
Child safety locks - rear doors..........67
Climate controls..........45 - 49
Climate system - general information..........48
Clock..........25
Coat hanger..........53
Cold weather driving..........87
Combination filter..........45, 49
Coolant..........116, 131
Cooling system..........78, 131
Courtesy light..........54
Courtesy lights (front) - replacing..........110
Courtesy lights - exterior..........60
Cruise control..........31
ProCarManuals.com