2003 VOLVO S80 light
[x] Cancel search: lightPage 75 of 109
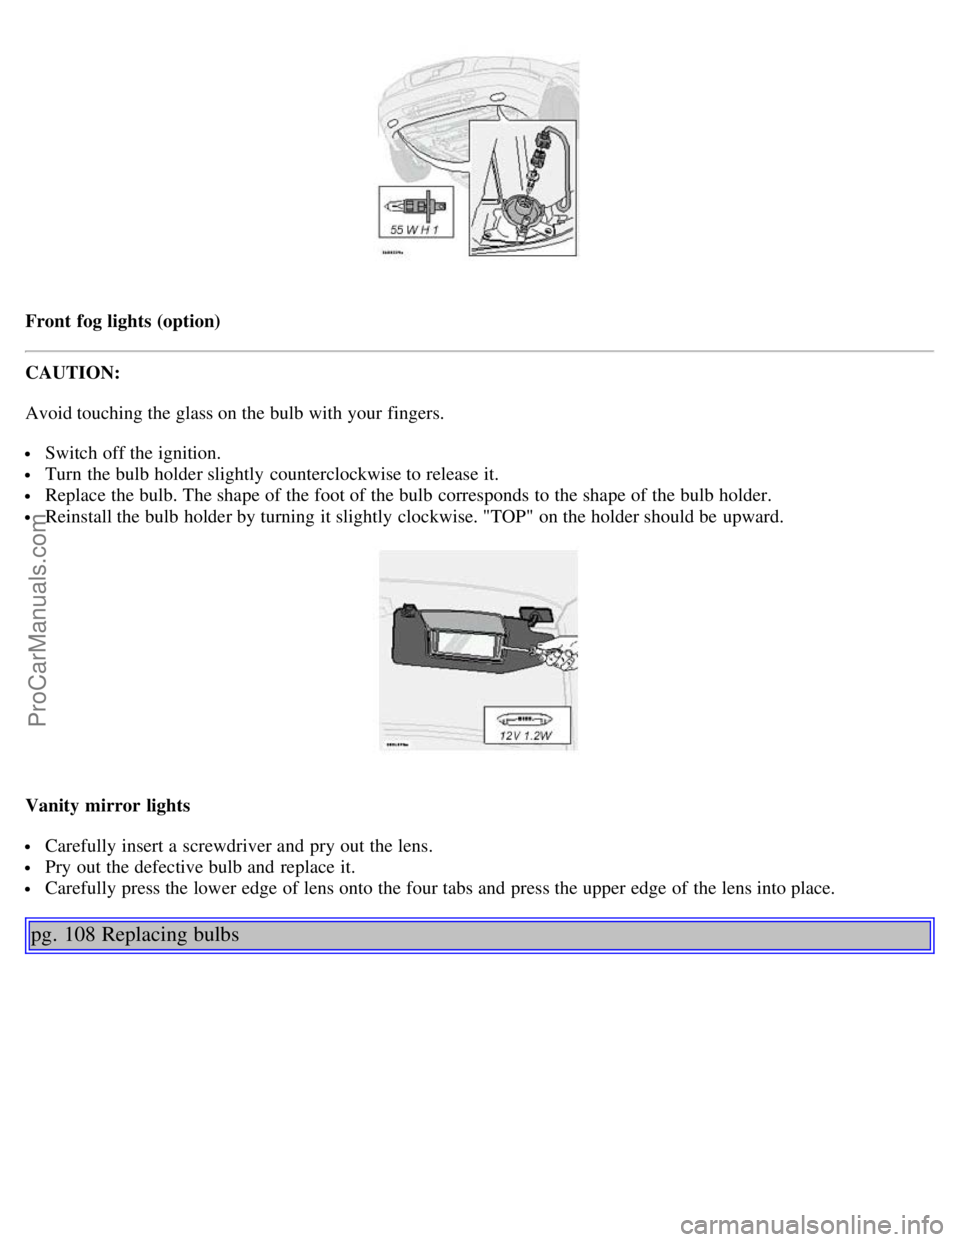
Front fog lights (option)
CAUTION:
Avoid touching the glass on the bulb with your fingers.
Switch off the ignition.
Turn the bulb holder slightly counterclockwise to release it.
Replace the bulb. The shape of the foot of the bulb corresponds to the shape of the bulb holder.
Reinstall the bulb holder by turning it slightly clockwise. "TOP" on the holder should be upward.
Vanity mirror lights
Carefully insert a screwdriver and pry out the lens.
Pry out the defective bulb and replace it.
Carefully press the lower edge of lens onto the four tabs and press the upper edge of the lens into place.
pg. 108 Replacing bulbs
ProCarManuals.com
Page 76 of 109
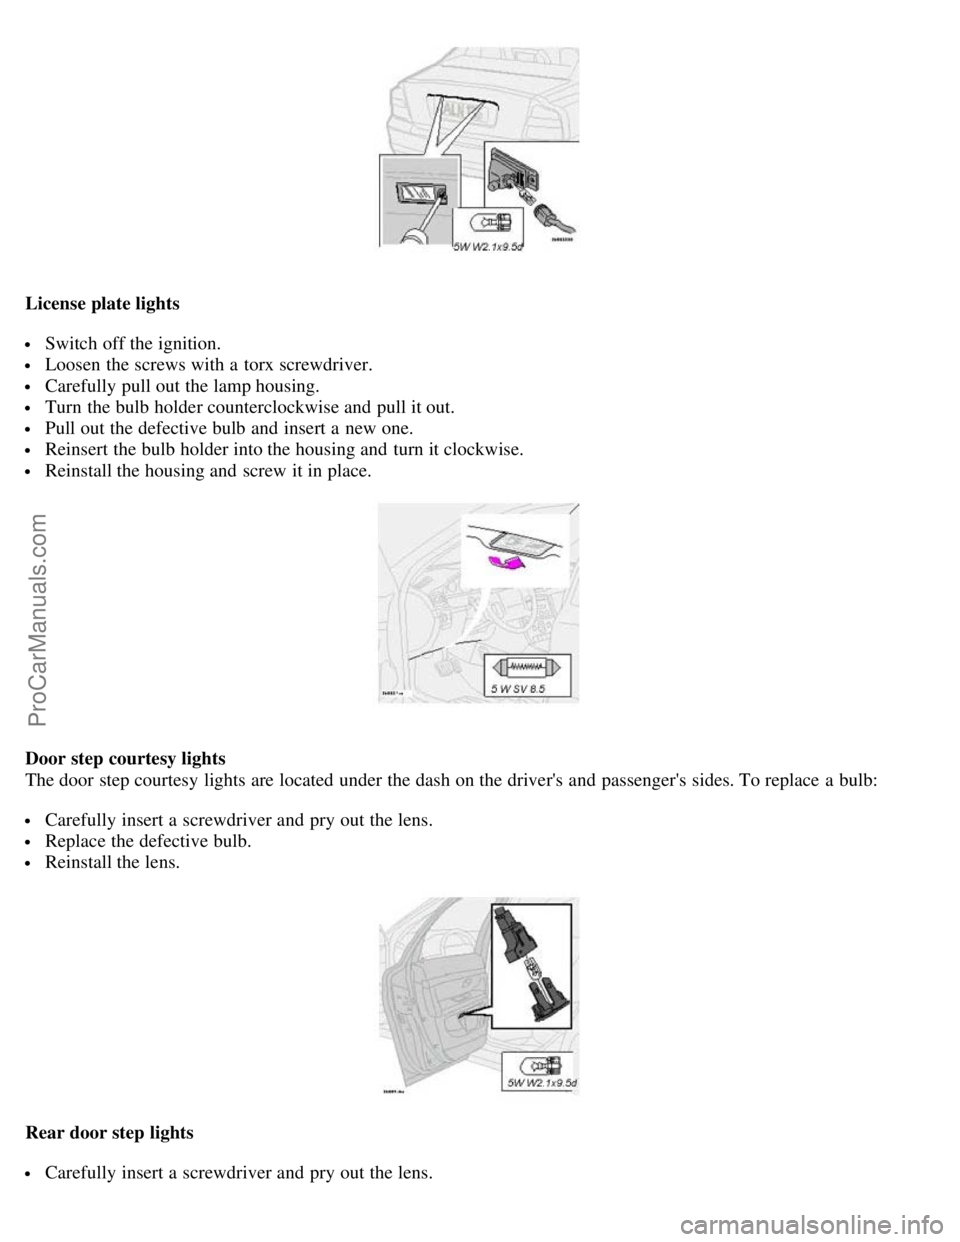
License plate lights
Switch off the ignition.
Loosen the screws with a torx screwdriver.
Carefully pull out the lamp housing.
Turn the bulb holder counterclockwise and pull it out.
Pull out the defective bulb and insert a new one.
Reinsert the bulb holder into the housing and turn it clockwise.
Reinstall the housing and screw it in place.
Door step courtesy lights
The door step courtesy lights are located under the dash on the driver's and passenger's sides. To replace a bulb:
Carefully insert a screwdriver and pry out the lens.
Replace the defective bulb.
Reinstall the lens.
Rear door step lights
Carefully insert a screwdriver and pry out the lens.
ProCarManuals.com
Page 83 of 109

Toe-in measured on the tire sides: 1.9 mm +/ 1.9 mm
Vehicle loading
The tires on your Volvo should perform to specifications at all normal loads when inflated as recommended on the tire
information label. The label is located on the inside of the fuel filler door and lists vehicle design limits. Do not load
your car beyond the load limits indicatedWARNING!
Improperly inflated tires will reduce tire life, adversely affect vehicle handling and can possibly lead to failure
resulting in loss of vehicle control without prior warning.
All specifications are subject to change without prior notice.
pg. 133 Electrical system
Electrical system
12 Volt, negative ground.
Voltage-controlled generator. Single-wire system with chassis and engine used as conductors. Grounded on chassis.
Battery
Voltage: 12 Volt, capacity: 600 A/115 min. reverse capacity
The battery contains corrosive and poisonous acids. It is of the utmost importance that old batteries are disposed of
correctly. Your Volvo retailer can assist you in this matter.
Generator
Rated output: max. current: 140 A
Starter motor:
Output: 1.7 kW
Bulbs
Bulb US no.Power Socket
Headlights
High beam H755W -
Low beam H755W -
Front parking lights 5WW 2.1x9.5d
Front direction indicators -21 W BAU 15d
Front fog lights H155 W -
Side marker lights -3 W W2.1x9.5d
Rear direction indicators -21W BAU 15 s
Tail lights 675W/4cp BA 15 s
Brake lights 115621W/32cp BA 15 s
Backup lights 115621W/32cp BA 15 s
Rear fog light 115621W/32cp BA 15 s
License plate light -5 W W 2.1x9.5d
ProCarManuals.com
Page 84 of 109

Door step courtesy lights
Front-5W SV 8.5
Rear -5W W 2.1x9.5d
Trunk lights -10 W SV 8.5
Glove compartment light -2 W BA 9s
Vanity mirror light(s) -12V 1.2 W
Instrument lighting -3 W W 2.1x9.5d
Rear ashtray -1.2 W W 2x4.6d
Front courtesy lights -10 W SV 8.5
Rear reading lights -5 W W2.1x9.5d
Sideview mirror -5W W2.1x9.5d
All specifications are subject to change without prior notice.
pg. 134 On Call Roadside Assistance
Volvo On Call Roadside Assistance
Your new Volvo comes with a four-year On Call Roadside Assistance program. Additional information, features, and
benefits are described in a separate information package in your glove compartment.
If you have misplaced your package, dial:
In the U.S.A.
1-800-63-VOLVO (1-800-638-6586)
In Canada:
1-800-263-0475
Technician certification
In addition to Volvo factory training, Volvo supports certification by the National Institute for Automotive Excellence
(A.S.E.). Certified technicians have demonstrated a high degree of competence in specific areas. Besides passing
exams, each technician must also have worked in the field for two or more years before a certificate is issued. These
ProCarManuals.com
Page 86 of 109
2 0 0 3
VOLVO S80
Chapter 10 - Audio systems
pg. 135 Audio systems
HU-611 overview136
HU-801 overview137
Functions138
Specifications149
General information150
HomeLink® Universal Transceiver (option)151
NOTE: The text on the face of the radio, describing the button functions, may vary slightly depending on which audio
system you have in your car.
pg. 136 Audio system HU-611 - overview
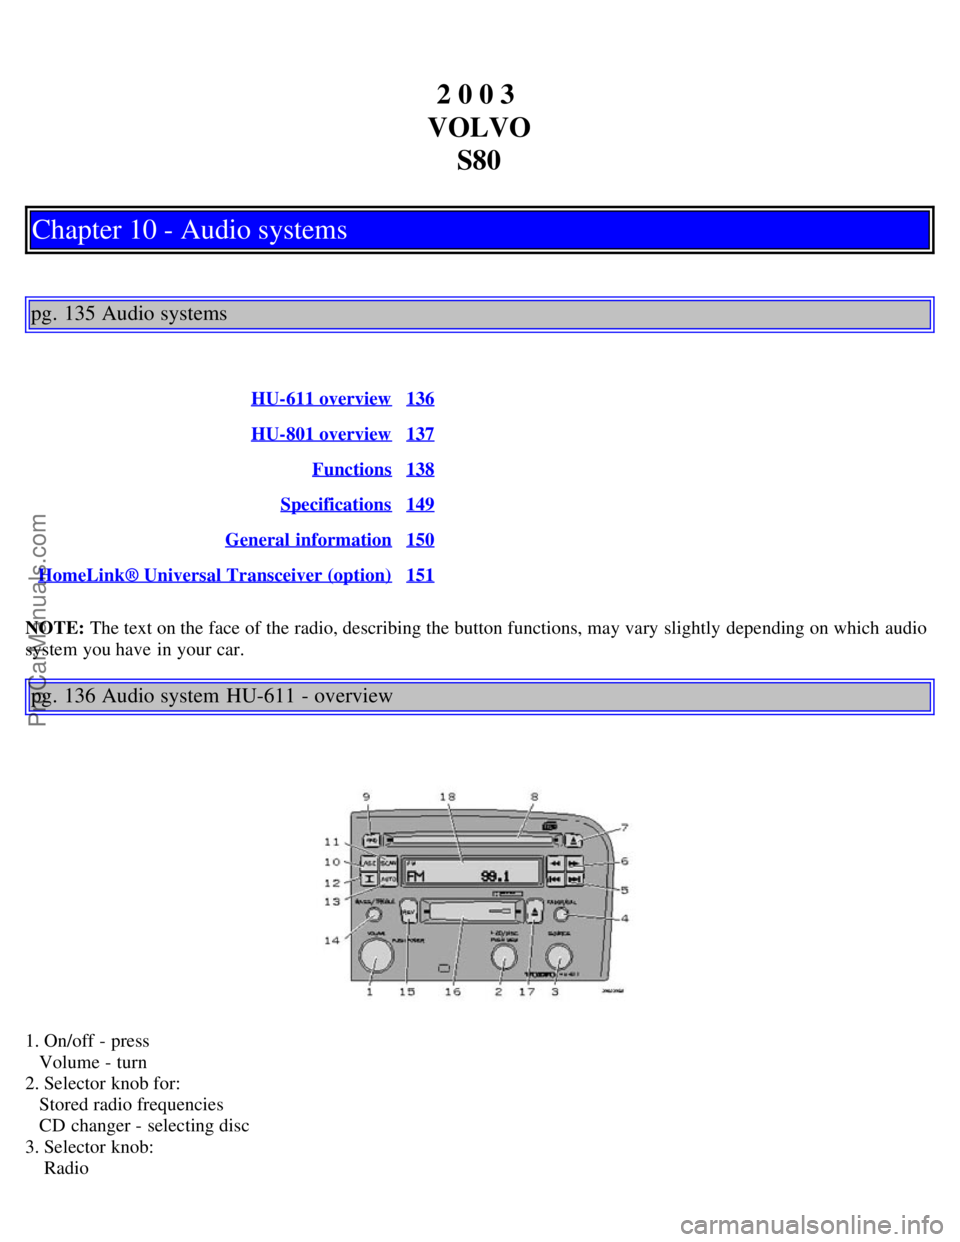
1. On/off - press
Volume - turn
2. Selector knob for:
Stored radio frequencies
CD changer - selecting disc
3. Selector knob:
Radio
ProCarManuals.com
Page 95 of 109
2 0 0 3
VOLVO S80
HomeLink® Universal Transceiver (option)
pg. 151 HomeLink® Universal Transceiver (option)
HomeLink® Universal Transceiver
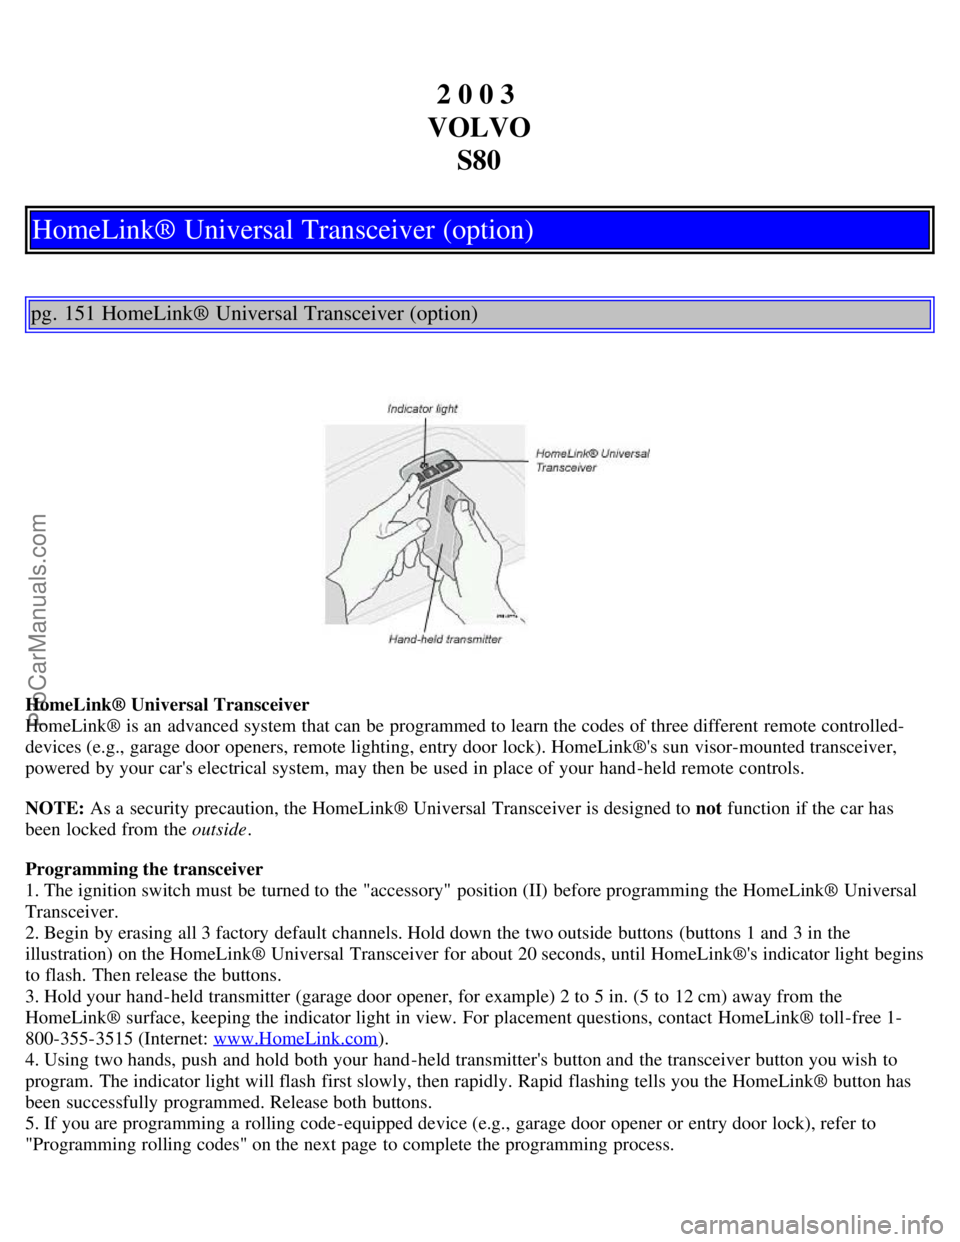
HomeLink® is an advanced system that can be programmed to learn the codes of three different remote controlled-
devices (e.g., garage door openers, remote lighting, entry door lock). HomeLink®'s sun visor-mounted transceiver,
powered by your car's electrical system, may then be used in place of your hand -held remote controls.
NOTE: As a security precaution, the HomeLink® Universal Transceiver is designed to not function if the car has
been locked from the outside .
Programming the transceiver
1. The ignition switch must be turned to the "accessory" position (II) before programming the HomeLink® Universal
Transceiver.
2. Begin by erasing all 3 factory default channels. Hold down the two outside buttons (buttons 1 and 3 in the
illustration) on the HomeLink® Universal Transceiver for about 20 seconds, until HomeLink®'s indicator light begins
to flash. Then release the buttons.
3. Hold your hand -held transmitter (garage door opener, for example) 2 to 5 in. (5 to 12 cm) away from the
HomeLink® surface, keeping the indicator light in view. For placement questions, contact HomeLink® toll-free 1-
800-355-3515 (Internet: www.HomeLink.com
).
4. Using two hands, push and hold both your hand -held transmitter's button and the transceiver button you wish to
program. The indicator light will flash first slowly, then rapidly. Rapid flashing tells you the HomeLink® button has
been successfully programmed. Release both buttons.
5. If you are programming a rolling code-equipped device (e.g., garage door opener or entry door lock), refer to
"Programming rolling codes" on the next page to complete the programming process.
ProCarManuals.com
Page 96 of 109

Repeat steps 3 and 4 to program the other two transceiver buttons.
If, after several attempts, you are unable to successfully train the HomeLink® Universal Transceiver to learn your
hand -held transmitter's signal, contact HomeLink® toll-free 1-800-355-3515 (Internet: www.HomeLink.com
).
pg. 152 HomeLink® Universal Transceiver (option)
WARNING!
If you use HomeLink® to open a garage door or gate, be sure no one is near the gate or door while it is in motion.
Do not use the HomeLink® Universal Transceiver with any garage door opener that lacks safety "stop" and
"reverse" features as required by federal safety standards. (This includes any garage door opener model
manufactured before April 1, 1982) A garage door opener that cannot "detect" an object, signalling the door to
"stop" and "reverse" does not meet current federal safety standards. Using a garage door opener without these
features increases the risk of serious injury or death. For more information on this matter, call toll-free 1-800-355-
3515 (Internet: www.HomeLink.com
).
NOTE - Canadian residents:
During programming, your hand -held transmitter may automatically stop transmitting. To successfully train
HomeLink®, continue to hold the HomeLink® button. At the same time, repeatedly press and hold your hand -held
transmitter's button at two-second intervals until HomeLink® has learned your transmitter's code. The HomeLink®
indicator light will flash first slowly, and then rapidly to indicate that the button has been successfully programmed.
Determining if your garage door uses a rolling code
Determine, in one of the following ways, if your garage door uses a rolling code system and is manufactured after
1996:
Refer to the garage door opener owner's manual for verification.
If your hand -held transmitter appears to program the HomeLink® Universal Transceiver but the programmed button
does not activate the garage door, your garage door opener may have a rolling code.
Press the programmed HomeLink® button. If the garage door opener has the rolling code feature, the HomeLink®
indicator light flashes rapidly and then glows steadily after approximately 2 seconds.
To train a rolling code garage door opener , follow these instructions after programming the desired transceiver
button according to "Programming the transceiver." The help of a second person may make training easier.
1. Locate the training button on the garage door opener motor head unit . The location and color of the training button
may vary. If you encounter difficulty, refer to the garage door opener owner's manual or call toll-free 1-800-355-3515
(Internet: www.HomeLink.com
).
2. Press the "training" button on the garage door opener motor head unit until the "training" light comes on.
3. Press and release the programmed HomeLink® button. Press and release the programmed HomeLink® button a
second time to complete the training process.
Some garage door openers may require you to do this procedure a third time to complete the training.
The programmed button on your HomeLink® Universal Transceiver should now operate your garage door opener. The
original hand -held transmitter can also be used, as desired, to operate the garage door.
The remaining two HomeLink® buttons can be programmed in the same way. In the event of any problems in
ProCarManuals.com
Page 97 of 109
programming the HomeLink® Universal Transceiver, call toll-free 1-800-355-3515 (Internet: www.HomeLink.com).
Operating the HomeLink® Universal Transceiver
Once programmed, the HomeLink® Universal Transceiver can be used in place of hand -held transmitters.
To operate, the key must be turned to the "accessory" position (II) or the engine must be running. Press the
programmed HomeLink® button to activate the garage door, driveway gate, security lighting, home security system,
etc.
Your original hand -held transmitters may, of course, be used at any time.
pg. 153 HomeLink® Universal Transceiver (option)
Erasing programmed buttons
Individual buttons cannot be erased. To erase all three programmed buttons:
1. Turn the ignition key to the "accessory" position (II).
2. Hold down the two outside buttons on the HomeLink® Universal Transceiver for about 20 seconds, until
HomeLink®'s indicator light begins to flash.
3. Release both buttons.
The HomeLink® buttons can be reprogrammed using the procedures described on the previous pages.
Reprogramming a single HomeLink® button
1. Press and hold the desired HomeLink® button. Do not release the button until step 3 has been completed.
2. When the indicator light begins to flash slowly (after approximately 20 seconds), position the hand -held transmitter
2 to 5 in. (5 to 12 cm) away from the HomeLink® surface.
3. Press and hold the hand -held transmitter button. The HomeLink® indicator light will flash first slowly, then rapidly.
When the indicator light flashes rapidly, release both buttons.
The previously programmed device has now been erased and the new device can be activated by pressing the
HomeLink® button that has just been programmed. This procedure will not affect any other programmed HomeLink®
buttons.
NOTE:
Retain the original transmitter(s) for future programming procedures (i.e., if you purchase a new car).
For your own security, erase all programmed buttons on the HomeLink® Universal Transceiver when you sell your
car.
Metallic sun protection films should not be used on any windows in a car equipped with HomeLink® Universal
Transceiver. This could interfere with the transceiver's function.
Contents | Top of Page
ProCarManuals.com