2003 VOLVO S80 key
[x] Cancel search: keyPage 47 of 109

NOTE: This button will NOT unlock the car.
pg. 66 Alarm
Temporarily disconnecting the alarm sensor(s) - option
This button will only be found in cars equipped with the optional inclination and/or movement sensors.
In certain situations it may be desirable to turn off the optional inclination and movement alarm sensors if, for
example, you drive your car onto a ferry where the rocking of the boat could trigger the alarm or if a pet is left in the
car with the doors locked.
To temporarily turn off the inclination and movement alarm sensor from the alarm system:
From the time the ignition key is turned from the Drive position (position II) until you lock the car, you can press the
button in the center console *. The LED in the switch will light up and a message will be displayed in the text window
to indicate that the sensors are disconnected.
The car can then be locked in the usual way to set the alarm.
NOTE: The optional sensors are automatically reconnected to the alarm system the next time the car is unlocked and
then locked again.
LED alarm status signals
The status of the alarm system is indicated by the red LED at the top of the dash:
LED off - the alarm is not armed
LED flashes once per second - the alarm is armed
LED flashes rapidly before the ignition is switched on - the alarm has been triggered
Fault in the alarm system: If a fault has been detected in the alarm system, a message will be displayed in the text
window. Contact a Volvo retailer.
Automatic reset function
If the car is unlocked with the remote, the car will re-lock and the alarm will re-arm after 2 minutes unless a door or
the trunk has been opened.
* The position of this button may vary, depending on the specifications of your car.
pg. 67 Child safety locks - rear doors
ProCarManuals.com
Page 52 of 109

systems.
Avoid spilling gasoline during refueling. In addition to causing damage to the environment, gasolines containing
alcohol can cause damage to painted surfaces, which may not be covered under the New Vehicle Limited Warranty.
Do not use gasolines containing methanol (methyl alcohol, wood alcohol). This practice can result in vehicle
performance deterioration and can damage critical parts in the fuel system. Such damage may not be covered under the
New Vehicle Limited Warranty.
* If the fuel filler cap is not closed tightly or if the engine is running when the car is refueled, the Check Engine
Light (Malfunction Indicator Lamp) may indicate a fault. However, your vehicle's performance will not be affected.
Use only Volvo original or approved fuel filler caps.
pg. 73 Starting the engine
Starting the engine
1. Fasten the seat belt.
WARNING!
Before starting, check that the seat, steering wheel and mirrors are adjusted properly. Make sure the brake pedal can
be depressed completely. Adjust the seat if necessary. See page 52
.
2. Apply the parking brake, if not already set. The gear selector is locked in the (P)ark position (SHIFTLOCK).
3. Without touching the accelerator pedal, turn the ignition key* to the starting position. Allow the starter to operate
for up to 5 seconds (turbo: 10 seconds). Release the key as soon as the engine starts. If the engine fails to start, repeat
this step.
NOTE: On certain models, when the car is started, idle speed may be noticeably higher than normal for a short period,
depending on the temperature of the engine.
This has been done to help bring components in the emission control system to their normal operating temperature as
quickly as possible, which enables them to function normally.
For cold starts at altitudes above 6000 ft (1800 meters), depress the accelerator pedal halfway and turn the key to the
starting position. Release the pedal slowly when the engine starts.
4. o release the gear selector from the (P)ark position, the engine must be running (or the ignition key must be in
position II) and the brake pedal must be depressed. While keeping firm pressure on the brake pedal, release the parking
brake.
5. Select the desired gear. The gear engages after a very slight delay which is especially noticeable when selecting R.
NOTE:
Your car is equipped with a KEYLOCK system. When the engine is switched off, the gear selector must be in the
( P )ark position before the key can be removed from the ignition switch.
When starting in cold weather, the transmission may shift up at slightly higher engine speeds than normal until the
automatic transmission fluid reaches normal operating temperature.
CAUTION :
The engine should be idling when you move the gear selector. Never accelerate until after you feel the transmission
ProCarManuals.com
Page 53 of 109

engage! Accelerating immediately after selecting a gear will cause harsh gear engagement and premature transmission
wear.
Selecting P or N when idling at a standstill for prolonged periods of time will help prevent overheating of the
automatic transmission fluid.
Do not race a cold engine immediately after starting. Oil flow may not reach some lubrication points fast enough to
prevent engine damage.
WARNING!
Always place the gear selector in Park and apply the parking brake before leaving the vehicle. Never leave the car
unattended with the engine running.
Always open the garage doors fully before starting the engine inside a garage to ensure adequate ventilation. The
exhaust gases contain carbon monoxide, which is invisible and odorless but very poisonous.
* Your car is equipped with an electronic start inhibitor (immobilizer). The keys you received with your car are
specially coded. The code in the key is transmitted to an antenna in the ignition switch where it is compared to the
code stored in the start inhibitor module. The car can only be started if a properly coded key is used.
If two of the keys to your car are close together, e.g., on the same key ring, when you try to start the car, this could
cause interference in the immobilizer system and result in the car not starting. If this should occur, remove one of the
keys from the key ring before trying to start the car again.
pg. 74 Automatic transmission
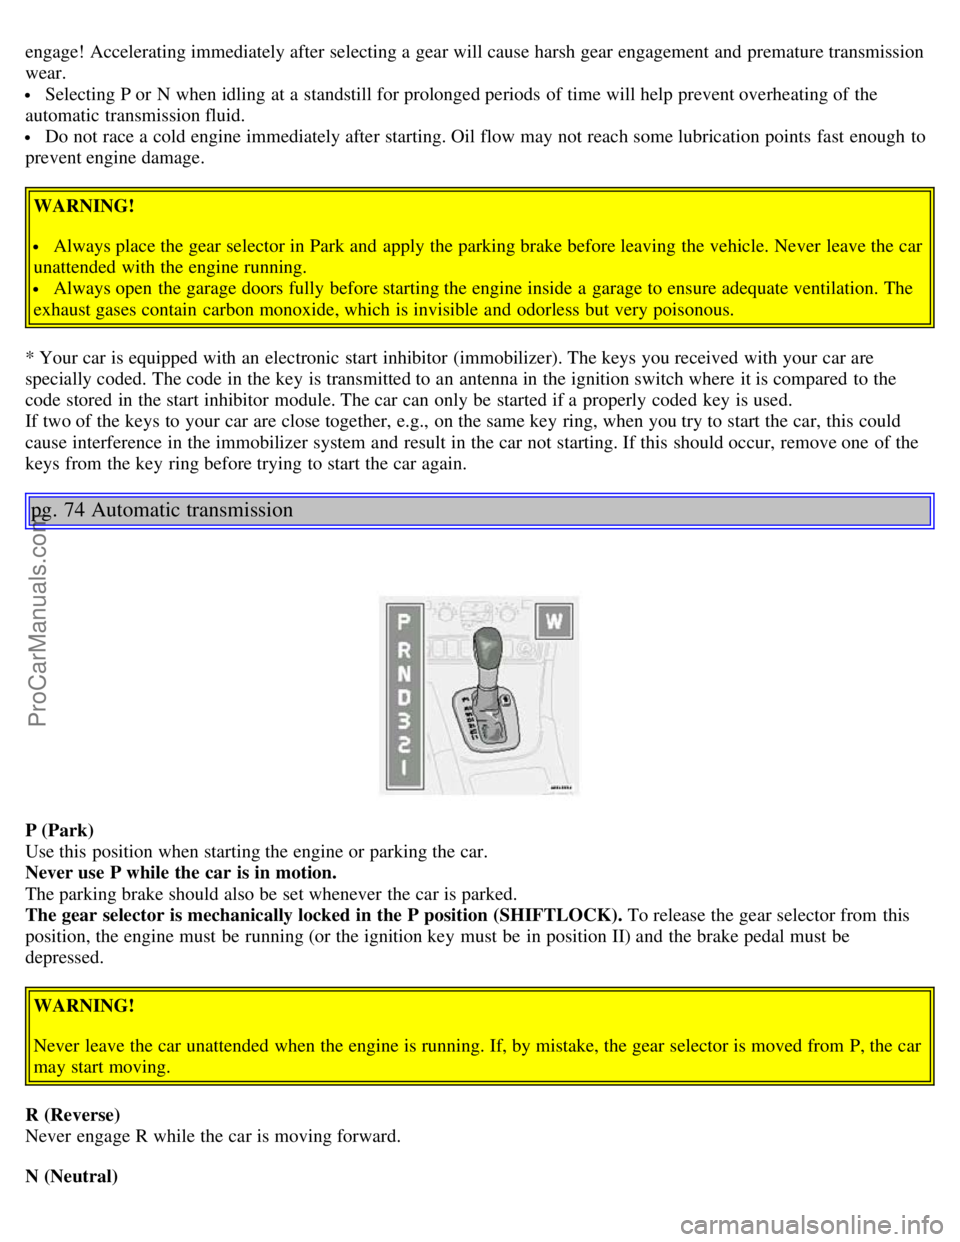
P (Park)
Use this position when starting the engine or parking the car.
Never use P while the car is in motion.
The parking brake should also be set whenever the car is parked.
The gear selector is mechanically locked in the P position (SHIFTLOCK). To release the gear selector from this
position, the engine must be running (or the ignition key must be in position II) and the brake pedal must be
depressed.
WARNING!
Never leave the car unattended when the engine is running. If, by mistake, the gear selector is moved from P, the car
may start moving.
R (Reverse)
Never engage R while the car is moving forward.
N (Neutral)
ProCarManuals.com
Page 55 of 109

W Winter/Wet driving mode - enhanced vehicle traction
Mode W will only function if the gear selector is in the (D)rive position.
Press the button at the base of the gear selector to engage/disengage this driving mode (see illustration).
An LED in the button will light up to indicate that W is engaged and this will also be displayed in the instrument
panel (see page 25
).
This mode may be selected for starting/moving off on slippery roads.
Cold starts
When driving before the engine has reached its normal operating temperature, the transmission will shift up at slightly
higher engine speeds to heat the three-way catalytic converter as quickly as possible.
pg. 76 Automatic transmission (Geartronic)
P (Park)
Use this position when starting the engine or parking the car.
Never use P while the car is in motion.
The parking brake should also be used when parking on grades.
The gear selector is mechanically locked in the P position (SHIFTLOCK). To release the gear selector from this
position, the engine must be running (or the ignition key must be in position II) and the brake pedal must be
depressed.
WARNING!
Never leave the car unattended when the engine is running. If, by mistake, the gear selector is moved from P, the car
may start moving.
R (Reverse)
ProCarManuals.com
Page 88 of 109

6. Selector knob:
Radio
Internal CD changer
CD
Station scan - press
TV (option on certain models)
External CD changer (option)
7. Radio - Station seek up/down
CD - Selecting next/previous track
8. Radio - Manual station selection
CD - Fast forward/backward
9. CD eject
10. Dolby Pro Logic - switching on
11. 2 channel stereo
12 3 channel stereo
13. CD slot
14. CD random play
15. Program type
16. News
17. Traffic information
18. Automatic presetting of radio stations
19. Display
pg. 138 Audio systems HU-611/HU-801
Switch on/off
Press the knob to switch on or turn off the radio.
Volume control
Turn the knob clockwise to increase volume. Volume control is electronic and does not have an end stop. If you have
a key pad in the steering wheel, increase or decrease the volume with the + or- buttons.
Bass
Adjust the bass by pressing the button to extend the control and turning it to the left (less bass) or to the right (more
ProCarManuals.com
Page 90 of 109

A - Setting station
Press the left side of the button to select lower frequencies and the right side for higher frequencies. Set frequencies are
displayed.
B - Station seek up/down
Press the left side (lower frequency) or right side (higher frequency) of the button to start the seek function. The radio
seeks the next audible station and tunes it in. Repeat the procedure to continue the seek function.
Audio system controls on the steering wheel
Station seek up/down
If you have a key pad in the steering wheel press the right or left arrow to switch between preset stations.
Scan function
Press the SCAN button (HU-611) or the SOURCE button (HU-801) to start the station scan function. When a station
is found, scanning stops for several seconds, after which scanning will continue.
Press the SCAN or SOURCE button when a station has been found if you would like to listen to that station and to
discontinue the scan function.
pg. 140 Audio systems HU-611/HU-801 - radio
A - Automatic station preset
This function seeks and stores up to 10 strong AM or FM stations in a separate memory. This function is especially
useful in areas where you are not familiar with the radio stations.
ProCarManuals.com
Page 97 of 109

programming the HomeLink® Universal Transceiver, call toll-free 1-800-355-3515 (Internet: www.HomeLink.com).
Operating the HomeLink® Universal Transceiver
Once programmed, the HomeLink® Universal Transceiver can be used in place of hand -held transmitters.
To operate, the key must be turned to the "accessory" position (II) or the engine must be running. Press the
programmed HomeLink® button to activate the garage door, driveway gate, security lighting, home security system,
etc.
Your original hand -held transmitters may, of course, be used at any time.
pg. 153 HomeLink® Universal Transceiver (option)
Erasing programmed buttons
Individual buttons cannot be erased. To erase all three programmed buttons:
1. Turn the ignition key to the "accessory" position (II).
2. Hold down the two outside buttons on the HomeLink® Universal Transceiver for about 20 seconds, until
HomeLink®'s indicator light begins to flash.
3. Release both buttons.
The HomeLink® buttons can be reprogrammed using the procedures described on the previous pages.
Reprogramming a single HomeLink® button
1. Press and hold the desired HomeLink® button. Do not release the button until step 3 has been completed.
2. When the indicator light begins to flash slowly (after approximately 20 seconds), position the hand -held transmitter
2 to 5 in. (5 to 12 cm) away from the HomeLink® surface.
3. Press and hold the hand -held transmitter button. The HomeLink® indicator light will flash first slowly, then rapidly.
When the indicator light flashes rapidly, release both buttons.
The previously programmed device has now been erased and the new device can be activated by pressing the
HomeLink® button that has just been programmed. This procedure will not affect any other programmed HomeLink®
buttons.
NOTE:
Retain the original transmitter(s) for future programming procedures (i.e., if you purchase a new car).
For your own security, erase all programmed buttons on the HomeLink® Universal Transceiver when you sell your
car.
Metallic sun protection films should not be used on any windows in a car equipped with HomeLink® Universal
Transceiver. This could interfere with the transceiver's function.
Contents | Top of Page
ProCarManuals.com
Page 100 of 109

Cup holder - opening..........56
D
Dimensions..........129
Direction indicator bulbs (front)..........105
Direction indicators..........35
Distributor ignition system..........132
Door step courtesy lights - replacing..........108
Doors and locks..........60
Drive belt..........116
Driver's seat and remote keyless entry system..........53
Driving economy..........78
Driving mode indicator..........25
Driving mode W..........75, 77, 87
Driving with trunk open..........79
E
Economical driving..........78
Electrical system..........133
Electrical system - general information..........79
Electrically operated front seats..........52
Electrically operated sideview mirrors..........40
Electrically operated sun roof..........41
Electrically operated windows..........39
Electronic Brake Force Distribution..........17
Electronic Climate Control(ECC)..........45 - 49
Emergency Locking Retractor (ELR)..........14
Emergency towing..........81, 82
Emergency warning flashers..........37
Emissions systems..........115
Engine - specifications..........130
Engine - starting..........73
Engine air filter..........117
Engine compartment..........119
Engine oil..........87, 120, 121, 131
Exterior courtesy lights..........60
Exterior features - overview..........23
F
Fog light - rear..........27
, 32
Fog lights - front..........32
Folding head restraints..........29
Folding passenger's seat backrest..........53
Folding rear seat backrests ........58
Folding sideview mirrors..........27
Front airbags - SRS..........4-7
Front airbags - SRS - warning light..........26
ProCarManuals.com