2003 VOLVO S80 tow
[x] Cancel search: towPage 40 of 109
2 0 0 3
VOLVO S80
Chapter 5 - Keys, Locks, Alarm
pg. 59 Keys, Locks, Alarm
Keys, Exterior courtesy lights, Locking and unlocking the car60
Remote keyless entry system61
Unlocking the trunk with the master key, Central locking buttons, "Trunk lock" function63
Alarm65
Child safety locks - rear doors67
pg. 60 Keys, Exterior courtesy lights, Locking and unlocking the car
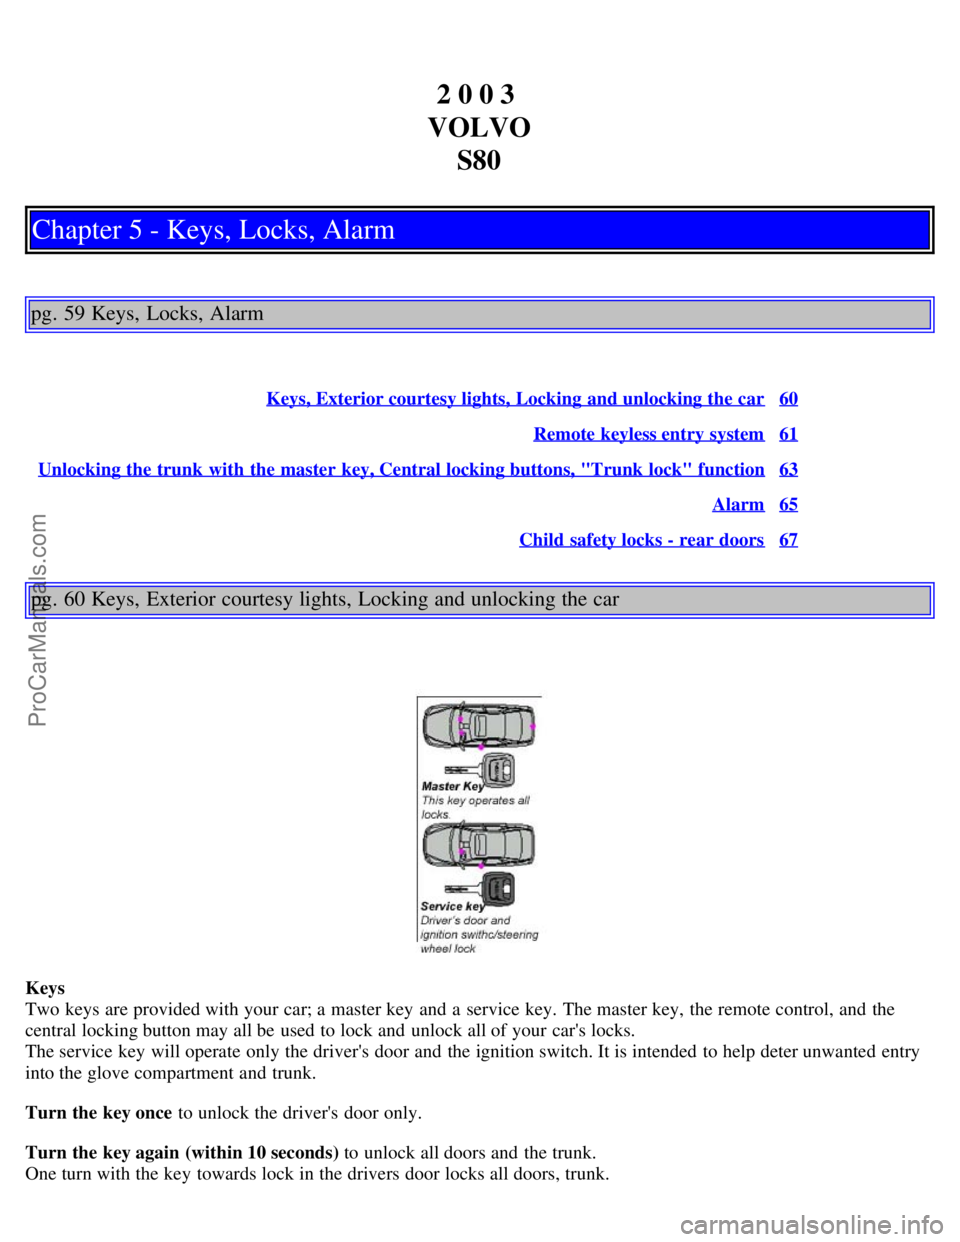
Keys
Two keys are provided with your car; a master key and a service key. The master key, the remote control, and the
central locking button may all be used to lock and unlock all of your car's locks.
The service key will operate only the driver's door and the ignition switch. It is intended to help deter unwanted entry
into the glove compartment and trunk.
Turn the key once to unlock the driver's door only.
Turn the key again (within 10 seconds) to unlock all doors and the trunk.
One turn with the key towards lock in the drivers door locks all doors, trunk.
ProCarManuals.com
Page 41 of 109
Use the switch on the front door armrests to lock/unlock the car from the inside.WARNING!
If the doors are locked while driving, this may hinder rapid access to the occupants of the car in the event of an
accident. (Also see information on "Child safety locks").
Note: To help prevent accidentally locking the keys in the car, the central locking system is designed to unlock the
doors immediately if the key is left in the ignition switch, the car is locked using the lock button on the door and the
door is then closed. A sound from the lock will be audible at this time.
Please note that this function will not unlock the doors if the engine is running.
Immobilizer (start inhibitor)
Each of the keys supplied with your car contains a coded transmitter. The code in the key is transmitted to an antenna
in the ignition switch where it is compared to the code stored in the start inhibitor module. The car will start only with
a properly coded key.
If you misplace a key, take the other keys to an authorized Volvo retailer for reprogramming as an antitheft measure.
This device complies with part 15 of the FCC rules. Operation is subject to the following condition: (1) This device
may not cause harmful interference, and (2) this device must accept any interference received, including interference
that may cause undesired operation.
Exterior Courtesy lights
Home Safe System
When you leave your car at night, you can make use of the courtesy lighting function:
Remove the key from the ignition switch.
Pull the direction indicator lever towards the steering wheel (as when using the headlight flasher function).
Exit the car and lock the doors.
The headlights, parking lights, license plate lights and the lights in the sideview mirrors will now come on and remain
on for 30, 60 or 90 seconds (the time interval is at your discretion and can be changed by an authorized Volvo retailer).
Approach lighting
When approaching the car at night, press the yellow button in the central locking remote control (see illustration on
page 61
). This lights up the interior courtesy light, parking lights, license plate lights and the lights in the sideview
mirrors.
pg. 61 Remote keyless entry system
ProCarManuals.com
Page 46 of 109
Insert your master key into the glove compartment. Turn it 90 degrees clockwise and remove the key. The glove
compartment cannot be unlocked with the service key.
Insert your master key into the ignition and turn it to position II.
Press the trunk lock button in the center console. An LED and a message in the text window will show that the trunk
lock has be activated.
Turn off the car and remove the master key.
With the trunk lock activated, neither the service key nor the remote control will open the trunk.
* The position of this button may vary, depending on the specifications of your car.
pg. 65 Alarm
Alarm
The alarm is automatically set (armed) whenever you lock your car.
When armed, the alarm continuously monitors a number of points on the car. The following conditions will set off the
alarm:
The hood is forced opened.
The trunk is forced opened.
A door is forced opened.
The ignition switch is tampered with.
If there is movement in the passenger compartment (if the car is equipped with the optional movement sensor).
The car is lifted or towed (if the car is equipped with the optional inclination sensor).
The battery is disconnected (while the alarm is set).
Arming the alarm
Press the LOCK button on the remote control, lock the car using the key in the driver's door or press the central lock
button on one of the front doors with the door open. One long flash of the turn signals will confirm that the alarm is
set.
Disarming the alarm
Press the UNLOCK button on the remote control or unlock the doors with the key.
Turning off (stopping) the alarm
If the alarm is sounding, it can be stopped by pressing the UNLOCK button on the remote control or by unlocking the
driver's door with the key.
Visual alarm signal
The visual alarm signal is given by flashing all turn signals and turning on the interior lighting for approximately 5
minutes.
Audible alarm signal
An audible alarm signal is given by a battery powered siren. One alarm cycle lasts for 25 seconds.
"Panic" function
In an emergency situation, this feature can be used to attract attention.
Activate the "panic" function by pressing the red button on the remote control (see illustration on page 61
) for at least
3 seconds or by pressing this button twice within 3 seconds. The turn signals will flash, the interior lights will go on
and the car's horn will sound.
The function can be turned off by pressing any of the buttons on the remote control or will stop automatically
after 25 seconds. When a button is pressed, there is a 5 second delay before the panic alarm is deactivated.
ProCarManuals.com
Page 49 of 109
2 0 0 3
VOLVO S80
Chapter 6 - Starting and driving
pg. 69 Starting and driving
Fuel requirements70
Refueling72
Starting the engine73
Automatic transmission74
Driving economy78
Points to remember79
Roof racks/load carriers80
Emergency towing81
Vehicle towing information82
Towing a trailer83
Jump starting86
Winter driving87
Long distance trips88
Three-way catalytic converter89
pg. 70 Fuel requirements
Fuel requirements
Octane rating
Volvo engines are designed for optimum performance on unleaded premium gasoline with an octane rating AKI of 91,
or above. AKI (ANTI KNOCK INDEX) is an average of the Research Octane Number, RON, and the Motor Octane
Number, MON. (RON + MON/2).
The minimum octane requirement is AKI 87 (RON 91).
ProCarManuals.com
Page 54 of 109
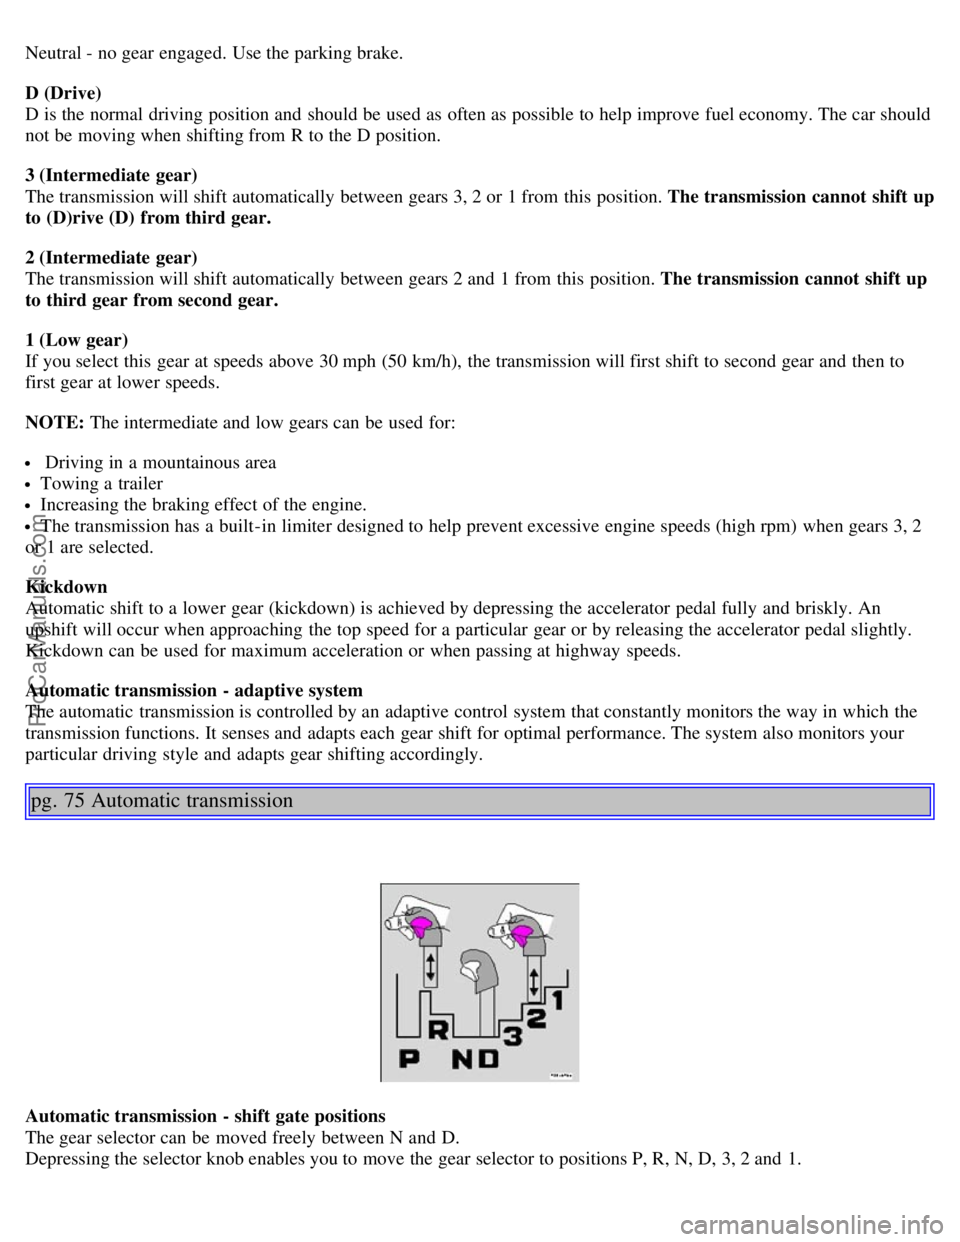
Neutral - no gear engaged. Use the parking brake.
D (Drive)
D is the normal driving position and should be used as often as possible to help improve fuel economy. The car should
not be moving when shifting from R to the D position.
3 (Intermediate gear)
The transmission will shift automatically between gears 3, 2 or 1 from this position. The transmission cannot shift up
to (D)rive (D) from third gear.
2 (Intermediate gear)
The transmission will shift automatically between gears 2 and 1 from this position. The transmission cannot shift up
to third gear from second gear.
1 (Low gear)
If you select this gear at speeds above 30 mph (50 km/h), the transmission will first shift to second gear and then to
first gear at lower speeds.
NOTE: The intermediate and low gears can be used for:
Driving in a mountainous area
Towing a trailer
Increasing the braking effect of the engine.
The transmission has a built-in limiter designed to help prevent excessive engine speeds (high rpm) when gears 3, 2
or 1 are selected.
Kickdown
Automatic shift to a lower gear (kickdown) is achieved by depressing the accelerator pedal fully and briskly. An
upshift will occur when approaching the top speed for a particular gear or by releasing the accelerator pedal slightly.
Kickdown can be used for maximum acceleration or when passing at highway speeds.
Automatic transmission - adaptive system
The automatic transmission is controlled by an adaptive control system that constantly monitors the way in which the
transmission functions. It senses and adapts each gear shift for optimal performance. The system also monitors your
particular driving style and adapts gear shifting accordingly.
pg. 75 Automatic transmission
Automatic transmission - shift gate positions
The gear selector can be moved freely between N and D.
Depressing the selector knob enables you to move the gear selector to positions P, R, N, D, 3, 2 and 1.
ProCarManuals.com
Page 57 of 109

Move the gear selector forward (toward "+") to shift to a higher gear or rearward (toward "-") to shift to a lower
gear.
If you hold the gear selector toward "-", the transmission will downshift one gear , and will utilize the braking power
of the engine. If the current speed is too high for using a lower gear, the downshift will not occur until the speed has
decreased enough to allow the lower gear to be used.
If you slow down to a very low speed, the transmission will automatically shift down.
When starting in the (MAN)ual position, 3rd gear is the highest gear that may be selected.
NOTE: Kickdown (see previous page) does not function when the transmission is in the manual shift (geartronic)
mode. The gear selector must be in D (Drive) position.
W Winter/Wet driving mode - enhanced vehicle traction
Mode W will only function if the gear selector is in the (D)rive position.
Press the button at the base of the gear selector to engage/disengage this driving mode (see illustration).
An LED in the button will light up to indicate that W is engaged and this will also be displayed in the instrument
panel (see page 25
).
This mode may be selected for starting/moving off on slippery roads.
pg. 78 Driving economy
Economical driving conserves natural resources
Better driving economy may be obtained by thinking ahead, avoiding rapid starts and stops and adjusting the speed of
your vehicle to immediate traffic conditions. Observe the following rules:
Bring the engine to normal operating temperature as soon as possible by driving with a light foot on the accelerator
pedal for the first few minutes of operation. A cold engine uses more fuel and is subject to increased wear.
Whenever possible, avoid using the car for driving short distances. This does not allow the engine to reach normal
operating temperature.
Drive carefully and avoid rapid acceleration and hard braking.
Do not exceed posted speed limits.
Avoid carrying unnecessary items (extra load) in the car.
Maintain correct tire pressure. Check tire pressure regularly (when tires are cold).
Remove snow tires when threat of snow or ice has ended.
Note that roof racks, ski racks, etc., increase air resistance and also fuel consumption.
Avoid using automatic transmission kickdown feature unless necessary.
Avoid using the air conditioning when it is not required. When engaged, the A/C compressor places an additional
load on the engine. However, at higher driving speeds, fuel consumption will be lower with the air conditioning on and
the windows closed than with the air conditioning off and the windows open.
Using the onboard trip computer's fuel consumption modes can help you learn how to drive more economically.
ProCarManuals.com
Page 58 of 109

Other factors that decrease gas mileage are:
Dirty air cleaner
Dirty engine oil and clogged oil filter
Dragging brakes
Incorrect front end alignment
Some of the above mentioned items and others are checked at the standard Maintenance Service intervals.
NOTE : Vehicles equipped with automatic transmissions should use (D)rive as often as possible and avoid using
"kickdown" to help improve fuel economy.
Cooling system
The risk for engine overheating is greatest, especially in hot weather, when:
Towing a trailer up steep inclines for prolonged periods at wide open throttle and low engine rpm.
Stopping the engine suddenly after high speed driving (so-called "after-boiling" can occur).
To avoid overheating, the following rules should be followed:
Do not drive for prolonged periods at engine speeds above 4500 rpm if you are towing a trailer in hilly terrain.
Reduce speed when towing a trailer up long, steep inclines. The risk of overheating can be reduced by switching off
the air conditioning system for a short time.
Do not let the engine idle unnecessarily for prolonged periods.
Do not mount auxiliary lamps in front of the grill.
When the risk of overheating is imminent, or in the event of overheating (the temperature gauge goes repeatedly into,
or stays continually in, the red section), the following precautions should be taken:
Switch off the air conditioning system.
Pull off the road, away from traffic, stop the car and put the gear selector into Park. Do not stop the engine!
Switch the heater to full (maximum) position. Increase the engine speed to approx. 2000 rpm (twice idling speed)
until the temperature begins to drop.
If the warning light in the center of the instrument panel is red, and the message "Coolant level lo stop engine" is
displayed, switch off the engine as soon as possible.
WARNING!
Do not remove coolant expansion tank cap. The coolant will be extremely hot.
If necessary, see page 116
for information on checking and topping-up the coolant level.
Contents | Top of Page
ProCarManuals.com
Page 72 of 109

To remove a defective bulb:
Switch off the ignition.
Open the hood.
Remove the plastic cover over the bulb (1) by turning it counterclockwise.
Remove the connector (2).
Loosen the retaining spring (3) by first moving it to the right and then moving it down, out of the way.
Pull out the defective bulb. Note the position of the guide lug on the base of the bulb (4).
Installing a new bulb
To install a new bulb:
Insert the new bulb, without touching the glass, with the guide lug upward (1). The bulb will only seat properly in
this position.
Move the retaining spring up and push it slightly to the left until it seats properly (2).
Press the connector into place on the bulb (3).
Reinstall the plastic cover and turn it clockwise until it is correctly in place (4). "TOP" must be upward.
NOTE: If the vertical aim of your headlights needs to be adjusted for any reason (e.g., towing a trailer for extended
periods), this should be done by an authorized Volvo retailer.
pg. 105 Replacing bulbs
Front parking light
Front parking lights
Switch off the ignition.
Remove the plastic cover over it the high beam bulb by turning it counterclockwise.
ProCarManuals.com