Page 191 of 483
Remote
ting or deactivating the anti-theft alarm
system)
- Use the selective unlock feature
(open the driver's door only)
- Switch on the intenor lights
- Unlock the rear lid
- Activating the
The remote transmitte r and the batteries
are located in the key. The receiver for the
signal is inside the passenge r compart
ment.
Your authorized VOLKSWAGE N
er can change the batteries for you .
The
operating range (blue) for the
mote control is shown in the illustration .
Maximum range of effectiveness depends
on several things. the batteries are
excep tional
B45 -6 0 3K
The
in an emergency.
How the remote control works
Button A unlocks the vehicle . After unlock
ing
the vehicle, you have you wait longer than onds. the vehicle will automatically lock
self once again. This prevents you from intenti onally unlocking the vehicle while yo u
are standing within the range of effective
ness of the remote control.
The anti-theft alarm system is turned
off for
t hese
ing your
Page 194 of 483
Anti-theft
can turn on the system using either
yo
ur key or the remo te control.
When you lock the vehicle, you turn
on the
a la rm sys tem au toma tically. S im ply turn the
key to the lock position or use the remo te
control.
The alarm sounds when
(on a locked vehicle)
a
th e engi ne or
the rear lid is forced
or when the ignition is switched on.
The horn will sound and the emergency
flashers will blink for about
the system warning
light in the driver's door will go out after 28
days . This is meant to conserve battery
power . The system is still operating.
the alarm has sounded on e and
t hen the vehicle is forced open again (for ex
ample. someone t ries to for
cibly ope n a
an d t he n tr ies to force open the rea r
lid). the signal will sound once again.
AND
Page 209 of 483

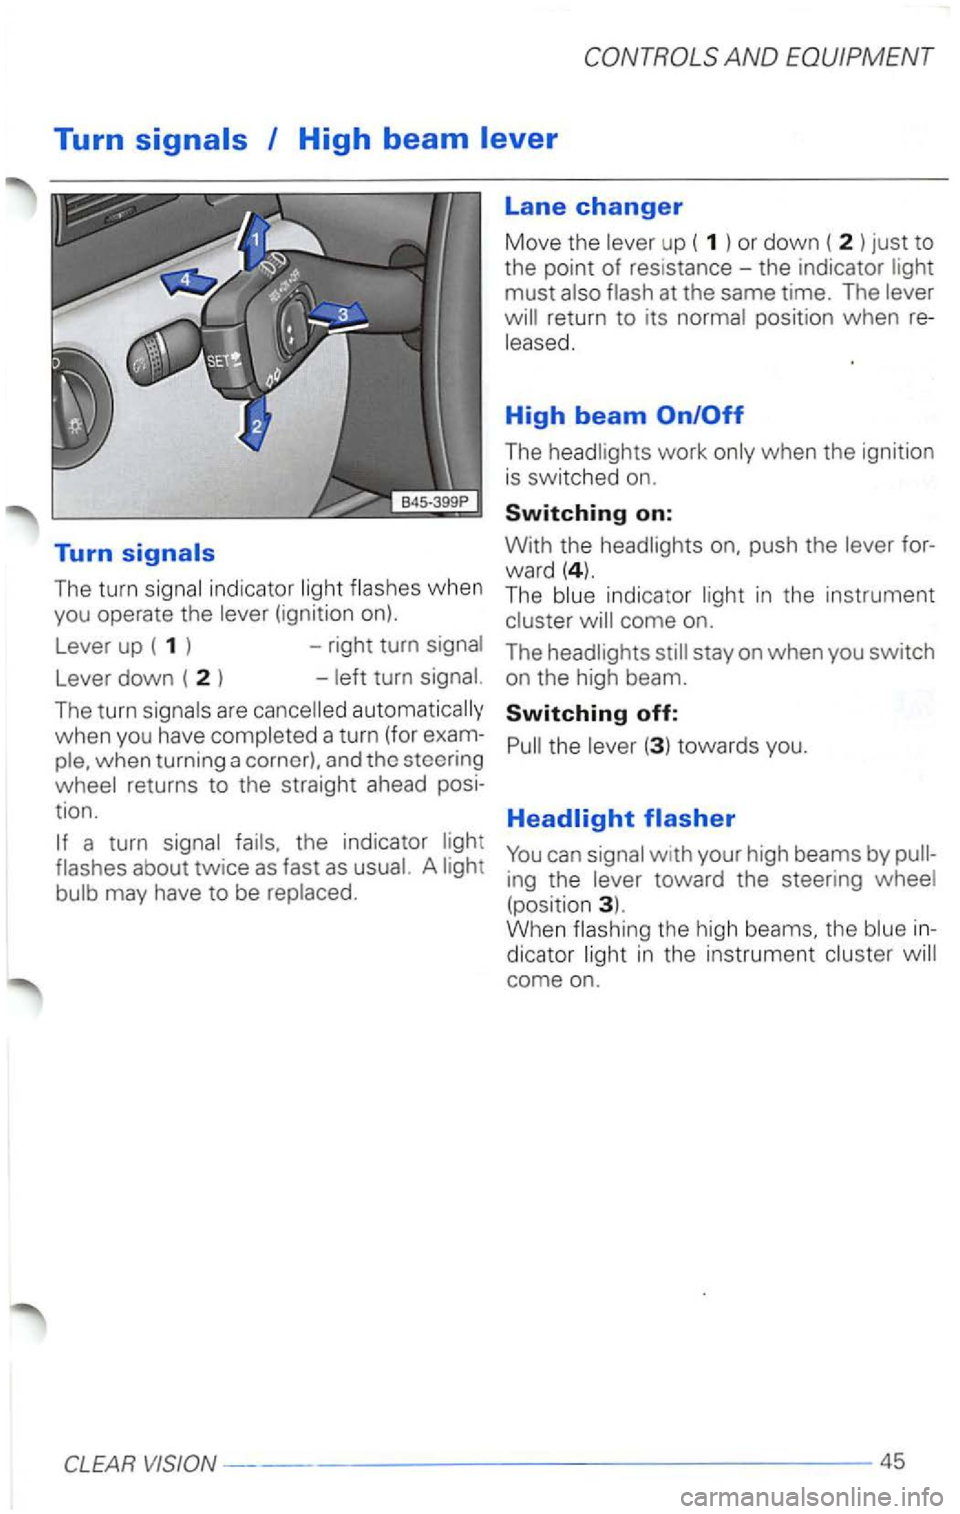
Turn
The turn signa l indicator ligh t flashes when you operate the lever (ignition on).
Lever up ( 1 ) -right turn signal
Lever down ( 2 ) - left turn signal.
The
turn signals are cancelled automatically
when you have completed a turn (for exam
ple. when turning a corner). and tho steering
wheel returns to the straight ahead posi
tion.
a turn signal fails. the indicator light
flashes about twice as fast as usual. A light
bulb may have
to be replaced.
Lane changer
Move the lever up ( 1 ) or down ( 2 ) just to
the point
of resistance -the indicator light
must also flash at the same time. The lever
return to its normal position when
The headl ights work only when the ignition
is switched on.
Switching on:
With the headlights push the lever for
ward
( 4). The blue indicator light in the instrument
cluster
stay on when you switch
on the high beam.
Switching off:
Pull the lever (3 ) towards you.
ing the lever toward the steering wheel
(position 3). When flashing the high beams, the blue
come on.
---------------------------------45
Page 276 of 483

ALPHABETICAL
H
Handbrake ........................ 1
Hat shel f ................ .......... 71
shade ....................... 71
Head Restraints .................... 56
................ Bo oklet 2.1
Height Adjustment
............... 56
........................ 56
Remov i
ng ....................... 56
Headlight
-Dimmer switch ..
............... 45
-
Flasher ........................ 45
Head l
ight dimmer switch lever ....... 45
H eadlig ht flasher .
.................. 45
Heated
- Driver
's seat .................... 43
-
seat ................ 44
-Window ....................... 43
Heated driver's seat ................ 43
Heated outside mirrors
.............. 51
Heated passenger seat .............. 44
Heating ..
.........................
Heat ing interior quickly .............. 83
Heat ing system
... Clim ate contro ls
Height adjustment of seats
......... . 59
H igh beam
........................ 16
H igh beam lever
.................... 45
Home
link ......................... . 53
Hood, opening ......... Bookle t 3.2
Hooks.
lie-Down. Cargo Net ........ 72
H orn ..
............................. 3
................. also Bookle t 2 .1
Ho w to use the air conditioning
more economically
................. 85
How to use this Manua l .............. 2
...........................
- Key safety interloc k ............. 93
information
about this Manual .................. 2
I ncreasing size of
luggage compartment .
............ 71
Indicator-Multifunction (MFA) ....... 11
lights ..................... 15
-Airbag system .................. 16
-Anti-Lock brake system ......... 17
-Electronic power cont ro l ......... 19
- Engine coolant temperature
. 19
-Engine
............... 22
- Generator . . . . . . . . . . . . . . . . . . . . . . 19
- High beam. .
................... 16
-Malfunction indicator lamp ....... 22
-belts .................... 19
-Trunk I Rear .................. 22
-Turn signals .................... 16
-Windshield washer .............. 22
-Windshield was her fluid ................... 22
wipe r blades .............. 48
112--------------------------------
Page 336 of 483
Press the button to turn the unit
come back on when the unit
is turned on again.
The foll
owing settings are also saved w hen
you turn off the system :
- Radio: the frequen cy se
tting
-
Turn the knob to adjust the volume.
Setting the turn-on
The volum e setting when the unit is turned
on is the same as it was when the unit was
turned off.
the Dolby ® button
(12, see page 1
hear a signa l tone, an d
The
Press the Dolby® button (12) again.
hear a sig nal tone, and
Press the Dolby ® button (12) again for
l o ng er th
an 3 secon ds to con firm the set
tings you've just made.
hear a signal tone. The unit is now in
the normal operating mode and your
changes are stored.
Notes
you do not confirm the sett ing you have
j ust made. the unit
return
to the normal operatio n mode after about
WORKS-- --------------5