Page 43 of 340

392003 MY SIENNA (OM45410U)
NOTICE
Avoid opening the fuel filler door
when the left side sliding door is fully
opened. Otherwise, the fuel filler door
may be damaged.
2. To re")
03 SIENNA_U (L/O 0207)
392003 MY SIENNA (OM45410U)
NOTICE
Avoid opening the fuel filler door
when the left side sliding door is fully
opened. Otherwise, the fuel filler door
may be damaged.
2. To remove the fuel tank cap, turnthe cap slowly counterclockwise,
then pause slightly before removing
it. After removing the cap, hang it
on the cap hanger.
It is not unusual to hear a slight swoosh
when the cap is opened. When insta lling,
turn the cap clockwise till you hear a
click.
If the cap is not tightened securely, the
malfunction indicator lamp comes on.
Make sure the cap is tightened securely. The indicator lamp goes off after driving
several times. If the indicator lamp does
not go off, contact your Toyota dealer as
soon as possible.
The left side sliding door does not open
fully if the fuel filler door is o
pened.
Left and right side power sliding door
models—The left side power sliding door
does not operate when the fuel f iller door
is opened.
CAUTION
�Make sure the cap is tightened se-
curely to prevent fuel sp illage in
case of an accident.
�Use only a genuine Toyota fuel tank
cap for replacement. It is designed
to regulate fuel tank pressure.
Page 48 of 340

442003 MY SIENNA (OM45410U)
While the vehicle is being driven, all ve-
hicle occupants should have the seatback
upright, sit well back in the seat and prop-
erly wear the seat")
03 SIENNA_U (L/O 0207)
442003 MY SIENNA (OM45410U)
While the vehicle is being driven, all ve-
hicle occupants should have the seatback
upright, sit well back in the seat and prop-
erly wear the seat belts provided.
CAUTION
�Do not drive the vehicle unless the
occupants are properly seated. Do
not allow sitting on top of a
folded�down seatback, or in the
luggage compartment or cargo area.
Persons not properly seated and/or
properly restrained by seat belts
can be severely injured in the event
of emergency braking or a collision.
�During driving, do not allow pas-
sengers to stand up or move
around between seats. Severe inju-
ries can occur in the event of emer-
gency braking or a collision.
CAUTION
The SRS side airbags are installed in
the driver and front passenger seats.
Observe the following precautions.
�Do not lean against the front door
when the vehicle is in use, since
the side airbag inflates with consid-
erable speed and force. Otherwise,
you may be killed or seriously in-
jured.
�Do not use accessories for the
seats which cover the parts where
the side airbags inflate. Such acces-
sories may prevent the side airbags
from activating correctly, causing
death or serious injury.
�Do not modify or replace the seats
or upholstery of the front seats
with the side airbags. Such changes
may disable the system or cause
the side airbags to inflate acciden-
tally, resulting in death or serious
injury. Consult your Toyota dealer if
you insist on modifications of this
kind.
Adjust the driver’s seat so that the foot
pedals, steering wheel and instrument
panel controls are within easy reach of
the driver.
CAUTION
�Adjustments should not be made
while the vehicle is moving, as the
seat may unexpectedly move and
cause the driver to lose control of
the vehicle.
�When adjusting the seat, be careful
that the seat does not hit a passen-
ger or luggage.
�After adjusting the seat position,
try sliding it forward and backward
to make sure it is locked in posi-
tion.
�After adjusting the seatback, push
back your body to make sure it is
locked in position.
SeatsFront seats—
—Front seat precautions (on vehicles with SRS side airbags)—Seat adjustment precautions
Page 51 of 340

472003 MY SIENNA (OM45410U)
CAUTION
To reduce the risk of sliding under
the lap belt during a collision, avoid
reclining the seatback any more than
needed. The seat belts provid")
03 SIENNA_U (L/O 0207)
472003 MY SIENNA (OM45410U)
CAUTION
To reduce the risk of sliding under
the lap belt during a collision, avoid
reclining the seatback any more than
needed. The seat belts provide maxi-
mum protection in a frontal or rear
collision when the driver and the pas-
senger are sitting up straight and
well back in the seats. If you are
reclined, the lap belt may slide past
your hips and apply restraint forces
directly to the abdomen. In the event
of a frontal collision, the more the
seat is reclined, the greater the risk
of personal injury.
CAUTION
�Adjustment should not be made
while the vehicle is moving.
�When adjusting the seat, be careful
that the seat does not hit a passen-
ger or luggage.
�Third seats only: Adjust both seat
cushions to the same position and
align both seatbacks at the same
angle when a person sits in the
third seat center position. Other-
wise, the person cannot wear the
seat belt properly and this may
cause serious injuries in a collision.
�After adjusting the seat position,
try sliding it forward and backward
to make sure it is lock in position.
�After adjusting the seatback, push
back your body to make sure it is
locked in position.
When returning seats to their original
position, observe the following pre-
cautions in order to prevent personal
injury in a collision or sudden stop:
�Make sure the seat is securely
locked by pushing forward and rear-
ward on the top of the seatback
and by trying to pull up the edge
of the bottom cushion. Failure to
do so will prevent the seat belt
from operating properly.
�Make sure the seat belts are not
twisted or caught under the seat
and are arranged in their proper
position and are ready to use.
Folding the seats up will enlarge the lug-
gage compartment. See “Luggage stowage
precautions” in Section 2 for precautions
in loading luggage.
Rear seats—
—Rear seat precautions
Page 53 of 340

492003 MY SIENNA (OM45410U)
1. SEAT POSITION ADJUSTING LEVER
Hold the center of the lever and pull it
up. Then slide the seat to the desired
position with slight body pressure a")
03 SIENNA_U (L/O 0207)
492003 MY SIENNA (OM45410U)
1. SEAT POSITION ADJUSTING LEVER
Hold the center of the lever and pull it
up. Then slide the seat to the desired
position with slight body pressure and
release the lever.
Do not place anything under the seats. It
might interfere with the seat�lock mecha-
nism.
2. SEATBACK ANGLE ADJUSTING LEVER
Lean forward and pull the lever up.
Then lean back to the desired angle
and release the lever.
CAUTION
To reduce the risk of sliding under
the lap belt during a collision, avoid
reclining the seatback any more than
needed. The seat belts provide maxi-
mum protection in a frontal or rear
collision when the p assengers are sit-
ting up straight and well back in the
seats. If you are reclined, the lap belt
may slide past your hips and apply
restraint forces directly to the abdo-
men. In the event of a frontal colli-
sion, the more the seat is reclined,
the greater the risk of personal injury.
For access to the third seat, do this.
1. Pull the lever behind the seatback.
The seat will slide forward.
2. Move the seat to the front�most posi- tion.
After passengers are in, lift up the seat-
back and return the seat until it locks.
CAUTION
�After putting back the seat, try
pushing the seat forward and rear-
ward to make sure it is secured in
place.
�Passengers sitting in the third seat
must be careful not to accidentally
pull the release lever while the ve-
hicle is moving.
—Moving second seat for third
seat entry
(right side captain seat)
Page 54 of 340
03 SIENNA_U (L/O 0207)
502003 MY SIENNA (OM45410U)
Lift the seatback angle adjusting lever
(1) or press the lever (2) behind the
seatback and fold the seatback down.You can use the second seatback as a
temporary table only when the vehicle is
stopped.
CAUTION
To avoid serious injury:
�Do not set up the seatback table
while the vehicle is moving.
�Do not sit on the folded seatback.
�Make sure the second seat is se-
curely locked in position when you
set the second seat as a temporary
table.
NOTICE
To prevent the seat from damaging,
avoid putting heavy loads on the tem-
porary table.
—Folding second seat
(bench seat)
Page 55 of 340
03 SIENNA_U (L/O 0207)
512003 MY SIENNA (OM45410U)
1. Pull the lever behind the seatback.
Right side only—The seat will slide for-
ward.2. Lift the seatback angle adjusting le- ver and fold the seatback down.You can use the second seatback as a
temporary table only when the vehicle is
stopped.
CAUTION
To avoid serious injury:
�Do not set up the seatback table
while the vehicle is moving.
�Do not sit on the folded seatback.
�Make sure the second seat is se-
curely locked in sliding position
when you set the second seat as a
temporary table.
—Folding second seats
(captain seat)
Page 56 of 340
03 SIENNA_U (L/O 0207)
522003 MY SIENNA (OM45410U)
�When the second seat for a table
was slid for accessing to the third
seat, get the seatback up to the
upright position, fold the seatback
down again, and make certain all
the latches are engaged.
NOTICE
To prevent the seat from damaging,
avoid putting heavy loads on the tem-
porary table.
1. Lift the seatback angle adjusting le-ver (1) or press the lever (2) behind
the seatback and fold the seatback
down.2. Pull the seat lock release lever. Liftthe seat and remove the seat toward
you.
Removing the second seat will enlarge the
luggage compartment. See “Luggage stow-
age precautions” in Section 2 for precau-
tions in loading luggage.
—Removing second seat
(bench seat)
Page 57 of 340
03 SIENNA_U (L/O 0207)
532003 MY SIENNA (OM45410U)
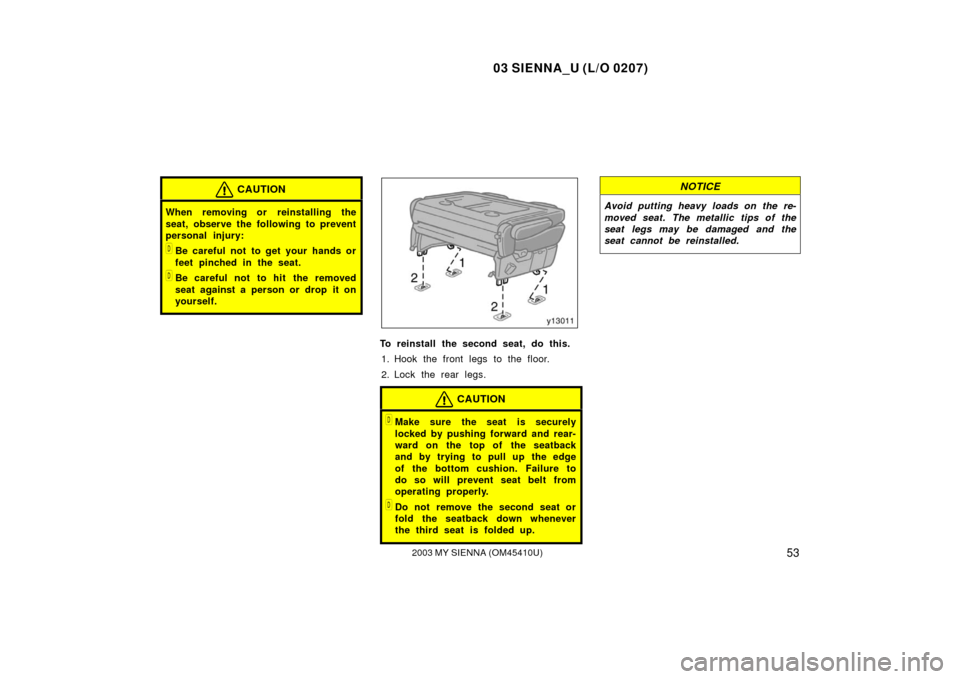
CAUTION
When removing or reinstalling the
seat, observe the following to prevent
personal injury:
�Be careful not to get your hands or
feet pinched in the seat.
�Be careful not to hit the removed
seat against a person or drop it on
yourself.
To reinstall the second seat, do this.1. Hook the front legs to the floor.
2. Lock the rear legs.
CAUTION
�Make sure the seat is securely
locked by pushing forward and rear-
ward on the top of the seatback
and by trying to pull up the edge
of the bottom cushion. Failure to
do so will prevent seat belt from
operating properly.
�Do not remove the second seat or
fold the seatback down whenever
the third seat is folded up.
NOTICE
Avoid putting heavy loads on the re-
moved seat. The metallic tips of the
seat legs may be damaged and the
seat cannot be reinstalled.

502003 MY SIENNA (OM45410U)
Lift the seatback angle adjusting lever
(1) or press the lever (2) behind the
seatback and fold the seatback down.You can use the second seatback as")

512003 MY SIENNA (OM45410U)
1. Pull the lever behind the seatback.
Right side only—The seat will slide for-
ward.2. Lift the seatback angle adjusting le- ver and fold the seat")