Page 125 of 252
’03 Corolla U (L/O 0201)
1212003 MY COROLLA_U (OM12744U)
OPERATION OF INSTRUMENTS AND
CONTROLS
Air conditioning system
Controls122
. . . . . . . . . . . . . . . . . . . . . . . . . . . . . . . . . . . . .\
. . . . . . . . . . . . . .
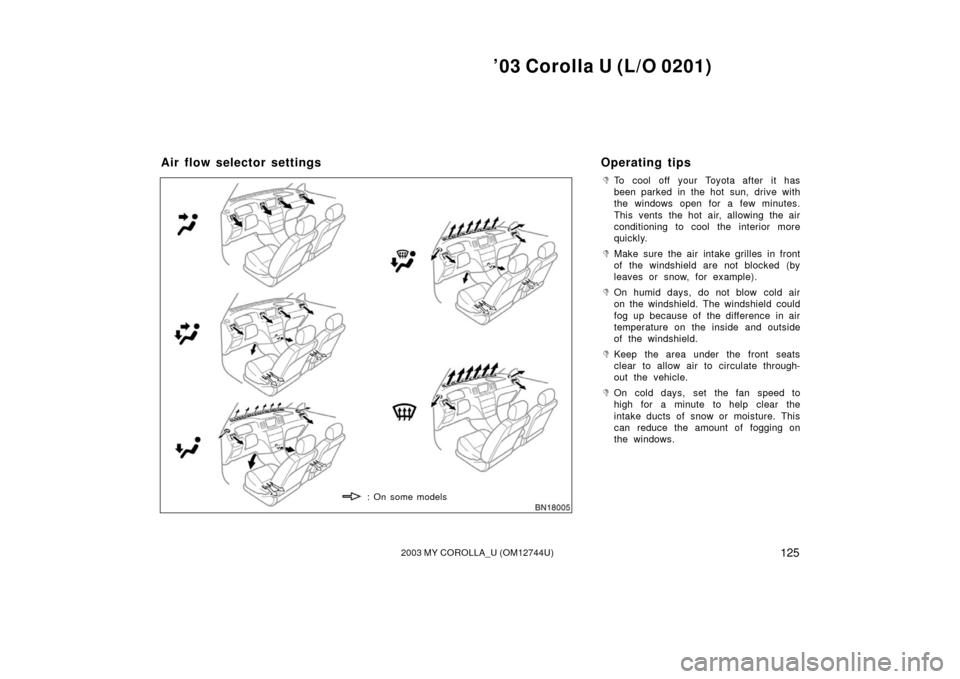
Air flow selector settings 125
. . . . . . . . . . . . . . . . . . . . . . . . . . . . . . . . . . . . \
.
Operating tips 125
. . . . . . . . . . . . . . . . . . . . . . . . . . . . . . . . . . . . \
. . . . . . . . . .
Side vents 128
. . . . . . . . . . . . . . . . . . . . . . . . . . . . . . . . . . . . \
. . . . . . . . . . . . .
Checking and replacing the air conditioning filter 128
. . . . . . . . . . . . . . .
SECTION 1� 8
Page 126 of 252
’03 Corolla U (L/O 0201)
1222003 MY COROLLA_U (OM12744U)
1. “A/C” button (on some models)
2. Air intake selector
3. Temperature selector
4. Fan speed selector
5. Air flow selector
Controls
Page 127 of 252

1232003 MY COROLLA_U (OM12744U)
Fan speed selector
Turn the knob to adjust the fan speed—to
the right to increase, to the left to de-
crease.
Temperature selector
Turn the")
’03 Corolla U (L/O 0201)
1232003 MY COROLLA_U (OM12744U)
Fan speed selector
Turn the knob to adjust the fan speed—to
the right to increase, to the left to de-
crease.
Temperature selector
Turn the knob to adjust the temperature—
to the right to warm, to the left to cool.
Air flow selector
Turn the knob to select the vents used for
air flow.1. Panel— Air flows mainly from the
instrument panel vents.
2. Bi�level— Air flows from both the floor
vents and the instrument panel vents.
3. Floor— Air flows mainly from the floor
vents.
4. Floor/Windshield— Air flows mainly
from the floor vents and windshield
vents.
Turning the air flow selector to the
floor/windshield position turns on the
defogging function with the purpose of
clearing the front view. This position allows the air intake to
select FRESH automatically. This is to
clean up the front view more quickly.
If you want to return the setting to
RECIRCULATE mode, press the air in-
take selector button once again.
Press the “A/C” button for dehumidified
heating or cooling. This setting clears
the front view more quickly.
If you turn the air flow selector to the
another position, the air intake mode
returns to FRESH mode automatically.
5. Windshield— Air flows mainly from the
windshield vents.
Turning the air flow selector to the
windshield position turns on the defog-
ging function with the purpose of clear-
ing the front view.
This position allows the air intake to
select FRESH automatically. This is to
clean up the front view more quickly.
If you want to return the setting to
RECIRCULATE mode, press the air in-
take selector button once again.
Press the “A/C” button for dehumidified
heating or cooling. This setting clears
the front view more quickly.
Page 128 of 252

1242003 MY COROLLA_U (OM12744U)
If you turn the air flow selector to the
another position, the air intake mode
returns to FRESH mode automatically.
For details about air fl")
’03 Corolla U (L/O 0201)
1242003 MY COROLLA_U (OM12744U)
If you turn the air flow selector to the
another position, the air intake mode
returns to FRESH mode automatically.
For details about air flow selector settings,
see the illustration after “A/C” button.
Air intake selector
Press the button to select the air source. 1. Recirculate (indicator light is on)—Re-
circulates the air inside the vehicle.
2. Fresh (indicator light is off)—Draws
outside air into the system.
To prevent fogging up of the windshield,
the air intake mode may change automati-
cally to FRESH depending on the condi-
tion of the air conditioning system. “A/C” button
To turn on the air conditioning, press the
“A/C” button. The “A/C” button indicator
will come on. To turn the air conditioning
off, press the button again.
If the “A/C” button indicator flashes, there
is a problem in the air conditioning system
and the air conditioning automatically
shuts off. If this happens, take your ve-
hicle to a Toyota dealer for service.
Page 129 of 252
’03 Corolla U (L/O 0201)
1252003 MY COROLLA_U (OM12744U)
�To cool off your Toyota after it has
been parked in the hot sun, drive with
the windows open for a few minutes.
This vents the hot air, allowing the air
conditioning to cool the interior more
quickly.
�Make sure the air intake grilles in front
of the windshield are not blocked (by
leaves or snow, for example).
�On humid days, do not blow cold air
on the windshield. The windshield could
fog up because of the difference in air
temperature on the inside and outside
of the windshield.
�Keep the area under the front seats
clear to allow air to circulate through-
out the vehicle.
�On cold days, set the fan speed to
high for a minute to help clear the
intake ducts of snow or moisture. This
can reduce the amount of fogging on
the windows.
: On some models
Air flow selector settingsOperating tips
Page 130 of 252

1262003 MY COROLLA_U (OM12744U)
�When driving on dusty roads, close all
windows. If dust thrown up by the ve-
hicle is still drawn into the vehicle after
closing the windo")
’03 Corolla U (L/O 0201)
1262003 MY COROLLA_U (OM12744U)
�When driving on dusty roads, close all
windows. If dust thrown up by the ve-
hicle is still drawn into the vehicle after
closing the windows, it is recommended
that the air intake selector be set to
FRESH and the fan speed selector to
any setting except “OFF”.
�If following another vehicle on a dusty
road, or driving in windy and dusty
conditions, it is recommended that the
air intake selector be temporarily set to
RECIRCULATE, which will close off the
outside passage and prevent outside
air and dust from entering the vehicle
interior.Heating
For best results, set controls to:
Fan speed— Any setting except “OFF”
Temperature— Towards red zone
Air intake—FRESH (outside air)
Air flow—FLOOR
Air conditioning—OFF
�For quick heating, select recirculated
air for a few minutes. To keep the
windows from fogging, select fresh af-
ter the vehicle interior has been
warmed.
�Press the “A/C” button on for dehumidi-
fied heating.
�Choose floor/windshield air flow to heat
the vehicle interior while defrosting or
defogging the windshield. Air conditioning
For best results, set controls to:
Fan speed— Any setting except “OFF”
Temperature— Towards blue zone
Air intake—FRESH (outside air)
Air flow—PANEL
Air conditioning—ON
�For quick cooling, select recirculated
air for a few minutes.
Ventilation
For best results, set controls to:
Fan speed— Any setting except “OFF”
Temperature— Towards blue zone
Air intake—FRESH (outside air)
Air flow—PANEL
Air conditioning—OFF
Page 131 of 252

1272003 MY COROLLA_U (OM12744U)
Defogging
The inside of the windshield
For best results, set controls to:Fan speed— Any setting except “OFF”
Temperature— Towards red")
’03 Corolla U (L/O 0201)
1272003 MY COROLLA_U (OM12744U)
Defogging
The inside of the windshield
For best results, set controls to:Fan speed— Any setting except “OFF”
Temperature— Towards red zone to heat;
blue zone to cool
Air intake—FRESH (outside air)
Air flow—WINDSHIELD
Turning the air flow selector to the wind-
shield or floor/windshield position turns on
the defogging function with the purpose of
clearing the front view.
When turning the air flow selector to wind-
shield or floor/windshield position, the air
intake selects FRESH automatically. This
is to clean up the front view more quickly.
If you want to return the setting to RE-
CIRCULATE mode, press the air intake
selector button once again.
Press the “A/C” button for dehumidified
heating or cooling. This setting clears the
front view more quickly.
If you turn the air flow selector to the
another position, the air intake mode re-
turns to FRESH mode automatically.
�On humid days, do not blow cold air
on the windshield—the difference be-
tween the outside and inside tempera-
tures could make the fogging worse.
Defrosting
The outside of the windshield
For best results, set controls to:
Fan speed— Any setting except “OFF”
Temperature— Towards red zone
Air intake—FRESH (outside air)
Air flow—WINDSHIELD
Turning the air flow selector to the wind-
shield or floor/windshield position turns on
the defrosting function with the purpose of
clearing the front view.
When turning the air flow selector to wind-
shield or floor/windshield position, the air
intake selects FRESH automatically. This
is to clean up the front view more quickly.
If you want to return the setting to RE-
CIRCULATE mode, press the air intake
selector button once again.
Press the “A/C” button for dehumidified
heating. This setting clears the front view
more quickly.
If you turn the air flow selector to the
another position, the air intake mode re-
turns to FRESH mode automatically.
�To heat the vehicle interior while de-
frosting the windshield, choose
floor/windshield air flow.
Page 133 of 252
’03 Corolla U (L/O 0201)
1292003 MY COROLLA_U (OM12744U)
2. Push each side of the glove box todisconnect the claws.3. Remove the filter cover as shown inthe illustration.4. Pull the filter out of the filter outlet.Inspect the filter on the surface.
If it is dirty, it should be replaced.

1212003 MY COROLLA_U (OM12744U)
OPERATION OF INSTRUMENTS AND
CONTROLS
Air conditioning system
Controls122
. . . . . . . . . . . . . . . . . . . . . . . . . . . . . . . . . .")

1222003 MY COROLLA_U (OM12744U)
1. “A/C” button (on some models)
2. Air intake selector
3. Temperature selector
4. Fan speed selector
5. Air flow selector
Controls")

1292003 MY COROLLA_U (OM12744U)
2. Push each side of the glove box todisconnect the claws.3. Remove the filter cover as shown inthe illustration.4. Pull the filter out of th")