Page 232 of 307

228
2003 CAMRY from Jan. ’03 Prod. (OM33593U)
Compact spare tire (on some models)
The compact spare tire is designed for
temporary emergency use only.
The compact spare tire")
’03Camry_U (L/O 0301)
228
2003 CAMRY from Jan. ’03 Prod. (OM33593U)
Compact spare tire (on some models)
The compact spare tire is designed for
temporary emergency use only.
The compact spare tire is identified by the
distinctive wording “TEMPORARY USE
ONLY” molded into the side wall of the
tire.
The compact spare tire saves space in
your luggage compartment, and its lighter
weight helps to improve fuel economy and
permits easier installation in case of a flat
tire.The compact spare tire can be used many
times, if necessary. It has tread life of up
to 4800 km (3000 miles) depending on
road conditions and your driving habits.
When tread wear indicators appear on the
tire, replace the tire.
See also the tire section on page 270 in
Section 7�2 for details on the tread wear
indicators and other service information.
CAUTION
�The compact spare tire was de-
signed especially for your Toyota.
Do not use it on any other vehicle.
�Do not use more than one compact
spare tire at the same time.
�The pressure for the compact spare
tire must be 420 kPa (4.2 kgf/cm2
or bar, 60 psi).
�Do not exceed 80 km/h (50 mph)
when driving with the compact
spare tire.
�The standard tire should be re-
paired and reinstalled as soon as
possible.
�Avoid sudden acceleration, sudden
deceleration and sharp turns with
the compact spare tire.
NOTICE
Your ground clearance is reduced
when the compact spare tire is
installed so avoid driving over ob-
stacles and drive slowly on rough,
unpaved roads and speed bumps.
Also, do not attempt to go through an
automatic car wash as the vehicle
may get caught, resulting in damage.
Page 233 of 307
’03Camry_U (L/O 0301)
229
2003 CAMRY from Jan. ’03 Prod. (OM33593U)
With a compact spare tire
Without a compact spare tire
1. Get the required tools and sparetire.
1. Jack handle
2. Wheel nut wrench
3. Front towing eyelet (on some models)
4. Jack
5. Spare tire
To prepare yourself for an emergency, you
should fam iliarize yourself with the use of
the jack, each of the tools and their stor-
age locations.
To remove the jack, turn the jack joint by
hand until the jack becomes free.
—Required tools and spare
tire
Page 234 of 307

230
2003 CAMRY from Jan. ’03 Prod. (OM33593U)
To store the jack, align the hole of the
jack head with the vehicle hook. Turn the
jack joint until the jack base fits securely")
’03Camry_U (L/O 0301)
230
2003 CAMRY from Jan. ’03 Prod. (OM33593U)
To store the jack, align the hole of the
jack head with the vehicle hook. Turn the
jack joint until the jack base fits securely
with the vehicle body.
This prevents the jack from flying forward
during a collision or sudden stop.To remove the spare tire:
1. Loosen the nut and remove it.
2. Remove the spare tire cover.
3. Loosen the bolt and remove it.
4. Remove the spacer. (compact spare tire only)
Then take the spare tire out of the ve-
hicle.
When storing the spare tire, put it in place
with the outer side of the wheel facing up.
Then secure the tire by repeating the
above removal steps in reverse order to
prevent it from flying forward during a
collision or sudden braking.2. Block the wheel diagonally opposite the flat tire to keep the vehicle from
rolling when it is j acked up.
When blocking the wheel, place a wheel
block in front of one of the front wheels
or behind one of the rear wheels.
—Blocking the wheel
Page 236 of 307
’03Camry_U (L/O 0301)
232
2003 CAMRY from Jan. ’03 Prod. (OM33593U)
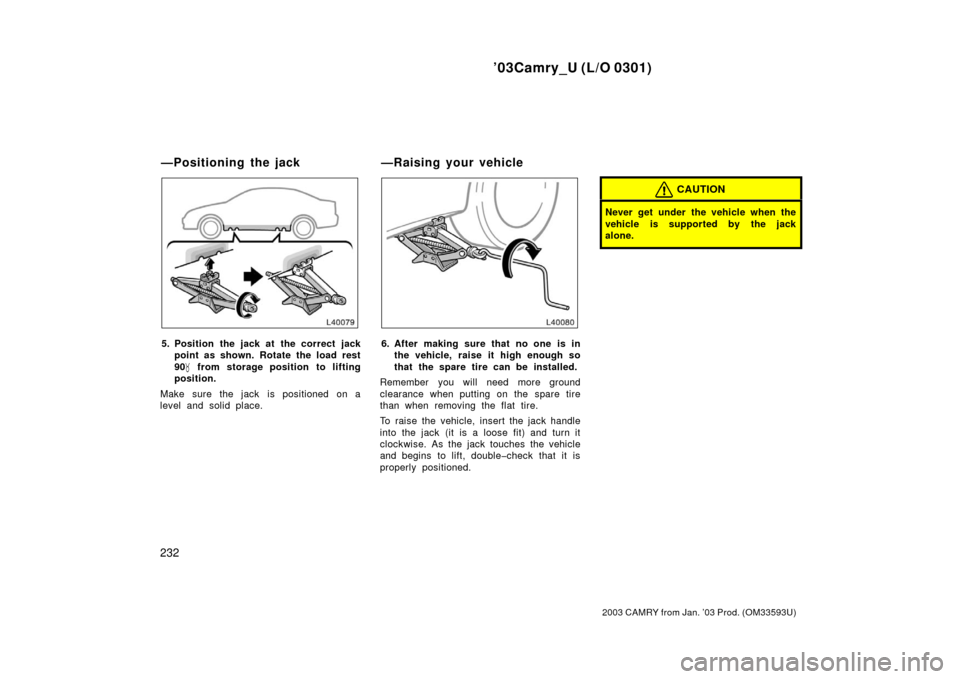
5. Position the jack at the correct jackpoint as shown. Rotate the load rest
90� from storage position to lifting
position.
Make sure the jack is positioned on a
level and solid place.6. After making sure that no one is in the vehicle, raise it high enough so
that the spare tire can be installed.
Remember you will need more ground
clearance when putting on the spare tire
than when removing the flat tire.
To raise the vehicle, insert the jack handle
into the jack (it is a loose fit) and turn it
clockwise. As the jack touches the vehicle
and begins to lift, double�check that it is
properly positioned.
CAUTION
Never get under the vehicle when the
vehicle is supported by the jack
alone.
—Positioning the jack —Raising your vehicle
Page 237 of 307
’03Camry_U (L/O 0301)
233
2003 CAMRY from Jan. ’03 Prod. (OM33593U)
7. Remove the wheel nuts and changetires.
Lift the flat tire straight off and put it
aside.
Roll the spare wheel into position and
align the holes in the wheel with the bolts.
Then lift up the wheel and get at least the
top bolt started through its hole. Wiggle
the tire and press it back over the other
bolts.Before putting on wheels, remove any cor-
rosion on the mounting surfaces with a
wire brush or such. Installation of wheels
without good metal�to�metal contact at the
mounting surface can cause wheel nuts to
loosen and eventually cause a wheel to
come off while driving.8. Reinstall all the wheel nuts finger tight.
Reinstall the wheel nuts (tapered end in-
ward) and tighten them as much as you
can by hand. Press back on the tire and
see if you can tighten them more.
—Changing wheels —Reinstalling wheel nuts
Page 239 of 307

235
2003 CAMRY from Jan. ’03 Prod. (OM33593U)
10. Reinstall the wheel ornament.1. Put the wheel ornament into position.
Align the cutout of the wheel ornament
with the valve")
’03Camry_U (L/O 0301)
235
2003 CAMRY from Jan. ’03 Prod. (OM33593U)
10. Reinstall the wheel ornament.1. Put the wheel ornament into position.
Align the cutout of the wheel ornament
with the valve stem as shown. 2. Tap it firmly with the side or heel of your hand to snap it into place.
CAUTION
Take due care in handling the orna-
ment to avoid unexpected personal
injury.
11. Check the air pressure of the re- placed tire.
Adjust the air pressure to the specification
designed on page 290 in Section 8. If the
pressure is lower, drive slowly to the
nearest service station and fill to the cor-
rect pressure.
Do not forget to reinstall the tire inflation
valve cap as dirt and moisture could get
into the valve core and possibly cause air
leakage. If the cap is missing, have a new
one put on as soon as possible.
12. Restow all the tools, jack and flat tire securely.
As soon after changing wheels as pos-
sible, tighten the wheel nuts to the torque
specified on page 290 in Section 8 with
a torque wrench. Have a technician repair
the flat tire and replace the spare tire with
it.
CAUTION
Before driving, make sure all the
tools, jack and flat tire are securely
in place in their storage location to
reduce the possibility of personal in-
jury during a collision or s udden
braking.
If your vehicle becomes stuck in snow,
mud, sand, etc., then you may attempt
to rock the vehicle free by moving it
forward and backward.
Vehicles with traction control system—
Turn off the traction control system to
become unstuck to allow the tires to
spin enough to remove the vehicle from
the obstruction. (For details, see “Trac-
tion control system” on page 124 in
Section 1�6.)
CAUTION
Do not attempt to rock the vehicle
free by moving it forward and back-
ward if people or objects are any-
where near the vehicle. During the
rocking operation the vehicle may
suddenly move forward or backward
as it becomes unstuck, causing injury
or damage to nearby people or ob-
jects.
—Reinstalling wheel ornament
(steel wheels only) —After changing wheels If your vehicle becomes stuck
Page 243 of 307
’03Camry_U (L/O 0301)
239
2003 CAMRY from Jan. ’03 Prod. (OM33593U)
NOTICE
Use only a cable or chain specifically
intended for use in towing vehicles.
Securely fasten the cable or chain to
the towing eyelets provided.
Before towing, release the parking brake
and put the transmission in neutral (manu-
al) or “N” (automatic). The key must be
in “ACC” (engine off) or “ON” (engine run-
ning).
CAUTION
If the engine is not running, the pow-
er assist for the brakes and steering
will not work so steering and braking
will be much harder than usual.
With a compact spare tire
Without a compact spare tire
1. Remove and turn over the spare tirecover. Remove the front towing eyelet
by turning it as shown in the illustra-
tions.
—Installing front towing eyelet
Page 273 of 307

269
2003 CAMRY from Jan. ’03 Prod. (OM33593U)
If hot
O.K.
If hot
addClose
OpenIf cold
O.K.
If cold
add
Check the fluid level through the reser-
voir. If necessary, add automa")
’03Camry_U (L/O 0301)
269
2003 CAMRY from Jan. ’03 Prod. (OM33593U)
If hot
O.K.
If hot
addClose
OpenIf cold
O.K.
If cold
add
Check the fluid level through the reser-
voir. If necessary, add automatic trans-
mission fluid DEXRON
�II or III.
If the vehicle has been driven around 80
km/h (50 mph) for 20 minutes (a little
more in frigid temperatures), the fluid is
hot (60 �C—80 �C or 140 �F—175 �F). You
may also check the level when the fluid
is cold (about room temperature,
10 �C—30 �C or 50 �F—85 �F) if the engine
has not been run for about five hours. Clean all dirt from outside of the reservoir
tank and look at the fluid level. If the fluid
is cold, the level should be in the “COLD”
range. Similarly, if it is hot, the fluid level
should be in the “HOT” range. If the level
is at the low side of either range, add
automatic transmission fluid DEXRON
�II
or III to bring the level within the range.
To remove the reservoir cap, turn it coun-
terclockwise and lift up. To reinstall it,
turn it clockwise. After replacing the reser-
voir cap, visually check the steering box
case, vane pump and hose connections
for leaks or damage.
CAUTION
The reservoir tank may be hot so be
careful not to burn yourself.
NOTICE
Avoid overfilling, or the power steer-
ing could be damaged.
Keep your tire pressures at the proper
level.
The recommended cold tire pressures, tire
size and the vehicle capacity weight are
given on page 285 in Section 8. They are
also on the tire pressure label as shown.
You should check the tire pressure every
two weeks, or at least once a month. And
don’t forget the spare!
Incorrect tire pressure may waste fuel,
reduce the comfort of driving, reduce tire
life and make your vehicle less safe to
drive.
If a tire frequently needs ref illing, have it
checked by your Toyota dealer.
Checking power steering fluid Checking tire pressure

229
2003 CAMRY from Jan. ’03 Prod. (OM33593U)
With a compact spare tire
Without a compact spare tire
1. Get the required tools and sparetire.
1. Jack handle
2. Wheel nut wren")

233
2003 CAMRY from Jan. ’03 Prod. (OM33593U)
7. Remove the wheel nuts and changetires.
Lift the flat tire straight off and put it
aside.
Roll the spare wheel into position a")

239
2003 CAMRY from Jan. ’03 Prod. (OM33593U)
NOTICE
Use only a cable or chain specifically
intended for use in towing vehicles.
Securely fasten the cable or chain to
the tow")