2003 SUBARU FORESTER service schedule
[x] Cancel search: service schedulePage 274 of 420
8-5
Driving tips
– CONTINUED –
Periodic inspections
To keep your vehicle in the best condition at all times,
always have the recommended maintenance services
listed in the maintenance schedule in the “Warranty
and Maintenance Booklet” performed at the specified
time or mileage intervals.Driving in foreign countries
When planning to use your vehicle in another country: �Confirm the availability of the correct fuel. (Refer to
the “Fuel requirements” section in chapter 7.) � Comply with all regulations and requirements of
each country.
Page 332 of 420

11 - 1
11
Maintenance and service
Maintenance schedule ................................ 11-3
Maintenance precautions ........................... 11-3 Before checking or servicing in the engine
compartment ................................................... 11-4
When you do checking or servicing in the
engine compartment while the engine is
running ............................................................. 11-5
Engine hood ................................................. 11-5
Engine compartment overview .................. 11-8
Engine oil ..................................................... 11-9 Checking the oil level ..................................... 11-9
Changing the oil and oil filter ........................ 11-10
Recommended grade and viscosity .............. 11-12
Recommended grade and viscosity under
severe driving conditions .............................. 11-14
Synthetic oil ..................................................... 11-14
Cooling system ............................................ 11-14 Cooling fan, hose and connections .............. 11-15
Engine coolant ................................................ 11-15
Air cleaner element ..................................... 11-19 Replacing the air cleaner element ................. 11-19
Spark plugs .................................................. 11-20 Recommended spark plugs ........................... 11-21
Drive belts .................................................... 11-21
Manual transmission oil .............................. 11-22 Checking the oil level ..................................... 11-22
Recommended grade and viscosity .............. 11-23
Automatic transmission fluid ..................... 11-24 Checking the fluid level .................................. 11-24 Recommended fluid ....................................... 11-25
Front differential gear oil (AT vehicles) ..... 11-26 Checking the oil level ..................................... 11-26
Recommended grade and viscosity ............. 11-26
Rear differential gear oil .............................. 11-27 Checking the gear oil level ............................ 11-27
Recommended grade and viscosity ............. 11-28
Power steering fluid ..................................... 11-29 Checking the fluid level .................................. 11-29
Recommended fluid ....................................... 11-30
Brake fluid .................................................... 11-30 Checking the fluid level .................................. 11-30
Recommended brake fluid ............................. 11-31
Clutch fluid (MT vehicles) ........................... 11-31 Checking the fluid level .................................. 11-31
Recommended clutch fluid ............................ 11-32
Brake booster ............................................... 11-32
Brake pedal ................................................... 11-33 Checking the brake pedal free play .............. 11-33
Checking the brake pedal reserve distance . 11-33
Clutch pedal (MT vehicles) .......................... 11-34 Checking the clutch function ........................ 11-34
Checking the clutch pedal free play ............. 11-34
Hill holder (MT vehicles — if equipped) ..... 11-35
Replacement of brake pad and lining ........ 11-35 Breaking-in of new brake pads and linings .. 11-36
Parking brake stroke ................................... 11-37
Tires and wheels .......................................... 11-37 Types of tires .................................................. 11-37
Page 334 of 420
11 - 3
Maintenance and service
–CONTINUED –
Maintenance and service
Maintenance schedule
The scheduled maintenance items required to be ser-
viced at regular intervals are shown in the “Warranty
and Maintenance Booklet”.
For details of your maintenance schedule, read the
separate “Warranty and Maintenance Booklet”.Maintenance precautions
When maintenance and service are required, it is rec-
ommended that all work be done by an authorized
SUBARU dealer.
If you perform maintenance and service by yourself,
you should familiarize yourself with the information
provided in this section on general maintenance and
service for your SUBARU.
Incorrect or incomplete service could cause improper
or unsafe vehicle operation. Any problems caused by
improper maintenance and service performed by you
are not eligible for warranty coverage.
�Testing of an All-Wheel Drive vehicle must
NEVER be performed on a single two-wheel dy-
namometer or similar apparatus. Attempting to
do so will result in transmission damage and in
uncontrolled vehicle movement and may cause
an accident or injuries to persons nearby. � Always select a safe area when performing
maintenance on your vehicle.� Always be very careful to avoid injury when
working on the vehicle. Remember that some of
Page 341 of 420
11 - 1 0
Maintenance and service
a bad smell, smoke, and/or a fire.
If you check the oil level just after stopping the engine,
wait a few minutes for the oil to drain back into the oil
pan before checking the level.
Just after driving or while the engine is warm, the en-
gine oil level reading may be in a range between the
upper level and the notch mark. This is caused by ther-
mal expansion of the engine oil.
To prevent overfilling the engine oil, do not add any
additional oil above the upper level when the engine is
cold. � Changing the oil and oil filter
Change the oil and oil filter according to the mainte-
nance schedule in the “Warranty and Maintenance
Booklet”.
The engine oil and oil filter must be changed more fre-
quently than listed in the maintenance schedule when
driving on dusty roads, when short trips are frequently
made, when towing a trailer, or when driving in ex-
tremely cold whether.
1. Warm up the engine by letting the engine idle for
about 10 minutes to ease draining the engine oil.
2. Park the vehicle on a level surface and stop the en- gine.
3. Remove the oil filler cap.
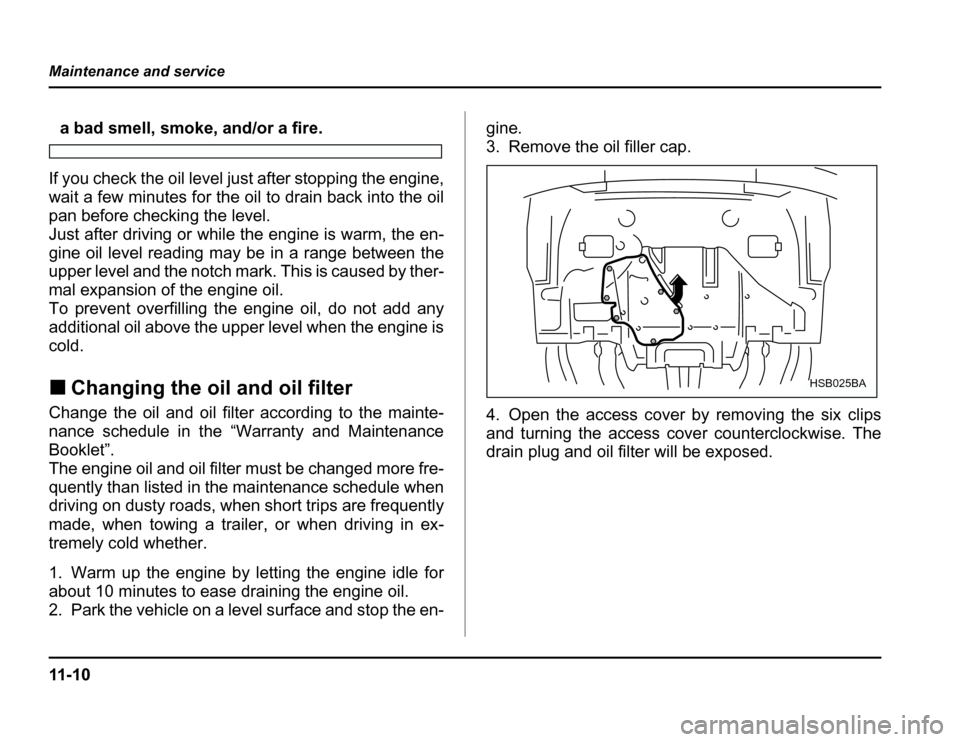
4. Open the access cover by removing the six clips
and turning the access cover counterclockwise. The
drain plug and oil filter will be exposed.
HSB025BA
Page 345 of 420

11 - 1 4
Maintenance and service
�
Recommended grade and viscosity
under severe driving conditions
If the vehicle is used in desert areas, in areas with very
high temperatures, or used for heavy-duty applica-
tions such as towing a trailer, use of oil with the follow-
ing grade and viscosities is recommended.
API classification SL or SJ: SAE viscosity No.:
30, 40, 10W-50, 20W-40, 20W-50
� Synthetic oil
You can use synthetic engine oil that meets the same
requirements given for conventional engine oil. When
using synthetic oil, you must use oil of the same clas-
sification, viscosity and grade shown in this owner’s
manual, and must follow the oil and filter changing in-
tervals shown in the maintenance schedule.
Cooling system
Never attempt to remove the radiator cap until
the engine has been shut off and has cooled
down completely. Since the coolant is under
pressure, you may suffer serious burns from a
spray of boiling hot coolant when the cap is re-
moved.
The cooling system has been filled at the facto-
ry with a high quality, corrosion-inhibiting,
year-around coolant which provides protection
againstfreezingdownto–33 °F(–36 °C). For
adding, use genuine SUBARU coolant or an
equivalent: a mixture of 50% soft water and 50%
ethylene-glycol basis coolant. Use of improper
coolants may result in corrosion in the cooling
system. It is important to maintain protection
against freezing and corrosion, even if freezing
temperatures are not expected. Never mix dif-
ferent kinds of coolant.
Page 347 of 420

11 - 1 6
Maintenance and service
1) Rubber gaskets
3. After refilling the reserve tank and the radiator, re-
install the caps and check that the rubber gaskets in-
side the radiator cap are in the proper position.
� Be careful not to spill engine coolant when
adding it. If coolant touches the exhaust pipe, it
may cause a bad smell, smoke, and/or a fire. � Do not splash the engine coolant over paint-
ed parts. The alcohol contain ed in the engine
coolant may damage the paint surface.
� Changing the coolant
1) Drain plug
Change the engine coolant using the following proce-
dures according to the maintenance schedule.
1. Remove the under cover.
2. Place a proper container under the drain plug and
loosen the drain plug.
3. Loosen the radiator cap to drain the coolant from
the radiator. Then drain the coolant from the reserve
tank. Tighten the drain plug securely.
1
HSB026BB
1HSB027BB
Page 350 of 420
11 -1 9
Maintenance and service
–CONTINUED –
Air cleaner element
The air cleaner element functions as a filter screen.
When the element is perforated or removed, engine
wear will be excessive and engine life shortened.
The air cleaner element is a viscous type. It is unnec-
essary to clean or wash the element.
Do not operate the engine with the air cleaner
element removed. The air cleaner element not
only filters intake air but also stops flames if the
engine backfires. If the air cleaner element is
not installed when the engine backfires, you
could be burned.
� Replacing the air cleaner element
Replace the air cleaner element according to the
maintenance schedule in the “Warranty and Mainte-
nance Booklet”. Under extremely dusty conditions, re-
place it more frequently. It is recommended that you
always use genuine SUBARU parts.
0
1) Bolt
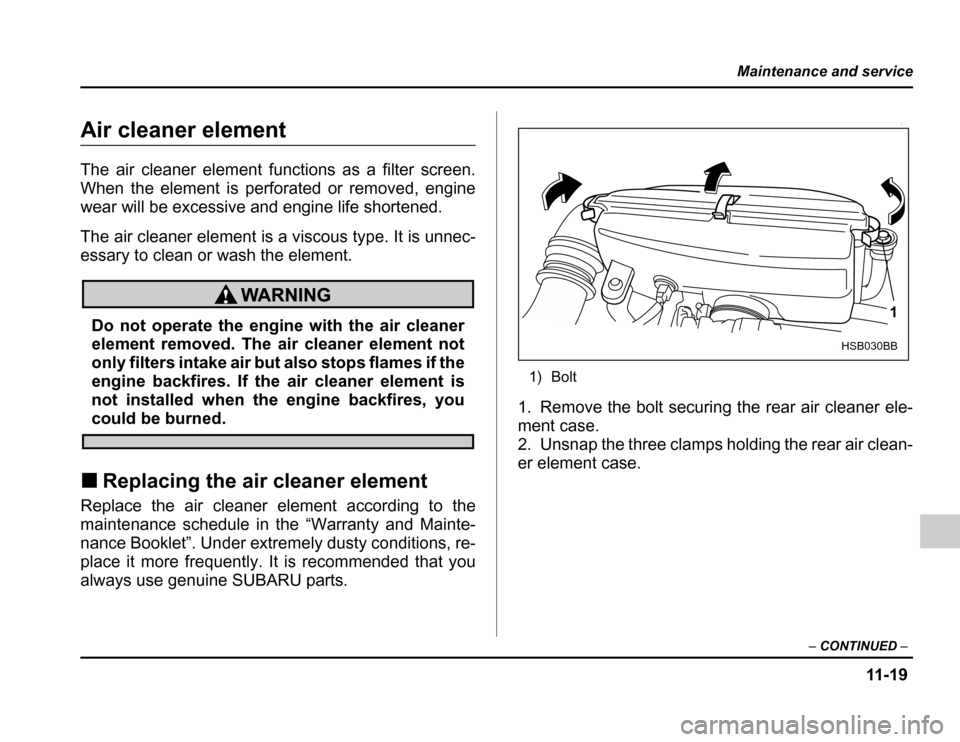
1. Remove the bolt securing the rear air cleaner ele-
ment case.
2. Unsnap the three clamps holding the rear air clean-
er element case.
1
HSB030BB
Page 351 of 420
11 - 2 0
Maintenance and service
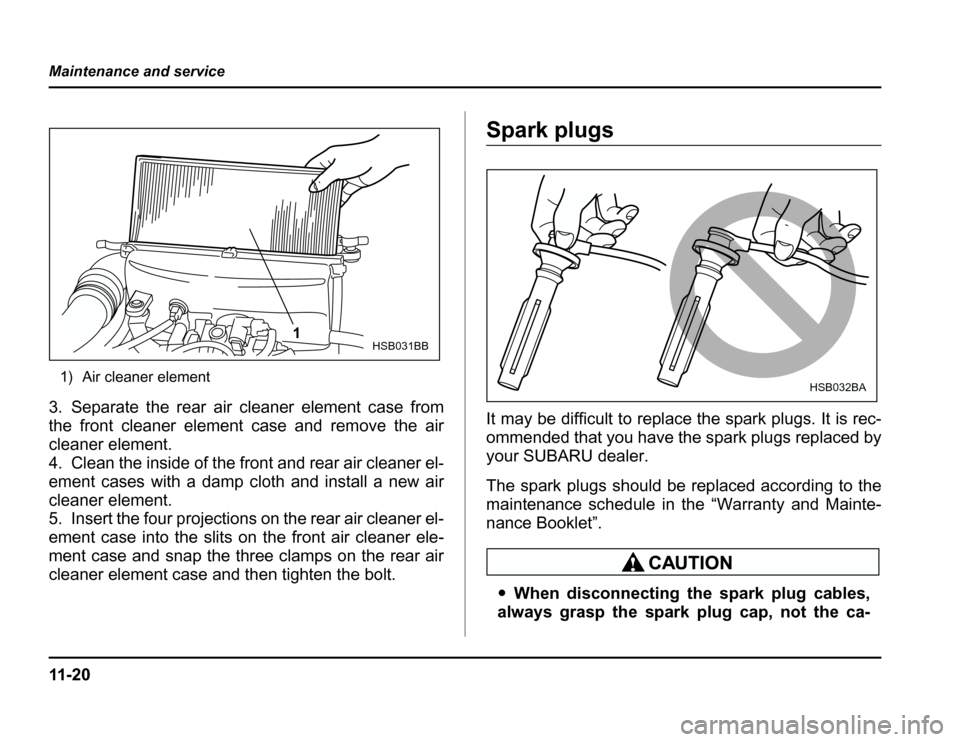
1) Air cleaner element
3. Separate the rear air cleaner element case from
the front cleaner element case and remove the air
cleaner element.
4. Clean the inside of the front and rear air cleaner el-
ement cases with a damp cloth and install a new air
cleaner element.
5. Insert the four projections on the rear air cleaner el-
ement case into the slits on the front air cleaner ele-
ment case and snap the three clamps on the rear air
cleaner element case and then tighten the bolt.
Spark plugs
It may be difficult to replace the spark plugs. It is rec-
ommended that you have the spark plugs replaced by
your SUBARU dealer.
The spark plugs should be replaced according to the
maintenance schedule in the “Warranty and Mainte-
nance Booklet”.
� When disconnecting the spark plug cables,
always grasp the spark plug cap, not the ca-
1HSB031BB
HSB032BA