2003 SKODA FABIA window
[x] Cancel search: windowPage 92 of 233
Heating and air conditioning system91
Using the systemSafetyDriving TipsGeneral MaintenanceBreakdown assist-
anceTechnical DataFabia Praktik
Using the system
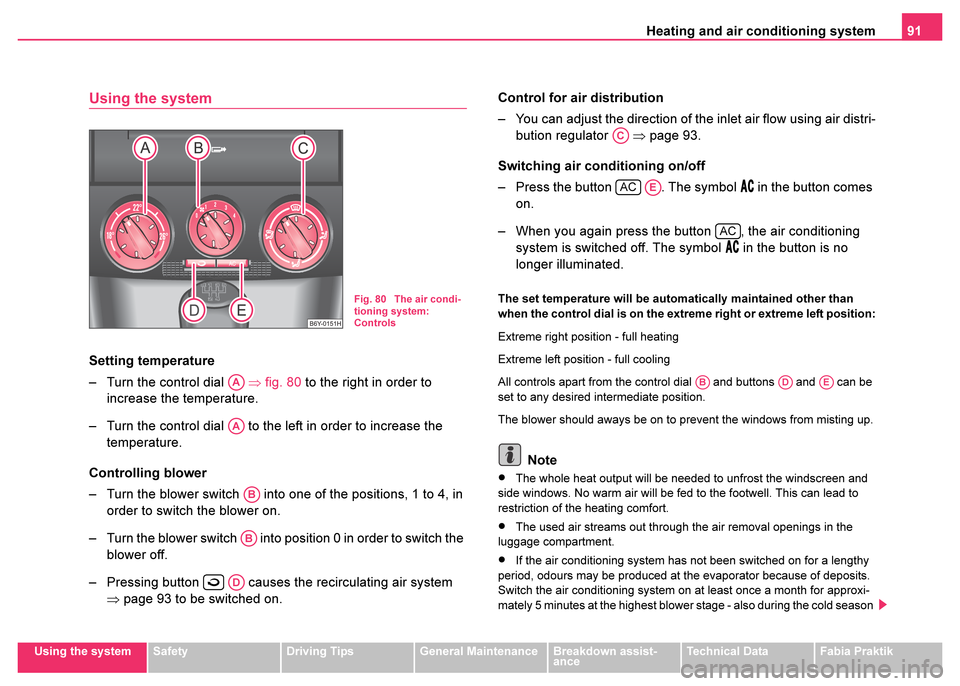
Setting temperature
– Turn the control dial ⇒fig. 80 to the right in order to
increase the temperature.
– Turn the control dial to the left in order to increase the temperature.
Controlling blower
– Turn the blower switch into one of the positions, 1 to 4, in order to switch the blower on.
– Turn the blower switch into position 0 in order to switch the blower off.
– Pressing button causes the recirculating air system ⇒page 93 to be switched on. Control for air distribution
– You can adjust the direction of the inlet air flow using air distri-
bution regulator ⇒page 93.
Switching air conditioning on/off
– Press the button . The symbol
in the button comes
on.
– When you again press the button , the air conditioning system is switched off. The symbol
in the button is no
longer illuminated.
The set temperature will be automatically maintained other than
when the control dial is on the extreme right or extreme left position:
Extreme right position - full heating
Extreme left position - full cooling
All controls apart from the control dial and buttons and can be
set to any desired intermediate position.
The blower should aways be on to prevent the windows from misting up.
Note
•The whole heat output will be needed to unfrost the windscreen and
side windows. No warm air will be fed to the footwell. This can lead to
restriction of the heating comfort.
•The used air streams out through the air removal openings in the
luggage compartment.
•If the air conditioning system has not been switched on for a lengthy
period, odours may be produced at the evaporator because of deposits.
Switch the air conditioning system on at least once a month for approxi-
mately 5 minutes at the highest blower stage - also during the cold season
Fig. 80 The air condi-
tioning system:
Controls
AA
AA
AB
AB
AD
AC
ACAE
AC
ABADAE
Page 93 of 233

Heating and air conditioning system
92
of the year - in order to remove such odours. Also open a window for a
short time.
•Please refer to the information regarding recirculated air mode
⇒ page 93.
Setting air conditioning system
Recommended settings of air conditioning controls for individual opera-
tions:
Defrosting the windscreen and side windows
•Turn control dial ⇒page 91, fig. 80 to the right up to the stop
•Control dial in the position 4
•Control dial in the position
•Open air outlet vents 4 ⇒ page 93, fig. 81 and point towards the side
window.
Warming up the inside of the vehicle as rapidly as possible
•Turn control dial to the right up to the stop
•Control dial in the position 4
•Control dial in the position
•Open the air outlet vents 4
•We recommend pressing button air recirculation mode. The
windows can steam up in this position however.
Heating the vehicle to a comfortable temperature
We recommend the following setting once the windows are no longer
misted up and the desired teperature has been reached:
•Control dial at the desired heat temperature
•Control dial in position 2 or 3
•Control dial in the position
•Open the air outlet vents 4
•Set the air distribution regulator as required between positions
and , if the windscreen gets misted up again.
Maximum cooling
•Close all windows and the sliding/tilting roof.
•Turn the control dial to the left up to the stop
•Control dial in the position 4
•Control dial in the position
•Open air outlet vents 3 and 4
•Switch on the air conditioning system by pressing button
•Switch on recirculated air mode by pressing button .
In this operating mode the air will be sucked out of the inside of the vehicle
and cooled (recirculated air mode). The recirculated air mode should only
be used for a short time since no fresh air from outside is being brought in.
Do not smoke in the vehicle when in recirculated air mode.
Optimum cooling
•Control dial at the desired heat temperature. This temperature will
be maintained automatically.
•Control dial in position 1 , 2, or 3
•Control dial in the position
•Open air outlet vents 3 and 4
•Switch on the air conditioning system by pressing button
•We recommend setting the air outlet vents 3 and 4 in such a way that
the air flows to the rear over the heads of the occupants. Do not press
button - recirculated air mode.
In this operating mode fresh air is drawn from outside and cooled.
AA
AB
AC
AA
AB
AC
AD
AA
AB
AC
AC
AA
AB
AC
AE
AD
AA
AB
AC
AE
AD
Page 94 of 233

Heating and air conditioning system93
Using the systemSafetyDriving TipsGeneral MaintenanceBreakdown assist-
anceTechnical DataFabia Praktik
Fresh air mode - ventilation
Non- pre-warmed fresh air streams through the air inlet nozzles
3 and 4
for the following settings.
•Turn the control dial ⇒page 91, fig. 80 to the left up to the stop
•Control dial into the desired position
•Control dial in the position
•Open air outlet vents 3 and 4 ⇒ fig. 81
•Switch off the recirculated air mode by pressing button .
•Switch off the cooling by pressing button
The control dial can be set to other positions as required.
Recirculated air mode
In recirculated air mode air is sucked out of the interior of
the vehicle and then fed back into the interior.
Recirculated air mode prevents po lluted air outside the vehicle
from getting into the vehicle, for example when driving through a
tunnel or when standing in a traffic jam.
Switching recirculated air mode on
– Press button ⇒page 91, fig. 80 , the button symbol
lights up.
Switching recirculated air mode off
– Press button again, the button symbol
goes out.
Recirculated air mode is switched off automatically if the air distribution
control is in position ⇒ page 91, fig. 80 . You can also switch recir- culated air mode on again from this setting by repeatedly pressing button
.
Air outlet vents
Fig. 81 Air outlet vents
Unwarmed or cooled air will flow out of the air outlet vents according to the
setting of control dial ⇒page 91, fig. 80 and the atmospheric condi-
tions.
AA
AB
AC
AD
AE
AC
AC
WARNING
You should not leave recirculated air mode on over a longer period
of time. “Stale air” may result in fatigue in the driver and passen-
gers, reduce attention levels and also cause the windows to mist
up. The risk of having an accident increases. Switch recirculated
air mode off as soon as the windows begin misting up.
AD
AA
Page 95 of 233

Heating and air conditioning system
94
You can set the air supply to the individual air outlet vents using the control
dial .
Air outlet vents 3 and 4 can also be opened or closed individually:
•Air outlet vent fully open - knurled wheel vertically in position F
•Air outlet vent fully closed - knurled wheel vertically in position F or
G.
Turning the horizontal and vertical knurled wheels on the air outlet vents
3 and 4 allows one to change the direction of the inlet air flow .
Using the air conditioning system economically
The compressor on the air conditioning system uses power from the
engine when in cooling mode which will effect the fuel consumption.
It recommended to open the windows or the doors of a vehicle for which
the interior has been strongly heated through the effect of direct sunlight
in order to allow the heated air to escape.
The air conditioning system should not be switched on while travelling
when the window is open.
The desired interior temperature can also be achieved without switching
in the air conditioning system just by switching to fresh air mode.
For the sake of the environment
When you economize on fuel, you also reduce pollutant emissions.
Operational problems
If the cooling system does not operate at outside temperatures higher
than +5°C, there is a problem in the system. The reasons for this may be:
•The fuse on the air conditioning system has blown. Check the fuse,
replace it if necessary ⇒page 209.
•The cooling system has switched off automatically for a short time
because the coolant temperature of the engine is too hot ⇒page 13.
If you are not able to rectify the operational problem yourself, or if the
cooling capacity decreases, switch the air conditioning system off. Please
contact your Škoda dealer.
AC
Page 97 of 233

Starting-off and Driving
96
- start engine
Diesel engines - fuel supply interrupted, ignition switched off, engine off
- heating glow plugs on, ignition switched on
•You should not switch on any major electrical components during the
heating period otherwise the vehicle battery will be drained unnecessarily.
- start engine
Applies to all models:
Position
To lock the steering , with the ignition key withdrawn, turn the steering
wheel until the steering locking pin is heard to engage. You should always
lock the steering as a general rule if you leave your vehicle. This acts as
a deterrent against possible theft of your vehicle ⇒.
Position
Move the steering wheel back and forward a little if the ignition key cannot,
or cannot easily be turned into this position, in order to release the
steering lock.
Position
The engine is started in this position. At the same time switched on low
beam or main beam or other electrical components with major power
consumption are briefly switched off. The ignition key moves back into
position when one releases the key.
The ignition key must be turned back into position each time before
starting the engine again. The starter repeat lock in the ignition lock
prevents the starter being engaged when the engine is running and thus
getting damaged. Ignition key withdrawal lock (automatic gearbox)
You can only withdraw the ignition key after switching off the ignition if the
selector lever is in position
P.
Starting engine
General
You can only start the engine only using an original ignition
key.
•Place the gearshift lever into neutral (or place the selector lever to the
position P or N in the case of an automatic gearbox) and put on the hand-
brake firmly before starting the engine.
A3
A1
A2
A3
A1
A2
A3
A2
A1
WARNING
•When driving, the ignition key must always be in the position
(ignition switched on) without the engine running. This position is
indicated by the warning lights coming on. If this is not the case, it
could result in unexpected locking of the steering wheel - risk of
accident!
•Only remove the ignition key from the ignition lock when the
vehicle has come to a standstill (put on the handbrake or select the
selector lever position P). The steering lock might otherwise
engage unintentionally - risk of accident!
•Always withdraw the ignition key if you are going to leave the
vehicle, even for a short time. This is particularly important if chil-
dren are left in the vehicle. The children might otherwise start the
engine or operate electrical equipment (e.g. power windows) - risk
of injury!
A2
Page 161 of 233

Care and cleaning
160
Automatic vehicle wash systems
The paintwork of the vehicle is sufficiently resistant that the vehicle can be
washed normally in automatic vehicle wash plants without any problem.
The actual stress to which the paintwork is subjected, however, depends
greatly on the design of the vehicle wash system, the filtering of the water
and the type of washing and care products used. If the paintwork of your
vehicle appears mat after being washed or even has scratches, point this
out to the operator of the vehicle wash plant. Use a different vehicle wash
plant, if necessary.
There are no particular points to note before washing your vehicle in such
a plant other than the usual precautionary measures (closing windows
and sliding/tilting roof, releasing and moving any factory-fitted aerials for
the radio* and navigation system* and telephone system* so that they are
flat against the bodywork, etc.).
It is best to first consult the operator of the vehicle wash plant if you have
any particular attached parts fitted to your vehicle - such as spoiler, roof
rack system or a two-way radio aerial.
It is important to degrease the lips of the windscreen wiper rubbers after
passing through the automatic vehicle wash system.
Caution
Do not screw the swivelling down roof aerial tight before washing the
vehicle in an automatic vehicle wash system - risk of damage!
Washing vehicle by hand
It is important to first soften the dirt with plenty of water and rinse it off as
thoroughly as possible before washing your vehicle by hand.
One should then clean the vehicle using a soft washing sponge,
washing glove or a washing brush and only slight pressure. Work from
the top to the bottom - beginning with the roof. Only place slight pressure
on the vehicle paintwork during cleaning Only use a shampoo for stub-
born dirt.
Wash out the sponge or washing glove thoroughly at short intervals.
Clean wheels, door sills and similar parts last. Use a second sponge for
such areas.
Rinse off the vehicle well after giving it a wash and dry it off using a
chamois leather.
Caution
•Do not wash your vehicle in bright sunlight - risk of paint damage.
•Ensure that the jet of water is not aimed directly at the locks or at the
door and panel joints if you spray your vehicle in winter down with a hose
- risk of freezing.
•Do not use any insect sponges, rough kitchen sponges or similar
cleaning products - risk of damage to the surface of paintwork.
WARNING
When washing your vehicle in the winter: Water and ice in the
brake system can affect the braking efficiency - risk of accident.
WARNING
•The ignition should always be switched off when you wash your
vehicle - risk of accident!
•Protect your hands and arms from sharp-edged metal parts
when you are cleaning the underfloor, the inside of the wheel hous-
ings or the wheel trims - risk of cuts.
Page 162 of 233

Care and cleaning161
Using the systemSafetyDriving TipsGeneral MaintenanceBreakdown assist-
anceTechnical DataFabia Praktik
For the sake of the environment
Only wash your vehicle at washing bays specifically reserved for this
purpose. This ensures that no water which may be contaminated by oil
flows into the sewage system. It is not even permitted to wash your vehicle
in certain areas except at such specific washing bays.
Washing with a high-pressure cleaner
When you wash your vehicle with a high-pressure cleaner, it is essential
to comply with the instructions for use of the cleaning equipment. This
applies in particular to the pressure used and to the spraying distance .
Maintain a sufficiently large distance to soft materials such as rubber
hoses or insulation material.
On no account use circular spray nozzles or so-called dirt cutters .
The water containing wax must be no hotter than 60°C.
Caution
It is particularly important that you do not clean tyres with circular spray
jets. Damage to tyres may occur even at a relatively large spraying
distance and if sprayed only for a short time.
Wax treatment
Good wax treatment is an effective way of protecting the paintwork from
harmful environmental influences and minor mechanical damage.
A new layer of a high-quality hard wax polish can be applied to the clean
bodywork after it has dried thoroughly. Even if you use a wax preserver regularly we still recommend that you treat the paintwork of the vehicle at
least twice a year with hard wax.
Caution
Never apply wax to the windows.
Polishing
Polishing is only necessary if the paintwork of your vehicle has become
unattractive and if it is no longer possible to achieve a gloss with wax
preservers.
You must treat the paintwork with a wax preserver if the polish you use
does not contain any preserving elements
⇒page 161, “Wax treatment”.
We recommend using a preservative from the range of accessories
offered by your Skoda dealer.
Caution
You must not treat mat painted parts or plastic with polishing products or
hard wax.
Paint damage
Slight damage to paintwork such as scratches, scuffs or traces of chip
damage must be touched up immediately with paint (Skoda painting pen)
before any corrosion can result. You can of course have this work carried
out by a Škoda dealer.
Škoda dealers have a range of matching touch-up pens or spray cans
available for your vehicle.
Page 163 of 233

Care and cleaning
162
The paint number of the original paintwork of your vehicle is indicated on
the vehicle data sticker ⇒page 223.
Any corrosion which has already have formed must be removed thor-
oughly. Apply a corrosion protection primer and then the paint to the
affected point. You can of course have this work carried out by a Škoda
dealer.
Plastic parts
External plastic parts are cleaned by normal washing. Plastic parts and
synthetic leather can also be treated with special solvent-free plastic
cleaning agents if a damp cloth is not sufficient. Paint care products are
not suitable for plastic parts.
Windows
Only use a plastic ice scraper for removing snow and ice from the
windows and mirrors. You should not move the ice scraper forward and
backward but in one direction on the window which you are cleaning in
order to avoid any damage to the surface of the glass.
You can best remove residues of rubber, oil, grease, wax or silicone by
using a special window cleaner or a special silicone remover.
You should also clean the windows regularly from the inside.
Do not use window leathers which you have used to polish the vehicle
body to dry off the windows. Residues of preservatives in the window
leather can dirty the window and reduce visibility.
Do not affix any stickers over the inside of the rear window to avoid
damage to the heating elements of the rear window heater .We recommend using a preservative from the range of accessories
offered by your Skoda dealer.
The headlight lenses
Please do not use any aggressive cleaning or chemical solvent products
- risk of damage to the plastic lenses
Please use soap and clean warm
water.
Caution
Never wipe the headlights dry and do not use any sharp objects for
cleaning the plastic lenses, this may result in damage to the protective
paintwork and consequently in formation of cracks on the headlight
lenses, e.g through effect of chemical products.
Door and window seals
The rubber seals on the doors, boot lid, bonnet, sliding roof and windows
remain supple and last longer if you treat them from time to time with a
rubber care product (e.g. silicone spray). You also avoid premature wear
of the seals and prevent leakages in this way. It is also easier to open the
doors. Rubber seals which are well cared for also do not stick together in
cold winter weather.
Locks
We recommend that you use Genuine Škoda Spray with regreasing and
anticorrosive effect for de-icing locks.