2003 SKODA FABIA ECU
[x] Cancel search: ECUPage 61 of 233

Lights and Visibility
60
Switching windscreen wipers off
– Move the lever back into its home position .
The windscreen wipers and the windscreen washer system only operate
if the ignition is switched on.
The rear window will be wiped again if the window wipers are on when
reverse gear is selected.
The windscreen washer nozzles are heated* when the ignition is switched
on.
Top up with wash liquid ⇒page 185.
Caution
In frosty weather, please first of all check whether the windscreen wiper
blades are not frozen to the windscreen before switching them on.
Switching on windscreen wipers when the blades are frozen to the wind-
screen may result in damage both to the blades and the motor of the wind-
screen wipers!
Headlight cleaning system*
Washing of the headlights lenses occurs for approximately 1 second
about 3 seconds after movement of the lever into position ⇒page 59,
fig. 39. You should remove stubborn dirt (such as insect residues) from the head-
light lenses at regular intervals, for example when refuelling. Please refer
to the notes
⇒page 162.
You should remove any snow from the fixtures of the washer nozzles and
clear ice in winter with a de-icing spray in order to ensure proper operation
of the cleaning system.
Replacing wiper blades on the windscreen wipers
Taking off the wiper blade
– Fold windscreen wiper arm away from the windscreen and position the wiper blade at right angles to the wiper arm
⇒fig. 40 .
– Press the securing spring in the direction of arrow and press the wiper blade at the same time in the direction of arrow ⇒ .
WARNING
Properly maintained windscreen wiper blades are essential for
clear visibility and safe driving ⇒page 60.
A0
A5
Fig. 40 Wiper blades
for the windscreen
AA
AB
Page 62 of 233

Lights and Visibility61
Using the systemSafetyDriving TipsGeneral MaintenanceBreakdown assist-
anceTechnical DataFabia Praktik
Attaching a wiper blade
– Push the wiper blade over the wiper arm. The securing spring
must click into place audibly.
Windscreen wiper blades in proper condition are essential to obtain good
visibility. Wiper blades should not be allowed to become dirtied by dust,
insect remains and preserving wax.
Juddering or smearing of the wiper blades could be due to wax residues
left on the windscreen by vehicle washing in automatic vehicle wash
systems. It is therefore important to degrease the lips of the winscreen
wiper blades after every pass through an automatic vehicle wash
system .
Replacing the wiper blade on the rear window wiper
Taking off the wiper blade
– Fold the window wiper arm away ⇒fig. 41 .
– Hold the window wiper arm at the top end with one hand.
– Take hold of the wiper blade with the other hand and pull the wiper blade in the direction of arrow .
Attaching a wiper blade
– Interlock the wiper blade into the window wiper arm - see arrow .
The same remarks apply here as for ⇒page 60, “Replacing wiper blades
on the windscreen wipers”.
WARNING
•There is a risk of damage to the windscreen if the windscreen
wiper is used carelessly.
•You should clean the wiper blades regularly with a windscreen
cleaner in order to avoid any smears. Clean a wiper blade with a
sponge or cloth if it is very dirty, for example from insect residues.
•Replace the windscreen wiper blades once or twice a year for
safety reasons. Windscreen wiper blades are available from Škoda
dealers.
Fig. 41 Wiper blade for
the rear window
AA
AB
Page 67 of 233

Seats and Stowage
66
Caution
Vehicles in the Praktik version should not experience contact between the
head restraint cover and the partition wall after adjusting the head
restraints since there is danger of damage to the seat cover through
rubbing when driving.
Middle rear head restraints*
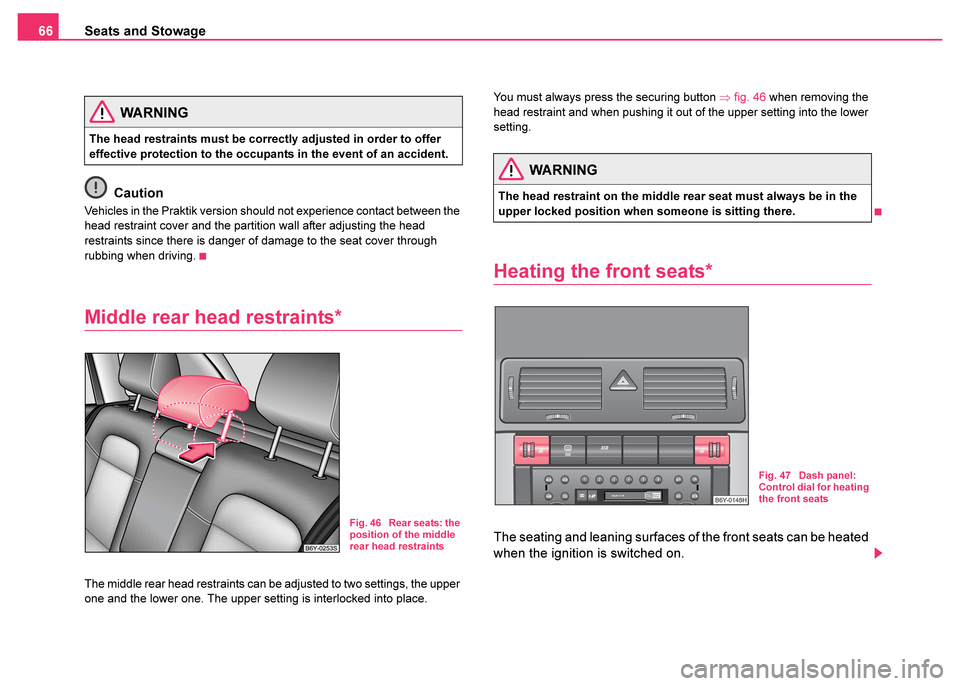
The middle rear head restraints can be adjusted to two settings, the upper
one and the lower one. The upper setting is interlocked into place. You must always press the securing button
⇒fig. 46 when removing the
head restraint and when pushing it out of the upper setting into the lower
setting.
Heating the front seats*
The seating and leaning surfaces of the front seats can be heated
when the ignition is switched on.
WARNING
The head restraints must be correctly adjusted in order to offer
effective protection to the occupants in the event of an accident.
Fig. 46 Rear seats: the
position of the middle
rear head restraints
WARNING
The head restraint on the middle rear seat must always be in the
upper locked position when someone is sitting there.
Fig. 47 Dash panel:
Control dial for heating
the front seats
Page 69 of 233

Seats and Stowage
68
The rear seats and the seat backrest can be folded forwards to
increase the volume of the luggage compartment ⇒page 69.
Both parts of the bank can be folded forward individually on vehi-
cles with a divided rear seat*.
Folding the rear seat forwards
– In order to avoid causing any damage when folding the rear seat forward it is important to adjust the front seats so that no
damage can occur when this is done.
– Pull up the rear seats in the direction of arrow ⇒page 67,
fig. 48 and fold forwards in direction of arrow .
– Pull up the unlocking knob on the seat backrest and fold the seat backrest forwards ⇒page 67, fig. 49 .
– Pull the head restraints out of the seat backrest.
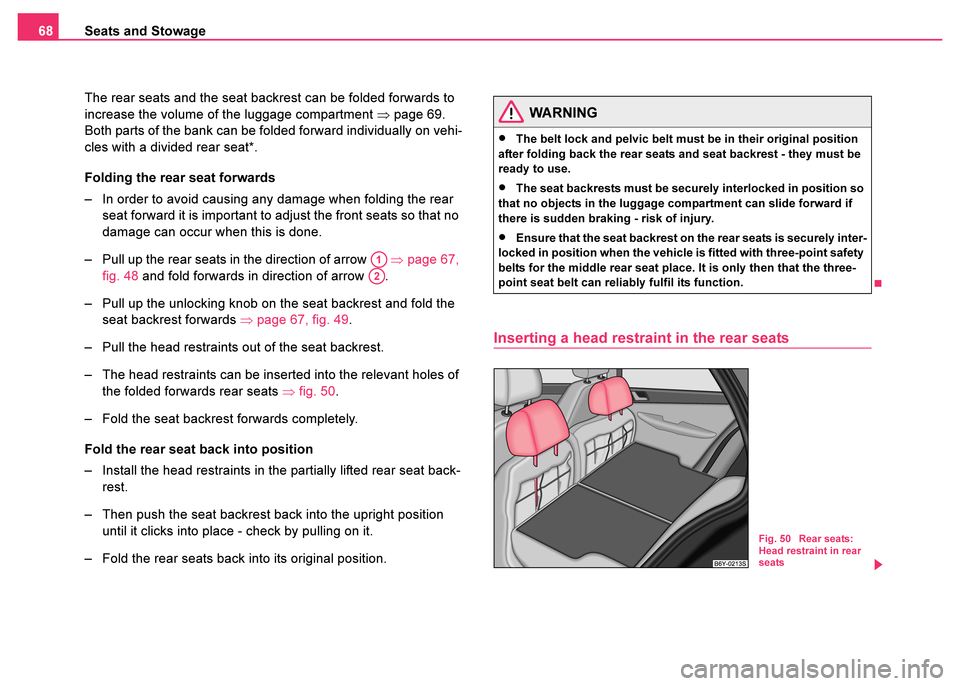
– The head restraints can be inserted into the relevant holes of the folded forwards rear seats ⇒fig. 50 .
– Fold the seat backrest forwards completely.
Fold the rear seat back into position
– Install the head restraints in the partially lifted rear seat back- rest.
– Then push the seat backrest back into the upright position until it clicks into place - check by pulling on it.
– Fold the rear seats back into its original position.
Inserting a head restraint in the rear seats
A1
A2
WARNING
•The belt lock and pelvic belt must be in their original position
after folding back the rear seats and seat backrest - they must be
ready to use.
•The seat backrests must be securely interlocked in position so
that no objects in the luggage compartment can slide forward if
there is sudden braking - risk of injury.
•Ensure that the seat backrest on the rear seats is securely inter-
locked in position when the vehicle is fitted with three-point safety
belts for the middle rear seat place. It is only then that the three-
point seat belt can reliably fulfil its function.
Fig. 50 Rear seats:
Head restraint in rear
seats
Page 71 of 233

Seats and Stowage
70
– Distribute the items of luggage as evenly as possible.
– Heavy objects should be transported as near to the rear axle as possible or better still between the axles.
– Attach the items of luggage to the lashing eyes or the safety net* ⇒page 70.
Caution
Please ensure that the heating elements of the rear window heater are not
damaged as a result of objects sliding in this area.
Note
•Tyre pressure must be adjusted to the load ⇒page 187, fig. 135.
Lashing eyes
Eyes are located on the sides of the loading area for lashing the goods to
be loaded ⇒fig. 52 .
You can also attach a securing net* to these eyes for lashing small objects.
The securing net* and the fixing instruction is located in the well under the
floor covering of the lugagge compartment behind the spare wheel.
WARNING
•Please note that the handling properties of your vehicle may be
affected when transporting heavy objects as a result of the
displacement of the centre of gravity. The speed and style of
driving must be adjusted accordingly.
•The items carried in the luggage compartment should be stored
in such a way that no objects are able to slip forward if there are
any sudden driving or braking manoeuvres undertaken - risk of
injury!
•Never drive with the boot lid slightly ajar or even fully opened
otherwise exhaust gases may get into the interior of the vehicle -
risk of poisoning!
•On no account exceed the permissible axle loads and the
permissible gross weight of the vehicle - risk of accident!
WARNING
The load to be transported must be fixed in place in such a way that
it cannot move during the journey and when braking.
Fig. 52 Luggage
compartment: Lashing
eyes
Page 75 of 233

Seats and Stowage
74
Unrolling
– Fold the backrests of the rear seats slightly forwards ⇒page 67, which makes it possible to clear the access for
unrolling the net partition.
– Pull the net partition at the bracket out of the housing in direction of the holders ⇒page 73, fig. 57 .
– Insert the cross rod into one of the mounts and push the cross rod forward.
– In the same way, fix the cross rod to the other side of the vehicle, mount .
– Then push the seat backrest back into the upright position until it clicks into place - check by pulling on it ⇒.
Rolling up
– Pull the cross rod back slightly, first on the one side then on the other side and take the cross rod out of the mount
⇒page 73, fig. 58 .
– Hold the cross rod in such a way that the net partition can roll
up slowily and without damage into housing .
If you wish to use the entire luggage compartment, you can remove the
luggage compartment cover ⇒page 72, fig. 56 .
AAAB
AC
AC
AC
AC
AB
WARNING
•Ensure that the seat backrest on the rear seats is securely inter-
locked in position when the vehicle is fitted with three-point safety
belts for the middle rear seat place. It is only then that the three-
point seat belt can reliably fulfil its function.
•First check for yourself that the cross road is inserted into the
mounts in the front position!AC
Page 131 of 233

Transporting children safely
130
Transporting children safely
What you should know about
transporting children!
An introduction to the subject
Accident statistics have revealed that children are gener-
ally more safely transported on the rear seats than on the
front passenger seat.
Children younger than 12 years of age should normally travel on the back
seat of the vehicle (take note of any national legal provisions which differ
from this). They should be secured there by means of a child restraint
system or by using the existing seat belts depending on their age, body
size and weight. The child seat should be mounted behind the front
passenger seat for safety reasons.
The physical principle of an accident does, of course, also apply to chil-
dren ⇒ page 112. They differ from adults in that their muscles and bone
structure of children are not yet fully developed. Thus children are
exposed to increased risk of injury.
Children should be transported by using special child safety seats in order
to reduce this risk of injury.
Only use child safety seats which are officially approved, suitable for chil-
dren and which comply with the ECE-R 44 standard, which classifies child
safety seats into 5 groups ⇒page 134. Child restraint systems which
have been tested for conformity with ECE-R 44 have a non-detachable
test seal (a large E within a circle and below this the test number) attached
to the seat. We recommend that you use child safety seats from the Škoda range of
genuine accessories. These child seats were developed and also tested
for use in Skoda vehicles. They fulfil the standard ECE-R 44.
Note
Any national legal provisions which vary from the information contained in
this Owner's Manual take precedence over the information contained
herein.
Important safety information on using child safety
seats
Correct use of child safety seats considerably reduces the
risk of injury!
WARNING
Always comply with national legal provisions and instructions
from the relevant child safety seat manufacturer when installing
and using a child seat
⇒ in “Important safety information on
using child safety seats”.
WARNING
•All the occupants of the car - in particular children - must wear
a seat belt when the car is moving.
Page 156 of 233

Towing a trailer155
Using the systemSafetyDriving TipsGeneral MaintenanceBreakdown assist-
anceTechnical DataFabia Praktik
Towing a trailer
Towing a trailer
Technical requirements
The towing device must satisfy certain technical require-
ments.
Your vehicle is designed primarily for transporting persons and luggage.
It can, however, also be used for towing a trailer, provided certain tech-
nical equipment is fitted.
If your vehicle has already been supplied with a factory-fitted towing
device then everything that is necessary for towing a trailer in technical
terms, and in terms of the law, has already been taken into account.
Your vehicle is fitted with a 13-pin power socket for the electrical connec-
tion between the vehicle and trailer. If the trailer which you wish to tow has
a 7-pin connector , you can use a suitable adapter cable.You can obtain
such an adapter from a Škoda dealer.
This work must be carried out in accordance with the manufacturer's
specifications if a towing device is retrofitted.
Škoda dealers are familiar with details relating to retrofitting a towing
device and for any necessary modifications to the cooling system.
General Maintenance
There are a number of points to pay attention to when
towing a trailer.
Trailer load
The permissible trailer load must on no account be exceeded.
You can negotiate appropriately steeper inclines and descents if you do
not make full use of the permissible trailer load.
The trailer loads specified only apply for altitudes up to 1 000 metres
above mean sea level. The fact that the engine power output drops with
increasing height due to a lowering of air pressure and thus the ability to
climb, means that the towed weight must be reduced by 10% for every
further increase of 1 000 metres in height above sea level. One should
take this into account before driving up to higher altitudes. The towed
weight is the weight of the (laden) vehicle and the (laden) trailer together.
The trailer and drawbar load information on the type plate of the
towing device are merely test data for the towing device The data
relating to your vehicle, which is often less than this test data, can
be found in your vehicle registration documents or in the brochure -
Technical Data .
Distribution of the load
Distribute the load in the trailer in such a way that any heavy items are
located as close as possible to the axle. Secure the items to prevent them
slipping.
You can make full use of the permissible drawbar load indicated on the
ball head of the towing device, but you must not exceed this.
WARNING
We recommend that you have the towing device installed by a
Škoda dealer. He is familiar with all the relevant details relating to
retrofitting such equipment. There is a risk of an accident if the
towing device is not properly fitted.