Page 208 of 263

WheelBolts
/!\Warning!
Riskofwheelboltbreakageandwheelsep-
aration,resultinginseverepersonalinjury
ordeath.
[>
Followallinstructionsconcerningwheelbolts.
208PracticalTips,EmergencyService
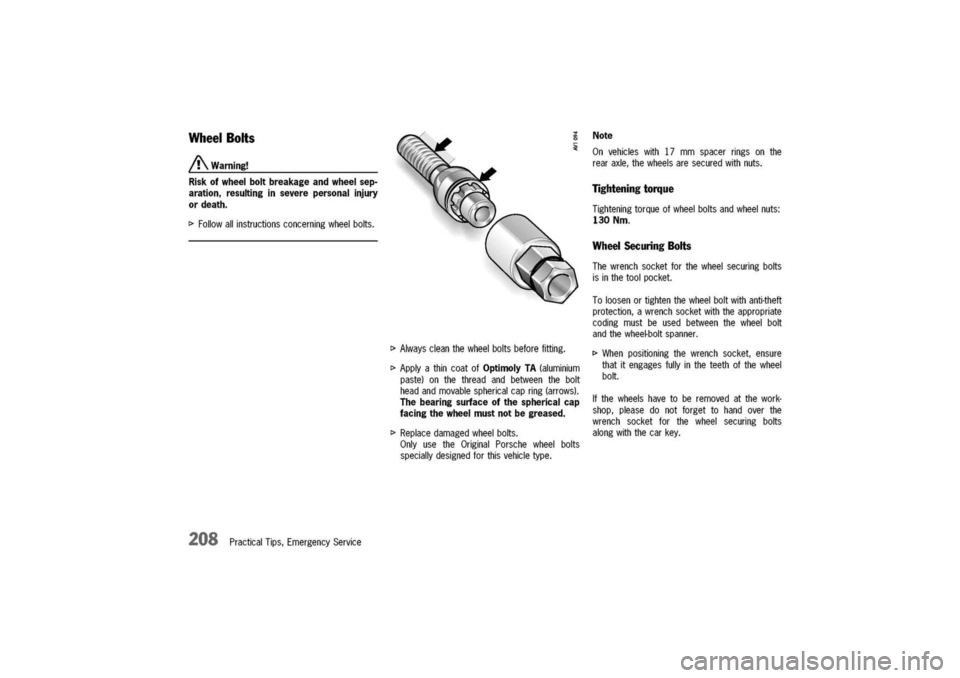
[>Alwayscleanthewheelboltsbeforefitting.
[>ApplyathincoatofOptimolyTA(aluminium
paste)onthethreadandbetweenthebolt
headandmovablesphericalcapring(arrows).
Thebearingsurfaceofthesphericalcap
facingthewheelmustnotbegreased.
[>Replacedamagedwheelbolts.
OnlyusetheOriginalPorschewheelbolts
speciallydesignedforthisvehicletype.
Note
Onvehicleswith17mmspacerringsonthe
rearaxle,thewheelsaresecuredwithnuts.
Tighteningtorque
Tighteningtorqueofwheelboltsandwheelnuts:
130Nm.
WheelSecuringBolts
Thewrenchsocketforthewheelsecuringbolts
isinthetoolpocket.
Toloosenortightenthewheelboltwithanti-theft
protection,awrenchsocketwiththeappropriate
codingmustbeusedbetweenthewheelbolt
andthewheel-boltspanner.
[>Whenpositioningthewrenchsocket,ensure
thatitengagesfullyintheteethofthewheel
bolt.
Ifthewheelshavetoberemovedatthework-
shop,pleasedonotforgettohandoverthe
wrenchsocketforthewheelsecuringbolts
alongwiththecarkey.
Page 216 of 263

Batterycare
[>
Ensurethatbatteryissecurelymounted.
[>Keepterminalsandconnectionscleanand
properlytightened.
Corrosioncanbepreventedbycoatingthe
terminalsandconnectionswithpetroleumjelly
orsiliconespray.
[>
Ensurethatventcapsaresecurelytightened
topreventspillage.
216PracticalTips,EmergencyService
Checkingtheelectrolytefluidlevel
Generally,theelectrolytelevelmustbechecked
moreofteninsummerthaninthewinter,and
moreoftenwhendrivinglongdistances.
[>Whenaddingwater,useonlycleanvessels.
Innocasemayalcohol(e.g.windowcleaner
residues)bepermittedtoenterthebattery.
[>
Unscrewandopenthefillerventcapsofeach
cell.
Withthecarhorizontal,thefluidlevelshould
meettheindicatormarkineachcell.
[>
Ifnecessary,topupwithdistilledwater.
Donotuse
acid.
Onlyfilluptothemark,otherwisetheelectro-
lytewilloverflowwhenthebatteryisbeing
chargedandcausedamage.
Batterycharging
Automotivebatteriesloosetheirefficiencywhen
notinuse.
Thechargeavailableinyourbatterycanbe
measuredwithabatteryhydrometer.
Werecommendthatthebatteryvoltagebe
testedbyyourPorschedealerwhohastheap-
propriateequipment.
Ifthecarisnotdrivenforprolongedperiods,
thebatterymustbechargedatleastevery6
weeks.
Adischargedbatteryallowsrapidformationof
sulfates,leadingtoprematuredeteriorationof
theplates.
Page 220 of 263

EmergencyStartingwithJumper
Cables
Ifthebatteryisdischarged,e.g.inwinteror
afterthecarhasbeenparkedforalongtime,
thebatteryofanothercarcanbeusedforstart-
ingwiththehelpofjumpercables.
Makesurethevoltageofbothbatteriesisthe
same.
Thecapacity(Amperehours,Ah)ofthebooster
batterymustnotbesubstantiallylessthanthat
ofthedischargedbattery.
Thedischargedbatterymustbecorrectlycon-
nectedtothevehicle'selectricalsystem.
Seethechapter"Battery"and"Emergencyun-
lockingoftheluggagecompartmentlidanden-
ginecompartmentlid".
Note
[>
Donottrytostartthecarbypushingortow-
ing.Damagetothecatalyticconvertersand
othercomponentsofthecarmayresult.
220PracticalTips,EmergencyService
/!\Warning!
Riskofdamageandseriouspersonalinjury
duetoshortcircuit.
[>
Useonlyjumpercablesofadequatediameter
cross-sectionandfittedwithcompletelyinsu-
latedalligatorclips.
[>
Followallwarningsandinstructionsofthe
jumpercablemanufacturer.
[>
Whenconnectingjumpercables,makesure
thattheycannotgetcaughtinanymoving
partsintheenginecompartment.
Thejumpercablesmustbelongenoughso
thatneithervehiclesnorcablestouchanother.
[>
Thevehiclesmustnotbeincontact,other-
wisecurrentmightflowassoonastheposi-
tiveterminalsareconnected.
[>
Thecableclampsmustnotbeallowedtocon-
tacteachotherwhenoneendofthejumper
cablesareconnectedtoabattery.
[>Ensurethattoolsorconductivejewellery
(rings,chains,watchstraps)donotcomeinto
contactwithlivepartsofthevehicle.
[>Improperhook-upofjumpercablescanruin
thealternator.
Dangerofcaustic
burns.
[>
Donotleanoverthebattery.
Dangerofgasexplosion.
[>Improperuseofboosterbatterytostartave-
hiclemaycauseanexplosion,resultingin
severepersonalinjuries.
[>Keepsourcesofignitionawayfromthebat-
tery,e.g.openflame,burningcigarettesor
sparkingduetocablecontactorwelding
work.
[>
Adischargedbatterycanfreezeevenat
-lOOCj14°F.
Beforeconnectingjumpercables,afrozen
batterymustbethawedout.
Page 225 of 263
Installing
1.Insertheadlightintoguiderailsandpushfully
intothewing.
2.Pushheadlighttotherearandatthesame
timeturnthesocketwrenchuntilitpoints
horizontallytotherearC.
Theheadlightlockingdevicemustperceptibly
andaudiblyengage.
3.Checkheadlightforafirmseating,e.g.by
pullingitintheareaofthefoglight.
4.Insertrubberplugintotheunlockingopening
andsecurethecarpeting.
Checkthefunctionofalllights.
I>I>I>
PracticalTips,EmergencyService
225
Page 230 of 263
0
1.Removecapinthewheelhousinglinerwith
thescrewdriver.
2.Insertscrewdriverintotheopeninginthe
wheelhousinglineratrightanglestotheside
markerlighthousing.
Bypressingwiththescrewdriver,disengage
thesecuringspringofthesidemarkerlight
housing.
230PracticalTips,EmergencyService
ChangingBulbintheSide
MarkerLight
~
3.Removesidemarkerlightandundobulb
holder(bayonetlock).
4.Removebulbfromtheholderandreplace.
Insertholder.
5.Insertthelighttabs(arrowA)intothewingat
thefront.
Engagesecuringspring(arrowB)inthewing.
6.Presscapintothewheelhousingliner.
Checkoperationofthelight.
Page 233 of 263
LicensePlateLights
Changingbulb
1.UndobothscrewsAandremovelight.
2.Pushrubbercoveringback,removedefective
bulbfrombetweenthecontactspringsand
replace.
3.Reassembleinreverseorder.
Checkoperationofthelight.
Luggage
CompartmentLight,
EngineCompartmentLight,
FootwellLights
Changingbulb
1.Withascrewdriver(arrow),carefullypress
lightoutofthecutoutinthelining.
2.Removedefectivebulbfrombetweenthe
contactspringsandreplace.
3.Insertthelightintothecutoutfirstfromone
sidethenfromtheother.Checkoperation.
DoorGuard/KerbLight
Changingbulb
1.Withascrewdriver(arrow),carefullypushout
thelight.
2.Pullbulbholderoutoflighthousing.
Removedefectivebulbandreplace.
3.Installbulbholderandinsertlight.
PracticalTips,EmergencyService
233
Page 235 of 263
~
RaisedBrakeLights
Changingbulb
Beforeremovingthebrakelightintherear
spoiler,thelattermustfirstbemanuallyex-
tended.
Seethechapter"RetractableRearSpoiler".
1.Leveroutright-handsegmentofthelenswith
thescrewdriverblade(arrow).
2.Turnlockoflighthousingcounterclockwise
byapprox.90°,andremovelight.
3.Disengageall6securingtabs(arrow)ofthe
bulbholder
Removebulbholder,takeoutdefectivebulb
andreplace.
4.Reassembleinreverseorder.
Checkoperationofthelight.
PracticalTips,EmergencyService
235
Page 236 of 263
AdjustingHeadlights
Seecautionon"ReplacingBulbs..
Adjustment
Theadjustmentismadewiththevehicleready
todriveandthefueltankcompletelyfilled.
Thedriver'sseatmustbeloadedbyapersonor
a165Ibs.(75kg)weightandthetirepressures
mustmeettheprescribedvalues.
Afterbeingloaded,thecarmustberolledafew
meterssothatthesuspensioncansettle.
236PracticalTips,EmergencyService
Forcheckingtheheadlightadjustment,theverti-
calpositionofthecutoffofthelowbeam(see
fig.)hastobeprojectedonaverticalscreen
(wall)indistanceof7.5mfromthefrontlensof
theheadlamp.
Thecorrectpositionofthecutoffis5cmat
7.5m(0.4°)belowahorizontalline,xcmfrom
groundtothecenteroftheheadlamplens.
Lateraladjustmentoftheheadlightsshouldbe
carriedoutataspecialistworkshopwithanopti-
caladjustmentunit.
Distance
Visualaimshallbeperformedatnotlessthan
7.5m(thisvalueisaroundeddownconversion
fromthe25-footdistancetypicaloffieldaim
usingascreen).The7.5mdistanceis
measuredfromtheheadlamplenstotheviewing
screen.