Page 332 of 418
Changing a Flat Tire
If a tire goes flat, avoid further tire and wheel damage
by driving slowly to a level place. Turn
on your
hazar
' varning flasl s.
Changing L he can cause an y. ... 2
vehicle can slip off the jack and roll over you
or other people. You and they could be badly
injured. Find a level place to change your tire.
To help prevent the vehicle from moving:
1. Set the parking brake firmly.
2. Put the shift lever in PARK (P).
3. Turn off the engine.
To be even more certain the vehicle won't
move: you can put blocks at the front and
rear
of the tire farthest away from the one
being changed. That would be the tire on
the other
side of the vehicle, at the
opposite end.
-
The following steps will tell you how to use the jack and
change a tire.
5-73
Page 333 of 418
Removing the Spare Tire and Tools 5. Remove the wheel wrench, jack and the spare tire
from the trunk.
The equipment you’ll need is in the trunk.
1. Pull the carpeting from the floor of the trunk.
2. Remove the retainer, then lift and remove the cover.
3. Remove the compact spare tire. See Compact
Spare Tire on page 5-81 for more information
about the compact spare tire.
4. Unscrew the wing nuts to remove the container that
holds the wrench and jack. The
tools you’ll be using include the jack
(A) and wheel
wrench
(B).
Removing the Wheel Covers and
Wheel Nut Caps
If your vehicle has aluminum wheels and a center cover
hides the wheel nuts, remove the center cover by
using the flat end
of the wrench to pry it off. Do not drop
the cover or lay it face down,
as it could become
scratched or damaged.
Do not use a hammer or mallet
on this type of cover.
5-74
Page 334 of 418
Removing the Flat Tire and Installing
the Spare Tire 2. The jack has a bolt at the end. Attach the wheel
wrench to the bolt to create a jack handle.
1. Use the wheel wrench to loosen the wheel nuts, but
don't remove them.
3. Turn the wheel wrench counterclockwise to lower
the jack
lift head until it fits under the vehicle.
5-75
Page 336 of 418
5. Raise the vehicle by turning the wheel wrench
clockwise. Raise the vehicle far enough
off the
ground
so there is enough room for the compact
spare tire to fit under the wheel well.
6. Remove all the wheel nuts and take off the flat tire.
7. Remove any rust or dirt
from the wheel bolts,
mounting surfaces
and spare wheel.
r
Rust or dirt on the wheel, or on the parts to
which
it is fastened, can make the wheel nuts
become loose after a time. The wheel could
come
off and cause an accident. When you
change a wheel, remove any rust
or dirt from
the places where the wheel attaches to the vehicle.
In an emergency, you can use a cloth
or a paper towel to do this; but be sure to use
a scraper or wire brush later,
if you need to, to
get all the rust or dirt
off.
5-77
Page 339 of 418

C+oring the Flat Tire -nd Tvls
Storing ‘he S-nre T:-e and Tc-Is
I.--=-
Storing a jack, a tire or other equipment in the
passenger compartment
of the vehicle could
cause injury. In a sudden stop or collision, loose equipment could strike someone. Store
all these
in the proper place.
After you’ve put the compact spare tire on your vehicle,
you’ll need to store the flat tire in your trunk.
Store the flat tire as far forward in the trunk as possible.
Store the jack and wheel wrench in their compartment
in the trunk. For storage, the jack must be raised
until the screw end is flush with the edge of the jack. ,tor
J a.
:k, a tire or other equipment in the
passenger compartment
of the vehicle could
cause injury. In a sudden stop or collision, loose equipment could strike someone. Store
all these in the proper place.
The compact spare tire is for temporary use only.
Replace the compact spare tire with
a full-size tire as
soon as you can. See
Compact Spare Tire on
page 5-87. See the storing instructions label to return
your compact spare tire into your trunk properly.
5-80
Page 340 of 418

/
.B
C
I
I E
I I
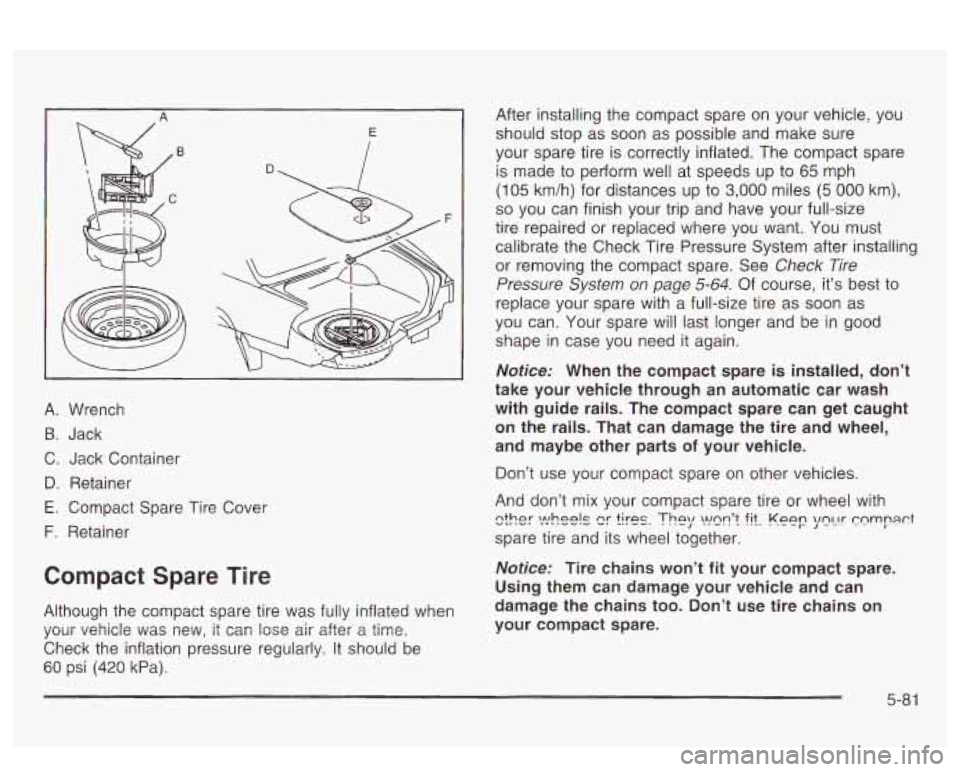
A. Wrench
B. Jack
C. Jack Container
D. Retainer
E. Compact Spare Tire Cover
F. Retainer
Compact Spare Tire
Although the compact spare tire was fully inflated when
Check the inflation pressure regularly. It should be
60 psi (420 kPa).
..^..I yuul vehicle was iievi, it mi7 lose air after a tine. After
installing the compact spare on your vehicle, you
should stop as soon as possible and make sure
your spare tire is correctly inflated. The compact spare
is made to perform well at speeds up to 65 mph
(105 km/h) for distances up to 3,000 miles (5 000 km)~
so you can finish your trip and have your full-size
tire repaired or replaced where you want. You must:
calibrate the Check Tire Pressure System after installing
or removing the compact spare. See
Check Tire
Pressure
System on page 5-64. Of course, it’s best to
replace your spare with a full-size tire as soon as
you can. Your spare will last longer and be in good
shape in case you need
it again.
Notice: When the compact spare is installed, don’t
take your vehic!e through
an automatic car wash
with guide rails. The compact spare can get caught on the rails. That can damage the tire and wheel,
and maybe other parts
of your vehicle.
Don’t use your compact spare on other vehicles.
And don’t mix your compact spare tire or wheel with
spare tire and its wheel together.
ether t!!hee!s ?irks. The;/ w~n’t fit. Kppp yncIr Cnmrpct
Nofice: Tire chains won’t fit your compact spare.
Using them can damage your vehicle and can
damage the chains too. Don’t use tire chains on
your compact spare.
5-81
Page 363 of 418

Maintenance Schedule
Introduction
IMPORTANT:
XEEP ENGINE OIL
AT THE PROPER
LEVEL AND CHANGE AS
RECOMMENDED
I
a
protection
Plan
Have you purchased the GM Protection Plan? The Plan
supplements your new vehicle warranties.
See your
Warranty and Owner Assistance booklet or your dealer
for details.
Your Vehicle and the Environment
Proper vehicle maintenance not only helps to keep your
vehicle in good working condition, but also helps the
environment.
All recommended maintenance procedures
are important. Improper vehicle maintenance can
even affect the quality of the air we breathe. Improper
fluid levels or the wrong tire inflation can increase
the level of emissions from your vehicle.
To help protect
our environment, and to keep your vehicle in good
condition, please maintain your vehicle properly.
Maintenance Requirements
Maintenance intervals, checks, inspections and
recommended fluids and lubricants as prescribed in this
manual are necessary to keep your vehicle in good
working condition. Any damage caused by failure
to follow recommended maintenance may not be
covered by warranty.
6-2
Page 379 of 418

Part B: Owner Checks and Services
Listed in this part are owner checks and services
which should be perFormed at the intervals specified to
help ensure the safety, dependability and emission
control performance of your vehicle.
Be sure any necessary repairs are completed at once.
Whenever any fluids or lubricants are added to your
vehicle, make sure they are the proper ones, as shown
in Part D.
At Each Fuel Fill
It is important for you or a service station attendant to
perform these underhood checks at each fuel fill.
Engine Oil Level Check
Check the engine oil level and add the proper oil if
necessary. See Engine Oil on page 5-75 for further
details.
Engine Coolant Level Check
Check the engine coolant level and add DEX-COOL@
coolant mixture
if necessary. See Engine Coolant
on page 5-26
for further details.
Windshield Washer Fluid Level Check
Check the windshield washer fluid level in the windshield
washer tank and add the proper fluid
if necessary.
See
Windshield Washer Fluid on page 5-40 for further
details.
At Least Once a Month
Tire Inflation Check
Make sure tries are inflated to the correct pressures.
Don’t forget to check your spare tire. See
Tires on
page 5-62
for further details.
Cassette Tape Player Service
Clean cassette tape player. Cleaning should be done
every
50 hours of tape play. See Audio System(s)
on page
3-77 for further details.
6-1 8