2003 PONTIAC BONNEVILLE climate control
[x] Cancel search: climate controlPage 140 of 418
Climate Controls
Climate Control System
With this system you can control the heating, cooling
and ventilation for your vehicle.
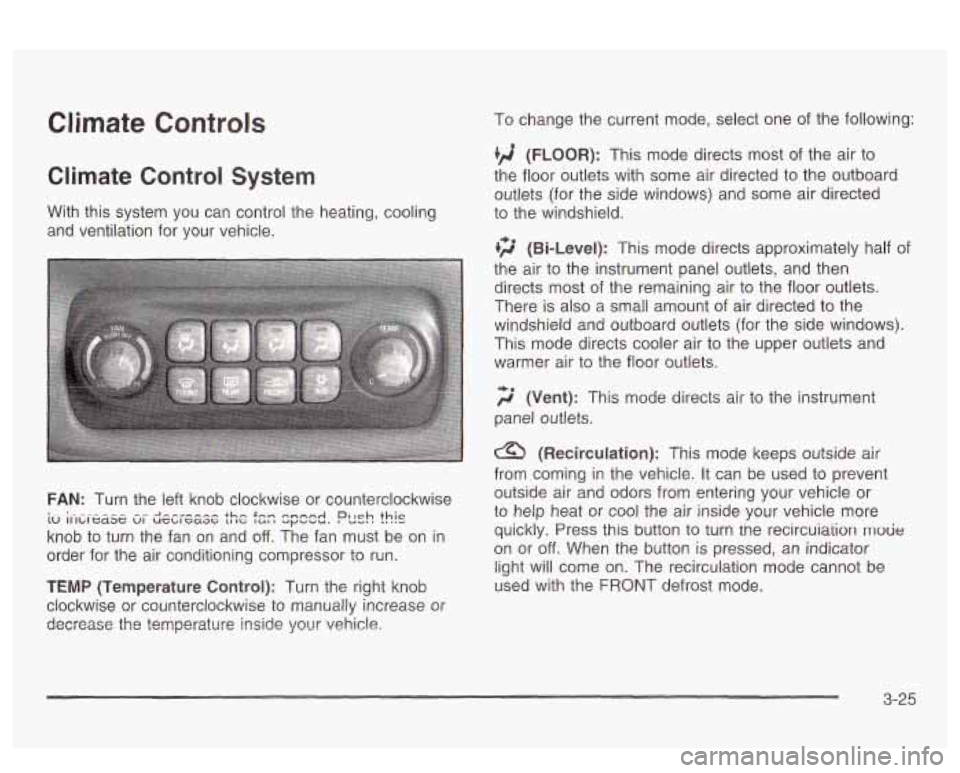
FAN: Turn the left knob clockwise or counterclockwise
knob to turn the fan on and
off. The fan must be on in
order for the air conditioning compressor to run.
I ~ . - -.-- --- -- -I-,,,,,, +hm .Fn- n.nnnA , Ich )hic 10 IIILIC~~G VI wsblcaac (ut I apbuu. Du-. I ..
TEMP (Temperature Control): Turn the right knob
clockwise or counterclockwise to manually increase or
decrease
the temperature inside your vehicle,
To change the current mode, select one of the following:
(FLOOR): This mode directs most of the air to
the floor outlets with some air directed to the outboard
outlets (for the side windows) and some air directed
to the windshield.
li;' (Bi-Level): This mode directs approximately half of
the air to the instrument panel outlets, and then
directs most
of the remaining air to the floor outlets.
There is also a small amount of air directed to the
windshield and outboard outlets (for the side windows).
This mode directs cooler air to the upper outlets and
warmer air to the floor outlets.
f;' (Vent): This mode directs air io th2 imtr~ment
panel outlets.
(Recirculation): This mode keeps outside air
from coming in the vehicle.
It can be used to prevent
outside air and odors from entering your vehicle or
to help heat or cool the air inside your vehicle more
quickly. Press
this button to turn tne recircuia'rion mode
on or off. When the button is pressed, an indicator
light will come on. The recirculation mode cannot be
used with the FRONT defrost mode.
3-25
Page 141 of 418

.1#t A/C (Air Conditioning): Press this button to turn
the air conditioning compressor on and off. When
A/C is
pressed, an indicator light in the button will come on
to let you know that air conditioning is activated.
If your
climate control system is
off, you may also turn it
back on in vent mode by selecting the
A/C button.
On hot days, open the windows
to let hot inside
air escape; then close them. This helps
to reduce the
time
it takes for your vehicle to cool down. It also helps
the system
to operate more efficiently.
For quick cool down on hot days, do the following:
1. Select the vent mode.
2. Select the recirculation mode.
3. Select NC.
4. Select the coolest temperature.
5. Select the highest fan speed.
Using these settings together for long periods of time
may cause the air inside
of your vehicle to become too
dry.
To prevent this from happening, after the air in
your vehicle has cooled, turn the recirculation mode
off.
The air conditioning system removes moisture from
the air,
so you may sometimes notice a small amount of
water dripping underneath your vehicle while idling or
after turning off the engine. This is normal.
Sensors
The solar sensor on your vehicle monitors
radiation and the air inside of your vehicle, the solar
then uses the
information
to maintain the selected temperature by
initiating needed adjustments
to the temperature, the fan
speed and the air delivery system. The system may
also supply cooler air to the side of the vehicle facing the
sun. The recirculation mode will also be activated, as
necessary.
Do not cover the solar sensor located in the
center of the instrument panel, near the windshield,
or the system will not work properly.
Defogging and Defrosting
There are two modes to clear fog or frost from your
windshield. Use the defog mode to clear the windows of
fog or moisture and warm the passengers. Use the
defrost mode
to remove fog or frost from the windshield
more quickly.
Press one of the available mode buttons
to select the
defog or defrost mode.
+3 (Defog): This mode directs most of the air to the
windshield and the floor outlets.
A small amount of air is
also directed to the outboard outlets (for the side
windows). When you select this mode, the system turns
off recirculation and runs the air conditioning compressor
unless the outside temperature is at or below freezing.
The recirculation mode cannot be selected while in
the defog mode.
3-26
Page 143 of 418

Automatic Climate Control System
With this system you can control the heating, cooling
and ventilation for your vehicle.
Automatic Operation
AUTO (Automatic): Press the AUTO button for
automatic control of the inside temperature, the air
delivery mode and the fan speed.
1. Press the AUTO button. Whenever this button is
pressed, the display will show the current settings
for five seconds before returning the display to
the exterior temperature.
2. Adjust the temperature to 75” F (24” C).
Choosing the coldest or warmest temperature
setting will not cause the system to heat or cool any
faster.
If you set the system at the warmest
temperature setting, the system will remain at the
maximum heat setting and fan speed.
In cold weather, the system will start at reduced fan
speeds to avoid blowing cold air into your vehicle
until warmer air is available. The system will
start out blowing air at the floor but may change
modes automatically as the vehicle warms up
to maintain the chosen temperature setting. The
length of time needed for warm up will depend on
the outside temperature and the length of time
that has elapsed since your vehicle was last driven.
3. Wait for the system to regulate. This may take from
10 to 30 minutes. Then adjust the temperature, if
necessary.
Do not cover the solar sensor located in the center OT
the instrument panel, near the windshield. For more
information on the solar sensor, see “Sensors” later in
this section.
3-28
Page 148 of 418
Climate Controls Personalization
If your vehicle is equipped with this feature, up to two
drivers are able to store and recall climate control
settings for the temperature, the fan speed and the
direction
of the airflow.
Memory buttons
1 and 2 are located on the driver’s
door panel and correspond to the numbers
1 or 2 found
on the back
of each remote keyless entry transmitter.
To store settings, do the following:
1. Select the desired temperature, fan speed and
airflow mode,
If desired, a separate temperature
setting may also be selected for the front seat
passenger. For information on how to
do this, see
Automatic Climate Control System on page 3-28.
2. Locate memory buttons 1 and 2 on the driver’s
door panel.
3. Press the memory button on the door panel that
corresponds to the number on the back of the
transmitter you are programming, until you hear two
beeps. The beeps confirm that your selection has
been saved and can now
be recalled. For more
information on the memory feature, see
Memory
Seat and Mirrors on page 2-48.
Follow these steps each time you want to change the
stored settings.
To recall the climate control settings last stored on your
transmitter, press the unlock button on your remote
keyless entry transmitter and put the ignition in
ACCESSORY or RUN.
3-33
Page 156 of 418
Battery Warning Light
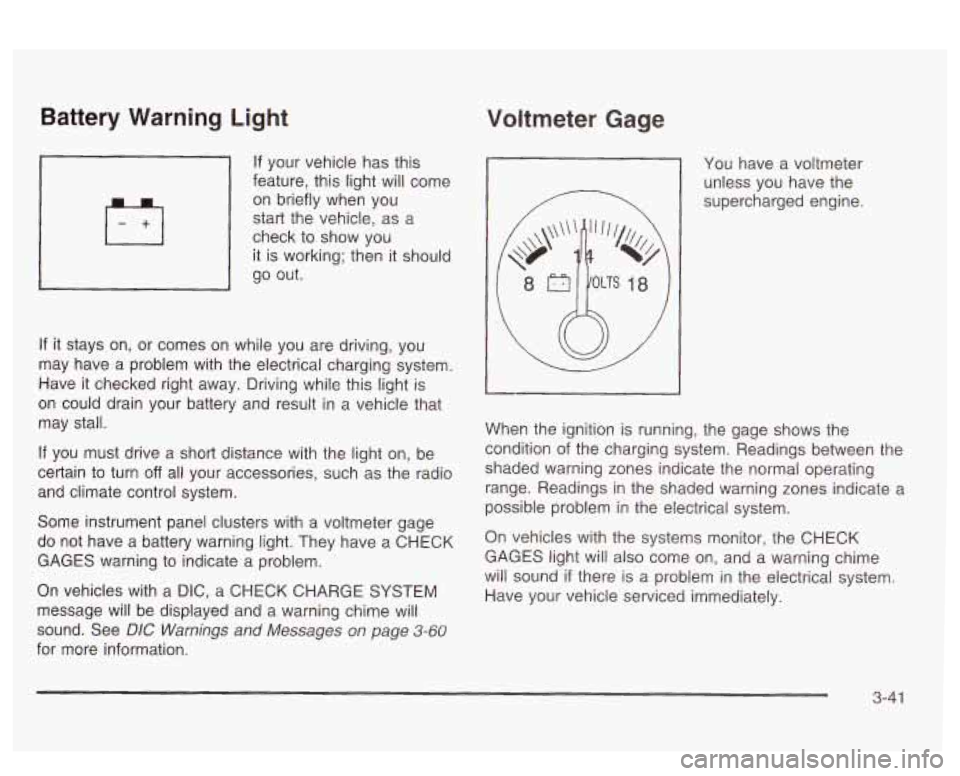
If your vehicle has this
feature, this light will come
on briefly when you
start the vehicle, as a
check to show you
it is working; then it should
go out.
If it stays on, or comes on while you are driving, you
may have a problem with the electrical charging system.
Have
it checked right away. Eriving while this light is
on could drain your battery and result in a vehicle that
may stall.
If you must drive a short distance with the light on, be
certain to turn
off all your accessories, such as the radio
and climate control system.
Some instrument panel clusters with a voltmeter gage
do not have a battery warning light. They have a CHECK
GAGES warning to indicate a problem.
On vehicles with a DIC, a CHECK CHARGE SYSTEM
message will be displayed and a warning chime will
sound. See
DIC Warnings and Messages on page 3-60
for more information.
Voltmeter Gage
You have a voltmeter
unless you have the
supercharged engine.
When the ignition is running, the gage shows the
condition
of the charging system. Readings between the
shaded warning zones indicate the normal operating
range. Readings in the shaded warning zones indicate a
possible problem in the electrical system.
On vehicles with the systems monitor, the CHECK
GAGES light will also come on, and a warning chime
will sound
if there is a problem in the electrical system.
Have your vehicle serviced immediately.
3-41
Page 177 of 418
DIC Vehicle Personalization
The DIC can be used to program the following
personalization features available with your vehicle:
Automatic Door Locks
Window Lock Out
Security Feedback
Delayed Locking
Perimeter Lighting
Memory Seats
Outside Curb View Assist Mirror
Driver ID
The DIC is used to program the personal choices of two
drivers. The drivers are recognized as DRIVER
#1
and DRIVER #2. You will let the DIC know which driver
you are by using your remote keyless entry transmitter
or by pressing the appropriate memory seat control
button located on the driver’s door or by choosing the
driver with the
DIC. Each remote keyless entry
transmitter was preprogrammed to belong to DRIVER
#I
or DRIVER #2. Each transmitter may be programmed
differently for each driver. When you
press the button with the unlock symbol on
your transmitter, the DIC will automatically change driver
numbers and the vehicle will recall the personalization
settings that were last made to correspond to your
transmitter, including your radio and comfort control
settings. See
Climate Controls Personalization on
page
3-33.
If you unlock the vehicle using your door key instead of
your transmitter, the DIC will not change drivers and
will recall the information from the last transmitter use or
the last driver change using the memory seat controls.
If this happens and you were not the last driver of
the vehicle, simply press your correct driver number on
the memory seat controls or press the button with
the unlock symbol
on your transmitter or select the
personalization programming mode and choose
the correct driver number.
Use the following steps for personalization programming
instructions.
1. Turn the ignition on and keep the transaxle in
2. Press the MODE button to reach personalization
3. Press the SELECT button to enter personalization
PARK (P).
programming display. programming mode.
3-62
Page 328 of 418
a tire graded 100. The relative performance of tires
depends upon the actual conditions of their use,
however, and may depart significantly from the norm
due to variations in driving habits, service practices and
differences in road characteristics and climate.
Traction - AA, A, B, C
The traction grades, from highest to lowest, are AA, A,
B, and C. Those grades represent the tire’s ability
to stop on wet pavement as measured under controlled
conditions on specified government test surfaces
of
asphalt and concrete. A tire marked C may have poor
traction performance. Warning: The traction grade
assigned to this tire is based on straight-ahead braking
traction tests, and does not include acceleration,
cornering, hydroplaning, or peak traction characteristics.
Temperature - A, B, C
The temperature grades are A (the highest), B, and C,
representing the tire’s resistance to the generation
under controlled conditions on a specified indoor
laboratory
test wheel. Sustained high temperature can
cause the material of the tire to degenerate and
reduce tire life, and excessive temperature can lead to
sudden tire failure. The grade
C corresponds to a
level of performance which all passenger car tires must
meet under the Federal Motor Vehicle Safety Standard
ui ireai ar~d iis aLiiiiy iu dissip& i-ledf vvi-Iei-1 t&&
No. 109. Grades B and A represent higher levels of
performance on the laboratory test wheel than the
minimum required by law.
Warning: The temperature grade for this tire
is
established for a tire that is properly inflated and not
overloaded. Excessive speed, underinflation, or
excessive loading, either separately or in combination,
can cause heat buildup and possible tire failure.
Wheel Alignment and Tire Balance
The wheels on your vehicle were aligned and balanced
carefully at the factory to give you the longest tire life
and best overall performance.
Scheduled wheel alignment and wheel balancing are
not needed. However,
if you notice unusual tire wear or
your vehicle pulling one way or the other, the alignment
may need to be reset. If you notice your vehicle
vibrating when driving on a smooth road, your wheels
may need
to be rebalanced.
Wheel Replacement
Replace any wheel that is bent, cracked or badly rusted
or corroded.
If wheel nuts keep coming loose, the
wheel, wheel bolts and wheel nuts should be replaced.
If the wheel leaks air, replace it (except some
aluminum wheels, which can sometimes be repaired).
See your dealer
if any of these conditions exist.
Your dealer will know the kind of wheel you need.
5-69
Page 400 of 418
A
Accessory Inflator ........................................... 5-72
Accessory Power Outlets
................................. 3-23
Adding Washer Fluid
....................................... 5-41
Additional Program Information
........................... 7-7
Additives. Fuel
................................................. 5-6
Add-on Electrical Equipment
............................ 5-91
Adjusting the Speakers (Balance/Fade)
...... 3.75. 3-85
Air Bag
Readiness Light
.......................................... 3-40
Air Bag Systems
............................................. 1-47
How Does an Air Bag Restrain?
.................... 1-52
Servicing Your Air Bag-Equipped Vehicle
......... 1-55
What Makes an Air Bag Inflate? .................... 1-52
What Will You See After an Air Bag Inflates?
.. 1-53
When Should an Air Bag Inflate?
................... 1-51
Where
Are the Air Bags? .............................. 1-50
Air Cleaner/Filter, Engine
................................. 5-22
All Overseas Locations
...................................... 7-4
Aluminum or Chrome-Plated Wheels
.................. 5-86
Ar~ie~~~~a, ulversiiy a- IU I
Antenna, XM Satellite Radio System ................ 3-101
Anti-lock Brake System (ABS)
............................ 4-7
Anti-Lock Brake, System Warning Light
.............. 3-43
Appearance Care
............................................ 5-82
Care of Safety Belts
.................................... 5-85
Chemicai Paint Spotting
............................... 5-88
AM ............................................................... 3-99 R . 0 an* .........................................
Appearance Care (cont.)
Cleaning the Inside of Your Vehicle
................ 5-82
Cleaning the Outside of Your Vehicle
.............. 5-85
Finish Damage
............................................ 5-87
GM Vehicle Care/Appearance Materials
.......... 5-88
Sheet Metal Damage
................................... 5-87
Underbody Maintenance
............................... 5-87
Weatherstrips
.............................................. 5-85
Ashtrays
........................................................ 3-24
Audio System(s)
............................................. 3-71
Audio Systems
Audio Steering Wheel Controls
...................... 3-98
Care of Your Cassette Tape Player
............... 3-100
Care of Your CD Player
.............................. 3-101
Care of Your CDs
...................................... 3-100
Chime Levei Adjustment
............................. 3-101
Diversity Antenna System
............................ 3-1 01
Radio with Cassette and CD
......................... 3-82
Radio with CD
............................................ 3-72
Setting the Time
.......................................... 3-71
Theft-Deterrent Feature
................................ 3-98
Trunk-Mounted CD Chanuer
.......................... 3-94
Understanding Radio Reception
..................... 3-99
XM Satellite Radio Antenna System
.............. 3-101
Automatic Climate Control System
..................... 3-28
Automatic Door Locks
..................................... 3-64
Automatic Level Control
................................... 4-36
Automatic Operation
.................................... 3-28
1