Page 127 of 177

17-02-2003
The ESP system offers increased safety duringnormal driving, but shouldnot incite the driver to take
risks or to drive at high speed. The operation of the system is assured to the extent to which therecommendations of the manufac-turer regarding the wheels (tyresand wheel rims), the braking com-ponents, the electronic compo-nents and the assembly and repairprocedures within the PEUGEOTnetwork are respected. After an accident or impact, have the system checked by a
PEUGEOT dealer.
DRIVING Y0UR 406
152
TRACTION CONTROL (ASR) AND
DYNAMIC STABILITY CONTROL
CONTROL (ESP) These systems are linked and com-
plement the ABS.
The ASR system optimises drive to prevent the wheels skidding, byacting on the brakes of the drivewheels and on the engine. It alsoallows the directional stability ofthe vehicle to be improved onacceleration. If there is a variation between the tra- jectory followed by the vehicle and
that required by the driver, the ESPsystem automatically acts on theengine and the brake of one or morewheels, in order to put the vehicleback on course.
Operation of the ASR and ESP systems
When one of these two sys-tems is operating, this lightflashes. Handbrake Applying When parking, pull the handbrake toimmobilise your vehicle.
Warning:
when parking on a slope,
direct your wheels towards the pave- ment and apply the handbrake. Releasing Pull the handle and press the buttonto release the handbrake.
Disarming the ESP/ASR systems In certain conditions (vehicle stuck in
mud or snow, or on loose ground...),it could prove useful to disarm theASR system to make the wheelsspin and regain grip. �
Press the switch "ESP OFF", si-
tuated to the left of the steering wheel.
The switch lights up and the indicatorlights come on, accompanied by themessage '' ASR/ESP de-activated''
on the multi-function display: the
ESP and ASR systems no longer
affect the operation of the engine orthe brakes. They engage again:� automatically when the ignition is
switched off,
� manually by pressing the switchagain.
Operating check When a system malfunctionoccurs, the switch lightflashes and the indicatorlight comes on.
Contact a PEUGEOT dealer tocheck the system.
Page 147 of 177

17-02-2003
Amber bulbs must be replaced by bulbs of iden-tical specification and
colour.
In certain weather conditions (lowtemperatures, humidity), the pres-
ence of condensation on theinside of the headlamp glass isnormal ; it disappears a few min-
utes after the lights have beenswitched on.
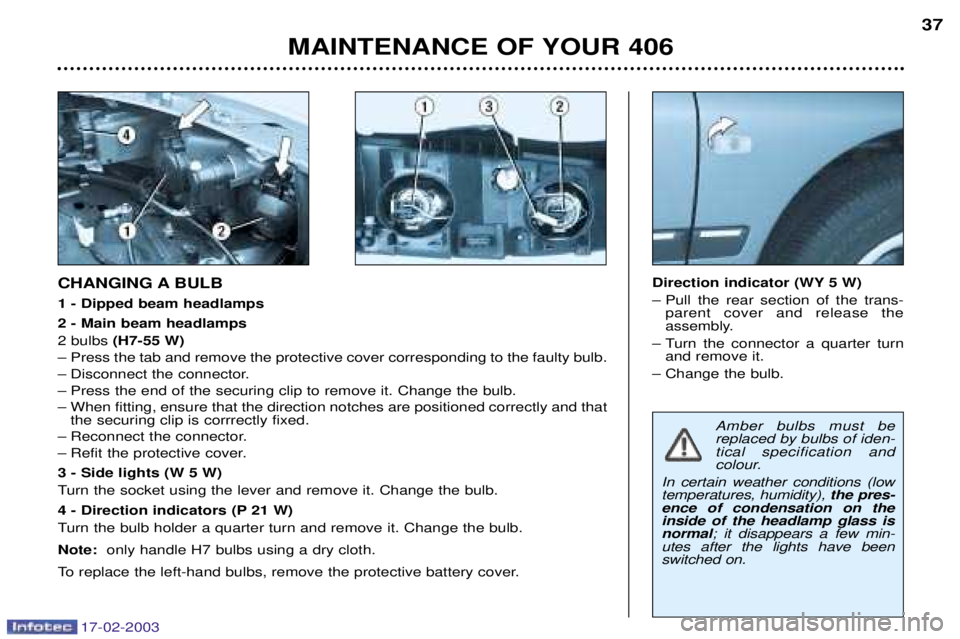
CHANGING A BULB 1 - Dipped beam headlamps 2 - Main beam headlamps 2 bulbs (H7-55 W)
Ð Press the tab and remove the protective cover corresponding to the faulty bulb.
Ð Disconnect the connector.
Ð Press the end of the securing clip to remove it. Change the bulb.
Ð When fitting, ensure that the direction notches are positioned correctly and that the securing clip is corrrectly fixed.
Ð Reconnect the connector.
Ð Refit the protective cover. 3 - Side lights (W 5 W)
Turn the socket using the lever and remove it. Change the bulb.
4 - Direction indicators (P 21 W)
Turn the bulb holder a quarter turn and remove it. Change the bulb. Note: only handle H7 bulbs using a dry cloth.
To replace the left-hand bulbs, remove the protective battery cover. Direction indicator (WY 5 W)
Ð Pull the rear section of the trans-
parent cover and release the
assembly.
Ð Turn the connector a quarter turn and remove it.
Ð Change the bulb.
MAINTENANCE OF YOUR 406 37
Page 148 of 177
17-02-2003
Third brake light - saloon (5 W 5 W bulbs) Lower the two metal clips on either side of the light and slide the cover
towards the rear.
Remove the bulb-holder.Change the faulty bulb.Rear lights, saloon
1 - Direction indicators (P 21 W).
2 - Reversing lights (P 21 W).
3 - Brake lights/Side lights (P 21/5 W).
4 - Side lights (P 21/5 W).
5 - Fog lamp (P 21 W). These 5 bulbs are changed from inside the boot:
Ð remove the retaining clips then release the carpet,
Ð remove the connector by pressing the tab
A,
Ð remove the bulb holder by squeezing the tabs,
Ð change the faulty bulb.
MAINTENANCE OF YOUR 406
38
Page 149 of 177
17-02-2003
Tailgate lights Open the flap using the cut-out pro- vided. Disconnect the connector by releas- ing tab A.
Unscrew the two nuts. Remove the light by squeezing the two tabs B. Extract the bulb holder by pressingthe tabs
C.
Change the faulty bulb.
1 - Side lights (P 21/5 W).
2 - Reversing lights (P 21 W).
3 - Fog lamp (P 21 W). Number plate lights (W 5 W)
Remove the translucent protector.Change the faulty bulb.
MAINTENANCE OF YOUR 406
40
Page 150 of 177
17-02-2003
Rear lights, estate
Wing lights
To remove the trim, pull the handle towards you and release the panelupwards.Open the flap using the ignition key. Remove the connector by pressing the metal bar
A.
Unscrew the wing nut B.
Release the light. To gain access to the bulbs, press
the tabs and release the bulb holder.
1 - Brake/side lights (P 21/5 W).
2 - Direction indicators (P 21 W). Change the faulty bulb.
MAINTENANCE OF YOUR 406
39
Page 151 of 177
17-02-2003
Tailgate lights Open the flap using the cut-out pro- vided. Disconnect the connector by releas- ing tab A.
Unscrew the two nuts. Remove the light by squeezing the two tabs B. Extract the bulb holder by pressingthe tabs
C.
Change the faulty bulb.
1 - Side lights (P 21/5 W).
2 - Reversing lights (P 21 W).
3 - Fog lamp (P 21 W). Number plate lights (W 5 W)
Remove the translucent protector.Change the faulty bulb.
MAINTENANCE OF YOUR 406
40
Page 153 of 177

17-02-2003
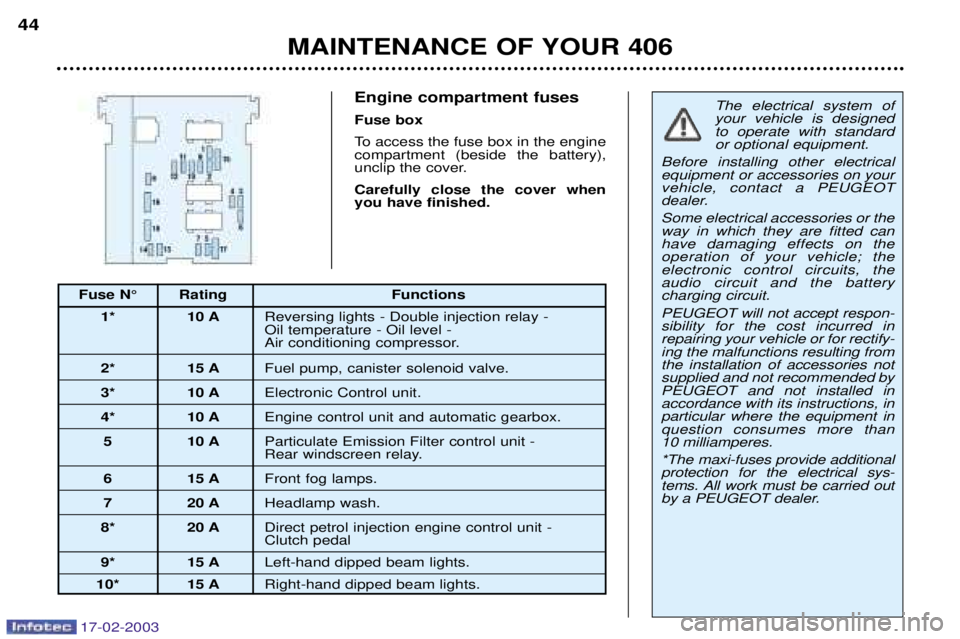
Fuse N¡ Rating Functions1* 10 A Reversing lights - Double injection relay - Oil temperature - Oil level -
Air conditioning compressor.
2* 15 A Fuel pump, canister solenoid valve.
3* 10 AElectronic Control unit.
4* 10 AEngine control unit and automatic gearbox.
5 10 A Particulate Emission Filter control unit -
Rear windscreen relay.
6 15 A Front fog lamps.
7 20 AHeadlamp wash.
8* 20 A Direct petrol injection engine control unit -
Clutch pedal
9* 15 A Left-hand dipped beam lights.
10* 15 A Right-hand dipped beam lights.
Engine compartment fuses Fuse box
To access the fuse box in the engine compartment (beside the battery),
unclip the cover. Carefully close the cover when you have finished.The electrical system of your vehicle is designedto operate with standardor optional equipment.
Before installing other electricalequipment or accessories on yourvehicle, contact a PEUGEOT
dealer. Some electrical accessories or the way in which they are fitted canhave damaging effects on theoperation of your vehicle; theelectronic control circuits, theaudio circuit and the batterycharging circuit. PEUGEOT will not accept respon- sibility for the cost incurred inrepairing your vehicle or for rectify-ing the malfunctions resulting fromthe installation of accessories notsupplied and not recommended byPEUGEOT and not installed inaccordance with its instructions, inparticular where the equipment inquestion consumes more than
10 milliamperes. *The maxi-fuses provide additional protection for the electrical sys-
tems. All work must be carried out
by a PEUGEOT dealer.
MAINTENANCE OF YOUR 406
44
Page 154 of 177
17-02-2003
Fuse N¡ RatingFunctions
11* 10 ALeft hand main beam.
12* 10 A Right hand main beam.
13* 15 AHorn.
14 10 AFront and rear screen wash pump.
15* 30 A Ignition coil - Windscreen wiper - Oxygen sensor - Oil pressure - Injection system.
16* 30 A Air pump - Oil temperature - Oil level - Brake lights operation - Alternator - Water in diesel
detector - Injection relay control.
17* 30 A Passenger's electric seat.
18 40 A Heater blower - Starter - Windscreen wiper slow speed.
MAINTENANCE OF YOUR 406 45