2003 Peugeot 406 wheel
[x] Cancel search: wheelPage 129 of 177
17-02-2003
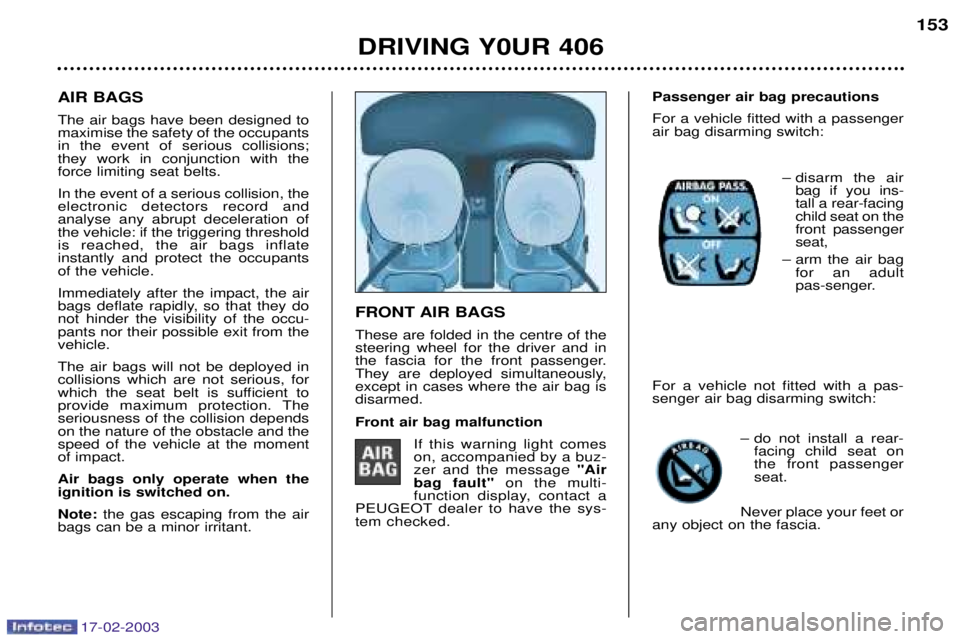
FRONT AIR BAGS These are folded in the centre of the steering wheel for the driver and in
the fascia for the front passenger.
They are deployed simultaneously,except in cases where the air bag isdisarmed. Front air bag malfunctionIf this warning light comes on, accompanied by a buz-zer and the message "Air
bag fault" on the multi-
function display, contact a
PEUGEOT dealer to have the sys-tem checked.
AIR BAGS The air bags have been designed to maximise the safety of the occupantsin the event of serious collisions;they work in conjunction with theforce limiting seat belts. In the event of a serious collision, the electronic detectors record andanalyse any abrupt deceleration ofthe vehicle: if the triggering thresholdis reached, the air bags inflateinstantly and protect the occupantsof the vehicle. Immediately after the impact, the air
bags deflate rapidly, so that they donot hinder the visibility of the occu-pants nor their possible exit from thevehicle. The air bags will not be deployed in collisions which are not serious, for
which the seat belt is sufficient to
provide maximum protection. Theseriousness of the collision dependson the nature of the obstacle and thespeed of the vehicle at the momentof impact. Air bags only operate when the ignition is switched on. Note: the gas escaping from the air
bags can be a minor irritant.
DRIVING Y0UR 406 153
Passenger air bag precautions For a vehicle fitted with a passenger air bag disarming switch: Ð disarm the airbag if you ins-tall a rear-facingchild seat on thefront passengerseat,
Ð arm the air bag for an adult
pas-senger.
For a vehicle not fitted with a pas-senger air bag disarming switch: Ð do not install a rear-facing child seat onthe front passengerseat.
Never place your feet or
any object on the fascia.
Page 131 of 177
17-02-2003
For the front and side air bags to be fully effective, observe the following safety rules:
¥ Wear a correctly adjusted seat belt.
¥ Sit in a normal upright position (passengers must not place their feet on the fascia).
¥ Do not leave any accessories, objects or pets between the occupants and the air bags. It could hamper the operation of the air bags or injure the occupants.
¥ All work on the air bag system is strictly forbidden unless it is carried out by an approved PEUGEOT dealer.
¥ After an accident or if the vehicle has been stolen or broken into, have the air bag systems checked.
¥ The air bag systems have been designed to be fully operational for 10 years from the date of registration of the vehicle. Have them replaced by a PEUGEOT dealer after this period. Front air bags
¥ Do not drive holding the steering wheel by its spokes or resting your hands on the centre part of the wheel.
¥ Smoke as little as possible; deployment of the air bags can cause burns or the risk of injury from a cigarette or pipe.
¥ Never remove or pierce the steering wheel or hit it violently.
Side air bags
¥ Do not fix or glue anything to the backs of the front seats. This could cause injury to the chest or arms when the side air bag inflates.
¥ Do not sit with the upper part of the body any nearer to the door than necessary.
¥ Only put approved covers on the seats. Contact your PEUGEOT dealer.
DRIVING Y0UR 406 155
Page 133 of 177
17-02-2003
For the front and side air bags to be fully effective, observe the following safety rules:
¥ Wear a correctly adjusted seat belt.
¥ Sit in a normal upright position (passengers must not place their feet on the fascia).
¥ Do not leave any accessories, objects or pets between the occupants and the air bags. It could hamper the operation of the air bags or injure the occupants.
¥ All work on the air bag system is strictly forbidden unless it is carried out by an approved PEUGEOT dealer.
¥ After an accident or if the vehicle has been stolen or broken into, have the air bag systems checked.
¥ The air bag systems have been designed to be fully operational for 10 years from the date of registration of the vehicle. Have them replaced by a PEUGEOT dealer after this period. Front air bags
¥ Do not drive holding the steering wheel by its spokes or resting your hands on the centre part of the wheel.
¥ Smoke as little as possible; deployment of the air bags can cause burns or the risk of injury from a cigarette or pipe.
¥ Never remove or pierce the steering wheel or hit it violently.
Side air bags
¥ Do not fix or glue anything to the backs of the front seats. This could cause injury to the chest or arms when the side air bag inflates.
¥ Do not sit with the upper part of the body any nearer to the door than necessary.
¥ Only put approved covers on the seats. Contact your PEUGEOT dealer.
DRIVING Y0UR 406 155
Page 143 of 177
17-02-2003
MAINTENANCE OF YOUR 406
34
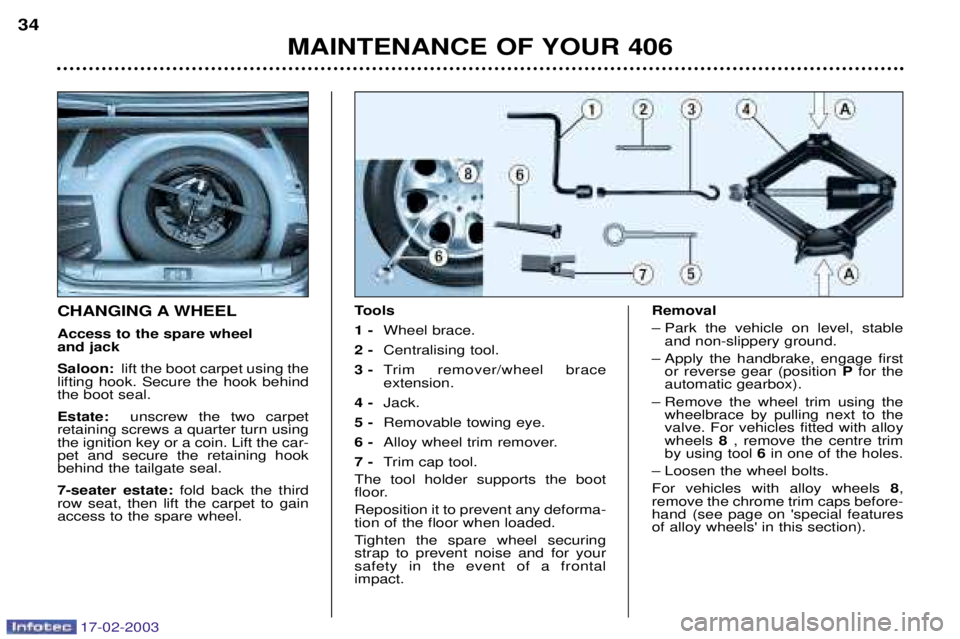
CHANGING A WHEEL Access to the spare wheel and jack Saloon:
lift the boot carpet using the
lifting hook. Secure the hook behind the boot seal. Estate: unscrew the two carpet
retaining screws a quarter turn using the ignition key or a coin. Lift the car-pet and secure the retaining hookbehind the tailgate seal. 7-seater estate: fold back the third
row seat, then lift the carpet to gain access to the spare wheel. Tools 1 -
Wheel brace.
2 - Centralising tool.
3 - Trim remover/wheel brace extension.
4 - Jack.
5 - Removable towing eye.
6 - Alloy wheel trim remover.
7 - Trim cap tool.
The tool holder supports the boot
floor. Reposition it to prevent any deforma- tion of the floor when loaded.
Tighten the spare wheel securing strap to prevent noise and for yoursafety in the event of a frontalimpact. Removal
Ð Park the vehicle on level, stable
and non-slippery ground.
Ð Apply the handbrake, engage first or reverse gear (position Pfor the
automatic gearbox).
Ð Remove the wheel trim using the wheelbrace by pulling next to the valve. For vehicles fitted with alloywheels 8, remove the centre trim
by using tool 6in one of the holes.
Ð Loosen the wheel bolts. For vehicles with alloy wheels 8,
remove the chrome trim caps before-
hand (see page on 'special featuresof alloy wheels' in this section).
Page 144 of 177
17-02-2003
MAINTENANCE OF YOUR 40635
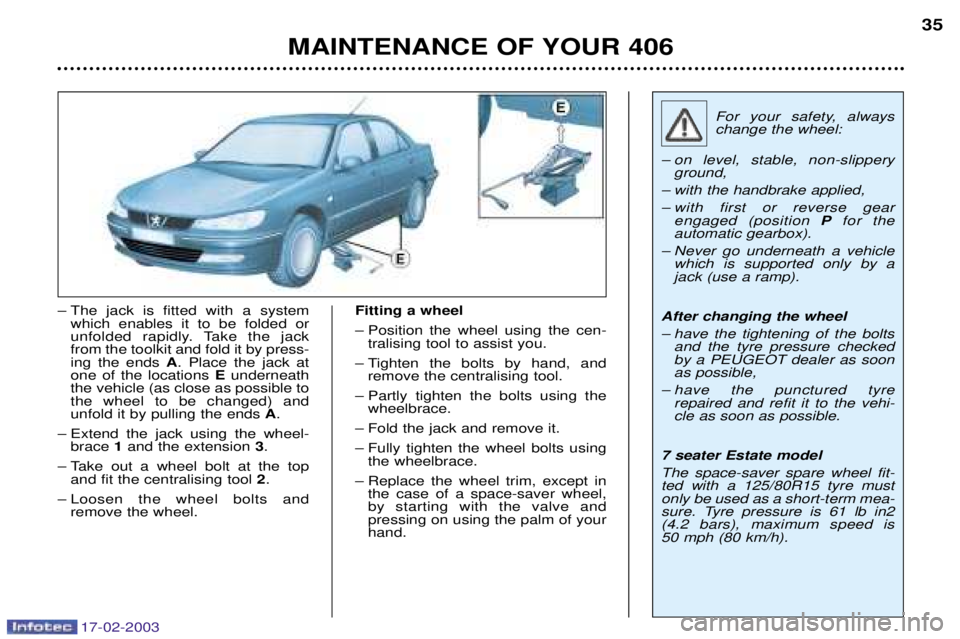
Ð The jack is fitted with a system
which enables it to be folded or
unfolded rapidly. Take the jackfrom the toolkit and fold it by press-ing the ends A. Place the jack at
one of the locations Eunderneath
the vehicle (as close as possible tothe wheel to be changed) andunfold it by pulling the ends A.
Ð Extend the jack using the wheel- brace 1and the extension 3.
Ð Take out a wheel bolt at the top and fit the centralising tool 2.
Ð Loosen the wheel bolts and remove the wheel. Fitting a wheel
Ð Position the wheel using the cen-
tralising tool to assist you.
Ð Tighten the bolts by hand, and remove the centralising tool.
Ð Partly tighten the bolts using the wheelbrace.
Ð Fold the jack and remove it.
Ð Fully tighten the wheel bolts using the wheelbrace.
Ð Replace the wheel trim, except in the case of a space-saver wheel, by starting with the valve andpressing on using the palm of yourhand. For your safety, alwayschange the wheel:
Ð on level, stable, non-slippery ground,
Ð with the handbrake applied,
Ð with first or reverse gear engaged (position Pfor the
automatic gearbox).
Ð Never go underneath a vehicle which is supported only by a jack (use a ramp).
After changing the wheel
Ð have the tightening of the bolts and the tyre pressure checked by a PEUGEOT dealer as soonas possible,
Ð have the punctured tyre repaired and refit it to the vehi-cle as soon as possible.
7 seater Estate model The space-saver spare wheel fit- ted with a 125/80R15 tyre mustonly be used as a short-term mea-
sure. Tyre pressure is 61 lb in2(4.2 bars), maximum speed is 50 mph (80 km/h).
Page 145 of 177
17-02-2003
MAINTENANCE OF YOUR 406
36
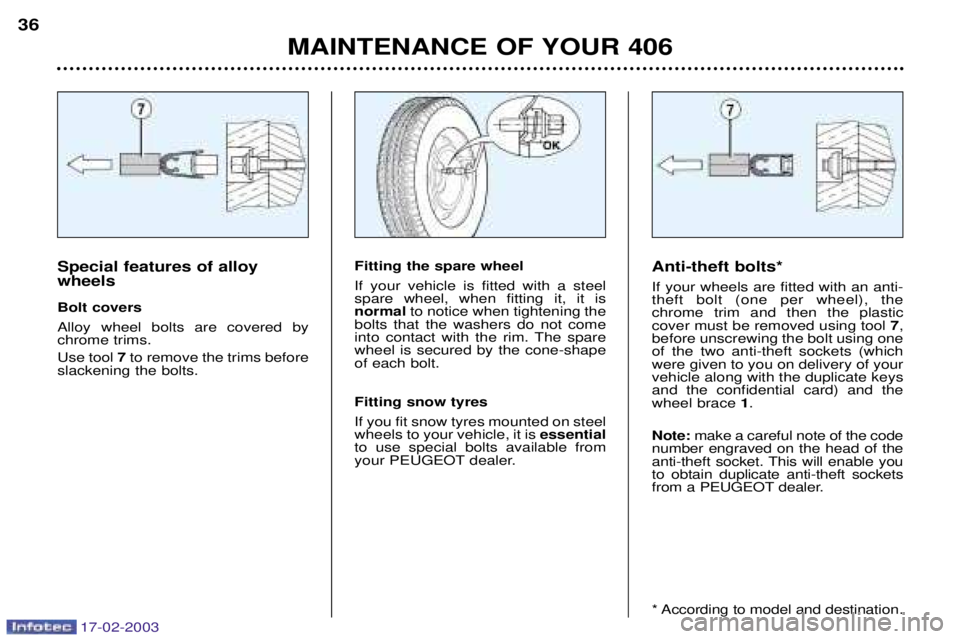
Anti-theft bolts* If your wheels are fitted with an anti- theft bolt (one per wheel), thechrome trim and then the plasticcover must be removed using tool 7,
before unscrewing the bolt using oneof the two anti-theft sockets (whichwere given to you on delivery of yourvehicle along with the duplicate keysand the confidential card) and thewheel brace 1.
Note: make a careful note of the code
number engraved on the head of the
anti-theft socket. This will enable youto obtain duplicate anti-theft sockets
from a PEUGEOT dealer.
* According to model and destination.
Special features of alloy wheels Bolt covers Alloy wheel bolts are covered by chrome trims. Use tool 7to remove the trims before
slackening the bolts.Fitting the spare wheel If your vehicle is fitted with a steel spare wheel, when fitting it, it is normal to notice when tightening the
bolts that the washers do not come
into contact with the rim. The sparewheel is secured by the cone-shapeof each bolt. Fitting snow tyres If you fit snow tyres mounted on steel wheels to your vehicle, it is essential
to use special bolts available from
your PEUGEOT dealer.
Page 146 of 177
17-02-2003
PETROL/LPG TWIN FUEL VERSION169
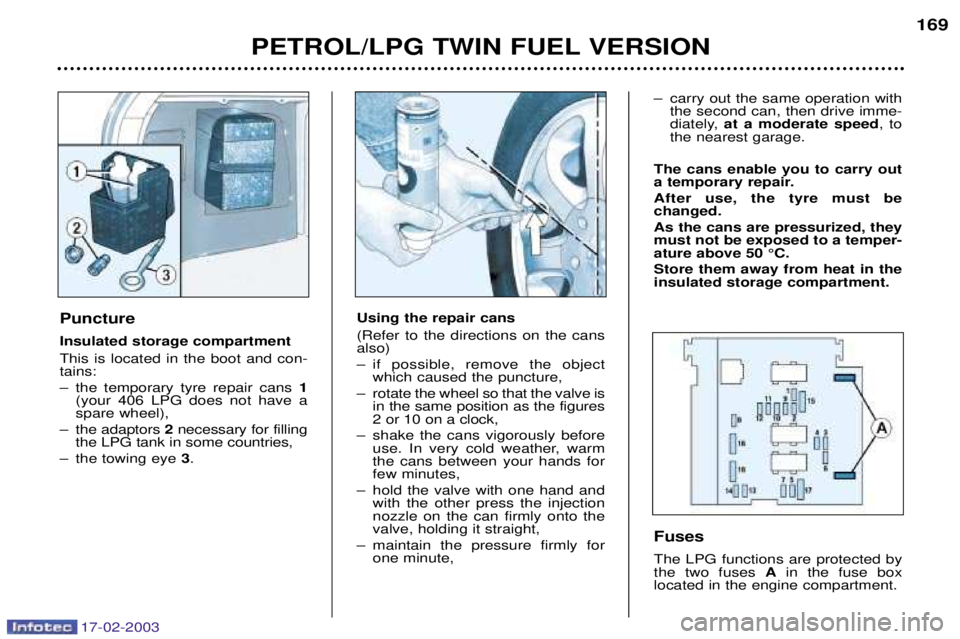
Puncture Insulated storage compartment This is located in the boot and con- tains:
Ð the temporary tyre repair cans 1
(your 406 LPG does not have a spare wheel),
Ð the adaptors 2necessary for filling
the LPG tank in some countries,
Ð the towing eye 3.
Fuses The LPG functions are protected by the two fuses Ain the fuse box
located in the engine compartment.
Using the repair cans (Refer to the directions on the cans also)
Ð if possible, remove the object
which caused the puncture,
Ð rotate the wheel so that the valve is in the same position as the figures 2 or 10 on a clock,
Ð shake the cans vigorously before use. In very cold weather, warmthe cans between your hands forfew minutes,
Ð hold the valve with one hand and with the other press the injectionnozzle on the can firmly onto thevalve, holding it straight,
Ð maintain the pressure firmly for one minute, Ð carry out the same operation with
the second can, then drive imme-
diately, at a moderate speed , to
the nearest garage.
The cans enable you to carry out
a temporary repair. After use, the tyre must be changed. As the cans are pressurized, they must not be exposed to a temper-ature above 50 ¡C. Store them away from heat in the insulated storage compartment.
Page 155 of 177
17-02-2003
PETROL/LPG TWIN FUEL VERSION169
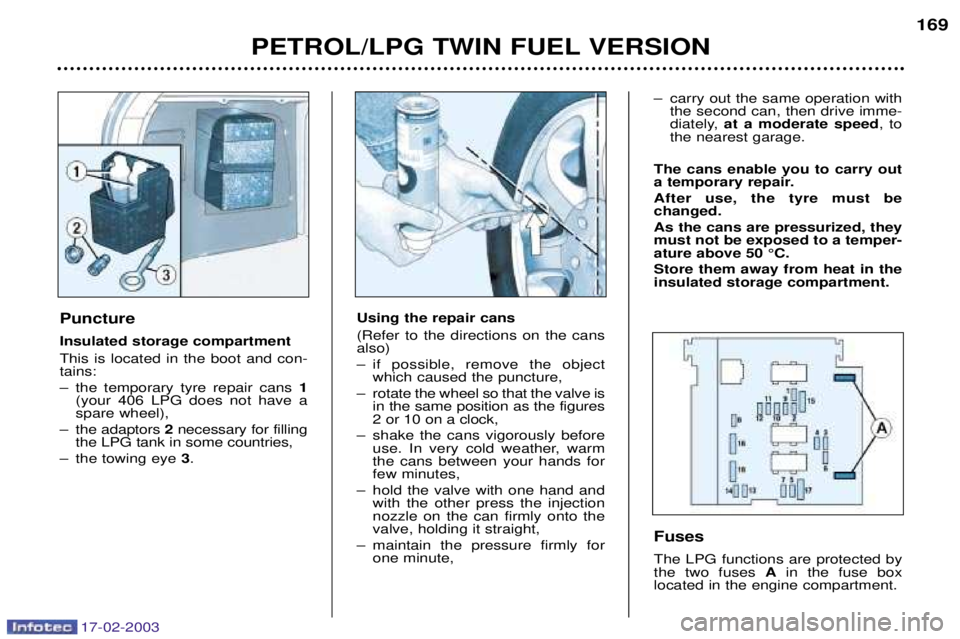
Puncture Insulated storage compartment This is located in the boot and con- tains:
Ð the temporary tyre repair cans 1
(your 406 LPG does not have a spare wheel),
Ð the adaptors 2necessary for filling
the LPG tank in some countries,
Ð the towing eye 3.
Fuses The LPG functions are protected by the two fuses Ain the fuse box
located in the engine compartment.
Using the repair cans (Refer to the directions on the cans also)
Ð if possible, remove the object
which caused the puncture,
Ð rotate the wheel so that the valve is in the same position as the figures 2 or 10 on a clock,
Ð shake the cans vigorously before use. In very cold weather, warmthe cans between your hands forfew minutes,
Ð hold the valve with one hand and with the other press the injectionnozzle on the can firmly onto thevalve, holding it straight,
Ð maintain the pressure firmly for one minute, Ð carry out the same operation with
the second can, then drive imme-
diately, at a moderate speed , to
the nearest garage.
The cans enable you to carry out
a temporary repair. After use, the tyre must be changed. As the cans are pressurized, they must not be exposed to a temper-ature above 50 ¡C. Store them away from heat in the insulated storage compartment.