2003 Peugeot 206 SW Dag roof
[x] Cancel search: roofPage 94 of 168

26-05-2003
YOUR 206 IN DETAIL91
TAILGATE RELEASE (saloon and 206 RC) This enables the tailgate to be unlocked in the event of a centrallocking fault:
Ð fold back the rear seats to gain access to the boot from inside the vehicle,
Ð pull the tailgate trim to release it,
Ð pull the opening catch 1upwards.
SUNROOF (saloon and 206 RC)
To open Press part Bof the switch. The sun-
roof will open in the intermediate
(comfort) position. To open com-
pletely, press part Bagain.
To close Press part Aof the switch. The sun-
roof will close in the intermediate
(comfort) position. To close com-
pletely, press part Aagain.
Panoramic sunroof screen
To move it to your chosen position, press part Aor Bof the switch.
The lighting is activated on opening the tailgate or the rearscreen. Notes: the tailgate and the rear
screen lock automatically while driv- ing (above 6 mph (10 km/h)) andunlock when one of the doors isopened. When the rear windscreen wiper is in a wiping position, the rear screencan only be opned at the end of thecycle. Close the rear screen using the windscreen wiper arm or by press-ing the centre of the glass.
"Tailgate/rear screen open" warning
With the engine running , if the
tailgate or the rear screen is not properly closed, you are warned byan audible signal and a message
"Tailgate open" or a diagram on
the multifunction display. In addition, while driving , if the
courtesy light button is in the "ligh- ting on opening the tailgate or rearscreen" position, the courtesy lightflashes.
Page 95 of 168

26-05-2003
YOUR 206 IN DETAIL91
TAILGATE RELEASE (saloon and 206 RC) This enables the tailgate to be unlocked in the event of a centrallocking fault:
Ð fold back the rear seats to gain access to the boot from inside the vehicle,
Ð pull the tailgate trim to release it,
Ð pull the opening catch 1upwards.
SUNROOF (saloon and 206 RC)
To open Press part Bof the switch. The sun-
roof will open in the intermediate
(comfort) position. To open com-
pletely, press part Bagain.
To close Press part Aof the switch. The sun-
roof will close in the intermediate
(comfort) position. To close com-
pletely, press part Aagain.
Panoramic sunroof screen
To move it to your chosen position, press part Aor Bof the switch.
The lighting is activated on opening the tailgate or the rearscreen. Notes: the tailgate and the rear
screen lock automatically while driv- ing (above 6 mph (10 km/h)) andunlock when one of the doors isopened. When the rear windscreen wiper is in a wiping position, the rear screencan only be opned at the end of thecycle. Close the rear screen using the windscreen wiper arm or by press-ing the centre of the glass.
"Tailgate/rear screen open" warning
With the engine running , if the
tailgate or the rear screen is not properly closed, you are warned byan audible signal and a message
"Tailgate open" or a diagram on
the multifunction display. In addition, while driving , if the
courtesy light button is in the "ligh- ting on opening the tailgate or rearscreen" position, the courtesy lightflashes.
Page 96 of 168

26-05-2003
YOUR 206 IN DETAIL
92
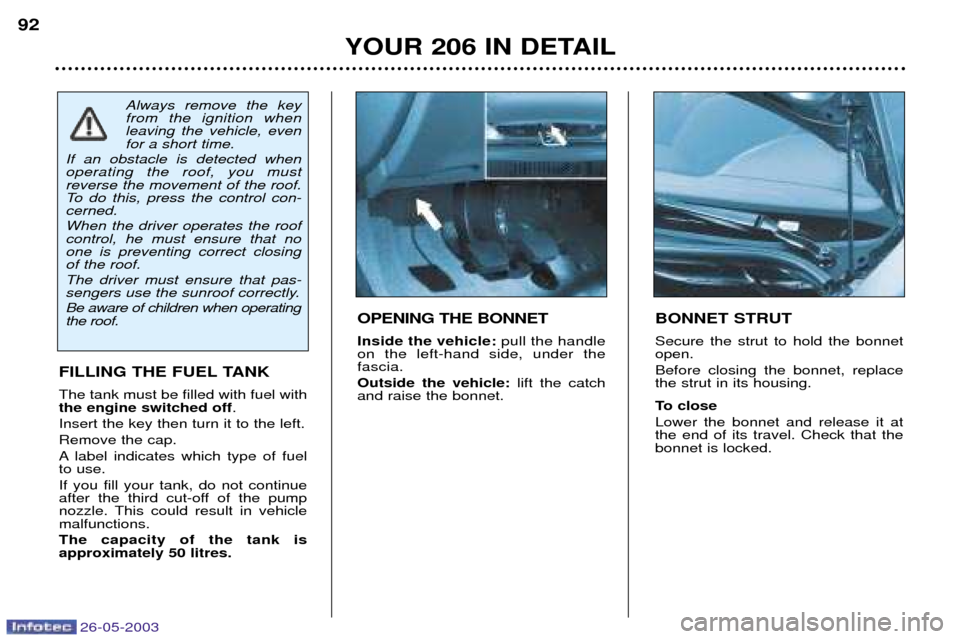
BONNET STRUT Secure the strut to hold the bonnet open. Before closing the bonnet, replace the strut in its housing.
To close Lower the bonnet and release it at the end of its travel. Check that thebonnet is locked.
FILLING THE FUEL TANK The tank must be filled with fuel with the engine switched off
.
Insert the key then turn it to the left. Remove the cap.
A label indicates which type of fuel to use. If you fill your tank, do not continue
after the third cut-off of the pump
nozzle. This could result in vehiclemalfunctions. The capacity of the tank is approximately 50 litres. OPENING THE BONNET Inside the vehicle: pull the handle
on the left-hand side, under the fascia. Outside the vehicle: lift the catch
and raise the bonnet.
Always remove the key from the ignition whenleaving the vehicle, evenfor a short time.
If an obstacle is detected whenoperating the roof, you mustreverse the movement of the roof.
To do this, press the control con-cerned. When the driver operates the roof control, he must ensure that noone is preventing correct closingof the roof. The driver must ensure that pas-
sengers use the sunroof correctly. Be aware of children when operating the roof.
Page 97 of 168

26-05-2003
YOUR 206 IN DETAIL
92
BONNET STRUT Secure the strut to hold the bonnet open. Before closing the bonnet, replace the strut in its housing.
To close Lower the bonnet and release it at the end of its travel. Check that thebonnet is locked.
FILLING THE FUEL TANK The tank must be filled with fuel with the engine switched off
.
Insert the key then turn it to the left. Remove the cap.
A label indicates which type of fuel to use. If you fill your tank, do not continue
after the third cut-off of the pump
nozzle. This could result in vehiclemalfunctions. The capacity of the tank is approximately 50 litres. OPENING THE BONNET Inside the vehicle: pull the handle
on the left-hand side, under the fascia. Outside the vehicle: lift the catch
and raise the bonnet.
Always remove the key from the ignition whenleaving the vehicle, evenfor a short time.
If an obstacle is detected whenoperating the roof, you mustreverse the movement of the roof.
To do this, press the control con-cerned. When the driver operates the roof control, he must ensure that noone is preventing correct closingof the roof. The driver must ensure that pas-
sengers use the sunroof correctly. Be aware of children when operating the roof.
Page 152 of 168

26-05-2003
PRACTICAL INFORMATION137
Fuse Rating
Functions
1 15 A Heated seat - Alarm
4 20 A Multifunction display - Navigation control unit - Boot lighting - Audio equipment
5 15 A Automatic gearbox diagnostics
6 10 A Coolant level - Automatic gearbox - Audio equipment - Steering wheel angle sensor (ESP)
7 15 A Driving school accessory - Alarm fitted as an accessory
9 30 A Rear electric windows
10 40 A Rear screen and mirror demisting
11 15 A Rear windscreen wiper
12 30 A Front electric windows - Sunroof
14 10 A Engine fuse box - Air bags - Steering wheel controls - Rain sensor
15 15 A Instrument panel - Multifunction display - Navigation control unit - Air conditioning - Audio equipment
16 30 A Locking/unlocking controls for doors, bonnet and boot
20 10 A Right-hand brake light
21 15 A Left-hand brake light - 3rd brake light
22 20 A Front courtesy light and rear courtesy light (206 SW) - Map reading light - Glove box lighting - Lighter - Rear 12 volts socket (206 SW)
S1 Shunt PARC shunt
Page 153 of 168

PRACTICAL INFORMATION
140
BATTERY
To charge the battery using a battery charger:
Ð Disconnect the battery,
Ð Follow the instructions for use given by the battery charger manufacturer,
Ð Reconnect starting with the negative (Ð) terminal,
Ð Check that the terminals and connectors are clean. If they are covered withsulphate (white or greenish deposit), disconnect them and clean them.
To start the vehicle from another battery:
Ð Connect the red cable to the positive (+) terminals of the two batteries,
Ð Connect one end of the green or black cable to the negative (Ð) terminal of the slave battery,
Ð Connect the other end of the green or black cable to an earth point on the bro- ken down vehicle as far as possible from the battery,
Operate the starter, let the engine run.
Wait for the engine to return to idle, then disconnect the cables.
Ð Before disconnecting the battery, you must wait for 2 minutes after switching off the ignition.
Ð Never disconnect a terminal when the engine is running.
Ð Never charge a battery without first disconnecting the terminals.
Ð Close the windows and sunroof before disconnecting the battery. If they do not operate normally following reconnection of the battery, they must be reintialised (see sections "Electric windows - Safety auto-reverse" and"Sunroof - Safety auto-reverse".
Ð After every reconnection of the battery, switch on the ignition and wait 1 minute before starting to allow the electronic systems to be initialised. Ifslight difficulties are experienced after this, please contact a PEUGEOT
dealer.
It is advisable to disconnect the battery if the vehicle is not to be used for a period of more than one month.
ECONOMY MODE FUNCTION After the engine has stopped, with the key in the accessories position,
certain functions (windscreen wiper,electric windows, courtesy lights,audio equipment etc.) can only beused for thirty minutes, to prevent
discharging the battery.
Once the thirty minutes are over, the message "Economy mode active"
appears on the multifunction displayand the active functions are put on
standby.
A flat battery will prevent the engine from starting.
26-05-2003
Page 154 of 168

26-05-2003
PRACTICAL INFORMATION141
FITTING AUDIO EQUIPMENT
Your vehicle is equipped with certain factory-fitted audio equipment:
Ð roof aerial,
Ð coaxial aerial cable,
Ð basic interference suppression,
Ð supply to front speakers,
Ð supply to rear speakers and tweeters,
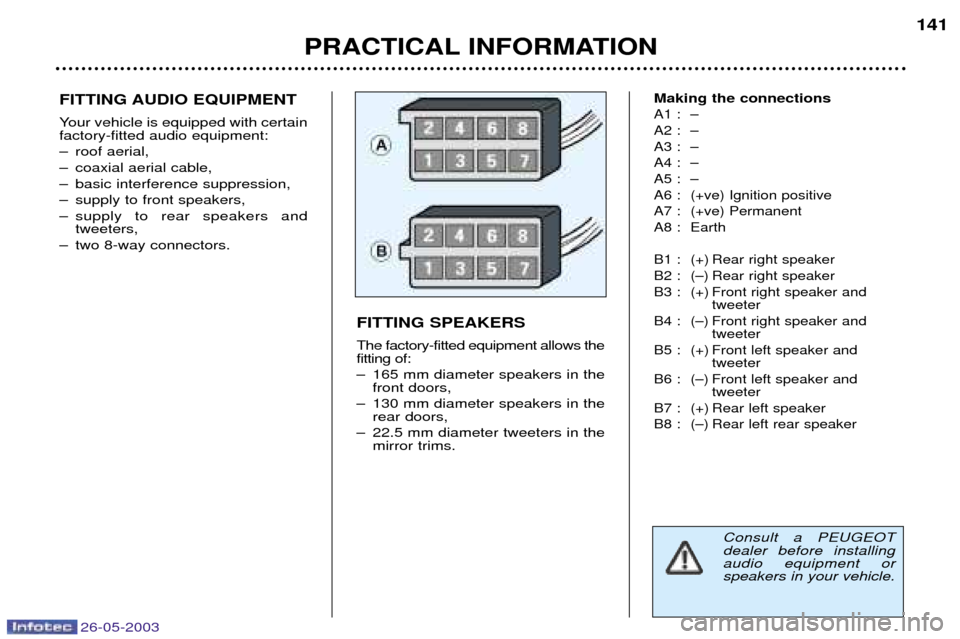
Ð two 8-way connectors. Making the connections
A1 : Ð
A2 : Ð
A3 : Ð
A4 : Ð
A5 : Ð
A6 : (+ve) Ignition positive
A7 : (+ve) Permanent
A8 : Earth
B1 : (+) Rear right speaker
B2 : (Ð) Rear right speaker
B3 : (+) Front right speaker and
tweeter
B4 : (Ð) Front right speaker and tweeter
B5 : (+) Front left speaker and tweeter
B6 : (Ð) Front left speaker and tweeter
B7 : (+) Rear left speaker
B8 : (Ð) Rear left rear speaker
FITTING SPEAKERS The factory-fitted equipment allows the fitting of:
Ð 165 mm diameter speakers in the front doors,
Ð 130 mm diameter speakers in the rear doors,
Ð 22.5 mm diameter tweeters in the mirror trims.
Consult a PEUGEOT dealer before installingaudio equipment orspeakers in your vehicle.
Page 157 of 168

26-05-2003
PRACTICAL INFORMATION
144
Removing the mat When removing the mat on the dri- ver's side, move the seat as far backas possible and remove the fixings. When refitting the mat, position it and replace the fixings by turningthem a quarter of a turn.
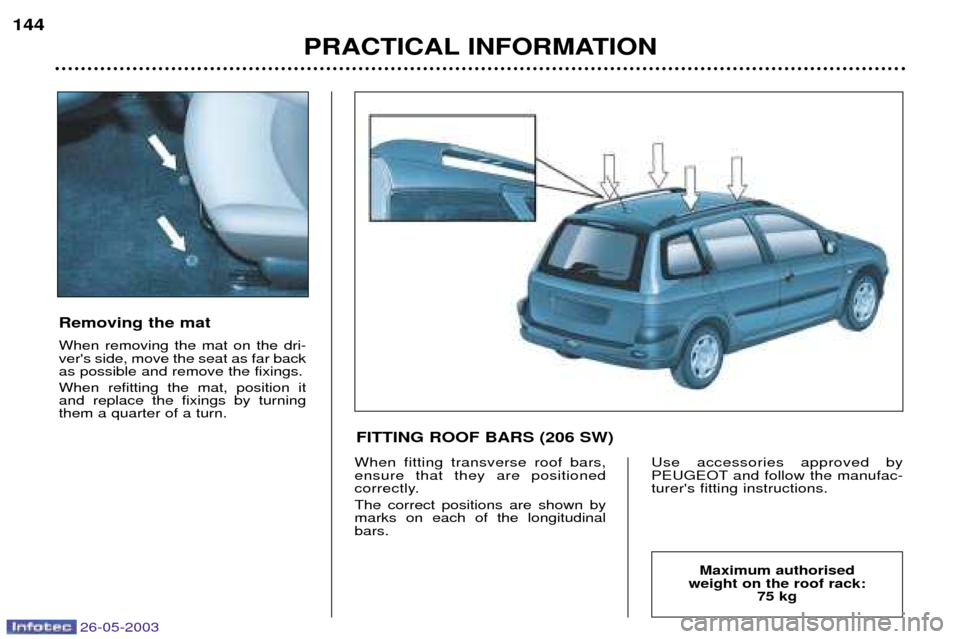
When fitting transverse roof bars, ensure that they are positioned
correctly. The correct positions are shown by marks on each of the longitudinalbars. Use accessories approved by
PEUGEOT and follow the manufac-turer's fitting instructions.
Maximum authorised
weight on the roof rack: 75 kg
FITTING ROOF BARS (206 SW)