Page 99 of 131
30-06-2003
PRACTICAL INFORMATION
96
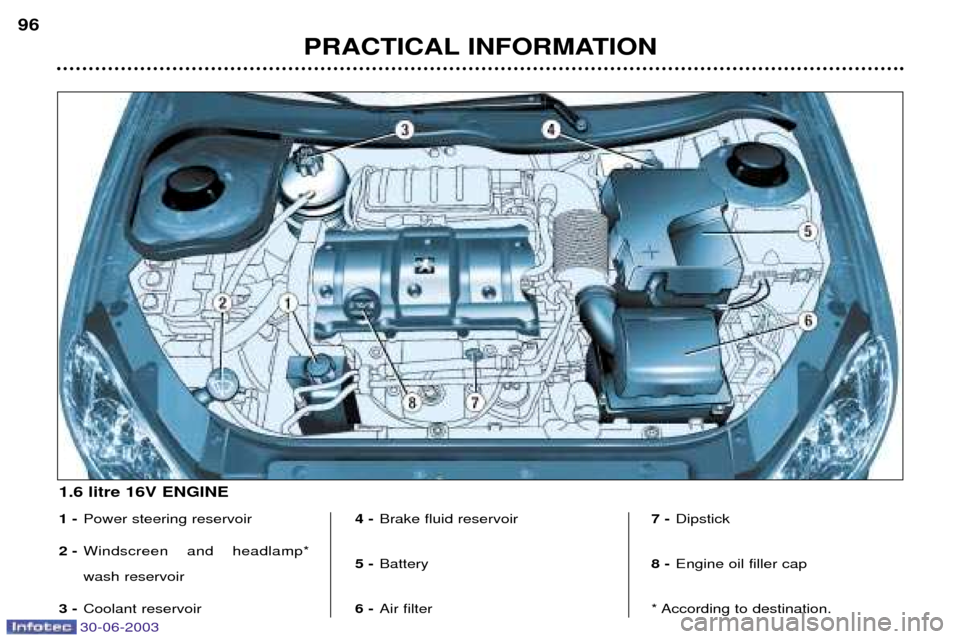
1 -
Power steering reservoir
2 - Windscreen and headlamp* wash reservoir
3 - Coolant reservoir 4 -
Brake fluid reservoir
5 - Battery
6 - Air filter 7 -
Dipstick
8 - Engine oil filler cap
* According to destination.
1.6 litre 16V ENGINE
Page 100 of 131
30-06-2003
PRACTICAL INFORMATION97
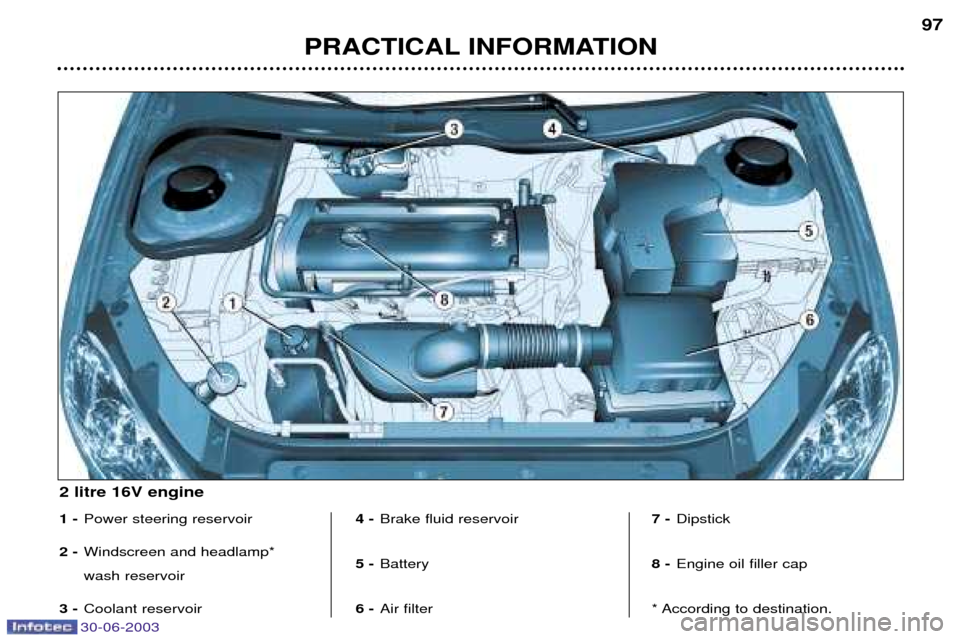
1 -
Power steering reservoir
2 - Windscreen and headlamp* wash reservoir
3 - Coolant reservoir 4 -
Brake fluid reservoir
5 - Battery
6 - Air filter 7 -
Dipstick
8 - Engine oil filler cap
* According to destination.
2 litre 16V engine
Page 101 of 131
30-06-2003
PRACTICAL INFORMATION
98
CHECKING THE LEVELS Oil level �
Check the level regularly and top
up between changes. The maxi-mum consumption is 0.5 l per 600miles (1000 km).
Check the level with the vehicle level,engine cold, using the oil level gaugeon the instrument panel or the dips-tick.
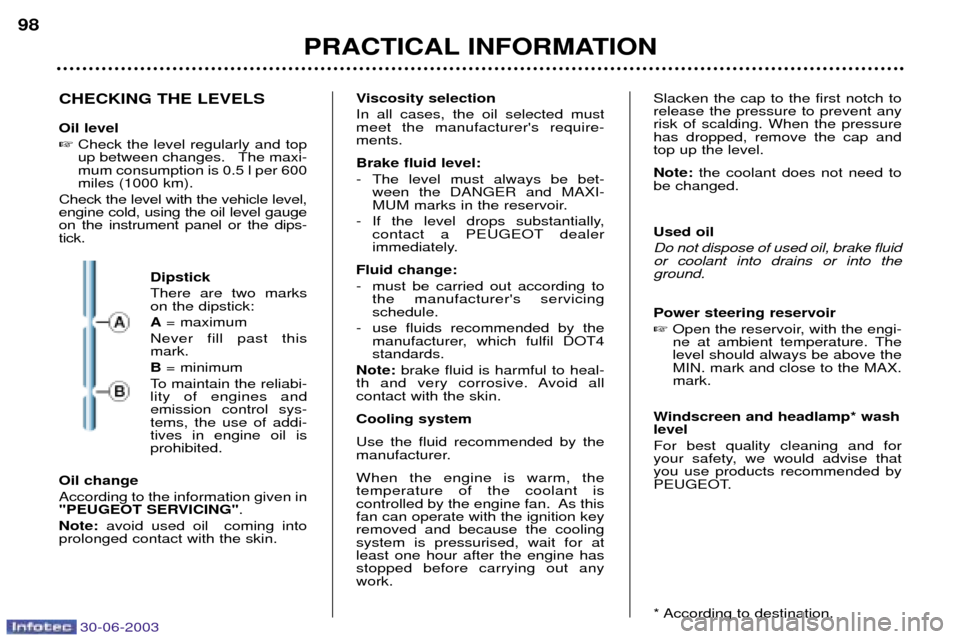
Dipstick There are two marks on the dipstick: A= maximum
Never fill past this mark. B = minimum
To maintain the reliabi- lity of engines andemission control sys-tems, the use of addi-tives in engine oil isprohibited.
Oil change According to the information given in
"PEUGEOT SERVICING" .
Note: avoid used oil coming into
prolonged contact with the skin. Viscosity selection In all cases, the oil selected must meet the manufacturer's require-ments. Brake fluid level:
- The level must always be bet-
ween the DANGER and MAXI-
MUM marks in the reservoir.
- If the level drops substantially, contact a PEUGEOT dealer
immediately.
Fluid change:
- must be carried out according to the manufacturer's servicing schedule.
- use fluids recommended by the manufacturer, which fulfil DOT4standards.
Note: brake fluid is harmful to heal-
th and very corrosive. Avoid allcontact with the skin. Cooling systemUse the fluid recommended by the
manufacturer. When the engine is warm, the temperature of the coolant is
controlled by the engine fan. As thisfan can operate with the ignition keyremoved and because the coolingsystem is pressurised, wait for atleast one hour after the engine hasstopped before carrying out anywork. Slacken the cap to the first notch torelease the pressure to prevent anyrisk of scalding. When the pressurehas dropped, remove the cap andtop up the level. Note:
the coolant does not need to
be changed. Used oil Do not dispose of used oil, brake fluid or coolant into drains or into theground. Power steering reservoir � Open the reservoir, with the engi-
ne at ambient temperature. Thelevel should always be above theMIN. mark and close to the MAX.mark.
Windscreen and headlamp* washlevel For best quality cleaning and for
your safety, we would advise thatyou use products recommended by
PEUGEOT.
* According to destination.
Page 102 of 131
30-06-2003
PRACTICAL INFORMATION99
CHECKS Battery
At the start of winter, have your bat-
tery checked by a PEUGEOT dea-
ler. Air filter and passenger compartment filter Have the filter elements replaced
regularly.
If you drive in dusty
conditions, change them twice asoften. Brake pads Brake pad wear depends on the style of driving, in particular forvehicles which are used in town,over short distances. It may be necessary to check the thickness of the pads, even betweenservices. Handbrake Where the handbrake travel is too great or there is a reduction in theperformance of the system, thehandbrake should be adjusted, evenbetween services. Have the system checked by a
PEUGEOT dealer. Manual gearbox This does not need an oil change. Check the level, according to themanufacturer's servicing schedule. Automatic gearbox This does not need an oil change. Have the level checked by a
PEUGEOT dealer, according to themanufacturer's servicing schedule. Oil filter
Change the filter regularly, in accor- dance with the servicing schedule.Only use products recommended by
PEUGEOT.
To ensure best performance fromcomponents as important as thepower steering and the brakingsystem, PEUGEOT selects andoffers quite specific products.
Page 104 of 131
30-06-2003
PRACTICAL INFORMATION101
CHANGING A WHEEL �
Park the vehicle on level, stable
ground which is not slippery.
� Apply the handbrake, engage first
gear or reverse (position Pon the
automatic gearbox) and switch offthe ignition.
� Chock the rear of the wheel withshim 2diagonally opposite the
wheel to be changed.
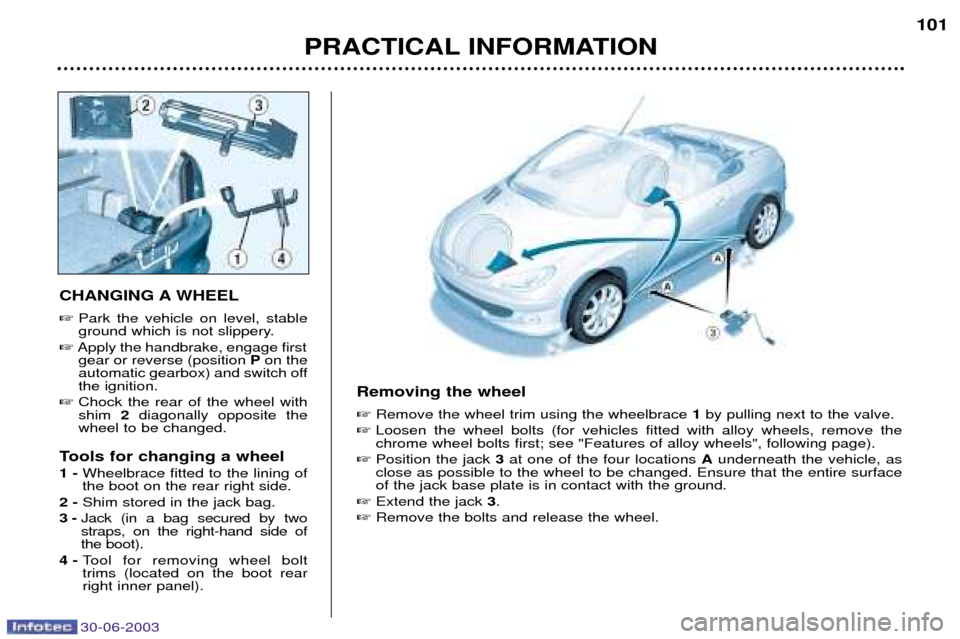
Tools for changing a wheel 1 - Wheelbrace fitted to the lining of the boot on the rear right side.
2 - Shim stored in the jack bag.
3 - Jack (in a bag secured by twostraps, on the right-hand side ofthe boot).
4 - Tool for removing wheel bolttrims (located on the boot rearright inner panel). Removing the wheel �
Remove the wheel trim using the wheelbrace 1by pulling next to the valve.
� Loosen the wheel bolts (for vehicles fitted with alloy wheels, remove the chrome wheel bolts first; see "Features of alloy wheels", following page).
� Position the jack 3at one of the four locations Aunderneath the vehicle, as
close as possible to the wheel to be changed. Ensure that the entire surfaceof the jack base plate is in contact with the ground.
� Extend the jack 3.
� Remove the bolts and release the wheel.
Page 105 of 131
30-06-2003
PRACTICAL INFORMATION
102
Refitting the wheel �
After positioning the wheel, pre-tighten the bolts using the wheelbrace 1.
� Compress the jack 3and release it.
� Fully tighten the bolts using the wheelbrace 1.
� Replace the wheel trim, starting at the valve passage hole, and press on it using the palm of the hand.
Replace the shim and the jack in their bag, then store the tools in the boot.For your safety, always change the wheel:
- on level, stable and non-slippery ground,
- with the handbrake applied and the ignition switched off,
- with the first or reverse gear engaged (position Pfor the auto-
matic gearbox),
- with the vehicle chocked using a shim.
Never go underneath a vehiclewhich is supported only by a
jack (use an axle stand) .
After changing the wheel:
- As soon as possible contact a PEUGEOT dealer to check that the wheel bolts are tight.
Page 109 of 131
30-06-2003
PRACTICAL INFORMATION
106
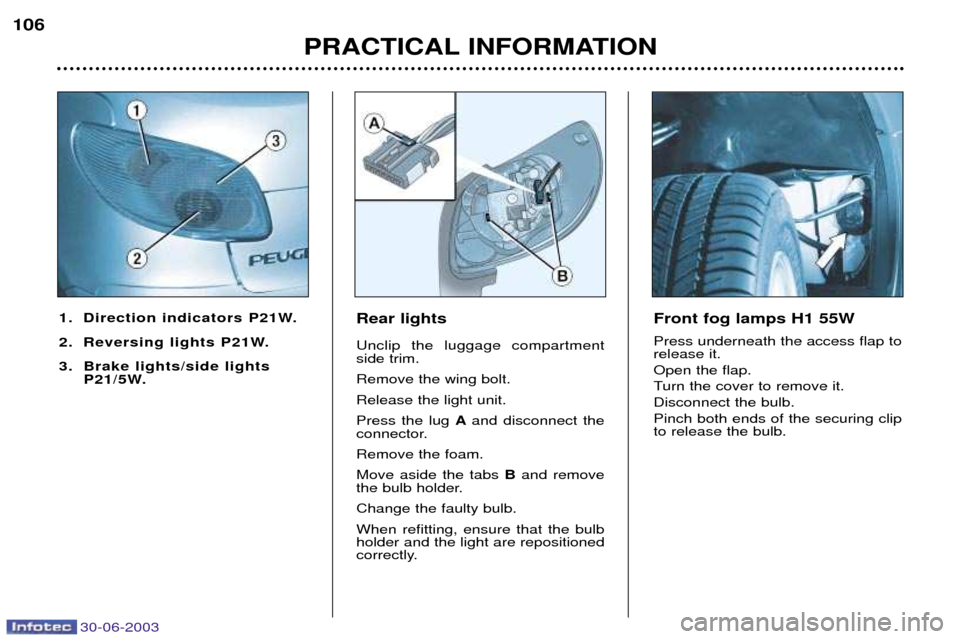
Rear lights Unclip the luggage compartment side trim. Remove the wing bolt.Release the light unit.Press the lug
Aand disconnect the
connector.Remove the foam.Move aside the tabs Band remove
the bulb holder.Change the faulty bulb.When refitting, ensure that the bulb holder and the light are repositioned
correctly.
1. Direction indicators P21W.
2. Reversing lights P21W.
3. Brake lights/side lights
P21/5W.Front fog lamps H1 55W Press underneath the access flap to release it. Open the flap.
Turn the cover to remove it.Disconnect the bulb.Pinch both ends of the securing clip to release the bulb.
Page 113 of 131
30-06-2003
PRACTICAL INFORMATION109
Fuse Rating
Functions
1 15 A Heated seat - Alarm
4 20 A Mulltifunction screen - Navigation control unit - Boot lighting - Audio system - Retractable roof control unit
5 15 A Automatic gearbox diagnostics
6 10 A Coolant level - Automatic gearbox - Audio system - Steering wheel angle sensor (ESP)
7 15 A Driving school accessories - Alarm fitted as an accessory - Rain detector
9 30 A Hydraulic pump
10 40 A Driving mirror demisting 11 15 A Windscreen wiper
12 30 A Front windows
14 10 A Engine module - Air bags - Steering wheel stalk
15 15 A Instrument panel - Multifunction screen - Navigation control unit - Air conditioning - Audio system
16 30 A Locking/unlocking of doors
20 10 A Right-hand brake light
21 15 A Left-hand brake light - 3rd brake light
22 20 A Front courtesy light - Glove box lighting - Lighter
S1 Shunt PARC shunt