Page 327 of 410

9.
10. Lower the jack by turning the wheel wrench
counterclockwise. Keep lowering the jack until the
spare tire slides
off the jack or is hanging by
the cable.
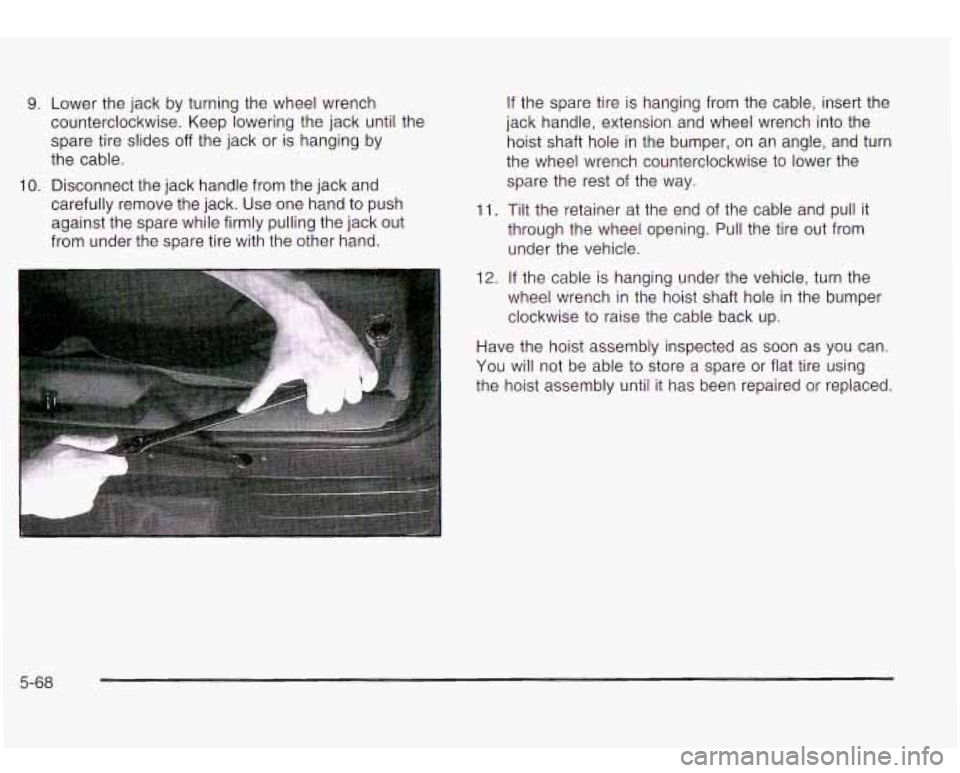
Disconnect the jack handle from the jack and
carefully remove the jack. Use one hand to push
against the spare while firmly pulling the jack out
from under the spare tire with the other hand.
If the spare tire is hanging from the cable, insert the
jack handle, extension and wheel wrench into the
hoist shaft hole in the bumper, on an angle, and turn
the wheel wrench counterclockwise
to lower the
spare the rest of the way.
11. Tilt the retainer at the end of the cable and pull it
through the wheel opening. Pull the tire out from
under the vehicle.
12. If the cable is hanging under the vehicle, turn the
wheel wrench in the hoist shaft hole in the bumper
clockwise to raise the cable back up.
Have the hoist assembly inspected as soon as you can.
You will not be able to store a spare or flat tire using
the hoist assembly until it has been repaired or replaced.
5-68
Page 328 of 410
Removing the Flat Tire and Installing
the Spare Tire
'- 1. Using the wheel wrench,
loosen all the wheel nuts.
Don't remove them yet.
Front
2. Turn the jack adjusting knob clockwise by hand to
3. Place the handle, extension and wheel wrench onto
raise the
jack lift head.
the jack.
5-69
Page 329 of 410
I L
A. Frame
B. Jack
C. Handle Rear
D. Extension
E. Wheel Wrench
4. Place the jack
in the appropriate position nearest
the flat tire.
Getting under a vehicle when
it is jacked up is
dangerous. If the vehicle slips
off the jack you
could be badly injured or killed. Never get under
a vehicle when it
is supported only by a jack. Raising your vehicle with the jack improperly
positioned can damage the vehicle and even
make the vehicle
fall.
To help avoid personal
injury and vehicle damage, be sure to
fit the
jack lift head into the proper location before raising the vehicle.
. . ....
5-70
Page 330 of 410
5. Raise the vehicle by turning the jack handle
clockwise. Raise the vehicle far enough
off the
ground
so there is enough room for the spare
tire to fit.
6. Remove all the wheel nuts and take off the flat tire.
7. Remove any rust or dirt
from the wheel
bolts,
mounting surfaces
and spare wheel.
Is--- -
Rust or dir n t ---lee-, 3r 4 the p. s to
which
it is fastened, can make the wheel nuts
become loose after
a time. The wheel could
come
off and cause an accident. When you
CAUTION: (Continued) change a
wheel, remove any rust or dirt from
the places where the wheel attaches
to the
vehicle. In an emergency, you can use a cloth
or a paper towel to do this;
but be sure to use
a scraper or wire brush later, if you need to, to
get all the rust or dirt
off.
1
Never use oil or grease on studs tan nnutS. If
you do, the nuts might come loose. Your wheel
could fall
off, causing a serious
8. Place the spare on the wheel mounting surface.
5-71
Page 333 of 410

Storing 9 Flat or Spare Tire and Tmls
n
Storing a jack, a tire, or other equipment in the
passenger compartment of the vehicle could
cause injury.
In a sudden stop or collision,
loose equipment could strike someone. Store
all these in the proper place.
.
The underbody-mounted spare tire needs to be
stored with the valve stem pointing up. If the
spare tire is stored with the valve stem
pointing downward,
its secondary latch won’t
work properly and the spare tire could loosen
CAUTION: (Continued)
CAUTION: (Continued,
and suddenly fall from your vehicle. If this
happened when your vehicle was being driven,
the tire might contact a person or another
vehicle, causing injury and, of course, damage
to itself as well. Be sure the underbody-
mounted spare tire
is stored with its valve
stem pointing up.
Notice: An aluminum wheel with a flat tire should
always be stored under the vehicle with the hoist. However, storing
it that way for an extended
period could damage the wheel. To avoid this,
always stow the wheel properly with the valve stem
pointing up and have the wheel repaired as soon
as possible.
Follow this diagram to store the underbody-mounted
spare.
5-74
Page 334 of 410
A.
B.
C.
D.
E.
Wheel Wrench Hoist Shaft Extension Retainer
Spare or Flat Tire
(Valve Stem
Pointed Up)
1. Put the tire on the ground at the rear of the vehicle,
with the valve stem pointed up and to the rear.
2. Pull the retainer through the wheel.
3. Put the socket end of the extension, on an angle,
through the hole in the rear bumper and into the
hoist shaft.
4. Raise the tire fully against the underside of the
vehicle by turning the wheel wrench clockwise
until you hear two clicks or feel it skip twice. The
spare tire hoist cannot be overtightened.
PUSH & PULL
5. Make sure the tire is stored securely. Push, pull,
and then try to rotate or turn the tire. If the tire
moves, use the wheel wrench to tighten the cable.
Return the jack, wheel wrench and wheel blocks to the
proper location under the rear seat of the vehicle.
Roll up the instruction label and return it to the slot in
the tool kit.
Return the rear seat to its proper position.
5-75
Page 355 of 410

Maintenance Schedule
Introduction Your
Vehicle and the Environment
Proper vehicle maintenance not only helps to keep your
vehicle in good working condition, but also helps the
environment. All recommended maintenance procedures
are important. Improper vehicle maintenance can
even affect the quality of the air we breathe. Improper
fluid levels or the wrong tire inflation can increase
the level of emissions from your vehicle.
To help protect
our environment, and to keep your vehicle in good
condition, please maintain your vehicle properly.
Maintenance Requirements
Maintenance intervals, checks, inspections and
recommended fluids and lubricants as prescribed in this
manual are necessary
to keep your vehicle in good
working condition. Any damage caused by failure
to follow recommended maintenance may not be
covered by warranty.
Have you purchased the GM Protection Plan? The Plan
supplements your new vehicle warranties. See your
Warranty and Owner Assistance booklet
or your dealer
for details.
6-2
Page 363 of 410

Part B: Owner Checks and Services
Listed in this part are owner checks and services
which should be performed at the intervals specified to
help ensure the safety, dependability and emission
control performance of your vehicle.
Be sure any necessary repairs are completed at once.
Whenever any fluids or lubricants are added to your
vehicle, make sure they are the proper ones, as shown
in Part
D.
At Each Fuel Fill
It is important for you or a service station attendant to
perform these underhood checks at each fuel fill.
Engine Oil Level Check
Check the engine oil level and add the proper oil if
necessary. See Engine Oil on page 5-13 for further
details.
Engine Coolant Level Check
Check the engine coolant level and add DEX-COOL@
coolant mixture
if necessary. See Engine Coolant
on page 5-22
for further details.
Windshield Washer Fluid Level Check
Check the windshield washer fluid level in the windshield
washer tank and add the proper fluid
if necessary.
See
Windshield Washer Fluid on page 5-33 for further
details.
At Least Once a Month
Tire Inflation Check
Make sure tries are inflated to the correct pressures.
Don’t forget to check your spare tire. See
Tires on
page 5-52
for further details.
Cassette Tape Player Service
Clean cassette tape player. Cleaning should be done
every
50 hours of tape play. See Audio Systern(s)
on page 3-56 for further details.
6-1 0