2003 Oldsmobile Bravada change wheel
[x] Cancel search: change wheelPage 313 of 410

The purpose of regular rotation is to achieve more
uniform wear for all tires on the vehicle. The first rotation
is the most important. See “Part A: Scheduled
Maintenance Services,” in Section
6, for scheduled
rotation intervals.
When rotating your tires, always use the correct rotation
pattern shown here.
After the tires have been rotated, adjust the front and
rear inflation pressures as shown on the
Certificationnire label. Make certain that
all wheel nuts
are properly tightened. See “Wheel
Nut Torque”
under
Capacities and Specifications on page 5-93.
Rust c. dirt or. - wheel, or on the parts to
which
it is fastened, can make wheel nuts
become loose after a time.
The wheel could
come
off and cause an accident. When you
change a wheel, remove any rust
or dirt from
places where the wheel attaches to the vehicle.
In an emergency, you can use a cloth or
a
paper towel to do this; but be sure to use a
scraper
or wire brush later, if you need to, to
get
all the rust or dirt off. See “Changing a Flat
Tire” in the Index.
5-54
Page 321 of 410

A rear blowout, particularly on a curve, acts much like a
skid and may require the same correction you’d use
in a skid. In any rear blowout, remove your foot from the
accelerator pedal. Get the vehicle under control by
steering the way you want the vehicle
to go. It may be
very bumpy and noisy, but you can still steer. Gently
brake
to a stop - well off the road if possible.
If
a tire goes flat, the next part shows how to use your
jacking equipment
to change a flat tire safely.
Changing a Flat Tire
If a tire goes flat, avoid further tire and wheel damage
by driving slowly
to a level place. Turn on your
hazard warning flashers. Cha..,ing
a tire can ca-.-e an injc.
,. The
vehicle can slip
off the jack and roll over you
or other people. You and they could be badly
injured. Find a level place to change your tire.
To help prevent the vehicle from moving:
1. Set the parking brake firmly.
2. Put the shift lever in PARK (P).
3. Turn off the engine.
4. Put the wheel blocks at the front and rear
of the tire farthest away from the one
being changed. That would be the tire on
the other side of the vehicle,
at the
opposite end.
5-62
Page 330 of 410

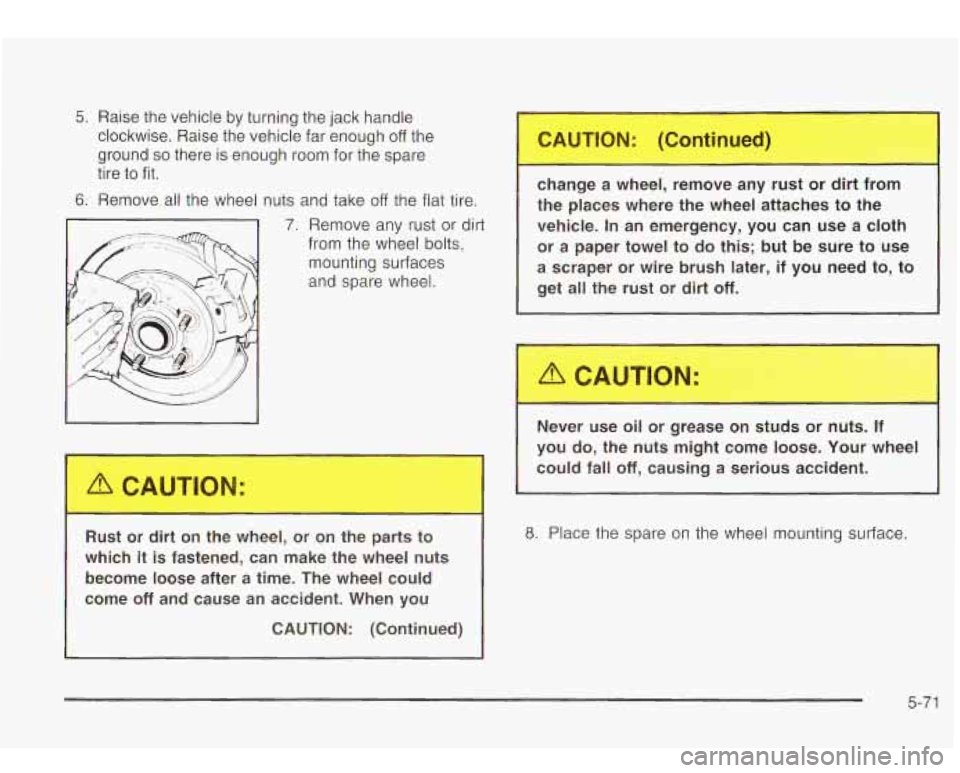
5. Raise the vehicle by turning the jack handle
clockwise. Raise the vehicle far enough
off the
ground
so there is enough room for the spare
tire to fit.
6. Remove all the wheel nuts and take off the flat tire.
7. Remove any rust or dirt
from the wheel
bolts,
mounting surfaces
and spare wheel.
Is--- -
Rust or dir n t ---lee-, 3r 4 the p. s to
which
it is fastened, can make the wheel nuts
become loose after
a time. The wheel could
come
off and cause an accident. When you
CAUTION: (Continued) change a
wheel, remove any rust or dirt from
the places where the wheel attaches
to the
vehicle. In an emergency, you can use a cloth
or a paper towel to do this;
but be sure to use
a scraper or wire brush later, if you need to, to
get all the rust or dirt
off.
1
Never use oil or grease on studs tan nnutS. If
you do, the nuts might come loose. Your wheel
could fall
off, causing a serious
8. Place the spare on the wheel mounting surface.
5-71
Page 357 of 410

Part A: Scheduled Maintenance
Services
This part contains engine oil scheduled maintenance
which explains the engine oil life system and how
it indicates when to change the engine oil and filter.
Also, listed are scheduled maintenance services which
are
to be performed at the mileage intervals specified.
Using Your Maintenance Schedule
We at General Motors want to help you keep your
vehicle in good condition. But we don’t know exactly how
you’ll drive it. You may drive very short distances only
a few times a week. Or you may drive long distances in
very hot, dusty weather. You may use your vehicle in
making deliveries. Or you may drive it to work,
to
do errands or in many other ways.
Because
of all the different ways people use their
vehicles, maintenance needs vary. You may need more
frequent checks and replacements.
So please read
the following and note how you drive.
If you have any
questions on how
to keep your vehicle in good condition,
see your dealer. This part tells you the
maintenance services you should
have done and when you should schedule them.
When you
go to your dealer for your service needs,
you’ll know that GM-trained and supported service
people will perform the work using genuine GM parts.
The proper fluids and lubricants
to use are listed in
Part
D. Make sure whoever services your vehicle uses
these.
All parts should be replaced and all necessary
repairs done before you or anyone else drives the
vehicle.
This schedule is for vehicles that:
carry passengers and cargo within recommended
limits. You will find these limits on your vehicle’s
Certificationflire label. See
Loading Your Vehicle on
page
4-4 1.
are driven on reasonable road surfaces within legal
driving limits.
are driven off-road in the recommended manner.
See
Operating Your All- Wheel-Drive Vehicle Off
Paved Roads on page 4- 15.
use the recommended fuel. See Gasoline Octane
on page 5-5.
6-4
Page 364 of 410

At Least Twice a Year
Restraint System Check
Make sure the safety belt reminder light and all your
belts, buckles, latch plates, retractors and anchorages
are working properly. Look for any other loose or
damaged safety belt system parts. If you see anything
that might keep a safety belt system from doing its
job, have it repaired. Have any torn or frayed safety belts
replaced.
Also look for any opened or broken air bag coverings,
and have them repaired or replaced. (The air bag
system does not need regular maintenance.)
Wiper Blade Check
Inspect wiper blades for wear or cracking. Replace
blade inserts that appear worn or damaged or that
streak or miss areas of the windshield.
Also see
Cleaning the Outside of Your Vehicle on page 5-80.
Spare Tire Check
At least twice a year, after the monthly inflation check of
the spare tire determines that the spare is inflated
to
the correct tire inflation pressure, make sure that
the spare tire is stored securely. Push, pull, and then try
to rotate or turn the tire. If it moves, use the wheel
wrenchhatchet
to tighten the cable. See Changing a Flat
Tire on page
5-62.
Engine Air Cleaner Filter Restriction
Indicator Check
Your vehicle may be equipped with an engine air
cleaner filter restriction indicator located on the air
cleaner in the engine compartment. The indicator lets
you know when the air cleaner filter is dirty and needs
to
be changed. Check the indicator at least twice a year
or when your engine oil is changed, whichever
occurs first. See
Engine Air Cleaner/Fi/fer on page 5-18
for more information. Inspect your air cleaner filter
restriction indicator more often
if the vehicle is used in
dusty areas or under
off road conditions.
Weatherstrip Lubrication
Silicone grease on weatherstrips will make them last
longer, seal better, and not stick or squeak. Apply
silicone grease with a clean cloth. During very cold,
damp weather more frequent application may be required. See
Part D: Recommended Fluids and
Lubricants on page
6-17.
Automatic Transmission Check
Check the transmission fluid level; add if needed. See
Automatic Transmission Fluid on page 5-20. A fluid loss
may indicate a problem. Check the system and repair
if needed.
6-1 1
Page 369 of 410

Transfer Case and Front Axle (All-Wheel Drive) Inspection
Every 12 months, or at engine oil change intervals,
check front axle and transfer case and add lubricant
when necessary.
A fluid loss could indicate a problem.
Check and have it repaired,
if needed. Check vent
hose at transfer case for kinks and proper installation.
Brake System Inspection
Inspect the complete system. Inspect brake lines and
hoses for proper hook-up, binding, leaks, cracks,
chafing, etc. Inspect disc brake pads for wear and rotors
for surface condition. Inspect other brake parts,
including calipers, parking brake, etc. Check parking
brake adjustment.
You may need to have your brakes
inspected more often
if your driving habits or
conditions result in frequent braking.
6-1 6
Page 395 of 410

Key Lock Cylinders Service .............................. 6-12
Keyless Entry System ....................................... 2-4
Keys ............................................................... 2-3
L
Lamps Light (cont.)
Charging System
...............
Check Gages Warning .......
Cruise Control ...................
Gate Ajar .........................
Low Fuel Warning .............
Malfunction Indicator ..........
Reduced Engine Power ......
Safety Belt Reminder ......... -
.......................... 3-32
.......................... 3-41
.......................... 3-40
.......................... 3-42
.......................... 3-42
.......................... 3-35
.......................... 3-40
.......................... 3-30
Exterior 3-1 4
Interior 3-1 7
Security ..................................................... 3-39
Service All-Wheel-Drive ................................ 3-41 ......................................................
.......................................................
Lamps On Reminder ....................................... 3-15 Lighted Visor Vanity Mirror ............................... 2-15
Lap-Shoulder Belt ................................... 1-1 4, 1-22 Loading Your Vehicle ....................................... 4-41
Child Restraints ........................................... 1-38 Locking Rear Axle ........................................... 4-10
Securing a Child Restraint Designed for the
Lockout Protection .......................................... 2-12
LATCH System Loading Your Vehicle for Off-Road Driving .......... 4-16
LATCH System ........................................ 1-40 Locks
Leather
......................................................... 5-79
Leaving Your Vehicle ....................................... 2-12
Leaving Your Vehicle With the
Engine Running
.......................................... 2-26
Liftgate Release .............................................. 2-1 3
Liftgate/Liftglass .............................................. 2-1 3
LiftglassILiftgate .............................................. 2-1 3
Light
Air Bag Readiness
....................................... 3-31
Anti-Lock Brake System Warning ................... 3-34
Brake System Warning ................................. 3-33
Change Engine Oil ...................................... 3-39
LEFT REAR DOOR AJAR ................................ 3-54
Delayed Locking ........................................... 2-9
Door ........................................................... 2-8
Leaving Your Vehicle .................................... 2-12
Lockout Protection ....................................... 2-12
Power Door .................................................. 2-9
Programmable Automatic Door Locks ............. 2-10
Rear Door Security Locks ............................. 2-12
Loss of Control ............................................... 4-14
Low Fuel Warning Light ................................... 3-42
Luggage Carrier .............................................. 2-42
Lumbar
Power Controls
............................................. 1-2
8
Page 397 of 410

Odometer ...................................................... 3-30
Off-Road Recovery
.......................................... 4-1 2
Oil
Change Engine Oil Light
............................... 3-39
Engine
....................................................... 5-1 3
Pressure Gage
............................................ 3-38
OIL PRESSURE LOWETOP ENGINE ............... 3-53
Older Children, Restraints
................................ 1-27
Online Owner Center
........................................ 7-3
Onstar@ System
............................................ 2-35
Onstar@ Personal Calling
................................. 2-36
Onstar@ Services
............................................ 2-35
Onstar@ Virtual Advisor
.................................... 2-36
Operating Your All-Wheel-Drive Vehicle
Off
Paved Roads .............................................. 4-15
Other Warning Devices
...................................... 3-6
Outlet Adjustment
............................................ 3-24
Outside Automatic Dimming Mirror with
Curb View Assist
................ ........... 2-33
Convex Mirror
............................................. 2-33
Heated Mirrors
............................................ 2-33
Manual Mirrors
............................................ 2-32
Power Mirror
............................................... 2-32
Overhead Console
.......................................... 2-41
Owners, Canadian
............................................... ii
Owner’s Information ........................................ 7-1 0
P
Park (P)
Parking Shifting Out
of ............, .... ..... 2-27
Brake
................................................ 2-25
Over Things That Burn
............................. 2-28
Park (P) Mechanism Check
........................... 6-14
Parking Brake and
Automatic Transmission
Parking on Hills
.............................................. 4-52
Park( P)
Shifting Into
................................................ 2-25
Part A
- Scheduled Maintenance Services ............ 6-4
Part
B - Owner Checks and Services ................ 6-10
Part C
. Periodic Maintenance Inspections .......... 6-15
Part D
- Recommended Fluids and Lubricants .... 6-17
Part E
. Maintenance Record ........................... 6-19
PASSENGER DOOR AJAR
.. .................... 3-54
Passing
................................................. 4.13, 4-50
Passlock@
..................................................... 2-17
Personalization
............................................... 3-46
Personalization, Climate Controls
...................... 3-27
Plan Ahead When Possible
................................ 7-7
Playing a Cassette Tape
.................................. 3-62
Playing a Compact Disc
.......................... 3.64, 3-72
Playing a Specific Loaded
Compact Disc
............................................. 3-73
Playing the Radio
................................... 3.57, 3-66
Power
Accessory Outlets
........................................ 3-19
10