Page 121 of 354
Interior Lamps
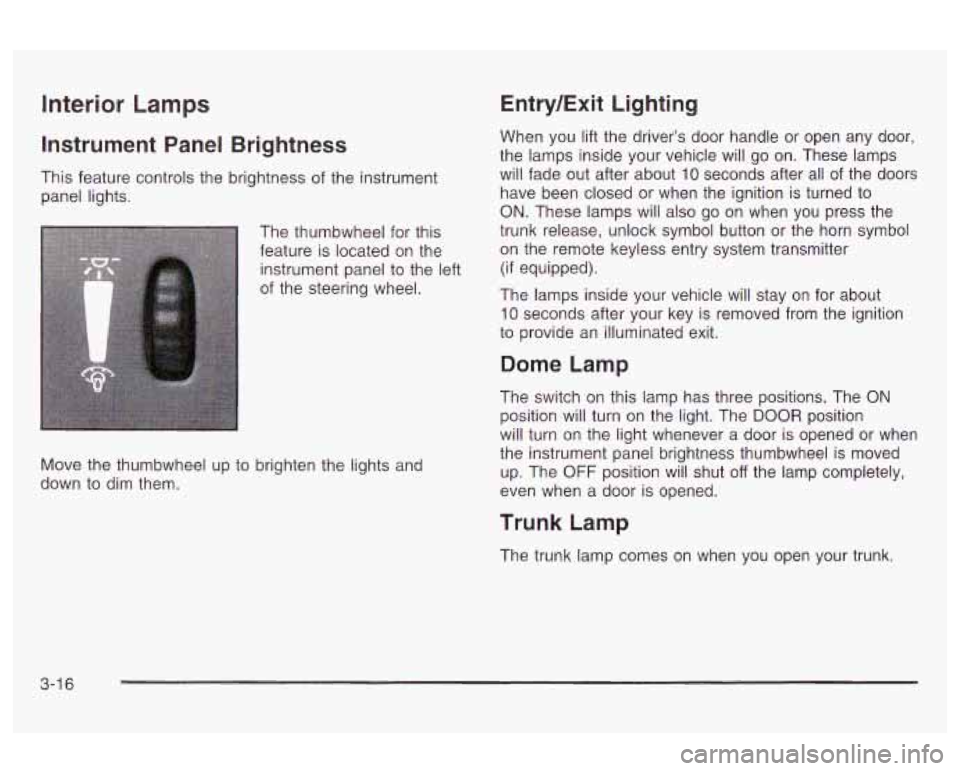
Instrument Panel Brightness
This feature controls the brightness of the instrument
panel lights.
The thumbwheel for this
feature is located on the
instrument panel to the left
of the steering wheel.
Move the thumbwheel up to brighten the lights and
down to dim them.
Entry/Exit Lighting
When you lift the driver’s door handle or open any door,
the lamps inside your vehicle will go on. These lamps
will fade out after about
10 seconds after all of the doors
have been closed or when the ignition is turned to
ON. These lamps will also go on when you press the
trunk release, unlock symbol button or the horn symbol
on the remote keyless entry system transmitter
(if equipped).
The lamps inside your vehicle will stay on for about
10 seconds after your key is removed from the ignition
to provide an illuminated exit.
Dome Lamp
The switch on this lamp has three positions. The ON
position will turn on the light. The DOOR position
will turn on the light whenever a door is opened or when
the instrument panel brightness thumbwheel is moved
up. The
OFF position will shut off the lamp completely,
even when a door is opened.
Trunk Lamp
The trunk lamp comes on when you open your trunk.
3-1 6
Page 122 of 354
Battery Run-Down Protection
Your vehicle has a battery run-down protection feature
designed to protect your vehicle's battery.
When any interior lamp (trunk, mirror reading lamps,
dome lamp or glove box) is left on when the ignition is
turned
off, the battery saver system will automatically
shut the lamp
off after 20 minutes. This will avoid
draining the battery.
Accessory Power Outlets
With accessory power outlets you can plug in auxiliary
electrical equipment such as a cellular telephone or
CB radio.
I
To reactivate the interior lamps, do one of the following: I
Lift the driver's door handle,
open any door or
press any remote keyless entry transmitter button
(if equipped),
press the power door lock switch,
press the remote trunk release or
turn the lamp that was left on to off and then to
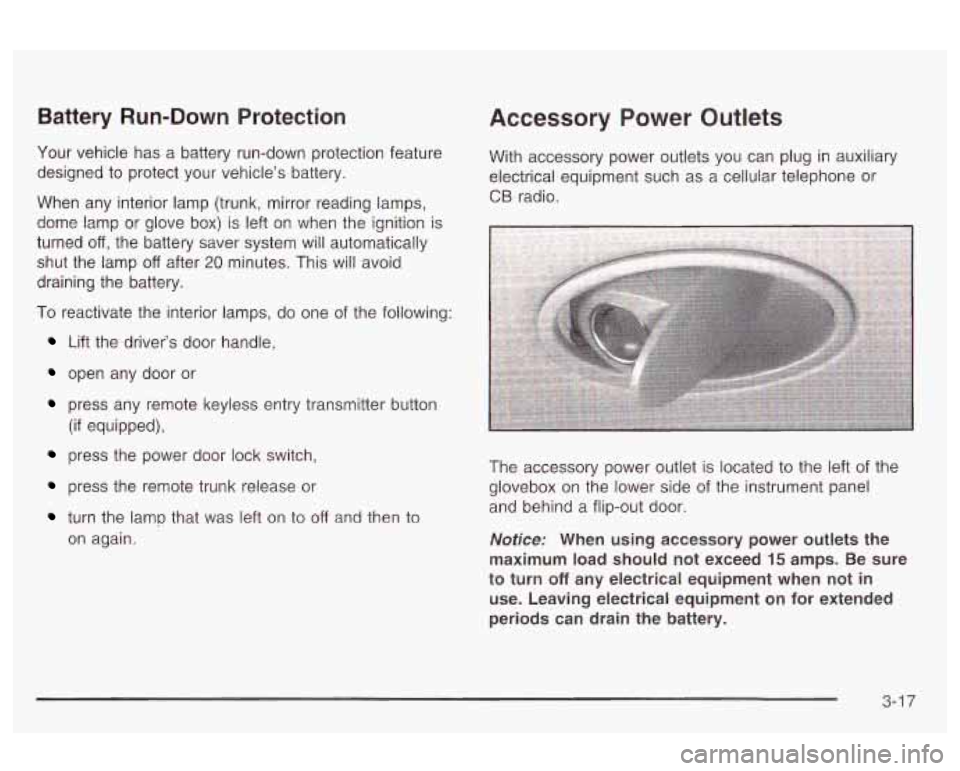
on again. The accessory power
outlet is located to the left of the
glovebox on the lower side of the instrument panel
and behind a flip-out door.
Notice: When using accessory power outlets the
maximum load should not exceed
15 amps. Be sure
to turn
off any electrical equipment when not in
use. Leaving electrical equipment on for extended
periods can drain the battery.
3-1 7
Page 212 of 354
Total Weight on Your Vehicle’s Tires
Be sure your vehicle’s tires are inflated to the upper limit
for cold tires. You’ll find these numbers on the Tire
Loading Information label at the rear edge of the driver’s
door or see
Loading Your Vehicle on page 4-34. Then
be sure you don’t go over the
GVW limit for your vehicle,
including the weight of the trailer tongue.
Hitches
It’s important to have the correct hitch equipment.
Crosswinds, large trucks going by and rough roads are
a few reasons why you’ll need the right hitch. Here
are some rules to follow:
The rear bumper on your vehicle is not intended for
hitches. Do not attach rental hitches or other
bumper-type hitches to it. Use only a
frame-mounted hitch that does not attach to the
bumper.
Will yo11 have to make any holes in the body nf
your vehicle when you install a trailer hitch? If
you do, then be sure to seal the holes later when
you remove the hitch. If you don’t seal them, deadly
carbon monoxide (CO) from your exhaust can get
into your vehicle. See
Engine Exhaust on
page
2-30. Dirt ana water can, too.
Safety Chains
You should always attach chains between your vehicle
and your trailer. Cross the safety chains under the
tongue of the trailer
so that the tongue will not drop to
the road
if it becomes separated from the hitch.
Instructions about safety chains may be provided by the
hitch manufacturer or by the trailer manufacturer.
Follow the manufacturer’s recommendation for attaching
safety chains and do not attach them to the bumper.
Always leave just enough slack
so you can turn
with your rig. And, never allow safety chains to drag on
the ground.
Trailer Brakes
Does your trailer have its own brakes?
Be sure to read and
follow the instructions for the trailer
brakes
so you’ll be able to install, adjust and maintain
them properly. And because you may have anti-lock
brakes, do not try to tap into your vehicle’s brake
system.
If you do, both systems won’t work well,
e!- 2! 2!!.
4-39
Page 222 of 354
Filling Your Tank The tethered fuel cap is behind a hinged door on the
passenger’s side of the vehicle.
Fuel vapor is highly flammable.
It burns
violently, and that can cause very bad injuries.
Don’t smoke if you’re near fuel or refueling
your vehicle. Keep sparks, flames and smoking
materials away from fuel.
While refueling, hang the tethered fuel cap inside the
fuel door.
To remove the ftjel cap: turn it slowly to the left
(counterclockwise). The fuel cap has a spring in it;
if you let go of the cap too soon, it will spring back to
the right.
5-7
Page 297 of 354
Instrument Panel Fuse Block
(Driver's Side)
f I A) WIPER I
F) EFC BATT G) PCMACC I ti: DALOCK I PWR SEAT E) 0 I) IPC / BFC ACG F) .
DRIVER
Fuses
WIPER
TRUNK REURADIO
AMP
TURN LPS Usage
Windshield Wiper Motor,
Washer Pump
Trunk Release Relay/Motor, Audio
Amplifier/RFA
Turn Signal Lamps
Fuses
PWR MIRROR
AIR BAG
BFC BATT
PCM ACC
DR LOCK
IPC/BFC ACC
STOP LPS
HAZARD LPS
I PC/HVAC
BATT
Circuit Breakers
PWR SEAT Usage
Power Mirrors
Air Bags Body Computer (BFC)
Power Control Module (PCM) Door Lock Motors
Cluster, Body Computer (BFC) Stop Lamps
Hazard Lamps
HVAC Head, Cluster, Data Link
Connector
Usage Power Seats
Relay Usage
TRUNK
REL Trunk Relay
DR UNLOCK Door Unlock Relay
DR LOCK Door Lock Relay
DRIVER DR Driver's Door Unlock Relay
UNLOCK
5-82
Page 299 of 354
Engine Compartment Fuse Block
The engine compartment fuse block is located on the
driver’s side of the engine compartment, near the
battery. Fuse 1
2
3
4
5
6
7
8
Relays
9
10
11
12
13
14
15
Usage
Ignition Switch
Right Electrical Center-Fog Lamps,
Radio, Body Function Control
Module, Interior Lamps
Left Electrical Center-Stop Lamps,
Hazard Lamps, Body Function
Control Module, Cluster, Climate
Control System
Anti-Lock Brakes
Left Electrical Center-Power Seats,
Power Mirrors, Door Locks, Trunk
Release, Audio Amplifier, Remote
Keyless Entry
Not Used
Ignition Switch
Cooling Fan
#I
Usage
Rear Defog
Not Used
Starter
Cooling Fan
#1
HVAC Blower (Climate Control)
Cooling Fan
#2
Cooling Fan
5-84
Page 314 of 354
Body Lubrication Service
Lubricate all the door hinges and latches, including
those for the hood and the trunk lid. Part
D tells
you what to use. More frequent lubrication may be
required when exposed to a corrosive environment.
Starter S---:tc" Ct---'-
Automatic Transaxle Shift Lock Control
System Check
When you are doing this chec the vehicle
could move suddenly.
If it does, you or others
could be injured. Follow the steps below.
When you are doing this check, the vehicle
could move suddenly.
If it does, you or others
CGG!~ be i~j~d. FO~~GVV the steps below.
1. Before you start, be sure you have enough room
2. Firmly apply both the parking brake and the regular
around the vehicle.
brake. See
Parking Brake on page 2-26 if
necessary.
Do not use the accelerator pedal, and be ready to
turn
off the engine immediately if it starts.
3. Try to start the engine in each gear. The starter
should work only in PARK (P) or NEUTRAL (N).
If the starter works in any other position, your
vehicle needs service.
1. Before you start, be sure you have enough room
around the vehicle. It should be parked
on a level
surface.
2. Firmly apply the parking brake. See Parking Brake
on page
2-26 if necessary.
Be ready to apply the regular brake immediately
if
the vehicle begins to move.
but don't start the engine. Without applying the
regular brake, try to move the shift lever out
of PARK (P) with normal effort. If the shift lever
moves out of PARK (P), your vehicle needs service.
3. With the engine off, turn the key to the ON position,
6-1 1
Page 318 of 354
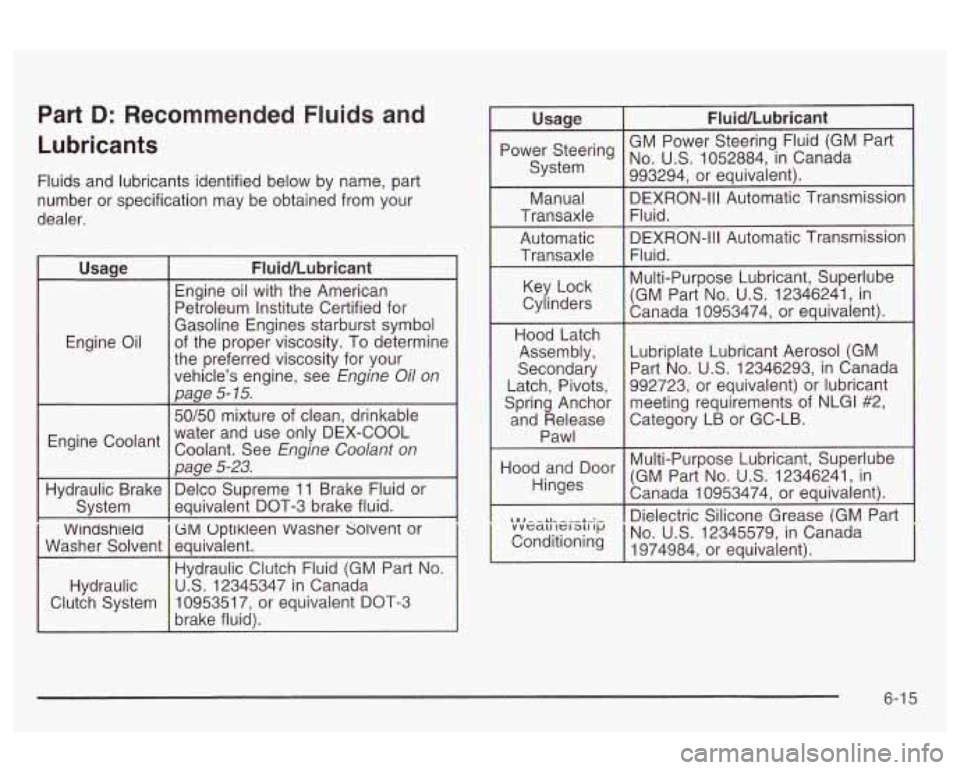
Part D: Recommended Fluids and
Lubricants
Fluids and lubricants identified below by name, part
number or specification may be obtained from your
dealer.
Wlndshleld
ti^ Optlkleen Washer solvent or
Washer Solvent equivalent.
Hydraulic Clutch Fluid (GM Part No.
Hydraulic
brake fluid).
U.S. 12345347 in Canada
Clutch System 10953517, or
equivalent DOT-3 Usaae
I Fluid/Lubricant -
GM Power
Steering Fluid (GM Part
No. US. 1052884, in Canada Power
System
993294. or eauivalent).
Key Lock
Cylinders Multi-Purpose Lubricant,
Superlube
(GM Part No.
U.S. 12346241, in
Canada 10953474. or equivalent).
Hood Latch
Assembly,
Secondary
Latch, Pivots,
Spring Anchor
and Release Pawl Lubriplate Lubricant Aerosol
(GM
Part
No. U.S. 12346293, in Canada
992723, or equivalent) or lubricant
meeting requirements
of NLGl #2,
Category LB or GC-LB.
Hood and Door
Hinges (GM
Part No. U.S. 12346241, in
Multi-Purpose Lubricant,
Superlube
Canada 10953474, or equivalent).
Dielectric Silicone Grease (GM Part
No. U.S. 12345579, in Canada
1974984, or equivalent).
6-1
5