2003 NISSAN XTERRA lock
[x] Cancel search: lockPage 197 of 272
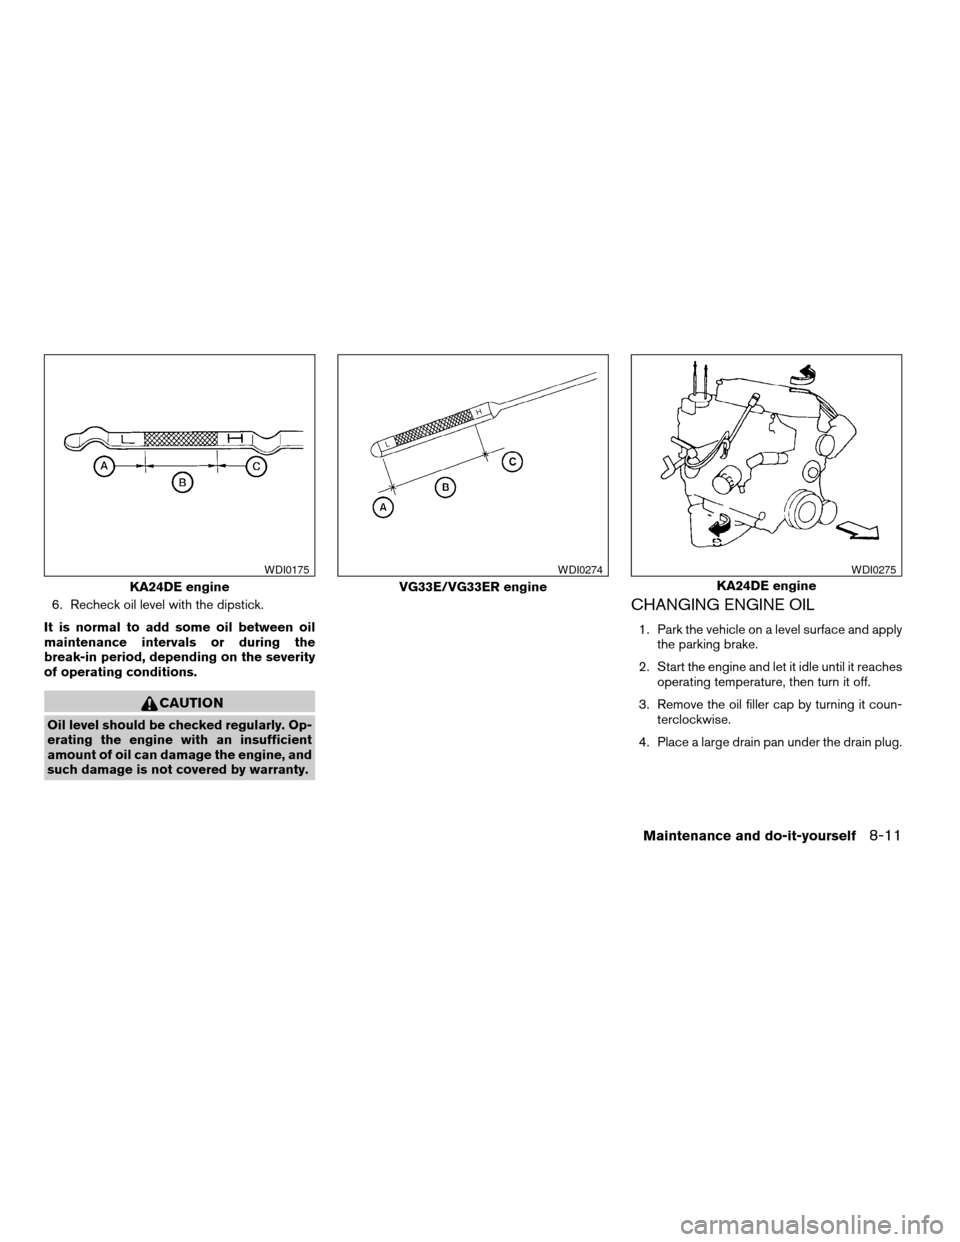
6. Recheck oil level with the dipstick.
It is normal to add some oil between oil
maintenance intervals or during the
break-in period, depending on the severity
of operating conditions.
CAUTION
Oil level should be checked regularly. Op-
erating the engine with an insufficient
amount of oil can damage the engine, and
such damage is not covered by warranty.
CHANGING ENGINE OIL
1. Park the vehicle on a level surface and apply
the parking brake.
2. Start the engine and let it idle until it reaches
operating temperature, then turn it off.
3. Remove the oil filler cap by turning it coun-
terclockwise.
4. Place a large drain pan under the drain plug.
KA24DE engine
WDI0175
VG33E/VG33ER engine
WDI0274
KA24DE engine
WDI0275
Maintenance and do-it-yourself8-11
ZREVIEW COPY:Ð2003 Xterra(xtr)
Owners Manual(owners)ÐUSA English(nna)
02/24/03Ðtbrooks
X
Page 198 of 272
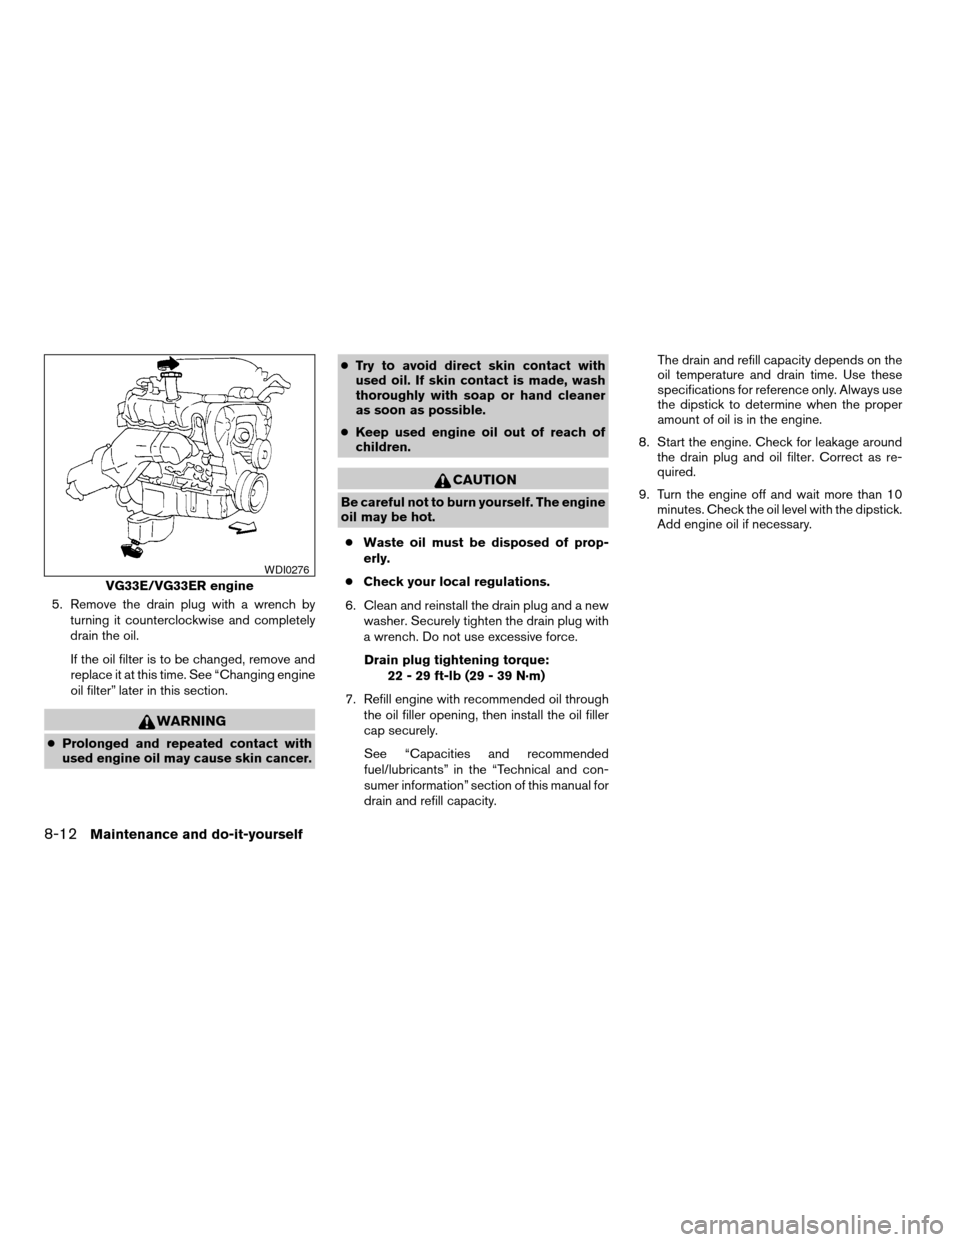
5. Remove the drain plug with a wrench by
turning it counterclockwise and completely
drain the oil.
If the oil filter is to be changed, remove and
replace it at this time. See “Changing engine
oil filter” later in this section.
WARNING
cProlonged and repeated contact with
used engine oil may cause skin cancer.cTry to avoid direct skin contact with
used oil. If skin contact is made, wash
thoroughly with soap or hand cleaner
as soon as possible.
cKeep used engine oil out of reach of
children.
CAUTION
Be careful not to burn yourself. The engine
oil may be hot.
cWaste oil must be disposed of prop-
erly.
cCheck your local regulations.
6. Clean and reinstall the drain plug and a new
washer. Securely tighten the drain plug with
a wrench. Do not use excessive force.
Drain plug tightening torque:
22 - 29 ft-lb (29 - 39 N·m)
7. Refill engine with recommended oil through
the oil filler opening, then install the oil filler
cap securely.
See “Capacities and recommended
fuel/lubricants” in the “Technical and con-
sumer information” section of this manual for
drain and refill capacity.The drain and refill capacity depends on the
oil temperature and drain time. Use these
specifications for reference only. Always use
the dipstick to determine when the proper
amount of oil is in the engine.
8. Start the engine. Check for leakage around
the drain plug and oil filter. Correct as re-
quired.
9. Turn the engine off and wait more than 10
minutes. Check the oil level with the dipstick.
Add engine oil if necessary.
VG33E/VG33ER engine
WDI0276
8-12Maintenance and do-it-yourself
ZREVIEW COPY:Ð2003 Xterra(xtr)
Owners Manual(owners)ÐUSA English(nna)
03/05/03Ðtmchalpi
X
Page 205 of 272
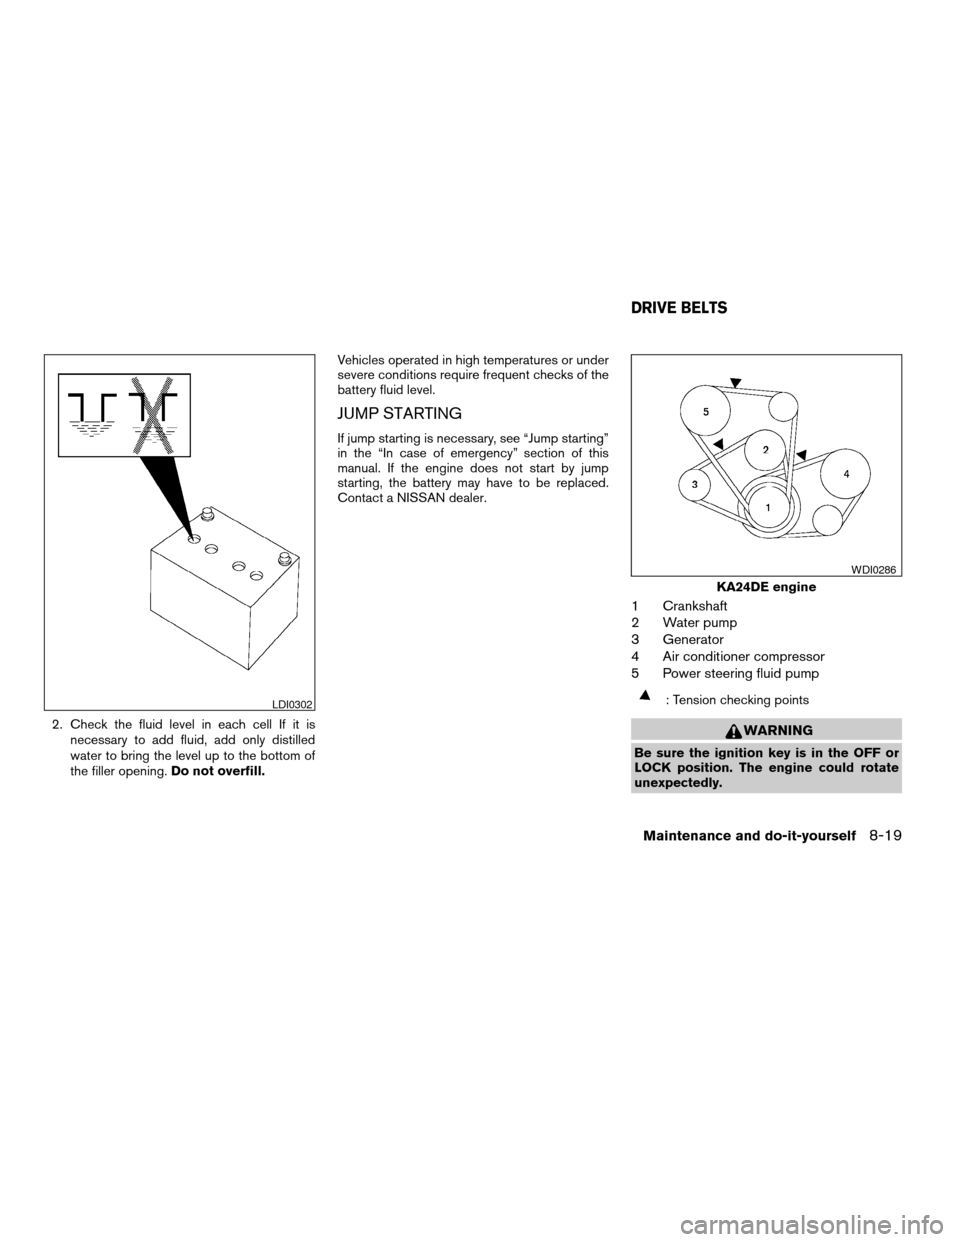
2. Check the fluid level in each cell If it is
necessary to add fluid, add only distilled
water to bring the level up to the bottom of
the filler opening.Do not overfill.Vehicles operated in high temperatures or under
severe conditions require frequent checks of the
battery fluid level.
JUMP STARTING
If jump starting is necessary, see “Jump starting”
in the “In case of emergency” section of this
manual. If the engine does not start by jump
starting, the battery may have to be replaced.
Contact a NISSAN dealer.
1 Crankshaft
2 Water pump
3 Generator
4 Air conditioner compressor
5 Power steering fluid pump
: Tension checking points
WARNING
Be sure the ignition key is in the OFF or
LOCK position. The engine could rotate
unexpectedly.
LDI0302
KA24DE engine
WDI0286
DRIVE BELTS
Maintenance and do-it-yourself8-19
ZREVIEW COPY:Ð2003 Xterra(xtr)
Owners Manual(owners)ÐUSA English(nna)
02/24/03Ðtbrooks
X
Page 220 of 272
cAiming is not necessary after replacing
the bulb. When aiming adjustment is
necessary, contact a NISSAN dealer.
Removing the headlight bulb
1. Open the hood.
2. Disconnect the negative (-) battery cable.
3. Disconnect the electrical connector from the
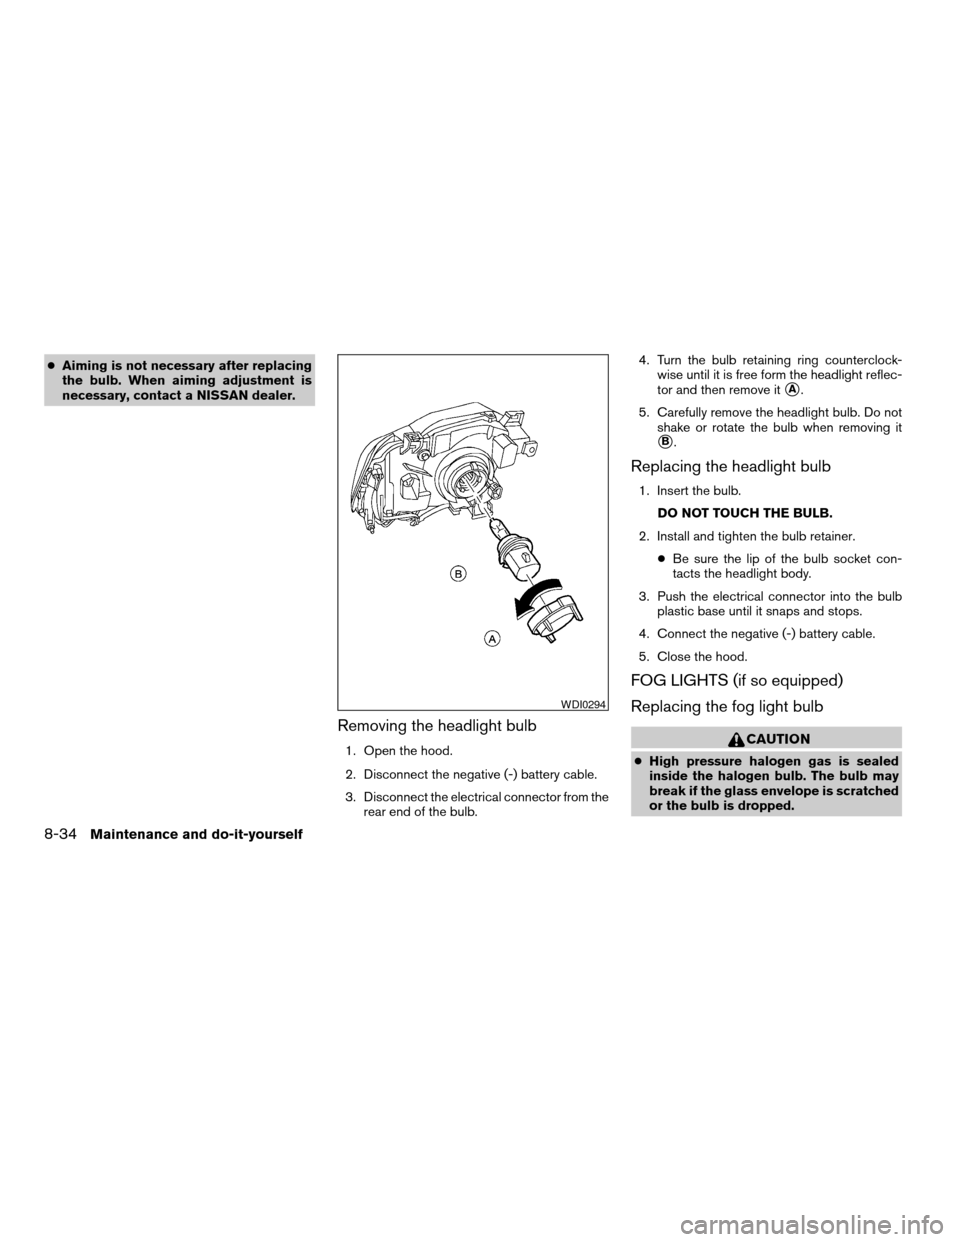
rear end of the bulb.4. Turn the bulb retaining ring counterclock-
wise until it is free form the headlight reflec-
tor and then remove it
sA.
5. Carefully remove the headlight bulb. Do not
shake or rotate the bulb when removing it
sB.
Replacing the headlight bulb
1. Insert the bulb.
DO NOT TOUCH THE BULB.
2. Install and tighten the bulb retainer.
cBe sure the lip of the bulb socket con-
tacts the headlight body.
3. Push the electrical connector into the bulb
plastic base until it snaps and stops.
4. Connect the negative (-) battery cable.
5. Close the hood.
FOG LIGHTS (if so equipped)
Replacing the fog light bulb
CAUTION
cHigh pressure halogen gas is sealed
inside the halogen bulb. The bulb may
break if the glass envelope is scratched
or the bulb is dropped.
WDI0294
8-34Maintenance and do-it-yourself
ZREVIEW COPY:Ð2003 Xterra(xtr)
Owners Manual(owners)ÐUSA English(nna)
02/24/03Ðtbrooks
X
Page 252 of 272
3. Route the trailer tow harness so that it does
not block access to the spare tire winch
socket.
4. Connect the tow harness connector (SAE
J1239) to your trailer.
5. Confirm proper vehicle and trailer stop/turn
lamp operation.
6.
When towing is completed, disconnect the
tow harness from the trailer and the vehicle.
Store the tow harness in the glove box. Rein-
stall the connector cap to the vehicle harness.
If you need further assistance in wiring a trailer to
your NISSAN, contact a NISSAN dealer.
Always confirm proper vehicle and trailer
stop/turn lamp operation every time the
trailer light circuits are connected for use.
Trailer brakes
If your trailer is equipped with a braking system,
make sure it conforms to federal and/or local
regulations and that it is properly installed.
WARNING
Never connect a trailer brake system di-
rectly to the vehicle brake system.
Pre-towing tips
cBe certain your vehicle maintains a level
position when a loaded and/or unloaded
trailer is hitched. Do not drive the vehicle if it
has an abnormal nose-up or nose-down
condition; check for improper tongue load,
overload, worn suspension or other possible
causes of either condition.
cAlways secure items in the trailer to prevent
load shift while driving.
cBe certain your rear view mirrors conform to
all federal, state or local regulations. If not,
install any mirrors required for towing before
driving the vehicle.
Trailer towing tips
In order to gain skill and an understanding of the
vehicle’s behavior, you should practice turning,
stopping and backing up in an area which is free
from traffic. Steering stability and braking perfor-
mance will be somewhat different than under
normal driving conditions.
cAlways secure items in the trailer to prevent
load shift while driving.
cAvoid abrupt starts, acceleration or stops.
cAvoid sharp turns or lane changes.
c
Always drive your vehicle at a moderate speed.
cAlways block the wheels on both vehicle and
trailer when parking. Parking on a slope is
not recommended; however, if you must do
so, and if your vehicle is equipped with an
automatic transmission, first block the
wheels and apply the parking brake, and
then move the transmission shift selector
lever into the P (Park) position. If you move
the shift selector lever to the P (Park) posi-
tion before blocking the wheels and applying
the parking brake, transmission damage
could occur.
cWhen going down a hill, shift into a lower
gear and use the engine braking effect.
When going up a long grade, downshift the
transmission to a lower gear and reduce
speed to reduce chances of engine over-
loading and/or overheating. However, for
long steep grades, do not stay in 1st or 2nd
gear when driving above 35 MPH (56 km/h) .
cIf the engine coolant rises to an extremely
high temperature when the air conditioner
system is on, turn off the air conditioner.
Coolant heat can be additionally vented by
opening the windows, switching the fan
control to high and setting the temperature
control to the HOT position.
cTrailer towing requires more fuel than normal
circumstances.
9-22Technical and consumer information
ZREVIEW COPY:Ð2003 Xterra(xtr)
Owners Manual(owners)ÐUSA English(nna)
02/24/03Ðtbrooks
X
Page 259 of 272
10 Index
A
Air bag (See supplemental restraint
system)......................1-8
Air bag warning light...........1-19, 2-12
Air cleaner housing filter............8-22
Air conditioner
Air conditioner operation...........4-5
Air conditioner service............4-9
Air conditioner specification label.....9-12
Air conditioner system refrigerant and
lubrication recommendations........9-6
Heater and air conditioner controls.....4-2
Servicing air conditioner...........4-9
Air flow charts..................4-6
Alarm system
(See vehicle security system).........2-15
Anchor point locations.............1-42
Antenna.....................4-28
Anti-lock brake system (ABS).........5-24
Anti-lock brake warning light..........2-10
Audible reminders................2-15
Audio system..................4-10
Compact disc (CD) player.........4-15
FM-AM radio with compact disc (CD)
changer...................4-16
FM-AM radio with compact disc (CD)
player....................4-12
Radio....................4-10
Steering wheel audio control switch. . . .4-28
Auto-lock free-running hubs..........5-20Automatic
Automatic power window switch.....2-32
Automatic transmission fluid (ATF). . . .8-14
Driving with automatic transmission. . . .5-10
Transmission selector lever lock release .5-12
B
Battery......................8-18
Charge warning light............2-11
Battery replacement
(See remote keyless entry system).......3-7
Before starting the engine............5-9
Belts (See drive belts).............8-19
Brake
Anti-lock brake system (ABS).......5-24
Brake booster................8-30
Brake fluid..................8-16
Brake light (See stop light).........8-36
Brake pedal.................8-29
Brake system................5-23
Brake warning light.............2-10
Brake wear indicators........2-15, 8-29
Parking brake check............8-29
Parking brake operation..........5-15
Self-adjusting brakes............8-29
Break-in schedule................5-18
Brightness control
Instrument panel..............2-21
Bulb check/instrument panel..........2-9
Bulb replacement................8-36C
Capacities and recommended
fuel/lubricants...................9-2
Car phone or CB radio.............4-29
Cargo (See vehicle loading information) . . .9-13
CD player (See audio system).........4-15
Check engine indicator light
(See malfunction indicator light)........2-13
Child restraint with top tether strap......1-41
Child restraints.......1-23, 1-24, 1-30, 1-39
Precautions on child restraints.......1-30
Top tether strap anchor point locations . .1-42
Child safety rear door lock............3-4
Chimes, audible reminders...........2-15
Cleaning exterior and interior..........7-2
Clock...................4-13, 4-18
Clutch
Clutch fluid.................8-16
Cold weather driving..............5-27
Compact disc (CD) player...........4-15
Controls
Audio controls (steering wheel)......4-28
Heater and air conditioner controls.....4-2
Coolant
Capacities and recommended
fuel/lubricants.................9-2
Changing engine coolant..........8-10
Checking engine coolant level........8-9
Engine coolant temperature gauge.....2-5
Corrosion protection...............7-5
ZREVIEW COPY:Ð2003 Xterra(xtr)
Owners Manual(owners)ÐUSA English(nna)
03/17/03Ðcathy
X
Page 260 of 272

Cover
Tonneau cover................2-30
Cruise control..................5-16
Cup holders...................2-27
D
Daytime running light system
(Canada only)..................2-21
Defogger switch
Rear window defogger switch.......2-20
Dimensions and weights.............9-9
Door locks....................3-2
Door open warning light............2-11
Drive belts....................8-19
Driving
Auto-lock free-running hubs........5-20
Cold weather driving............5-27
Driving with automatic transmission. . . .5-10
Driving with manual transmission.....5-13
Precautions when starting and driving . . .5-2
E
Economy - fuel.................5-18
Emission control information label.......9-12
Emission control system warranty.......9-24
Engine
Before starting the engine..........5-9
Capacities and recommended
fuel/lubricants.................9-2
Changing engine coolant..........8-10
Changing engine oil............8-11
Changing engine oil filter..........8-13Checking engine coolant level........8-9
Checking engine oil level..........8-10
Engine compartment check locations. . . .8-9
Engine coolant temperature gauge.....2-5
Engine cooling system............8-9
Engine oil..................8-10
Engine oil and oil filter recommendation . .9-5
Engine oil pressure warning light.....2-11
Engine oil viscosity..............9-5
Engine serial number............9-11
Engine specifications.............9-7
Starting the engine..............5-9
Exhaust gas (Carbon monoxide)........5-2
F
First aid kit....................6-2
Flashers (See hazard warning flasher switch)
..........................2-22
Flat tire......................6-2
Floor mat positioning aid.............7-4
Fluid
Automatic transmission fluid (ATF). . . .8-14
Brake fluid..................8-16
Capacities and recommended fuel/lubricants
.........................9-2
Clutch fluid.................8-16
Engine coolant................8-9
Engine oil..................8-10
Power steering fluid.............8-15
Window washer fluid............8-17
F.M.V.S.S. certification label..........9-11
Fog light switch.................2-22
Front seats....................1-2Fuel
Capacities and recommended
fuel/lubricants.................9-2
Fuel economy................5-18
Fuel filler cap................3-13
Fuel filler lid.................3-13
Fuel gauge..................2-6
Fuel octane rating..............9-4
Fuel recommendation............9-3
Fuses......................8-31
G
Gascap.....................3-13
Gauge
Engine coolant temperature gauge.....2-5
Fuel gauge..................2-6
Odometer...................2-3
Speedometer.................2-3
Tachometer..................2-5
Gear Basket
(see roof rack with gear basket)........3-10
General maintenance..............8-2
Glove box....................2-27
Glove box lock.................2-27
H
Hazard warning flasher switch.........2-22
Head restraints..................1-7
Headlight and turn signal switch........2-20
Headlights....................8-33
Heater
Heater and air conditioner controls.....4-2
Heater operation...............4-4
10-2
ZREVIEW COPY:Ð2003 Xterra(xtr)
Owners Manual(owners)ÐUSA English(nna)
03/17/03Ðcathy
X
Page 261 of 272

Hood release...................3-8
Horn.......................2-23
Hubs
Auto-lock free-running hubs........5-20
I
Ignition switch..................5-7
Important vehicle information label.......9-11
In-cabin microfilter...............8-23
Increasing fuel economy............5-18
Indicator lights and audible reminders
(See warning/indicator lights and audible
reminders).....................2-9
Inside mirror...................3-16
Instrument brightness control.........2-21
Instrument panel.................2-2
Interior light...................2-35
ISOFIX child restraints.............1-39
J
Jump starting...................6-9
K
Key ........................3-2
Keyless entry system
(See remote keyless entry system).......3-4L
Labels
Air conditioner specification label.....9-12
Emission control information label.....9-12
Engine serial number............9-11
F.M.V.S.S. certification label........9-11
Vehicle identification number
(VIN) plate..................9-10
Warning labels (for SRS)..........1-19
LATCH (Lower Anchors and Tether for
Children) System................1-39
License plate
Installing the license plate.........9-13
Light
Air bag warning light.........1-19, 2-12
Brake light (See stop light).........8-36
Bulb check/instrument panel........2-9
Bulb replacement..............8-36
Charge warning light............2-11
Fog light switch...............2-22
Headlight and turn signal switch......2-20
Headlights..................8-33
Interior light.................2-35
Light bulbs..................8-33
Low tire pressure warning light......2-11
Low washer fluid warning light.......2-12
Spotlights (See map light).........2-35
Warning/indicator lights and audible
reminders...................2-9
Lights
Map lights..................2-35
Lock
Child safety rear door lock..........3-4
Door locks..................3-2Glove box lock...............2-27
Power door locks...............3-3
Rear door lock................3-9
Low fuel warning light.............2-11
Low tire pressure warning light........2-11
Low tire pressure warning system........5-3
Low washer fluid warning light.........2-12
Luggage rack..................3-10
Luggage rack (see roof rack).........3-10
Luggage rack
(see roof rack with gear basket)........3-10
Luggage
(See vehicle loading information). . .9-13
M
Maintenance
General maintenance............8-2
Inside the vehicle...............8-3
Maintenance precautions..........8-5
Outside the vehicle..............8-2
Seat belt maintenance...........1-30
Under the hood and vehicle.........8-4
Malfunction indicator lamp (MIL)........2-13
Manual front seat adjustment..........1-2
Manual windows................2-33
Map lights....................2-35
Meters and gauges................2-3
Instrument brightness control.......2-21
Mirror
Inside mirror.................3-16
Outside mirror control........3-16, 3-17
Outside mirrors...............3-16
Vanity mirror.................3-15
Multi-remote control system
(See remote keyless entry system).......3-4
Multi-remote controller battery replacement. .8-32
10-3
ZREVIEW COPY:Ð2003 Xterra(xtr)
Owners Manual(owners)ÐUSA English(nna)
03/17/03Ðcathy
X