2003 NISSAN XTERRA spare tire
[x] Cancel search: spare tirePage 238 of 272

WHEELS AND TIRES
Road wheel/offset in (mm) Tire Spare tire size
4X2 XE 15X7J/1.57 (40) Steel
16X7JJ/1.57 (40) AlloyP265/70R15
P265/70R16P265/70R15
P265/70R16
SE 16X7JJ/1.57 (40) Alloy
17X8JJ (40) AlloyP265/70R16
P265/65R17P265/70R16
P265/65R17
4X4 XE 16X7JJ/1.57 (40) Steel P265/70R16 P265/70R16
SE 16X7JJ/1.57 (40) Alloy
17X8JJ (40) AlloyP265/70R16
P265/65R17P265/70R16
P265/65R17
9-8Technical and consumer information
ZREVIEW COPY:Ð2003 Xterra(xtr)
Owners Manual(owners)ÐUSA English(nna)
02/24/03Ðtbrooks
X
Page 243 of 272

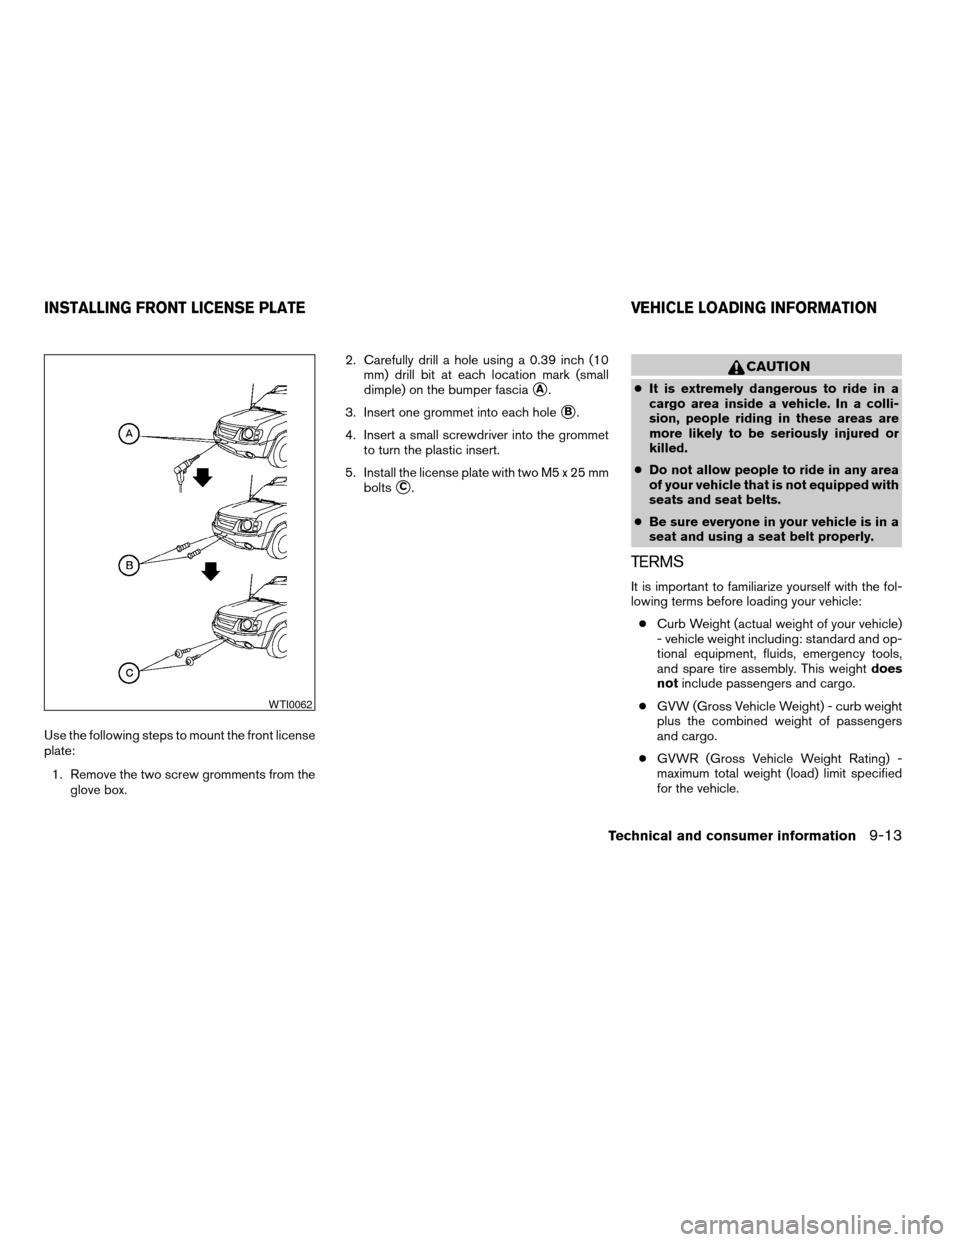
Use the following steps to mount the front license
plate:
1. Remove the two screw gromments from the
glove box.2. Carefully drill a hole using a 0.39 inch (10
mm) drill bit at each location mark (small
dimple) on the bumper fascia
sA.
3. Insert one grommet into each hole
sB.
4. Insert a small screwdriver into the grommet
to turn the plastic insert.
5. Install the license plate with two M5 x 25 mm
bolts
sC.
CAUTION
cIt is extremely dangerous to ride in a
cargo area inside a vehicle. In a colli-
sion, people riding in these areas are
more likely to be seriously injured or
killed.
cDo not allow people to ride in any area
of your vehicle that is not equipped with
seats and seat belts.
cBe sure everyone in your vehicle is in a
seat and using a seat belt properly.
TERMS
It is important to familiarize yourself with the fol-
lowing terms before loading your vehicle:
cCurb Weight (actual weight of your vehicle)
- vehicle weight including: standard and op-
tional equipment, fluids, emergency tools,
and spare tire assembly. This weightdoes
notinclude passengers and cargo.
cGVW (Gross Vehicle Weight) - curb weight
plus the combined weight of passengers
and cargo.
cGVWR (Gross Vehicle Weight Rating) -
maximum total weight (load) limit specified
for the vehicle.
WTI0062
INSTALLING FRONT LICENSE PLATE VEHICLE LOADING INFORMATION
Technical and consumer information9-13
ZREVIEW COPY:Ð2003 Xterra(xtr)
Owners Manual(owners)ÐUSA English(nna)
02/24/03Ðtbrooks
X
Page 252 of 272

3. Route the trailer tow harness so that it does
not block access to the spare tire winch
socket.
4. Connect the tow harness connector (SAE
J1239) to your trailer.
5. Confirm proper vehicle and trailer stop/turn
lamp operation.
6.
When towing is completed, disconnect the
tow harness from the trailer and the vehicle.
Store the tow harness in the glove box. Rein-
stall the connector cap to the vehicle harness.
If you need further assistance in wiring a trailer to
your NISSAN, contact a NISSAN dealer.
Always confirm proper vehicle and trailer
stop/turn lamp operation every time the
trailer light circuits are connected for use.
Trailer brakes
If your trailer is equipped with a braking system,
make sure it conforms to federal and/or local
regulations and that it is properly installed.
WARNING
Never connect a trailer brake system di-
rectly to the vehicle brake system.
Pre-towing tips
cBe certain your vehicle maintains a level
position when a loaded and/or unloaded
trailer is hitched. Do not drive the vehicle if it
has an abnormal nose-up or nose-down
condition; check for improper tongue load,
overload, worn suspension or other possible
causes of either condition.
cAlways secure items in the trailer to prevent
load shift while driving.
cBe certain your rear view mirrors conform to
all federal, state or local regulations. If not,
install any mirrors required for towing before
driving the vehicle.
Trailer towing tips
In order to gain skill and an understanding of the
vehicle’s behavior, you should practice turning,
stopping and backing up in an area which is free
from traffic. Steering stability and braking perfor-
mance will be somewhat different than under
normal driving conditions.
cAlways secure items in the trailer to prevent
load shift while driving.
cAvoid abrupt starts, acceleration or stops.
cAvoid sharp turns or lane changes.
c
Always drive your vehicle at a moderate speed.
cAlways block the wheels on both vehicle and
trailer when parking. Parking on a slope is
not recommended; however, if you must do
so, and if your vehicle is equipped with an
automatic transmission, first block the
wheels and apply the parking brake, and
then move the transmission shift selector
lever into the P (Park) position. If you move
the shift selector lever to the P (Park) posi-
tion before blocking the wheels and applying
the parking brake, transmission damage
could occur.
cWhen going down a hill, shift into a lower
gear and use the engine braking effect.
When going up a long grade, downshift the
transmission to a lower gear and reduce
speed to reduce chances of engine over-
loading and/or overheating. However, for
long steep grades, do not stay in 1st or 2nd
gear when driving above 35 MPH (56 km/h) .
cIf the engine coolant rises to an extremely
high temperature when the air conditioner
system is on, turn off the air conditioner.
Coolant heat can be additionally vented by
opening the windows, switching the fan
control to high and setting the temperature
control to the HOT position.
cTrailer towing requires more fuel than normal
circumstances.
9-22Technical and consumer information
ZREVIEW COPY:Ð2003 Xterra(xtr)
Owners Manual(owners)ÐUSA English(nna)
02/24/03Ðtbrooks
X
Page 263 of 272

Starting
Before starting the engine..........5-9
Jump starting.................6-9
Precautions when starting and driving . . .5-2
Push starting................6-11
Starting the engine..............5-9
Steering
Power steering fluid.............8-15
Power steering system...........5-23
Tilting steering wheel............3-15
Steering wheel audio control switch......4-28
Step rail.....................3-13
Stop light....................8-36
Storage.....................2-25
Sunroof.....................2-33
Supplemental air bag warning light . . .1-19, 2-12
Supplemental restraint system
Information and warning labels.......1-19
Precautions on supplemental restraint
system.....................1-8
Supplemental restraint system
(Supplemental air bag system).........1-8
Switch
Automatic power window switch.....2-32
Fog light switch...............2-22
Hazard warning flasher switch.......2-22
Headlight and turn signal switch......2-20
Ignition switch................5-7
Overdrive switch..............5-13
Power door lock switch...........3-3
Rear window defogger switch.......2-20
Rear window wiper and washer
switches...................2-19
Windshield wiper and washer switch . . .2-18T
Tachometer....................2-5
Temperature gauge
Engine coolant temperature gauge.....2-5
Three-way catalyst................5-2
Tie down hooks.................2-29
Tilting steering wheel..............3-15
Tire
Flat tire....................6-2
Spare tire...................6-4
Tire chains..................8-41
Tire placard.................9-12
Tire pressure................8-40
Tire rotation.................8-42
Tires of 4-wheel drive............8-44
Types of tires................8-40
Uniform tire quality grading.........9-23
Wheels and tires..............8-40
Wheel/tire size................9-8
Tire pressure
Low tire pressure warning light......2-11
Top tether strap child restraint.........1-41
Towing
2-wheel drive models............6-13
4-wheel drive models............6-14
Flat towing..................6-15
Tow truck towing..............6-13
Towing load/specification chart......9-19
Trailer towing................9-17
Transfer case..................5-19
Transmission
Automatic transmission fluid (ATF). . . .8-14
Driving with automatic transmission. . . .5-10
Driving with manual transmission.....5-13Selector lever lock release.........5-12
Travel (See registering your vehicle in
another country).................9-10
Turn signal switch (See headlight and
turn signal switch)............2-20, 2-21
U
Uniform tire quality grading...........9-23
V
Vanity mirror...................3-15
Vehicle dimensions and weights........9-9
Vehicle dynamic control (VDC) system. . . .5-25
Vehicle identification..............9-10
Vehicle identification number (VIN)
(Chassis number)................9-10
Vehicle identification number (VIN) plate . . .9-10
Vehicle loading information...........9-13
Vehicle recovery.................6-15
Vehicle security system.............2-15
Ventilators.....................4-2
W
Warning
Air bag warning light.........1-19, 2-12
Anti-lock brake warning light........2-10
Battery charge warning light........2-11
Brake warning light.............2-10
Door open warning light..........2-11
Engine oil pressure warning light.....2-11
10-5
ZREVIEW COPY:Ð2003 Xterra(xtr)
Owners Manual(owners)ÐUSA English(nna)
03/17/03Ðcathy
X
Page 272 of 272

1. Engine coolant 8-9
2. Battery 8-18
3. Power steering fluid 8-15
4. Automatic transmission fluid 8-14
5. Heater and air conditioner 4-2;
Audio system 4-12, 4-16
6. Passenger supplemental air bag 1-8
7. Fuel filler cap 3-11;
Fuel recommendations 9-3
8. Spare tire 6-2
9. Rear door lock 3-7
10. Seat belts 1-21
11. Door locks 3-2
12. Driver supplemental air bag 1-8
13. Hood release 3-6
14. Meters and gauges 2-3
15. Clutch fluid 8-16
16. Brake fluid 8-16
17. Engine oil 8-10
18. Window washer fluid 8-17
QUICK REFERENCE
ZREVIEW COPY:Ð2003 Xterra(xtr)
Owners Manual(owners)ÐUSA English(nna)
03/17/03Ðcathy
X