2003 NISSAN XTERRA door lock
[x] Cancel search: door lockPage 92 of 272

When the power door lock switch (driver or pas-
senger side) is moved to the lock position with
the key in the ignition and any door open, all doors
will lock and then unlock automatically.
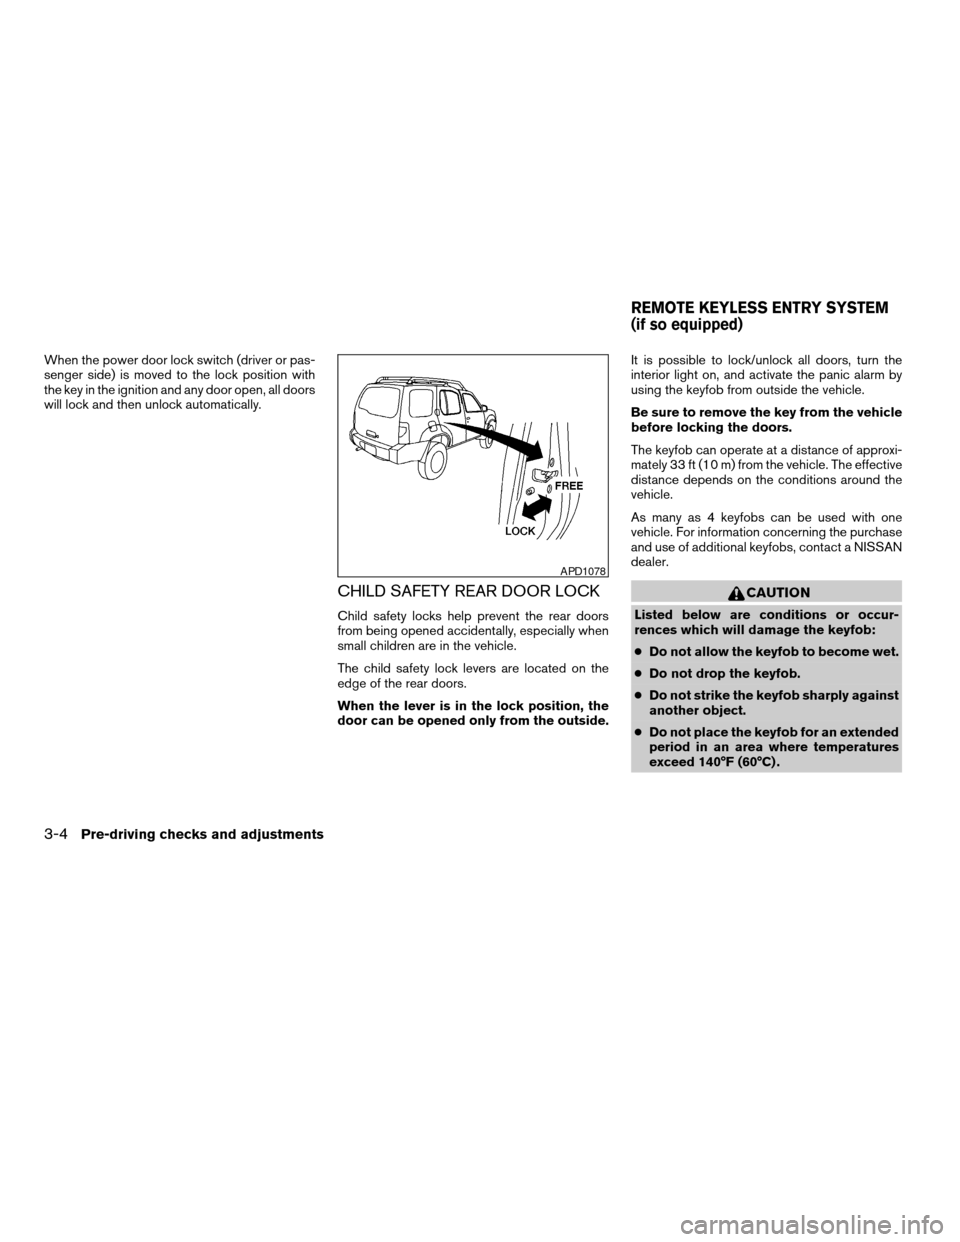
CHILD SAFETY REAR DOOR LOCK
Child safety locks help prevent the rear doors
from being opened accidentally, especially when
small children are in the vehicle.
The child safety lock levers are located on the
edge of the rear doors.
When the lever is in the lock position, the
door can be opened only from the outside.It is possible to lock/unlock all doors, turn the
interior light on, and activate the panic alarm by
using the keyfob from outside the vehicle.
Be sure to remove the key from the vehicle
before locking the doors.
The keyfob can operate at a distance of approxi-
mately 33 ft (10 m) from the vehicle. The effective
distance depends on the conditions around the
vehicle.
As many as 4 keyfobs can be used with one
vehicle. For information concerning the purchase
and use of additional keyfobs, contact a NISSAN
dealer.
CAUTION
Listed below are conditions or occur-
rences which will damage the keyfob:
cDo not allow the keyfob to become wet.
cDo not drop the keyfob.
cDo not strike the keyfob sharply against
another object.
cDo not place the keyfob for an extended
period in an area where temperatures
exceed 140°F (60°C) .
APD1078
REMOTE KEYLESS ENTRY SYSTEM
(if so equipped)
3-4Pre-driving checks and adjustments
ZREVIEW COPY:Ð2003 Xterra(xtr)
Owners Manual(owners)ÐUSA English(nna)
03/17/03Ðcathy
X
Page 93 of 272

HOW TO USE REMOTE KEYLESS
ENTRY SYSTEM
Locking doors
1. Close all windows.
2. Remove the key from the ignition switch.
3. Close the hood and all doors
4. Push the
button on the keyfob. All
the doors lock. The hazard lights flash twice
and the horn beeps once to indicate all
doors are locked.cWhen the
button is pushed with
all doors locked, the hazard lights flash
twice and the horn beeps once as a re-
minder that the doors are already locked.
The horn may or may not beep once.
Refer to “Silencing the horn beep feature”
later in this section for details.
c
If a door is open and you push thebutton, the doors will lock but the horn will
not beep and the hazard lights will not flash.
Unlocking doors
Push thebutton on the keyfob once.
cOnly the driver’s door unlocks.
cThe interior lights illuminate for 30 seconds
when the interior light switch is in O or
DOOR position.
Push the
button on the keyfob again with 5
seconds.
cAll doors unlock.
WPD0157WPD0158
Pre-driving checks and adjustments3-5
ZREVIEW COPY:Ð2003 Xterra(xtr)
Owners Manual(owners)ÐUSA English(nna)
03/17/03Ðcathy
X
Page 94 of 272

The interior lights can be turned off without wait-
ing 30 seconds by inserting the key into the
ignition and turning to the ON or START position,
locking the doors with the keyfob or pushing the
interior light switch to the OFF position.
Auto relock
When thebutton on the keyfob is pushed,
all doors will lock automatically within 5 minutes
unless one of the following operations is per-
formed:
cAny door is opened.
cA key is inserted into the ignition switch and
the key is turned from OFF to ON.
Using the panic alarm
If you are near your vehicle and feel threatened,
you may activate the panic alarm to call attention
by pushing and holding the
button on the
keyfob forlonger than 0.5 second.
The panic alarm and headlights will stay on for 30
seconds.
The panic alarm stops when:
cit has run for 30 seconds, or
cthe
orbutton is pushed on
the keyfob.
Silencing the horn beep feature
If desired, the horn beep feature can be deacti-
vated using the keyfob.
To deactivate:Press and hold the
andbuttonsfor at least 2 seconds.
The hazard lights will flash three times to confirm
that the horn beep feature has been deactivated.
To activate:Press and hold the
andbuttonsfor at least 2 seconds
once more.
The hazard lights will flash once and the horn will
sound once to confirm that the horn beep feature
has been reactivated.
WPD0159WIC0325
3-6Pre-driving checks and adjustments
ZREVIEW COPY:Ð2003 Xterra(xtr)
Owners Manual(owners)ÐUSA English(nna)
03/17/03Ðcathy
X
Page 97 of 272

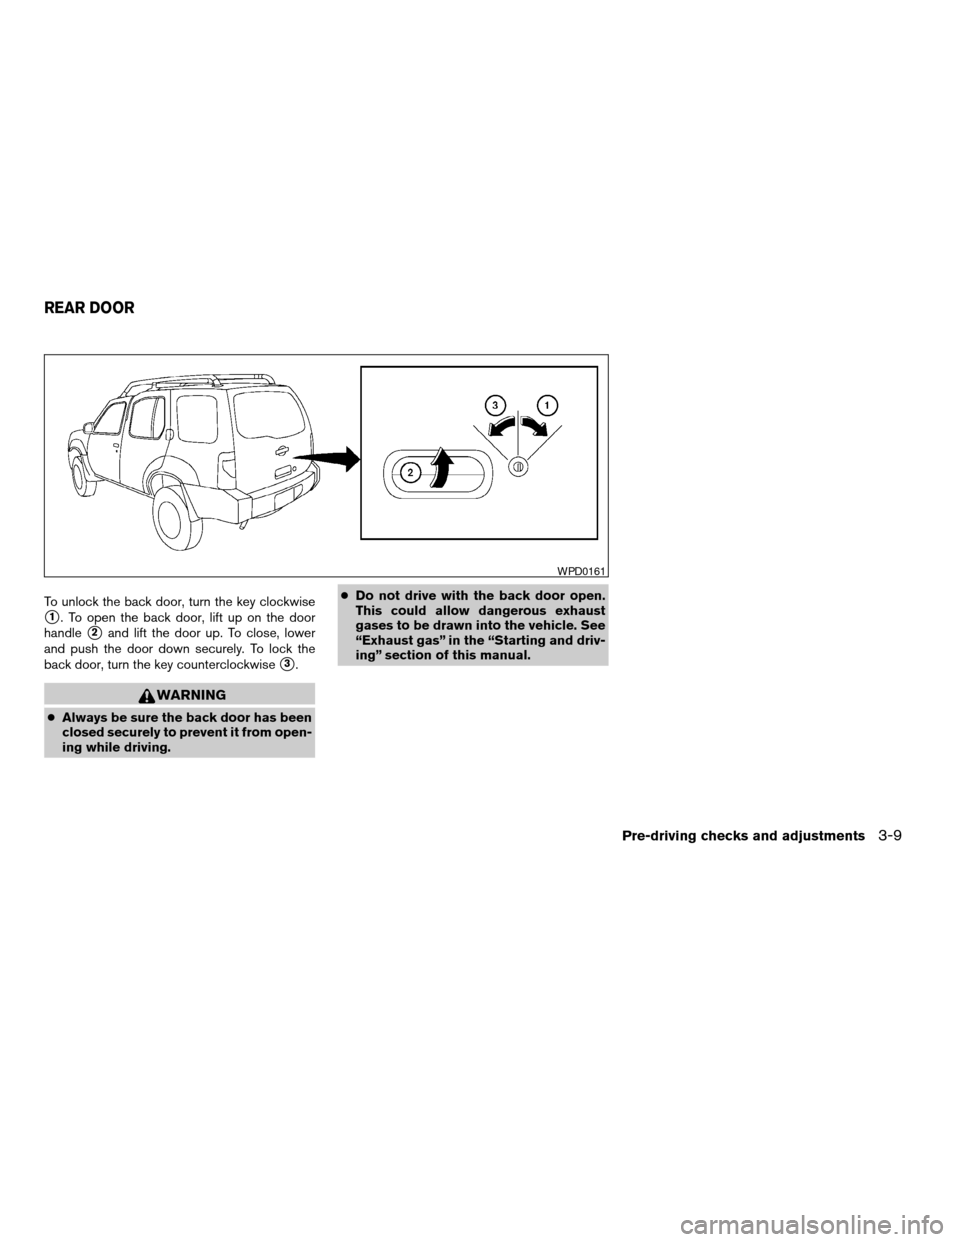
To unlock the back door, turn the key clockwise
s1. To open the back door, lift up on the door
handle
s2and lift the door up. To close, lower
and push the door down securely. To lock the
back door, turn the key counterclockwise
s3.
WARNING
cAlways be sure the back door has been
closed securely to prevent it from open-
ing while driving.cDo not drive with the back door open.
This could allow dangerous exhaust
gases to be drawn into the vehicle. See
“Exhaust gas” in the “Starting and driv-
ing” section of this manual.
WPD0161
REAR DOOR
Pre-driving checks and adjustments3-9
ZREVIEW COPY:Ð2003 Xterra(xtr)
Owners Manual(owners)ÐUSA English(nna)
03/17/03Ðcathy
X
Page 99 of 272

1. Tubular roof rack torxdriver
2. Wheel nut wrench
3. Jack rod
Getting the tubular roof rack torxdriver
1. Open the back door.
2. Roll back the cargo area carpet.
3. Remove the roof rack torxdriver.
Tubular roof rack crossbar adjustment
The front and rear crossbars can be adjusted
forward, backward, or be removed. Use the
torxdriver located in the tool kit to loosen both
crossbar adjusting screws.To adjust:
a. Loosen the adjusting screws with the
torxdriver by turning counterclockwise.
WPD0163
AIC1146
Pre-driving checks and adjustments3-11
ZREVIEW COPY:Ð2003 Xterra(xtr)
Owners Manual(owners)ÐUSA English(nna)
03/17/03Ðcathy
X
Page 137 of 272

5 Starting and driving
Precautions when starting and driving................5-2
Exhaust gas (carbon monoxide)..................5-2
Three-way catalyst..............................5-2
Low tire pressure warning system
(if so equipped)................................5-3
On-pavement and off-road driving
precautions....................................5-4
Avoiding collision and rollover....................5-4
Drinking alcohol/drugs and driving................5-5
Driving safety precautions.......................5-5
Ignition switch.....................................5-7
Automatic transmission..........................5-7
Manual transmission............................5-8
Key positions..................................5-8
Before starting the engine..........................5-9
Starting the engine................................5-9
Driving the vehicle................................5-10
Automatic transmission (if so equipped)..........5-10
Manual transmission...........................5-13
Parking brake....................................5-15
Cruise control (if so equipped).....................5-16
Precautions on cruise control...................5-16Cruise control operations.......................5-17
Break-in schedule................................5-18
Increasing fuel economy...........................5-18
Using four wheel drive (4WD)......................5-19
Transfer case shifting procedures...............5-19
Auto-lock free-running hubs............5-20
Parking/parking on hills............................5-22
Power steering...................................5-23
Brake system....................................5-23
Brake precautions.............................5-23
Anti-lock Brake System (ABS)..................5-24
Vehicle dynamic control (VDC) system
(if so equipped)..................................5-25
Cold weather driving..............................5-27
Freeing a frozen door lock......................5-27
Anti-freeze....................................5-27
Battery.......................................5-27
Draining of coolant water.......................5-27
Tire equipment................................5-27
Special winter equipment.......................5-28
Driving on snow or ice.........................5-28
Engine block heater (if so equipped).............5-28
ZREVIEW COPY:Ð2003 Xterra(xtr)
Owners Manual(owners)ÐUSA English(nna)
02/24/03Ðtbrooks
X
Page 145 of 272

cMake sure the area around the vehicle is
clear.
cCheck fluid levels such as engine oil, cool-
ant, brake and clutch fluid, and window
washer fluid as frequently as possible, or at
least whenever you refuel.
cCheck that all windows and lights are clean.
cVisually inspect tires for their appearance
and condition. Also check tires for proper
inflation.
cLock all doors.
cPosition seat and adjust head restraints.
cAdjust inside and outside mirrors.
cFasten seat belts and ask all passengers to
do likewise.
cCheck the operation of warning lights when
the key is turned to the ON (3) position. See
“Warning/indicator lights and audible re-
minders” in the “Instruments and controls”
section of this manual.1. Apply the parking brake.
2.Automatic transmission:
Move the shift selector lever to P (Park) or N
(Neutral) . P (Park) is recommended.
The shift selector lever cannot be
moved out of P (Park) and into any of
the other gear positions if the ignition
key is turned to the OFF position or if
the key is removed from the ignition
switch.
The starter is designed not to operate if
the shift selector lever is in any of the
driving positions.
Manual transmission:
Move the shift lever to N (Neutral) . Depress
the clutch pedal to the floor while cranking
the engine.
The starter is designed not to operate
unless the clutch pedal is fully de-
pressed.
3. Crank the enginewith your foot off the
accelerator pedalby turning the ignition
key to START. Release the key when the
engine starts. If the engine starts, but fails to
run, repeat the above procedure.cWhen the engine is very hard to start in
extremely cold weather or when restart-
ing, depress the accelerator pedal a little
(approximately 1/5 to the floor) and hold it
and then crank the engine. Release the
key and the accelerator pedal when the
engine starts.
cWhen the engine is very hard to start
because it is flooded, depress the accel-
erator pedal all the way to the floor and
hold it. Crank the engine for 5-6 seconds.
After cranking the engine, release the ac-
celerator pedal. Crank the enginewith
your foot off the accelerator pedalby
turning the ignition key to START. Release
the key when the engine starts. If the
engine starts, but fails to run, repeat the
above procedure.
CAUTION
Do not operate the starter for more than
15 seconds at a time. If the engine does
not start, turn the key off and wait 10
seconds before cranking again, otherwise
the starter could be damaged.
4. Allow the engine to idle for at least 30 sec-
onds after starting. Drive at moderate speed
for a short distance first, especially in cold
weather.
BEFORE STARTING THE ENGINE STARTING THE ENGINE
Starting and driving5-9
ZREVIEW COPY:Ð2003 Xterra(xtr)
Owners Manual(owners)ÐUSA English(nna)
03/05/03Ðtmchalpi
X
Page 163 of 272

FREEING A FROZEN DOOR LOCK
To prevent a door lock from freezing, apply de-
icer through the key hole. If the lock becomes
frozen, heat the key before inserting it into the key
hole.
ANTI-FREEZE
In the winter when it is anticipated that the tem-
perature will drop below 32°F (0°C) , check the
anti-freeze (ethylene glycol base) to assure
proper winter protection. For details, see ‘‘Engine
cooling system’’ in the ‘‘Maintenance and do-it-
yourself’’ section of this manual.
BATTERY
If the battery is not fully charged during extremely
cold weather conditions, the battery fluid may
freeze and damage the battery. To maintain maxi-
mum efficiency, the battery should be checked
regularly. For details, see ‘‘Battery’’ in the ‘‘Main-
tenance and do-it-yourself’’ section of this
manual.
DRAINING OF COOLANT WATER
If the vehicle is to be left outside without anti-
freeze, drain the cooling system, including the
engine block. Refill before operating the vehicle.For details, see ‘‘Changing engine coolant’’ in the
‘‘Maintenance and do-it-yourself’’ section of this
manual.
TIRE EQUIPMENT
1. SUMMER tires have a tread designed to
provide superior performance on dry pave-
ment. However, the performance of these
tires will be substantially reduced in snowy
and icy conditions. If you operate your ve-
hicle on snowy or icy roads, NISSAN recom-
mends the use of MUD & SNOW or ALL
SEASON TIRES on all four wheels. Please
consult a NISSAN dealer for the tire type,
size, speed rating and availability informa-
tion.
2. For additional traction on icy roads, studded
tires may be used. However, some U.S.
states and Canadian provinces prohibit their
use. Check local, state and provincial laws
before installing studded tires.
Skid and traction capabilities of studded
snow tires on wet or dry surfaces may be
poorer than that of non-studded snow tires.
3. Tire chains may be used.
Use of tire chains may be prohibited accord-
ing to location. Check the local laws before
installing tire chains. When installing tire
chains, make sure they are of proper size forthe tires on your vehicle and are installed
according to the chain manufacturer’s sug-
gestions.Use only SAE Class “S”
chains.Class “S” chains are used on ve-
hicles with restricted tire to vehicle clear-
ance. Vehicles that can use Class “S” chains
are designed to meet the minimum clear-
ances between the tire and the closest ve-
hicle suspension or body component re-
quired to accommodate the use of a winter
traction device (tire chains or cables) . The
minimum clearances are determined using
the factory equipped tire size. Other types
may damage your vehicle. Use chain ten-
sioners when recommended by the tire
chain manufacturer to ensure a tight fit.
Loose end links of the tire chain must be
secured or removed to prevent the possibil-
ity of whipping action damage to the fenders
or underbody. If possible, avoid fully loading
your vehicle when using tire chains. In addi-
tion, drive at a reduced speed. Otherwise,
your vehicle may be damaged and/or vehicle
handling and performance may be adversely
affected.
Never install tire chains on spare tires. Do
not use tire chains on dry roads.
COLD WEATHER DRIVING
Starting and driving5-27
ZREVIEW COPY:Ð2003 Xterra(xtr)
Owners Manual(owners)ÐUSA English(nna)
02/24/03Ðtbrooks
X