2003 NISSAN XTERRA key battery
[x] Cancel search: key batteryPage 88 of 272

The interior lights illuminate when a front, rear or
the back door is opened. Once the doors are
closed, these lights turn off in 30 seconds or turn
off immediately when the key is turned to the ON
position.
BATTERY SAVER (if so equipped)
If the vehicle doors are not fully closed and the
interior lights remain illuminated, they eventually
turn off automatically to prevent the battery from
becoming discharged. Interior lights that illumi-
nate when doors are opened turn off after ap-
proximately 30 minutes.
Type B
WIC0350
ILLUMINATED ENTRY SYSTEM
2-36Instruments and controls
ZREVIEW COPY:Ð2003 Xterra(xtr)
Owners Manual(owners)ÐUSA English(nna)
02/21/03Ðtbrooks
X
Page 89 of 272

3 Pre-driving checks and adjustments
Keys .............................................3-2
Doors............................................3-2
Locking with key................................3-2
Locking with inside lock knob....................3-3
Locking with power door lock switch
(if so equipped)................................3-3
Child safety rear door lock.......................3-4
Remote keyless entry system (if so equipped).........3-4
How to use remote keyless entry system..........3-5
Battery replacement............................3-7
Hood............................................3-8
Rear door.........................................3-9
Tubular roof rack with gear basket..................3-10Tubular step rail (if so equipped)...................3-13
Fuel filler lid......................................3-13
Fuel filler cap..................................3-13
Steering wheel...................................3-15
Tilt operation (if so equipped)...................3-15
Sun visors.......................................3-15
Vanity mirror (if so equipped)....................3-15
Mirrors..........................................3-16
Inside mirror..................................3-16
Outside mirrors...............................3-16
Outside mirror remote control
(if so equipped)...............................3-17
ZREVIEW COPY:Ð2003 Xterra(xtr)
Owners Manual(owners)ÐUSA English(nna)
03/18/03Ðcathy
X
Page 95 of 272

Deactivating the horn beep feature does not si-
lence the horn if the alarm is triggered.
BATTERY REPLACEMENT
Replace the battery in the keyfob as follows:
s1Open the lid using a coin.
s2Remove the battery.
s3Install a new battery with the “+” facing
down.
Recommended battery: Toshiba CR2025 or
equivalent.
s4Close the lid securely.
WPD0160
Pre-driving checks and adjustments3-7
ZREVIEW COPY:Ð2003 Xterra(xtr)
Owners Manual(owners)ÐUSA English(nna)
03/17/03Ðcathy
X
Page 96 of 272

5. Press thebutton, then thebutton two or three times to check the key-
fob operation.
If the battery is removed for any reason
other than replacement, perform step 5.
cAn improperly disposed battery can
hurt the environment. Always confirm
local regulations for battery disposal.
cThe keyfob is water-resistant; how-
ever, if it does get wet, immediately
wipe completely dry.
cThe operational range of the keyfob
extends to approximately 33 ft (10 m)
from the vehicle. This range may vary
with conditions.
FCC Notice:
Changes or modifications not expressly ap-
proved by the manufacturer for compliance
could void the user’s authority to operate
the equipment.
This device complies with Part 15 of the FCC
Rules and RSS-210 of Industry Canada.
Operation is subject to the following two
conditions: (1) This device may not cause
harmful interference, and (2) this device
must accept any interference received, in-
cluding interference that may cause undes-
ired operation of the device.
WARNING
cMake sure the hood is completely
closed and latched before driving. Fail-
ure to do so could cause the hood to fly
open and result in an accident.
cIf you see steam or smoke coming from
the engine compartment, to avoid injury
do not open the hood.
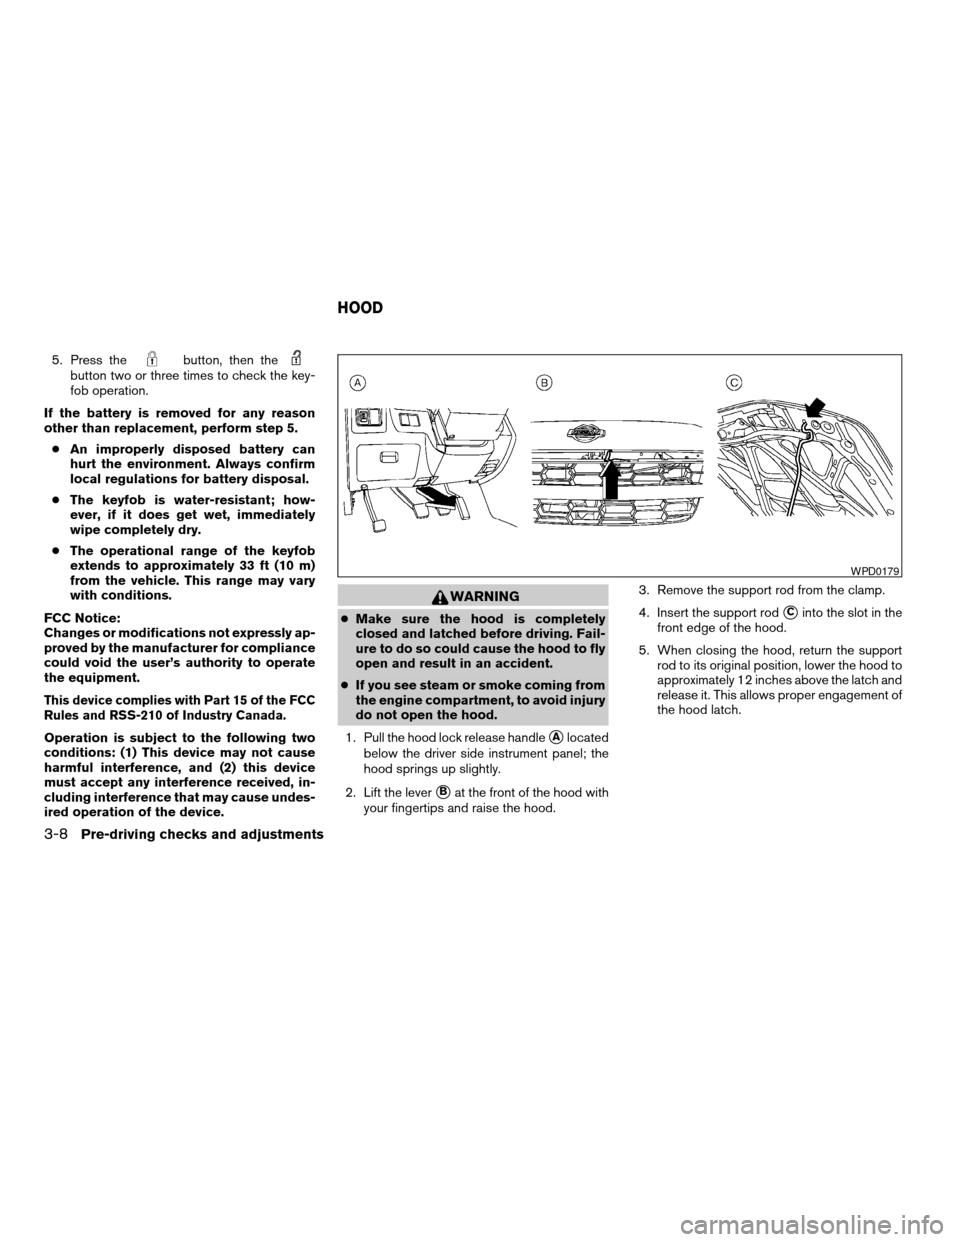
1. Pull the hood lock release handle
sAlocated
below the driver side instrument panel; the
hood springs up slightly.
2. Lift the lever
sBat the front of the hood with
your fingertips and raise the hood.3. Remove the support rod from the clamp.
4. Insert the support rod
sCinto the slot in the
front edge of the hood.
5. When closing the hood, return the support
rod to its original position, lower the hood to
approximately 12 inches above the latch and
release it. This allows proper engagement of
the hood latch.
WPD0179
HOOD
3-8Pre-driving checks and adjustments
ZREVIEW COPY:Ð2003 Xterra(xtr)
Owners Manual(owners)ÐUSA English(nna)
03/17/03Ðcathy
X
Page 137 of 272

5 Starting and driving
Precautions when starting and driving................5-2
Exhaust gas (carbon monoxide)..................5-2
Three-way catalyst..............................5-2
Low tire pressure warning system
(if so equipped)................................5-3
On-pavement and off-road driving
precautions....................................5-4
Avoiding collision and rollover....................5-4
Drinking alcohol/drugs and driving................5-5
Driving safety precautions.......................5-5
Ignition switch.....................................5-7
Automatic transmission..........................5-7
Manual transmission............................5-8
Key positions..................................5-8
Before starting the engine..........................5-9
Starting the engine................................5-9
Driving the vehicle................................5-10
Automatic transmission (if so equipped)..........5-10
Manual transmission...........................5-13
Parking brake....................................5-15
Cruise control (if so equipped).....................5-16
Precautions on cruise control...................5-16Cruise control operations.......................5-17
Break-in schedule................................5-18
Increasing fuel economy...........................5-18
Using four wheel drive (4WD)......................5-19
Transfer case shifting procedures...............5-19
Auto-lock free-running hubs............5-20
Parking/parking on hills............................5-22
Power steering...................................5-23
Brake system....................................5-23
Brake precautions.............................5-23
Anti-lock Brake System (ABS)..................5-24
Vehicle dynamic control (VDC) system
(if so equipped)..................................5-25
Cold weather driving..............................5-27
Freeing a frozen door lock......................5-27
Anti-freeze....................................5-27
Battery.......................................5-27
Draining of coolant water.......................5-27
Tire equipment................................5-27
Special winter equipment.......................5-28
Driving on snow or ice.........................5-28
Engine block heater (if so equipped).............5-28
ZREVIEW COPY:Ð2003 Xterra(xtr)
Owners Manual(owners)ÐUSA English(nna)
02/24/03Ðtbrooks
X
Page 148 of 272

2 (Second gear):
Use this position for hill climbing or engine brak-
ing on downhill grades.
Do not shift into the 2 position at speeds above
60 MPH (96 km/h) . Do not exceed 60 MPH (96
km/h) in the 2 position.
1 (Low gear):
Use this position when climbing steep hills slowly
or driving slowing through deep snow, sand or
mud, or for maximum engine braking on steep
downhill grades.
Do not shift into the 1 position at speeds above
31 MPH (50 km/h) . Do not exceed 31 MPH (50
km/h) in the 1 position.Shift lock release
If the battery is discharged, the shift selector lever
may not be moved from the P (Park) position even
with the brake pedal depressed and the shift
selector lever button pushed.
To move the shift selector lever, release the shift
lock and push the shift selector lever button. The
shift selector lever can be moved to N (Neutral) .
However, the steering wheel will be locked un-
less the ignition switch is turned to the ON posi-
tion.
To release the shift lock, complete the following
procedure:
1. Turn the ignition key to the LOCK position
and remove the key.
2. Apply the parking brake.
3. Remove the shift lock cover
sA.
4. Insert a small screwdriver in the shift lock
slot, and push down
sB.
5. Push the shift selector lever button
sCand
move the shift selector lever to N (Neutral)
position
sDwhile holding down the shift
lock.
6. Turn the key to the ON position to unlock the
steering wheel. Now the vehicle may be
moved to the desired location.
WSD0062
5-12Starting and driving
ZREVIEW COPY:Ð2003 Xterra(xtr)
Owners Manual(owners)ÐUSA English(nna)
02/24/03Ðtbrooks
X
Page 163 of 272

FREEING A FROZEN DOOR LOCK
To prevent a door lock from freezing, apply de-
icer through the key hole. If the lock becomes
frozen, heat the key before inserting it into the key
hole.
ANTI-FREEZE
In the winter when it is anticipated that the tem-
perature will drop below 32°F (0°C) , check the
anti-freeze (ethylene glycol base) to assure
proper winter protection. For details, see ‘‘Engine
cooling system’’ in the ‘‘Maintenance and do-it-
yourself’’ section of this manual.
BATTERY
If the battery is not fully charged during extremely
cold weather conditions, the battery fluid may
freeze and damage the battery. To maintain maxi-
mum efficiency, the battery should be checked
regularly. For details, see ‘‘Battery’’ in the ‘‘Main-
tenance and do-it-yourself’’ section of this
manual.
DRAINING OF COOLANT WATER
If the vehicle is to be left outside without anti-
freeze, drain the cooling system, including the
engine block. Refill before operating the vehicle.For details, see ‘‘Changing engine coolant’’ in the
‘‘Maintenance and do-it-yourself’’ section of this
manual.
TIRE EQUIPMENT
1. SUMMER tires have a tread designed to
provide superior performance on dry pave-
ment. However, the performance of these
tires will be substantially reduced in snowy
and icy conditions. If you operate your ve-
hicle on snowy or icy roads, NISSAN recom-
mends the use of MUD & SNOW or ALL
SEASON TIRES on all four wheels. Please
consult a NISSAN dealer for the tire type,
size, speed rating and availability informa-
tion.
2. For additional traction on icy roads, studded
tires may be used. However, some U.S.
states and Canadian provinces prohibit their
use. Check local, state and provincial laws
before installing studded tires.
Skid and traction capabilities of studded
snow tires on wet or dry surfaces may be
poorer than that of non-studded snow tires.
3. Tire chains may be used.
Use of tire chains may be prohibited accord-
ing to location. Check the local laws before
installing tire chains. When installing tire
chains, make sure they are of proper size forthe tires on your vehicle and are installed
according to the chain manufacturer’s sug-
gestions.Use only SAE Class “S”
chains.Class “S” chains are used on ve-
hicles with restricted tire to vehicle clear-
ance. Vehicles that can use Class “S” chains
are designed to meet the minimum clear-
ances between the tire and the closest ve-
hicle suspension or body component re-
quired to accommodate the use of a winter
traction device (tire chains or cables) . The
minimum clearances are determined using
the factory equipped tire size. Other types
may damage your vehicle. Use chain ten-
sioners when recommended by the tire
chain manufacturer to ensure a tight fit.
Loose end links of the tire chain must be
secured or removed to prevent the possibil-
ity of whipping action damage to the fenders
or underbody. If possible, avoid fully loading
your vehicle when using tire chains. In addi-
tion, drive at a reduced speed. Otherwise,
your vehicle may be damaged and/or vehicle
handling and performance may be adversely
affected.
Never install tire chains on spare tires. Do
not use tire chains on dry roads.
COLD WEATHER DRIVING
Starting and driving5-27
ZREVIEW COPY:Ð2003 Xterra(xtr)
Owners Manual(owners)ÐUSA English(nna)
02/24/03Ðtbrooks
X
Page 175 of 272

CAUTION
cAlways connect positive (1) to positive
(1) and negative (2) to body ground (for
example, strut mounting bolt, engine
lift bracket, etc.) — not to the battery.
cMake sure the jumper cables do not
touch moving parts in the engine com-
partment and that the cable clamps do
not contact any other metal.
5. Start the engine of the booster vehicle and
let it run for a few minutes.
6. Keep the engine speed of the booster ve-
hicle at about 2,000 rpm, and start the en-
gine of the vehicle being jump started.
WARNING
Do not keep the starter motor engaged for
more than 10 seconds. If the engine does
not start right away, turn the key off and
wait 3 to 4 seconds before trying again.
7. After starting the engine, carefully discon-
nect the negative cable and then the positive
cable.8. Replace the vent caps (if so equipped) . Be
sure to dispose of the cloth used to cover
the vent holes as it may be contaminated
with corrosive acid.
WARNING
cAutomatic transmission models cannot
be push-started or tow-started. This
may cause transmission or other ve-
hicle damage.
cThree-way catalyst equipped models
should not be started by pushing. The
three-way catalyst may be damaged.
cNever try to start the vehicle by towing
it. When the engine starts, the forward
surge could cause the vehicle to collide
with the tow vehicle.
PUSH STARTING
In case of emergency6-11
ZREVIEW COPY:Ð2003 Xterra(xtr)
Owners Manual(owners)ÐUSA English(nna)
02/24/03Ðtbrooks
X