2003 NISSAN SENTRA display
[x] Cancel search: displayPage 23 of 224
SUPPLEMENTAL AIR BAG
WARNING LIGHT
The supplemental air bag warning light,
displayingin the instrument panel, moni-
tors the circuits of the supplemental front air
bags, pre-tensioner seat belt and supplemental
side air bag (if so equipped) systems. The circuits
monitored by the supplemental air bag warning
light are the diagnosis sensor unit, crash zone
sensor, supplemental air bag modules, pre-
tensioner seat belts and all related wiring.
When the ignition key is in the ON or START
position, the supplemental air bag warning lightilluminates for about 7 seconds and then turns
off. This means the system is operational.
If any of the following conditions occur, the
supplemental front air bag, supplemental side air
bag and pre-tensioner seat belt systems need
servicing:
cThe supplemental air bag warning light re-
mains on after approximately 7 seconds.
cThe supplemental air bag warning light flashes
intermittently.
cThe supplemental air bag warning light does
not come on at all.
Under these conditions, the supplemental front
air bag, supplemental side air bag or pre-
tensioner seat belt systems may not operate
properly. It must be checked and repaired. Take
your vehicle to the nearest NISSAN dealer.
WARNING
If the supplemental air bag warning light
is on, it could mean that the supplemental
front air bag or supplemental side air bag
system will not operate in an accident.
Repair and replacement procedure
The supplemental front air bags, pre-tensioner
seat belts and supplemental side air bags (if soequipped) are designed to inflate on a one-time-
only basis. As a reminder, unless it is damaged,
the supplemental air bag warning light remains
illuminated after inflation has occurred. Repair
and replacement of these supplemental air bag
systems should be done only by a NISSAN
dealer.
When maintenance work is required on the ve-
hicle, the supplemental front air bags, supple-
mental side air bags (if so equipped) , pre-
tensioner seat belts and related parts should be
pointed out to the person performing the mainte-
nance. The ignition key should always be in the
LOCK position when working under the hood or
inside the vehicle.
WARNING
cOnce a supplemental front air bag or
supplemental side air bag has inflated,
the air bag module will not function
again and must be replaced. Addition-
ally, if any of the supplemental front air
bags inflate, the activated pre-
tensioner seat belts must also be re-
placed. The air bag module and pre-
tensioner seat belt system should be
replaced by a NISSAN dealer. The air
bag module and pre-tensioner seat belt
system cannot be repaired.
LRS0100
Seats, restraints and supplemental air bag systems1-17
ZREVIEW COPY:Ð2003 Sentra(b15)
Owners Manual(owners)ÐUSA English(nna)
12/10/02Ðsysadmin
X
Page 48 of 224
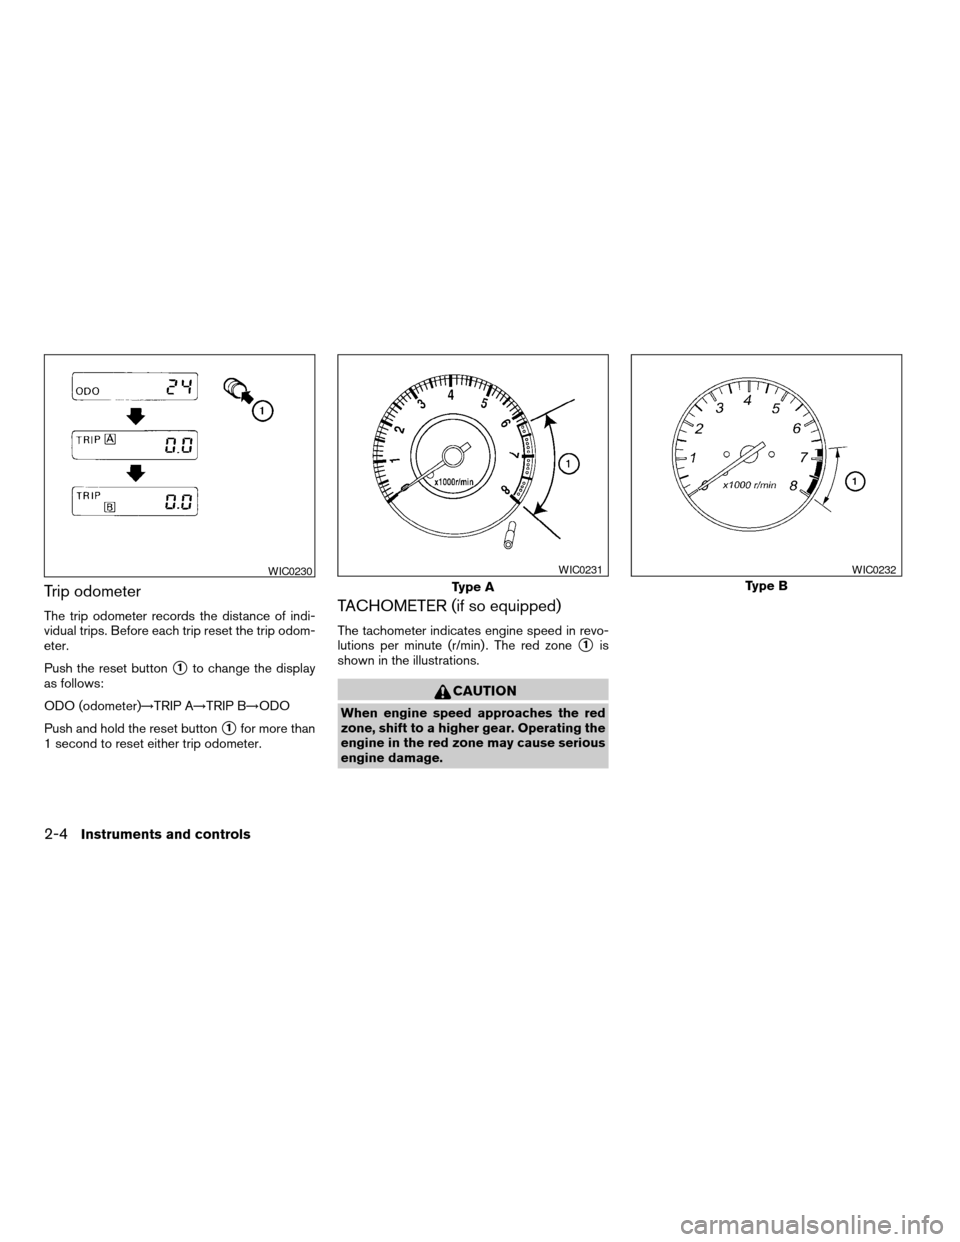
Trip odometer
The trip odometer records the distance of indi-
vidual trips. Before each trip reset the trip odom-
eter.
Push the reset button
s1to change the display
as follows:
ODO (odometer)!TRIP A!TRIP B!ODO
Push and hold the reset button
s1for more than
1 second to reset either trip odometer.
TACHOMETER (if so equipped)
The tachometer indicates engine speed in revo-
lutions per minute (r/min) . The red zone
s1is
shown in the illustrations.
CAUTION
When engine speed approaches the red
zone, shift to a higher gear. Operating the
engine in the red zone may cause serious
engine damage.
WIC0230
Type A
WIC0231
Type B
WIC0232
2-4Instruments and controls
ZREVIEW COPY:Ð2003 Sentra(b15)
Owners Manual(owners)ÐUSA English(nna)
12/10/02Ðdebbie
X
Page 101 of 224

Adjusting tone quality and speaker balance
To adjust BAS/TRE or FAD/BAL (Bass/Treble or
Fader/Balance) , press the AUDIO button until
the desired mode (BAS, TRE, FAD, or BAL) ap-
pears in the display. Press the
orbutton to adjust Bass (BAS) and Treble (TRE) to
the desired level. Use theorbutton
also to adjust Fader (FAD) or Balance (BAL)
modes. Fader (FAD) adjusts the sound level be-
tween the front and rear speakers and Balance
(BAL) adjusts the sound between the right and
left speakers.
Clock operation
Pressing the clock button alternates the clock
and the radio/CD player options in the display.
Clock set
Depressing the clock and
buttons to-
gether sets hours. Depressing the clock
and
buttons together sets minutes.
Clock priority mode
In this mode the clock is shown in the display. If
any radio or CD functions are activated, the radio
or CD display illuminates for 10 seconds then
returns to the clock mode.
LHA0033
Heater, air conditioner and audio systems4-13
ZREVIEW COPY:Ð2003 Sentra(b15)
Owners Manual(owners)ÐUSA English(nna)
12/10/02Ðdebbie
X
Page 102 of 224
NOTE:
After clock adjustment, the radio is in the
clock priority mode.
FM-AM radio operation
FM/AM band select
Push the button to change from AM to FM recep-
tion.
The FM stereo indicator, ST, illuminates during
FM stereo reception. When the stereo broadcast
signal is weak, the radio automatically changes
from stereo to monaural reception.
TUNE buttons
WARNING
The radio should not be tuned while driv-
ing so full attention may be given to ve-
hicle operation.
Use the
andbuttons for manual tun-
ing. To move quickly through the channels, hold
either of the tune buttons down for more than 0.5
seconds.
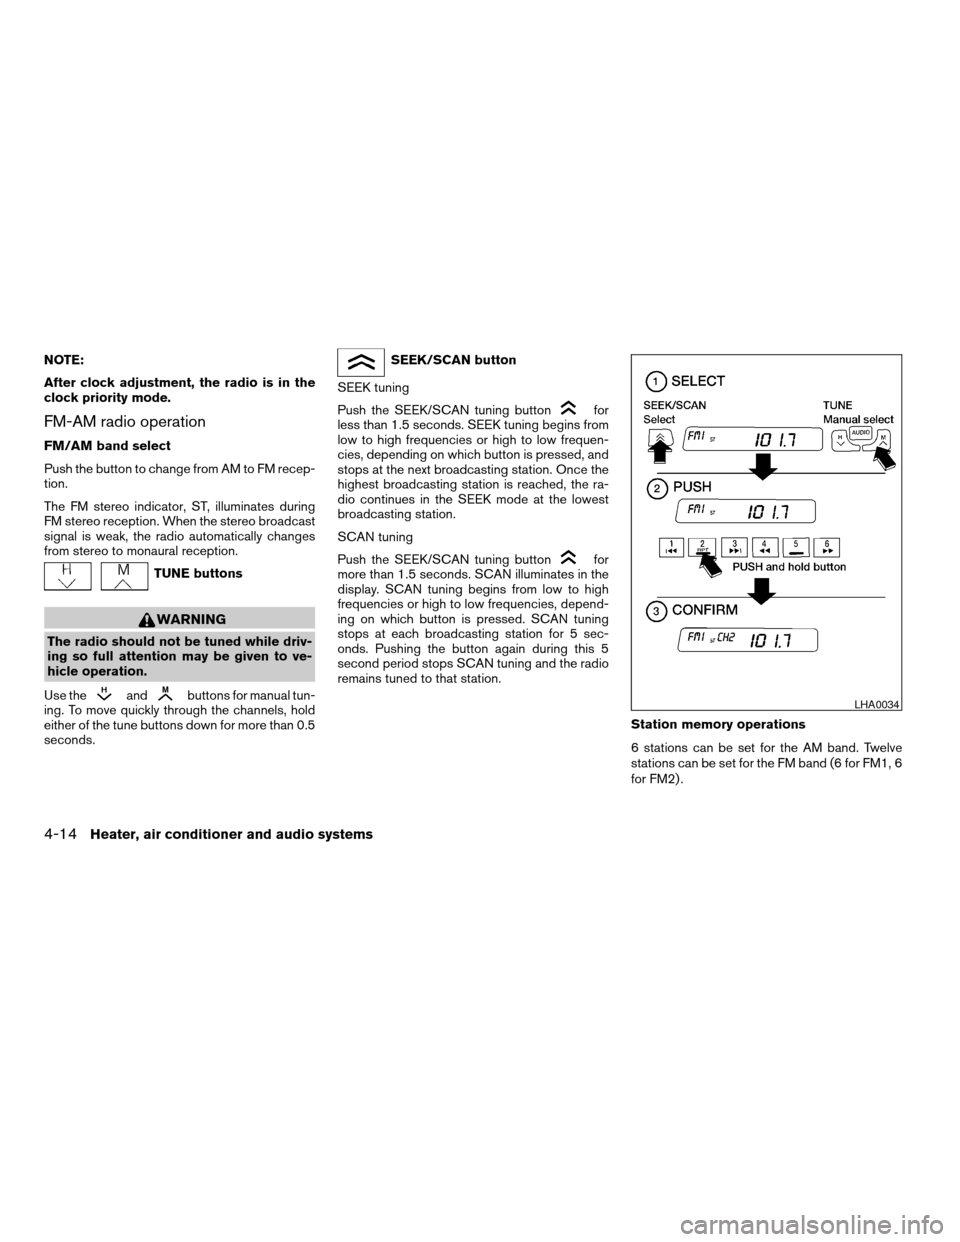
SEEK/SCAN button
SEEK tuning
Push the SEEK/SCAN tuning button
for
less than 1.5 seconds. SEEK tuning begins from
low to high frequencies or high to low frequen-
cies, depending on which button is pressed, and
stops at the next broadcasting station. Once the
highest broadcasting station is reached, the ra-
dio continues in the SEEK mode at the lowest
broadcasting station.
SCAN tuning
Push the SEEK/SCAN tuning button
for
more than 1.5 seconds. SCAN illuminates in the
display. SCAN tuning begins from low to high
frequencies or high to low frequencies, depend-
ing on which button is pressed. SCAN tuning
stops at each broadcasting station for 5 sec-
onds. Pushing the button again during this 5
second period stops SCAN tuning and the radio
remains tuned to that station.
Station memory operations
6 stations can be set for the AM band. Twelve
stations can be set for the FM band (6 for FM1, 6
for FM2) .
LHA0034
4-14Heater, air conditioner and audio systems
ZREVIEW COPY:Ð2003 Sentra(b15)
Owners Manual(owners)ÐUSA English(nna)
12/10/02Ðdebbie
X
Page 103 of 224
1. Push to select AM, FM1, or FM2. The se-
lected band illuminates in the display.
2. Tune to the desired station.
3. Push the desired station select button for
more than 1.5 seconds. For example, in the
illustrations, ch2 is to be memorized. The
radio mutes when the select button is
pushed.
4. When the indicator illuminates in the display
and the sound resumes, memorizing is com-
plete.
5. Other station select buttons can be set in
the same manner.
If the battery cable is disconnected, or if the radio
fuse opens, the radio memory is canceled. In that
case, reset the desired stations.
Compact disc (CD) player operation
Turn the ignition key to the ACC or ON position,
and carefully insert the compact disc into the slot
with the label side up. The compact disc is auto-
matically pulled into the slot and starts to play.
If the radio is already operating, it automatically
turns off and the compact disc begins to play.
CAUTION
Do not force a compact disc into the CD
insert slot. This could damage the CD
and/or CD changer/player.
CD button
When the CD button is pushed with a compact
disc loaded and the radio playing, the radio turns
off and the compact disc starts to play.
When this button is pushed while the compact
disc is playing, the compact disc stops playing.
FF (Fast Forward) , REW
(Rewind) buttons
When the
orbutton is pushed while
the compact disc is playing, the compact disc
plays at an increased speed while fast forwarding
or rewinding. When the button is released, the
compact disc returns to normal play speed.
APS (Automatic Program
Search) FF, APS REW
When the
button is pushed while the com-
pact disc is playing, the selection following the
present one starts to play from the beginning.
Push the
button several times to skip sev-
eral selections. Each time the button is pushed,the CD advances one selection. (When the last
selection on the compact disc is skipped, the first
selection is played.)
When the
button is pushed, the selection
being played returns to the beginning. Push
the
button several times to skip back sev-
eral selections. Each time the button is pushed,
the CD moves back one selection.
Repeat/Random button
When the
button is pushed while the
compact disc is playing, the play pattern changes
as follows:
1:The current selection is repeated.
RANDOM:Selections are played at random, not
following the sequence on the compact disc. The
same program may be repeated twice.
Normal(no symbol): All selections are played in
sequence.
When a new compact disc is inserted, the
play pattern automatically changes to the
“Normal” play pattern.
Heater, air conditioner and audio systems4-15
ZREVIEW COPY:Ð2003 Sentra(b15)
Owners Manual(owners)ÐUSA English(nna)
12/10/02Ðdebbie
X
Page 104 of 224

CD EJECT button
When the
button is pushed with a com-
pact disc loaded, the compact disc ejects.
When the
button is pushed while the com-
pact disc is playing, the compact disc ejects and
the system turns off.
If the compact disc ejects and is not re-
moved within 10 seconds, it is pulled back
into the slot.
DISC indicator light
CD IN appears in the display when a CD is
loaded with the system ON.
1. APS (Automatic Program Search) FF,
APS REW buttons
2. Display
3.
FF (Fast Forward) , REW (Rewind) buttons
4. Repeat button
5. Disc eject button6. Load indicator light
7. Door
8. Disc selection button
9. Disc indication light
10. Load indicator light
11. Play/stop button
WHA0203
4-16Heater, air conditioner and audio systems
ZREVIEW COPY:Ð2003 Sentra(b15)
Owners Manual(owners)ÐUSA English(nna)
12/10/02Ðdebbie
X
Page 105 of 224
COMPACT DISC (CD) CHANGER (if
so equipped)
To use the CD changer, turn the ignition key to
the ACC or ON position.
Disc loading — single
CAUTION
Trying to load a CD with the CD door
closed could damage the CD and/or CD
changer.
When a disc selection button is pressed for less
than 1.5 seconds, the CD changer enters the
One Disc Loading Mode. The disc selection but-
ton starts flashing green and both WAIT and the
disc selection button number flash in the display
until the door is opened. When the door has
opened, the display changes from WAIT to LOAD
and the load indicator lights flash green. Load
only one CD at a time. After the CD is loaded, the
door closes, the load indicator lights turn off and
the disc selection button turns a solid green. The
CD that was loaded starts to play automatically.
Disc loading — all
When a disc selection button is pressed for
longer than 1.5 seconds, the CD changer auto-
matically changes to All Disc Loading Mode. All
disc selection buttons start flashing orange, ex-cept the disc selection button that was pushed
initially. This button flashes green and both WAIT
and the disc selection button number flash in the
display until the door is opened. When the door
opens, the display changes from WAIT to LOAD
and the load indicator lights flash green. Load
only one CD at a time. After the CD is loaded, the
door closes, the load indicator lights turn off and
the disc selection button turns a solid green.
After all the CDs have been loaded, the CD that
was loaded first starts to play.
Play/Stop button
Press the
button while a CD is playing, the
CD stops playing and the CD changer turns off.
Press the
button while the CD changer is
off, the last CD that was loaded starts to play.
Press the
button with no CDs loaded, the
CD changer enters the One Disc Loading Mode.
FF (fast forward) REV (re-
verse) buttons
When the
orbutton is pushed while
the CD is playing, the CD plays at an increased
speed while fast forwarding or reversing. When
the button is released, the CD returns to normal
play speed.
APS (Automatic Program
Search) , FF, APS REV
When the
button is pushed while the CD
is playing, the selection following the current one
starts to play from the beginning. Push the
button several times to skip several selections.
Each time the button is pushed, the CD advances
one selection. When the last selection on the CD
is skipped, the first selection is played.
When the
button is pushed, the current
selection returns to the beginning. Push
the
button several times to skip back sev-
eral selections. Each time the button is pushed,
the CD moves back one selection. Went the first
selection on the CD is skipped, the last selection
is played.
Repeat Button
When the
button is pushed while a CD is
playing, the play pattern will change as follows.
ALL — All disc repeat:All CDs are played
repeatedly in sequence.
BLANK (no symbol) — One disc repeat:The
current CD is repeated.
1 — One track repeat:The current selection is
repeated.
Heater, air conditioner and audio systems4-17
ZREVIEW COPY:Ð2003 Sentra(b15)
Owners Manual(owners)ÐUSA English(nna)
12/10/02Ðdebbie
X
Page 106 of 224

ALL RANDOM — All disc random:Selections
from all the CDs that are stored are played at
random. The same program may be repeated
twice. Pressing the
button will select the
next random selection.
RANDOM — One disc random:Selections
from the current CD are played at random. The
same program may be repeated twice. Pressing
the
button will select the next random se-
lection.
When a new CD is inserted, the play pattern
automatically changes to the “ALL” play
pattern.
CD Eject — Single
When the
button is pressed for less than
1.5 seconds, then the current CD that is playing
(or if the CD changer is off, the last CD that was
played) ejects. The disc indicator light starts
flashing orange and both WAIT and the disc
selection button number flash in the display until
the CD is ejected. When the CD is ejected, the
disc indicator light turns off and the display turns
from WAIT to EJECT. When the CD is removed
from the unit, the CD changer automatically
changes to One Disc Loading Mode so a new
CD can be loaded into the empty holder. The disc
indicator light starts flashing green and both
LOAD and the disc selection button number ap-pear in the display until a CD is loaded. One Disc
Loading Mode cancels if another disc selection
button is pushed or by waiting longer than 15
seconds to load a CD.
CD Eject — ALL
When the
button is pressed for longer than
1.5 seconds, the CD changer automatically
changes to All Disc Eject Mode. The disc indica-
tor light for the current CD (or the last CD that
was played) starts flashing orange and both
WAIT and the disc selection button number flash
in the display until the CD ejects. When the CD
ejects, the disc indicator light turns off and the
display turns from WAIT to EJECT. When the CD
is removed from the unit, the next CD starts to
eject. After all the CDs are ejected, the CD
changer turns off.
If a CD is ejected and is not removed within
10 seconds, it will be pulled back into the
slot.
CD CARE AND CLEANING
cHandle a CD by its edges. Do not bend the
disc. Never touch the surface of the disc.
cAlways place the discs in the storage case
when they are not being used.
cTo clean a disc, wipe the surface from the
center to the outer edge using a clean, soft
cloth. Do not wipe the disc using a circular
motion.
cDo not use a conventional record cleaner or
alcohol intended for industrial use.
LHA0049
4-18Heater, air conditioner and audio systems
ZREVIEW COPY:Ð2003 Sentra(b15)
Owners Manual(owners)ÐUSA English(nna)
12/10/02Ðdebbie
X