2003 NISSAN SENTRA ECO mode
[x] Cancel search: ECO modePage 2 of 224
This manual includes information for all options
available on this model. Therefore, you may find
some information that does not apply to your
vehicle.
All information, specifications and illustrations in
this manual are those in effect at the time of
printing. NISSAN reserves the right to change
specifications or design without notice and with-
out obligation.
IMPORTANT INFORMATION ABOUT
THIS MANUAL
You will see various symbols in this manual. They
are used in the following ways:
WARNING
This is used to indicate the presence of a
hazard that could cause death or serious
personal injury. To avoid or reduce the
risk, the procedures must be followed
precisely.
CAUTION
This is used to indicate the presence of a
hazard that could cause minor or moder-
ate personal injury or damage to your ve-
hicle. To avoid or reduce the risk, the pro-
cedures must be followed carefully.If you see this symbol, it means“Do not do this”
or“Do not let this happen.”
If you see a symbol similar to these in an illustra-
tion, it means the arrow points to the front of the
vehicle.
Arrows in an illustration that are similar to these
indicate movement or action.
Arrows in an illustration that are similar to these
call attention to an item in the illustration.
CALIFORNIA PROPOSITION 65
WARNING
WARNING
Engine exhaust, some of its constituents,
and certain vehicle components contain
or emit chemicals known to the State of
California to cause cancer and birth de-
fects or other reproductive harm. In addi-
tion, certain fluids contained in vehicles
and certain products of component wear
contain or emit chemicals known to the
State of California to cause cancer and
birth defects or other reproductive harm.
© 2003 NISSAN NORTH AMERICA, INC.
GARDENA, CALIFORNIA
All rights reserved. No part of this Owner’s
Manual may be reproduced or stored in a retrieval
system, or transmitted in any form, or by any
means, electronic, mechanical, photocopying,
recording or otherwise, without the prior written
permission of Nissan North America, Inc., Gar-
dena, California.
APD1005
WHEN READING THE MANUAL
ZREVIEW COPY:Ð2003 Sentra(b15)
Owners Manual(owners)ÐUSA English(nna)
12/10/02Ðdebbie
X
The inside pages of this manual contain
a minimum of 50% recycled fibers,
including 10% post-consumer fibers.
Page 33 of 224
cFollow all of the child restraint manu-
facturer’s instructions for installation
and use. When purchasing a child re-
straint, be sure to select one which will
fit your child and vehicle. It may not be
possible to properly install some types
of child restraints in your vehicle.
cIf the child restraint is not anchored
properly, the risk of a child being in-
jured in a collision or a sudden stop
greatly increases.
cAdjustable seatbacks should be posi-
tioned to fit the child restraint, but as
upright as possible.
cAfter attaching the child restraint, test it
before you place the child in it. Tilt it
from side to side. Try to tug it forward
and check to see if the belt holds the
restraint in place. The child restraint
should not move more than 1 inch. If the
restraint is not secure, tighten the belt
as necessary, or put the restraint in an-
other seat and test it again.cFor a front-facing child restraint, if the
seat position where it is installed has a
three-point type lap/shoulder belt,
check to make sure the shoulder belt
does not go in front of the child’s face or
neck. If it does, put the shoulder belt
behind the child restraint. If you must
install a front facing child restraint in
the front seat, see “Installation on front
passenger seat” later in this section.
cWhen your child restraint is not in use,
keep it secured with a seat belt to pre-
vent it from being thrown around in
case of a sudden stop or accident.
CAUTION
Remember that a child restraint left in a
closed vehicle can become very hot.
Check the seating surface and buckles
before placing your child in the child
restraint.
INSTALLATION ON REAR SEAT
CENTER OR OUTBOARD
POSITIONS
WARNING
cThe three-point seat belt in your vehicle
is equipped with an automatic locking
mode retractor which must be used
when installing a child restraint.
cFailure to use the retractor’s locking
mode will result in the child restraint
not being properly secured. The re-
straint could tip over or otherwise be
unsecured and cause injury to the child
in a sudden stop or collision.
Seats, restraints and supplemental air bag systems1-27
ZREVIEW COPY:Ð2003 Sentra(b15)
Owners Manual(owners)ÐUSA English(nna)
12/10/02Ðsysadmin
X
Page 42 of 224
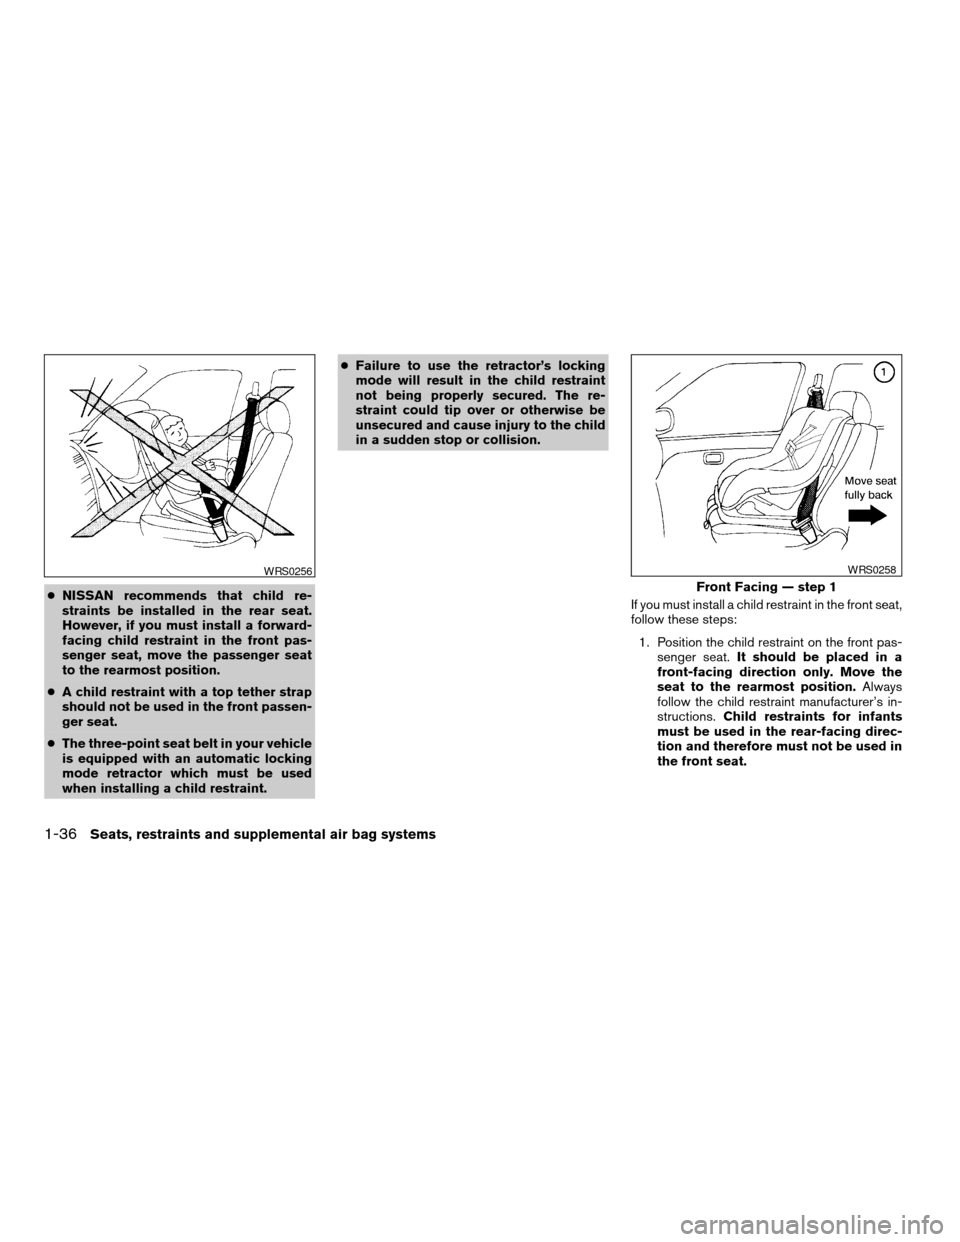
cNISSAN recommends that child re-
straints be installed in the rear seat.
However, if you must install a forward-
facing child restraint in the front pas-
senger seat, move the passenger seat
to the rearmost position.
cA child restraint with a top tether strap
should not be used in the front passen-
ger seat.
cThe three-point seat belt in your vehicle
is equipped with an automatic locking
mode retractor which must be used
when installing a child restraint.cFailure to use the retractor’s locking
mode will result in the child restraint
not being properly secured. The re-
straint could tip over or otherwise be
unsecured and cause injury to the child
in a sudden stop or collision.
If you must install a child restraint in the front seat,
follow these steps:
1. Position the child restraint on the front pas-
senger seat.It should be placed in a
front-facing direction only. Move the
seat to the rearmost position.Always
follow the child restraint manufacturer’s in-
structions.Child restraints for infants
must be used in the rear-facing direc-
tion and therefore must not be used in
the front seat.
WRS0256
Front Facing — step 1
WRS0258
1-36Seats, restraints and supplemental air bag systems
ZREVIEW COPY:Ð2003 Sentra(b15)
Owners Manual(owners)ÐUSA English(nna)
12/10/02Ðdebbie
X
Page 90 of 224
0
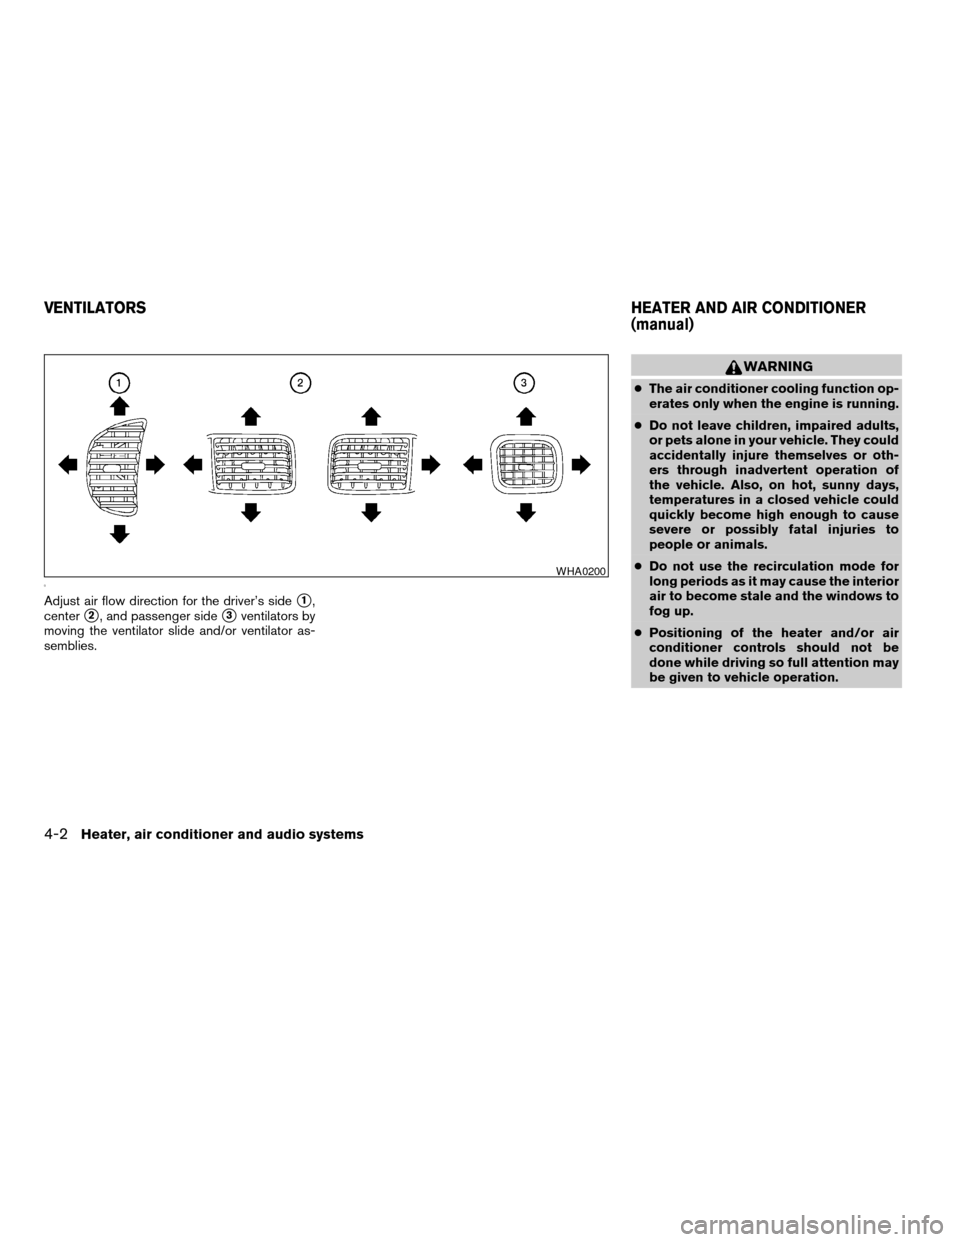
Adjust air flow direction for the driver’s sides1,
center
s2, and passenger sides3ventilators by
moving the ventilator slide and/or ventilator as-
semblies.
WARNING
cThe air conditioner cooling function op-
erates only when the engine is running.
cDo not leave children, impaired adults,
or pets alone in your vehicle. They could
accidentally injure themselves or oth-
ers through inadvertent operation of
the vehicle. Also, on hot, sunny days,
temperatures in a closed vehicle could
quickly become high enough to cause
severe or possibly fatal injuries to
people or animals.
cDo not use the recirculation mode for
long periods as it may cause the interior
air to become stale and the windows to
fog up.
cPositioning of the heater and/or air
conditioner controls should not be
done while driving so full attention may
be given to vehicle operation.
WHA0200
VENTILATORSHEATER AND AIR CONDITIONER
(manual)
4-2Heater, air conditioner and audio systems
ZREVIEW COPY:Ð2003 Sentra(b15)
Owners Manual(owners)ÐUSA English(nna)
12/10/02Ðdebbie
X
Page 101 of 224
Adjusting tone quality and speaker balance
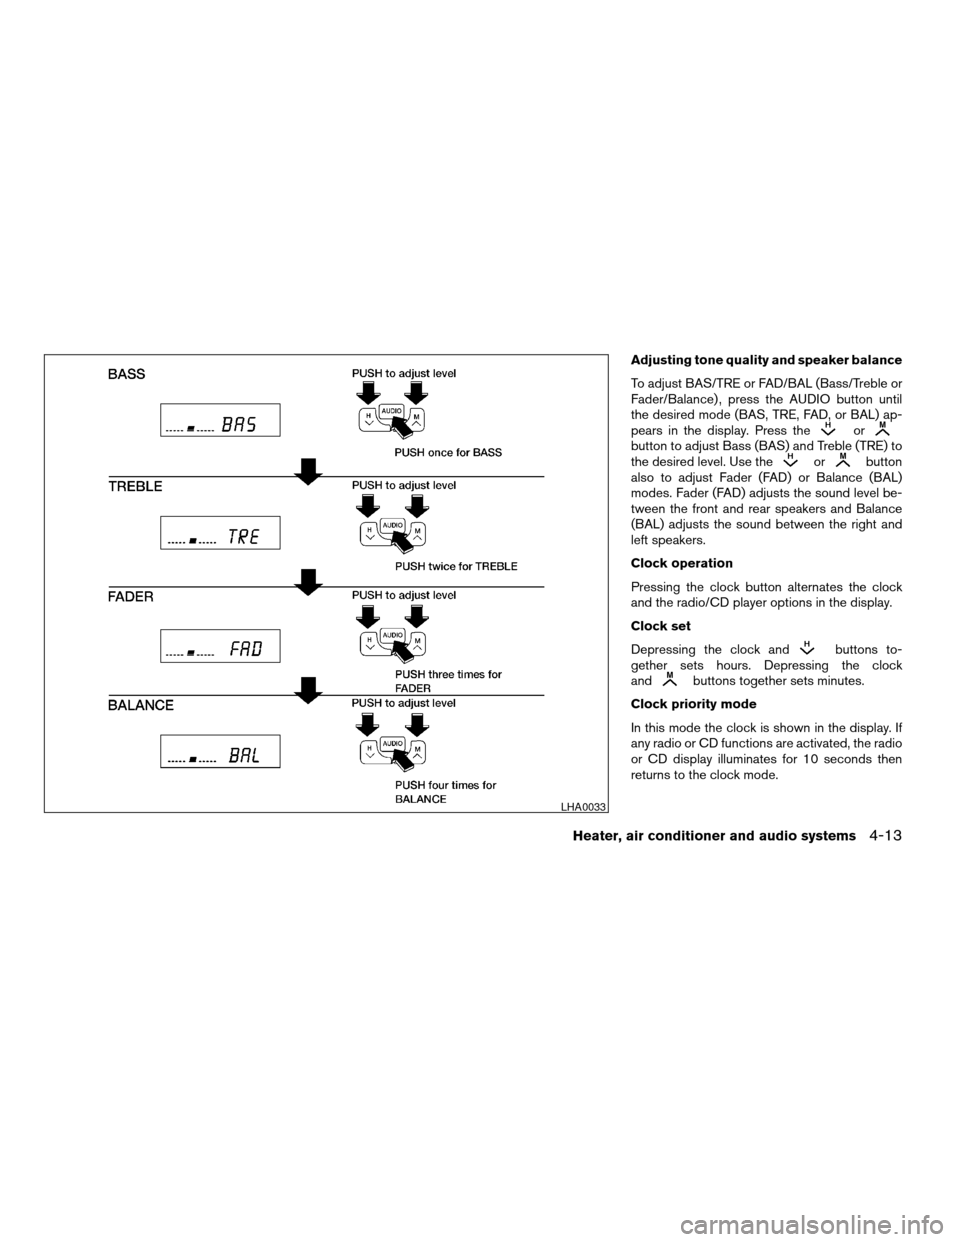
To adjust BAS/TRE or FAD/BAL (Bass/Treble or
Fader/Balance) , press the AUDIO button until
the desired mode (BAS, TRE, FAD, or BAL) ap-
pears in the display. Press the
orbutton to adjust Bass (BAS) and Treble (TRE) to
the desired level. Use theorbutton
also to adjust Fader (FAD) or Balance (BAL)
modes. Fader (FAD) adjusts the sound level be-
tween the front and rear speakers and Balance
(BAL) adjusts the sound between the right and
left speakers.
Clock operation
Pressing the clock button alternates the clock
and the radio/CD player options in the display.
Clock set
Depressing the clock and
buttons to-
gether sets hours. Depressing the clock
and
buttons together sets minutes.
Clock priority mode
In this mode the clock is shown in the display. If
any radio or CD functions are activated, the radio
or CD display illuminates for 10 seconds then
returns to the clock mode.
LHA0033
Heater, air conditioner and audio systems4-13
ZREVIEW COPY:Ð2003 Sentra(b15)
Owners Manual(owners)ÐUSA English(nna)
12/10/02Ðdebbie
X
Page 102 of 224
NOTE:
After clock adjustment, the radio is in the
clock priority mode.
FM-AM radio operation
FM/AM band select
Push the button to change from AM to FM recep-
tion.
The FM stereo indicator, ST, illuminates during
FM stereo reception. When the stereo broadcast
signal is weak, the radio automatically changes
from stereo to monaural reception.
TUNE buttons
WARNING
The radio should not be tuned while driv-
ing so full attention may be given to ve-
hicle operation.
Use the
andbuttons for manual tun-
ing. To move quickly through the channels, hold
either of the tune buttons down for more than 0.5
seconds.
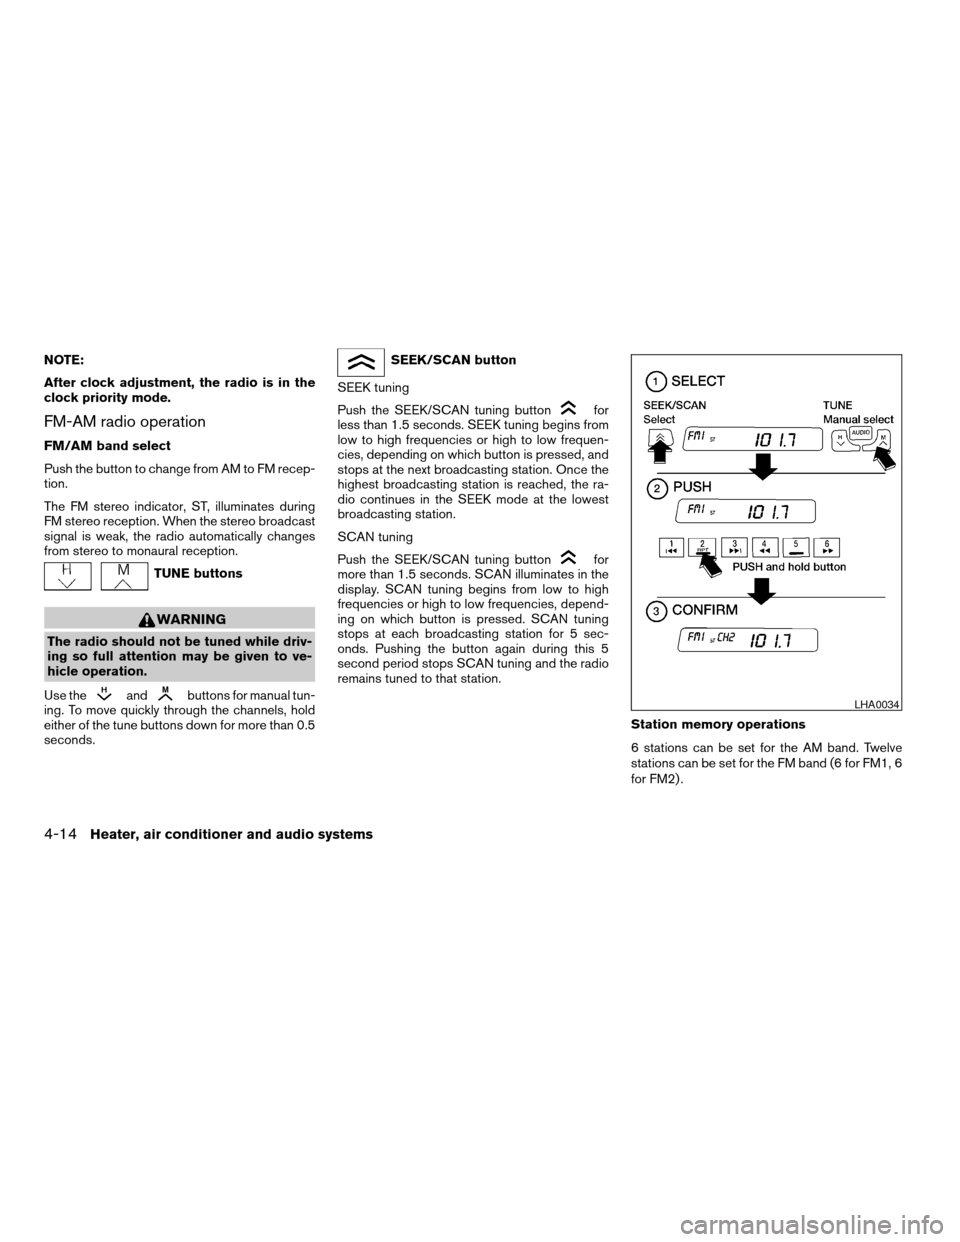
SEEK/SCAN button
SEEK tuning
Push the SEEK/SCAN tuning button
for
less than 1.5 seconds. SEEK tuning begins from
low to high frequencies or high to low frequen-
cies, depending on which button is pressed, and
stops at the next broadcasting station. Once the
highest broadcasting station is reached, the ra-
dio continues in the SEEK mode at the lowest
broadcasting station.
SCAN tuning
Push the SEEK/SCAN tuning button
for
more than 1.5 seconds. SCAN illuminates in the
display. SCAN tuning begins from low to high
frequencies or high to low frequencies, depend-
ing on which button is pressed. SCAN tuning
stops at each broadcasting station for 5 sec-
onds. Pushing the button again during this 5
second period stops SCAN tuning and the radio
remains tuned to that station.
Station memory operations
6 stations can be set for the AM band. Twelve
stations can be set for the FM band (6 for FM1, 6
for FM2) .
LHA0034
4-14Heater, air conditioner and audio systems
ZREVIEW COPY:Ð2003 Sentra(b15)
Owners Manual(owners)ÐUSA English(nna)
12/10/02Ðdebbie
X
Page 105 of 224
COMPACT DISC (CD) CHANGER (if
so equipped)
To use the CD changer, turn the ignition key to
the ACC or ON position.
Disc loading — single
CAUTION
Trying to load a CD with the CD door
closed could damage the CD and/or CD
changer.
When a disc selection button is pressed for less
than 1.5 seconds, the CD changer enters the
One Disc Loading Mode. The disc selection but-
ton starts flashing green and both WAIT and the
disc selection button number flash in the display
until the door is opened. When the door has
opened, the display changes from WAIT to LOAD
and the load indicator lights flash green. Load
only one CD at a time. After the CD is loaded, the
door closes, the load indicator lights turn off and
the disc selection button turns a solid green. The
CD that was loaded starts to play automatically.
Disc loading — all
When a disc selection button is pressed for
longer than 1.5 seconds, the CD changer auto-
matically changes to All Disc Loading Mode. All
disc selection buttons start flashing orange, ex-cept the disc selection button that was pushed
initially. This button flashes green and both WAIT
and the disc selection button number flash in the
display until the door is opened. When the door
opens, the display changes from WAIT to LOAD
and the load indicator lights flash green. Load
only one CD at a time. After the CD is loaded, the
door closes, the load indicator lights turn off and
the disc selection button turns a solid green.
After all the CDs have been loaded, the CD that
was loaded first starts to play.
Play/Stop button
Press the
button while a CD is playing, the
CD stops playing and the CD changer turns off.
Press the
button while the CD changer is
off, the last CD that was loaded starts to play.
Press the
button with no CDs loaded, the
CD changer enters the One Disc Loading Mode.
FF (fast forward) REV (re-
verse) buttons
When the
orbutton is pushed while
the CD is playing, the CD plays at an increased
speed while fast forwarding or reversing. When
the button is released, the CD returns to normal
play speed.
APS (Automatic Program
Search) , FF, APS REV
When the
button is pushed while the CD
is playing, the selection following the current one
starts to play from the beginning. Push the
button several times to skip several selections.
Each time the button is pushed, the CD advances
one selection. When the last selection on the CD
is skipped, the first selection is played.
When the
button is pushed, the current
selection returns to the beginning. Push
the
button several times to skip back sev-
eral selections. Each time the button is pushed,
the CD moves back one selection. Went the first
selection on the CD is skipped, the last selection
is played.
Repeat Button
When the
button is pushed while a CD is
playing, the play pattern will change as follows.
ALL — All disc repeat:All CDs are played
repeatedly in sequence.
BLANK (no symbol) — One disc repeat:The
current CD is repeated.
1 — One track repeat:The current selection is
repeated.
Heater, air conditioner and audio systems4-17
ZREVIEW COPY:Ð2003 Sentra(b15)
Owners Manual(owners)ÐUSA English(nna)
12/10/02Ðdebbie
X
Page 106 of 224

ALL RANDOM — All disc random:Selections
from all the CDs that are stored are played at
random. The same program may be repeated
twice. Pressing the
button will select the
next random selection.
RANDOM — One disc random:Selections
from the current CD are played at random. The
same program may be repeated twice. Pressing
the
button will select the next random se-
lection.
When a new CD is inserted, the play pattern
automatically changes to the “ALL” play
pattern.
CD Eject — Single
When the
button is pressed for less than
1.5 seconds, then the current CD that is playing
(or if the CD changer is off, the last CD that was
played) ejects. The disc indicator light starts
flashing orange and both WAIT and the disc
selection button number flash in the display until
the CD is ejected. When the CD is ejected, the
disc indicator light turns off and the display turns
from WAIT to EJECT. When the CD is removed
from the unit, the CD changer automatically
changes to One Disc Loading Mode so a new
CD can be loaded into the empty holder. The disc
indicator light starts flashing green and both
LOAD and the disc selection button number ap-pear in the display until a CD is loaded. One Disc
Loading Mode cancels if another disc selection
button is pushed or by waiting longer than 15
seconds to load a CD.
CD Eject — ALL
When the
button is pressed for longer than
1.5 seconds, the CD changer automatically
changes to All Disc Eject Mode. The disc indica-
tor light for the current CD (or the last CD that
was played) starts flashing orange and both
WAIT and the disc selection button number flash
in the display until the CD ejects. When the CD
ejects, the disc indicator light turns off and the
display turns from WAIT to EJECT. When the CD
is removed from the unit, the next CD starts to
eject. After all the CDs are ejected, the CD
changer turns off.
If a CD is ejected and is not removed within
10 seconds, it will be pulled back into the
slot.
CD CARE AND CLEANING
cHandle a CD by its edges. Do not bend the
disc. Never touch the surface of the disc.
cAlways place the discs in the storage case
when they are not being used.
cTo clean a disc, wipe the surface from the
center to the outer edge using a clean, soft
cloth. Do not wipe the disc using a circular
motion.
cDo not use a conventional record cleaner or
alcohol intended for industrial use.
LHA0049
4-18Heater, air conditioner and audio systems
ZREVIEW COPY:Ð2003 Sentra(b15)
Owners Manual(owners)ÐUSA English(nna)
12/10/02Ðdebbie
X