2003 NISSAN SENTRA belt
[x] Cancel search: beltPage 41 of 224
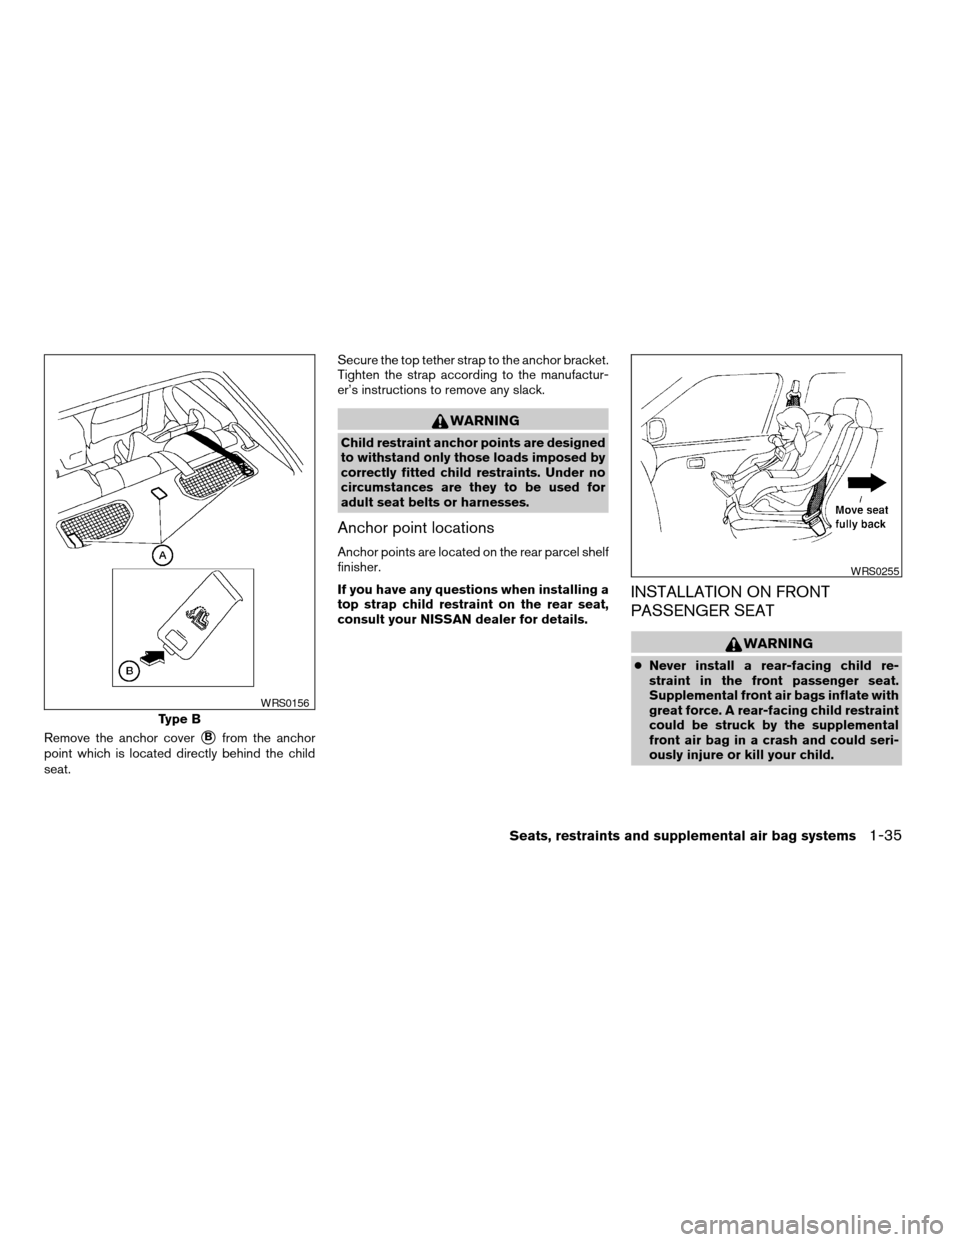
Remove the anchor coversBfrom the anchor
point which is located directly behind the child
seat.Secure the top tether strap to the anchor bracket.
Tighten the strap according to the manufactur-
er’s instructions to remove any slack.
WARNING
Child restraint anchor points are designed
to withstand only those loads imposed by
correctly fitted child restraints. Under no
circumstances are they to be used for
adult seat belts or harnesses.
Anchor point locations
Anchor points are located on the rear parcel shelf
finisher.
If you have any questions when installing a
top strap child restraint on the rear seat,
consult your NISSAN dealer for details.
INSTALLATION ON FRONT
PASSENGER SEAT
WARNING
cNever install a rear-facing child re-
straint in the front passenger seat.
Supplemental front air bags inflate with
great force. A rear-facing child restraint
could be struck by the supplemental
front air bag in a crash and could seri-
ously injure or kill your child.
Type B
WRS0156
WRS0255
Seats, restraints and supplemental air bag systems1-35
ZREVIEW COPY:Ð2003 Sentra(b15)
Owners Manual(owners)ÐUSA English(nna)
12/10/02Ðdebbie
X
Page 42 of 224
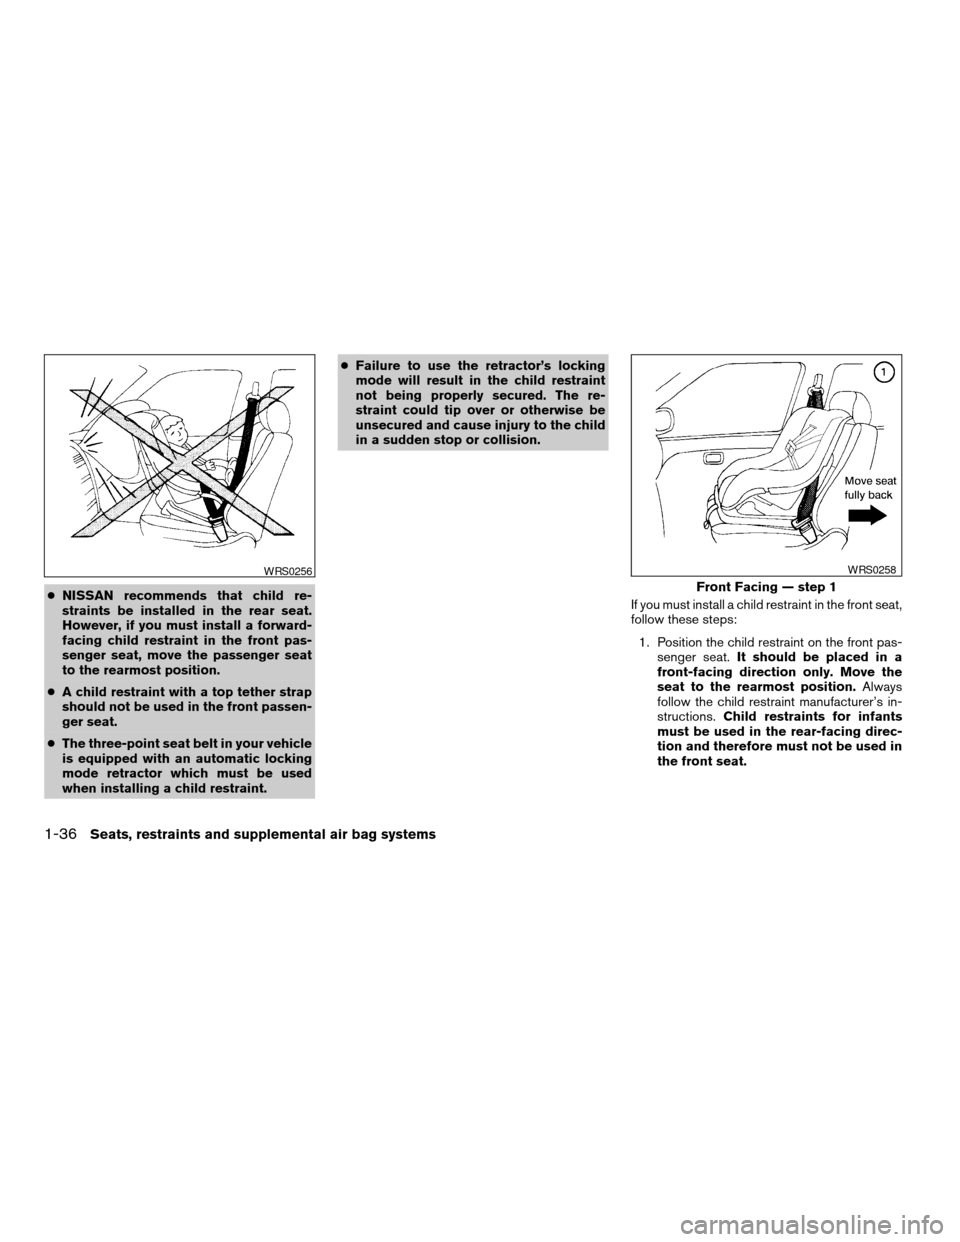
cNISSAN recommends that child re-
straints be installed in the rear seat.
However, if you must install a forward-
facing child restraint in the front pas-
senger seat, move the passenger seat
to the rearmost position.
cA child restraint with a top tether strap
should not be used in the front passen-
ger seat.
cThe three-point seat belt in your vehicle
is equipped with an automatic locking
mode retractor which must be used
when installing a child restraint.cFailure to use the retractor’s locking
mode will result in the child restraint
not being properly secured. The re-
straint could tip over or otherwise be
unsecured and cause injury to the child
in a sudden stop or collision.
If you must install a child restraint in the front seat,
follow these steps:
1. Position the child restraint on the front pas-
senger seat.It should be placed in a
front-facing direction only. Move the
seat to the rearmost position.Always
follow the child restraint manufacturer’s in-
structions.Child restraints for infants
must be used in the rear-facing direc-
tion and therefore must not be used in
the front seat.
WRS0256
Front Facing — step 1
WRS0258
1-36Seats, restraints and supplemental air bag systems
ZREVIEW COPY:Ð2003 Sentra(b15)
Owners Manual(owners)ÐUSA English(nna)
12/10/02Ðdebbie
X
Page 43 of 224

2. Route the seat belt tongue through the child
restraint and insert it into the buckle until you
hear and feel the latch engage.
Be sure to follow the child restraint manu-
facturer’s instructions for belt routing.3. Pull on the shoulder belt until all of the belt is
fully extended. At this time, the seat belt
retractor is in the automatic locking mode
(child restraint mode) . It reverts to emer-
gency locking mode when the seat belt is
fully retracted.4. Allow the seat belt to retract slightly. Pull up
on the shoulder belt to remove any slack in
the belt.
Front Facing — step 2
WRS0159
Front Facing — step 3
WRS0160
Front Facing — step 4
WRS0161
Seats, restraints and supplemental air bag systems1-37
ZREVIEW COPY:Ð2003 Sentra(b15)
Owners Manual(owners)ÐUSA English(nna)
12/10/02Ðdebbie
X
Page 44 of 224

5. Before placing the child in the child restraint,
use force to tilt the child restraint from side
to side, and tug it forward to make sure that
it is securely held in place. It should not move
more than 1 inch.
6. Check that the retractor is in the automatic
locking mode by trying to pull more seat belt
out of the retractor. If you cannot pull any
more belt webbing out of the retractor, the
retractor is in the automatic locking mode.7. Check to make sure the child restraint is
properly secured prior to each use. If the
seat belt is not locked, repeat steps 3
through 6.
After the child restraint is removed and the seat
belt is fully retracted, the automatic locking mode
(child restraint mode) is canceled.
Front Facing — step 5
WRS0257
1-38Seats, restraints and supplemental air bag systems
ZREVIEW COPY:Ð2003 Sentra(b15)
Owners Manual(owners)ÐUSA English(nna)
12/10/02Ðdebbie
X
Page 51 of 224

orAnti-lock brake warning light (if
so equipped)Low fuel warning lightCruise SET switch indicator light (if so
equipped)
orBrake warning lightLow washer fluid warning light (if so equipped)High beam indicator light (Blue)
Charge warning lightSeat belt warning light and chimeMalfunction indicator lamp (MIL)
Door open warning lightSupplemental air bag warning lightOverdrive off indicator light (automatic trans-
mission models only)
Engine oil pressure warning lightCRUISE main switch indicator light (if so
equipped)Turn signal/hazard indicator lights
CHECKING BULBS
With all doors closed, apply the parking brake
and turn the ignition key to the ON position
without starting the engine. The following lights
will come on:
,,or,,,
If equipped, the following lights come on briefly
and then go off:
or
If any light fails to come on, it may indicate
a burned-out bulb or an open circuit in the
electrical system. Have the system repaired
promptly.
WARNING LIGHTS
orAnti-lock brake
warning light (if so
equipped)
If the light comes on while the engine is running,
it may indicate the anti-lock brake system is not
functioning properly. Have the system checked
by a NISSAN dealer.
Turn off the engine, and start it again by
slowly turning the ignition key (quickly do-
ing so may cause the ABS light to stay on
when there is nothing wrong) . If the light
stays on, have the system checked by a
NISSAN dealer.If an abnormality occurs in the system, the anti-
lock function ceases, but the regular braking
system continues to operate.
If the light comes on while you are driving,
contact a NISSAN dealer for repair.orBrake warning light
This light functions for both the parking brake and
the foot brake systems.
WARNING/INDICATOR LIGHTS AND
AUDIBLE REMINDERS
Instruments and controls2-7
ZREVIEW COPY:Ð2003 Sentra(b15)
Owners Manual(owners)ÐUSA English(nna)
12/10/02Ðdebbie
X
Page 52 of 224
When the ignition key is in the ON position, the
light comes on when the parking brake is applied,
and also warns of a low brake fluid level. If the
light comes on while the engine is running with
the parking brake not applied, stop the vehicle
and perform the following:
1. Check the brake fluid level. Add brake fluid
as necessary. See “Brake fluid” in the “Main-
tenance and do-it-yourself” section of this
manual.
2. If the brake fluid level is correct, have the
brake system checked by a NISSAN dealer.
WARNING
cYour vehicle is equipped with an auto-
matic engine cooling fan. It may come
on at any time without warning, even if
the ignition key is in the OFF position
and the engine is not running. To avoid
injury, always disconnect the negative
battery cable before working near the
fan.
cPressing the brake pedal with the en-
gine stopped and/or a low brake fluid
level may increase your stopping dis-
tance and braking will require greater
pedal effort as well as pedal travel.cIf the brake fluid level is below the
MINIMUM or MIN mark on the brake
fluid reservoir, do not drive until the
brake system has been checked at a
NISSAN dealer.
Charge warning light
If this light comes on while the engine is running,
it may indicate the charging system is not func-
tioning properly. Turn the engine off and check
the generator belt. If the belt is loose, broken,
missing, or if the light remains on, see a NISSAN
dealer immediately.
CAUTION
Do not continue driving if the generator
belt is loose, broken or missing.
Door open warning light
This light comes on when any of the doors are not
closed securely while the ignition key is in the ON
position.
Engine oil pressure warning
light
This light warns of low engine oil pressure. If the
light flickers or comes on during normal driving,
pull off the road in a safe area, stop the engine
immediatelyand call a NISSAN dealer.The engine oil pressure warning light is not
designed to indicate a low oil level. Use the
dipstick to check the oil level.See “Engine
oil” in the “Maintenance and do-it-yourself” sec-
tion of this manual.
CAUTION
Running the engine with the engine oil
pressure warning light on could cause se-
rious damage to the engine almost imme-
diately. Such damage is not covered by
warranty. Turn off the engine as soon as it
is safe to do so.
Low fuel warning light
This light comes on when the fuel level in the fuel
tank is getting low. Refuel as soon as it is conve-
nient, preferably before the fuel gauge reaches E
(Empty) .There will be a small reserve of fuel
in the tank when the fuel gauge needle
reaches E (Empty) .
Low washer fluid warning light
(if so equipped)
This light comes on when the washer fluid is at a
low level. Add washer fluid as necessary. See the
“Maintenance and do-it-yourself” section of this
manual.
2-8Instruments and controls
ZREVIEW COPY:Ð2003 Sentra(b15)
Owners Manual(owners)ÐUSA English(nna)
12/10/02Ðdebbie
X
Page 53 of 224
Seat belt warning light and
chime
The light and chime remind you to fasten your
seat belts. The light illuminates whenever the
ignition key is turned to the ON or START position
and remains illuminated until the driver’s seat belt
is fastened. At the same time, the chime sounds
for about 7 seconds unless the driver’s seat belt
is securely fastened.
Refer to “Seat belts” in the “Seats, restraints and
supplemental air bag systems” section for pre-
cautions on seat belt usage.
Supplemental air bag warning
light
When the ignition key is in the ON or START
position, the supplemental air bag warning light
illuminates for about 7 seconds and then turns
off. This means the system is operational.
If any of the following conditions occur, the
supplemental front air bag, supplemental side air
bag or pre-tensioner seat belt systems need ser-
vicing and your vehicle must be taken to a
NISSAN dealer:
cThe supplemental air bag warning light re-
mains on after approximately 7 seconds.cThe supplemental air bag warning light flashes
intermittently.
cThe supplemental air bag warning light does
not come on at all.
Unless checked and repaired, the supplemental
restraint system (air bag system) and/or the pre-
tensioner seat belts may not function properly.
For additional details see “Supplemental restraint
system” in the “Seats, restraints and supplemen-
tal air bag systems” section of this manual.
WARNING
If the supplemental air bag warning light
is on, it could mean that the supplemental
front air bag or supplemental side air bag
system (if so equipped) or pre-tensioner
seat belt system will not operate in an
accident.
INDICATOR LIGHTS
Cruise main switch indicator
light (if so equipped)
The light comes on when the cruise control main
switch is pushed. The light goes out when the
main switch is pushed again. When the cruise
main switch indicator light comes on, the cruise
control system is operational.
Cruise set switch indicator
light (if so equipped)
The light comes on while the vehicle speed is
controlled by the cruise control system. If the light
blinks while the engine is running, it may indicate
the cruise control system is not functioning prop-
erly. Have the system checked by a NISSAN
dealer.
High beam indicator light
(Blue)
This blue light comes on when the headlight high
beams are on and goes out when the low beams
are selected.
The high beam indicator light also comes on
when the passing signal is activated.
Malfunction indicator lamp
(MIL)
If this indicator lamp comes on steady or blinks
while the engine is running, it may indicate a
potential emission control malfunction.
The malfunction indicator lamp may also come on
steady if the fuel filler cap is loose or missing, or if
the vehicle runs out of fuel. Check to make sure
the fuel filler cap is installed and closed tightly,
and that the vehicle has at least 3 gallons of fuel
in the fuel tank.
Instruments and controls2-9
ZREVIEW COPY:Ð2003 Sentra(b15)
Owners Manual(owners)ÐUSA English(nna)
12/10/02Ðdebbie
X
Page 70 of 224
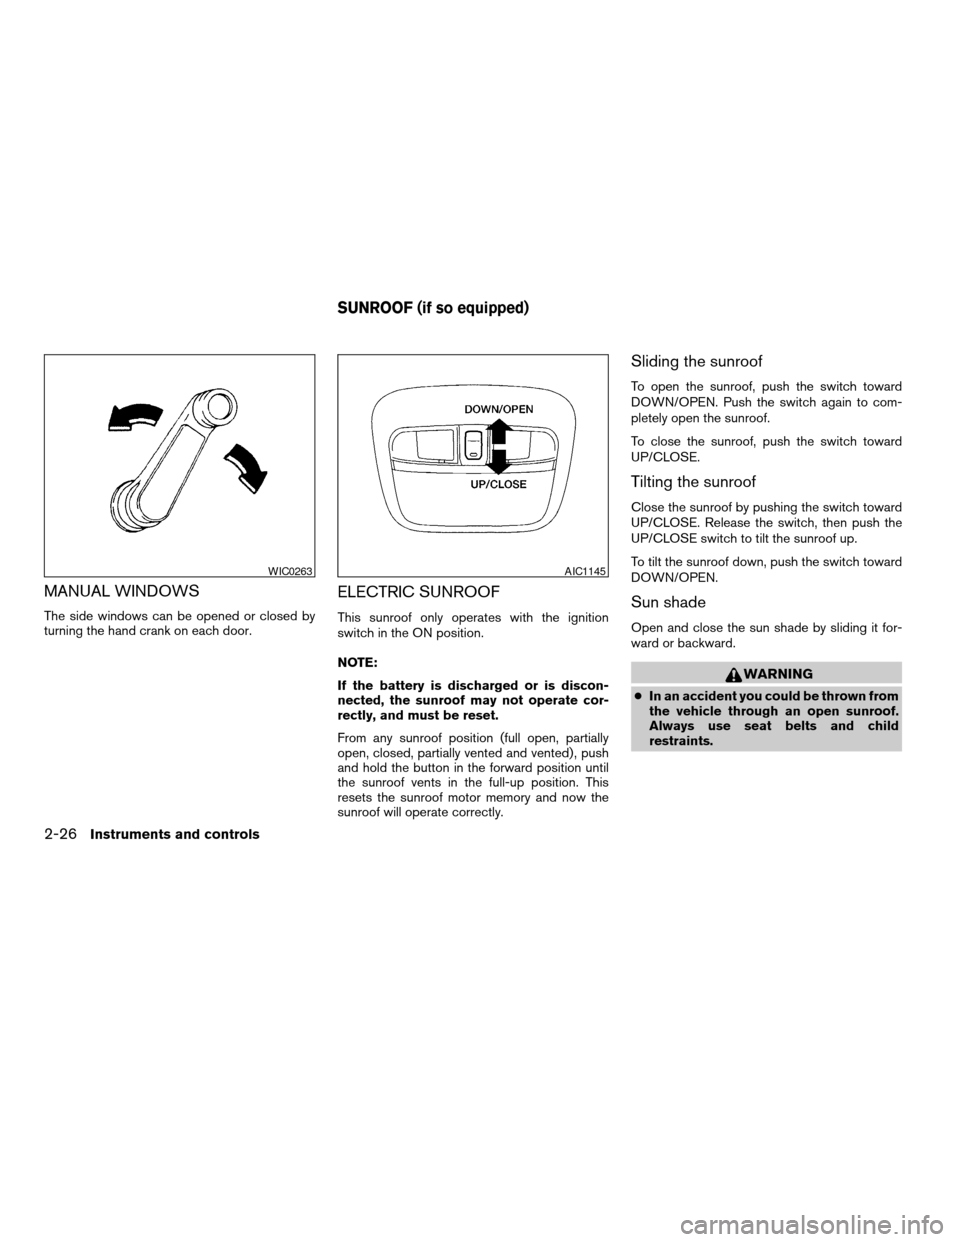
MANUAL WINDOWS
The side windows can be opened or closed by
turning the hand crank on each door.
ELECTRIC SUNROOF
This sunroof only operates with the ignition
switch in the ON position.
NOTE:
If the battery is discharged or is discon-
nected, the sunroof may not operate cor-
rectly, and must be reset.
From any sunroof position (full open, partially
open, closed, partially vented and vented) , push
and hold the button in the forward position until
the sunroof vents in the full-up position. This
resets the sunroof motor memory and now the
sunroof will operate correctly.
Sliding the sunroof
To open the sunroof, push the switch toward
DOWN/OPEN. Push the switch again to com-
pletely open the sunroof.
To close the sunroof, push the switch toward
UP/CLOSE.
Tilting the sunroof
Close the sunroof by pushing the switch toward
UP/CLOSE. Release the switch, then push the
UP/CLOSE switch to tilt the sunroof up.
To tilt the sunroof down, push the switch toward
DOWN/OPEN.
Sun shade
Open and close the sun shade by sliding it for-
ward or backward.
WARNING
cIn an accident you could be thrown from
the vehicle through an open sunroof.
Always use seat belts and child
restraints.
WIC0263AIC1145
SUNROOF (if so equipped)
2-26Instruments and controls
ZREVIEW COPY:Ð2003 Sentra(b15)
Owners Manual(owners)ÐUSA English(nna)
12/10/02Ðdebbie
X