2003 NISSAN SENTRA lights
[x] Cancel search: lightsPage 98 of 224

RADIO
Turn the ignition key to the ACC or ON position
and press the power on switch to turn the radio
on. If you listen to the radio with the engine not
running, the key should be turned to the ACC
position.
Radio reception is affected by station signal
strength, distance from radio transmitter, build-
ings, bridges, mountains and other external influ-
ences. Intermittent changes in reception quality
normally are caused by these external influences.
Using a cellular phone in or near the ve-
hicle may influence radio reception quality.
Radio reception
Your NISSAN radio system is equipped with
state-of-the-art electronic circuits to enhance ra-
dio reception. These circuits are designed to
extend reception range, and to enhance the qual-
ity of that reception.
However there are some general characteristics
of both FM and AM radio signals that can affect
radio reception quality in a moving vehicle, even
when the finest equipment is used. These char-
acteristics are completely normal in a given re-
ception area, and do not indicate any malfunction
in your NISSAN radio system.Reception conditions will constantly change be-
cause of vehicle movement. Buildings, terrain,
signal distance and interference from other ve-
hicles can work against ideal reception. De-
scribed below are some of the factors that can
affect your radio reception.
FM RADIO RECEPTION
Range: FM range is normally limited to 25 - 30
miles (40 - 48 km) , with monaural (single chan-
nel) FM having slightly more range than stereo
FM. External influences may sometimes interfere
with FM station reception even if the FM station is
within 25 miles (40 km) . The strength of the FM
signal is directly related to the distance between
the transmitter and receiver. FM signals follow a
line-of-sight path, exhibiting many of the same
characteristics as light. For example they will
reflect off objects.
Fade and drift: As your vehicle moves away from
a station transmitter, the signals will tend to fade
and/or drift.
Static and flutter: During signal interference from
buildings, large hills or due to antenna position
(usually in conjunction with increased distance
from the station transmitter) static or flutter can
be heard. This can be reduced by adjusting the
treble control to reduce treble response.Multipath reception: Because of the reflective
characteristics of FM signals, direct and reflected
signals reach the receiver at the same time. The
signals may cancel each other, resulting in mo-
mentary flutter or loss of sound.
AM RADIO RECEPTION
AM signals, because of their low frequency, can
bend around objects and skip along the ground.
In addition, the signals can be bounced off the
ionosphere and bent back to earth. Because of
these characteristics, AM signals are also sub-
ject to interference as they travel from transmitter
to receiver.
Fading: Occurs while the vehicle is passing
through freeway underpasses or in areas with
many tall buildings. It can also occur for several
seconds during ionospheric turbulence even in
areas where no obstacles exist.
Static: Caused by thunderstorms, electrical
power lines, electric signs and even traffic lights.
AUDIO SYSTEM
4-10Heater, air conditioner and audio systems
ZREVIEW COPY:Ð2003 Sentra(b15)
Owners Manual(owners)ÐUSA English(nna)
12/10/02Ðdebbie
X
Page 105 of 224

COMPACT DISC (CD) CHANGER (if
so equipped)
To use the CD changer, turn the ignition key to
the ACC or ON position.
Disc loading — single
CAUTION
Trying to load a CD with the CD door
closed could damage the CD and/or CD
changer.
When a disc selection button is pressed for less
than 1.5 seconds, the CD changer enters the
One Disc Loading Mode. The disc selection but-
ton starts flashing green and both WAIT and the
disc selection button number flash in the display
until the door is opened. When the door has
opened, the display changes from WAIT to LOAD
and the load indicator lights flash green. Load
only one CD at a time. After the CD is loaded, the
door closes, the load indicator lights turn off and
the disc selection button turns a solid green. The
CD that was loaded starts to play automatically.
Disc loading — all
When a disc selection button is pressed for
longer than 1.5 seconds, the CD changer auto-
matically changes to All Disc Loading Mode. All
disc selection buttons start flashing orange, ex-cept the disc selection button that was pushed
initially. This button flashes green and both WAIT
and the disc selection button number flash in the
display until the door is opened. When the door
opens, the display changes from WAIT to LOAD
and the load indicator lights flash green. Load
only one CD at a time. After the CD is loaded, the
door closes, the load indicator lights turn off and
the disc selection button turns a solid green.
After all the CDs have been loaded, the CD that
was loaded first starts to play.
Play/Stop button
Press the
button while a CD is playing, the
CD stops playing and the CD changer turns off.
Press the
button while the CD changer is
off, the last CD that was loaded starts to play.
Press the
button with no CDs loaded, the
CD changer enters the One Disc Loading Mode.
FF (fast forward) REV (re-
verse) buttons
When the
orbutton is pushed while
the CD is playing, the CD plays at an increased
speed while fast forwarding or reversing. When
the button is released, the CD returns to normal
play speed.
APS (Automatic Program
Search) , FF, APS REV
When the
button is pushed while the CD
is playing, the selection following the current one
starts to play from the beginning. Push the
button several times to skip several selections.
Each time the button is pushed, the CD advances
one selection. When the last selection on the CD
is skipped, the first selection is played.
When the
button is pushed, the current
selection returns to the beginning. Push
the
button several times to skip back sev-
eral selections. Each time the button is pushed,
the CD moves back one selection. Went the first
selection on the CD is skipped, the last selection
is played.
Repeat Button
When the
button is pushed while a CD is
playing, the play pattern will change as follows.
ALL — All disc repeat:All CDs are played
repeatedly in sequence.
BLANK (no symbol) — One disc repeat:The
current CD is repeated.
1 — One track repeat:The current selection is
repeated.
Heater, air conditioner and audio systems4-17
ZREVIEW COPY:Ð2003 Sentra(b15)
Owners Manual(owners)ÐUSA English(nna)
12/10/02Ðdebbie
X
Page 114 of 224

cMake sure the area around the vehicle is clear.
cCheck fluid levels such as engine oil, coolant,
brake and clutch fluid, and window washer
fluid as frequently as possible, or at least
whenever you refuel.
cCheck that all windows and lights are clean.
cVisually inspect tires for their appearance and
condition. Also check tires for proper inflation.
cLock all doors.
cPosition seat and adjust head restraints.
cAdjust inside and outside mirrors.
cFasten seat belts and ask all passengers to do
likewise.
cCheck the operation of warning lights when
the key is turned to the ON (3) position. See
“Warning/indicator lights and audible remind-
ers” in the “Instruments and controls” section
of this manual.1. Apply the parking brake.
2.Automatic transmission:
Move the shift selector lever to P (Park) or N
(Neutral) . P (Park) is recommended.
The shift selector lever cannot be
moved out of P (Park) and into any of
the other gear positions if the ignition
key is turned to the OFF position or if
the key is removed from the ignition
switch.
The starter is designed not to operate if
the shift selector lever is in any of the
driving positions.
Manual transmission:
Move the shift lever to N (Neutral) . Depress
the clutch pedal to the floor while cranking
the engine.
The starter is designed not to operate
unless the clutch pedal is fully de-
pressed.
3. Crank the enginewith your foot off the
accelerator pedalby turning the ignition
key to START. Release the key when the
engine starts. If the engine starts, but fails to
run, repeat the above procedure.cWhen the engine is very hard to start in
extremely cold weather or when restart-
ing, depress the accelerator pedal a little
(approximately 1/5 to the floor) and hold it
and then crank the engine. Release the
key and the accelerator pedal when the
engine starts.
cWhen the engine is very hard to start
because it is flooded, depress the accel-
erator pedal all the way to the floor and
hold it. Crank the engine for 5-6 seconds.
After cranking the engine, release the ac-
celerator pedal. Crank the enginewith
your foot off the accelerator pedalby
turning the ignition key to START. Release
the key when the engine starts. If the
engine starts, but fails to run, repeat the
above procedure.
CAUTION
Do not operate the starter for more than
15 seconds at a time. If the engine does
not start, turn the key off and wait 10
seconds before cranking again, otherwise
the starter could be damaged.
4. Allow the engine to idle for at least 30 sec-
onds after starting. Drive at moderate speed
for a short distance first, especially in cold
weather.
BEFORE STARTING THE ENGINE STARTING THE ENGINE
5-6Starting and driving
ZREVIEW COPY:Ð2003 Sentra(b15)
Owners Manual(owners)ÐUSA English(nna)
12/18/02Ðskoniecz
X
Page 138 of 224

cWhenever working on or near a battery,
always wear suitable eye protectors (for
example, goggles or industrial safety
spectacles) and remove rings, metal
bands, or any other jewelry. Do not lean
over the battery when jump starting.
cDo not attempt to jump start a frozen
battery. It could explode and cause se-
rious injury.
cYour vehicle has an automatic engine
cooling fan. It could come on at any
time. Keep hands and other objects
away from it.
WARNING
Always follow the instructions below.
Failure to do so could result in damage to
the charging system and cause personal
injury.
1. If the booster battery is in another vehicle,
position the two vehicles to bring their bat-
teries near each other.
Do not allow the two vehicles to touch.2. Apply the parking brake. Move the shift lever
to N (Neutral) (manual transmission) or to P
(Park) (automatic transmission) . Switch off
all unnecessary electrical systems (lights,
heater, air conditioner, etc.) .
3. Remove vent caps on the battery (if so
equipped) . Cover the battery with an old
cloth to reduce explosion hazard.
4. Connect jumper cables in the sequence il-
lustrated (
sA,sB,sC,sD).
WCE0054
6-8In case of emergency
ZREVIEW COPY:Ð2003 Sentra(b15)
Owners Manual(owners)ÐUSA English(nna)
12/20/02Ðcathy
X
Page 149 of 224

8 Maintenance and do-it-yourself
Maintenance requirements..........................8-2
General maintenance..............................8-2
Explanation of general maintenance items.........8-2
Maintenance precautions...........................8-5
Engine compartment check locations................8-7
Engine cooling system.............................8-9
Checking engine coolant level...................8-9
Changing engine coolant.......................8-10
Engine oil........................................8-12
Checking engine oil level.......................8-12
Changing engine oil...........................8-13
Changing engine oil filter.......................8-14
Automatic transmission fluid.......................8-15
Temperature conditions for checking.............8-16
Power steering fluid...............................8-18
Brake and clutch fluid.............................8-18
Brake fluid....................................8-19
Clutch fluid...................................8-19
Window washer fluid.............................8-20
Window washer fluid reservoir..................8-20
Battery..........................................8-20
Jump starting.................................8-22
Drive belts.......................................8-22
Spark plugs......................................8-23Replacing spark plugs.........................8-23
Air cleaner.......................................8-24
In-cabin Microfilter (if so equipped)..............8-25
Windshield wiper blades..........................8-28
Cleaning.....................................8-28
Replacing....................................8-28
Parking brake and brake pedal.....................8-29
Checking parking brake........................8-29
Checking brake pedal..........................8-29
Brake booster.................................8-30
Fuses...........................................8-31
Engine compartment...........................8-31
Passenger compartment.......................8-32
Keyfob battery replacement........................8-33
Lights...........................................8-34
Headlights....................................8-34
Fog lights (if so equipped)......................8-35
Exterior and interior lights.......................8-36
Wheels and tires.................................8-39
Tire pressure..................................8-39
Types of tires..................................8-40
Tire chains....................................8-41
Changing wheels and tires.....................8-42
ZREVIEW COPY:Ð2003 Sentra(b15)
Owners Manual(owners)ÐUSA English(nna)
12/20/02Ðcathy
X
Page 151 of 224

Wheel nuts*When checking the tires, make
sure no wheel nuts are missing, and check for any
loose wheel nuts. Tighten if necessary.
Tire rotation*Tires should be rotated every
7,500 miles (12,000 km) .
Wheel alignment and balanceIf the vehicle
should pull to either side while driving on a
straight and level road, or if you detect uneven or
abnormal tire wear, there may be a need for wheel
alignment.
If the steering wheel or seat vibrates at normal
highway speeds, wheel balancing may be
needed.
cFor additional information regarding tires, refer
to “Important Tire Safety Information” (US) or
“Tire Safety Information” (Canada) in the War-
ranty Information Booklet .
WindshieldClean the windshield on a regular
basis. Check the windshield at least every six
months for cracks or other damage. Have a dam-
aged windshield repaired by a qualified repair
facility.
Windshield wiper blades*Check for cracks or
wear if they do not wipe properly.
Doors and hoodCheck that the doors and
hood operate properly. Also ensure that all
latches lock securely. Lubricate hinges, latches,latch pins, rollers and links as necessary. Make
sure that the secondary latch keeps the hood
from opening when the primary latch is released.
When driving in areas using road salt or other
corrosive materials, check lubrication frequently.
Lights*Clean the headlights on a regular basis.
Make sure that the headlights, stop lights, tail
lights, turn signal lights, and other lights are all
operating properly and installed securely. Also
check headlight aim.
Inside the vehicle
The maintenance items listed here should be
checked on a regular basis, such as when per-
forming periodic maintenance, cleaning the ve-
hicle, etc.
Warning lights and chimesMake sure all
warning lights and chimes are operating properly.
Windshield wiper and washer*Check that
the wipers and washer operate properly and that
the wipers do not streak.
Windshield defrosterCheck that the air
comes out of the defroster outlets properly and in
sufficient quantity when operating the heater or
air conditioner.
Steering wheelCheck for changes in the steer-
ing system, such as excessive freeplay, hard
steering or strange noises.SeatsCheck seat position controls such as seat
adjusters, seatback recliner, etc. to ensure they
operate smoothly and all latches lock securely in
every position. Check that the head restraints
move up and down smoothly and the locks (if so
equipped) hold securely in all latched positions.
Seat beltsCheck that all parts of the seat belt
system (for example, buckles, anchors, adjusters
and retractors) operate properly and smoothly,
and are installed securely. Check the belt web-
bing for cuts, fraying, wear or damage.
Accelerator pedalCheck the pedal for smooth
operation and make sure the pedal does not bind
or require uneven effort. Keep the floor mat away
from the pedal.
Clutch pedal*Make sure the pedal operates
smoothly and check that it has the proper free
travel.
BrakesCheck that the brakes do not pull the
vehicle to one side when applied.
Brake pedal and booster*Check the pedal for
smooth operation and make sure it has the proper
distance under it when depressed fully. Check
the brake booster function. Be certain to keep the
floor mat away from the pedal.
Maintenance and do-it-yourself8-3
ZREVIEW COPY:Ð2003 Sentra(b15)
Owners Manual(owners)ÐUSA English(nna)
12/20/02Ðcathy
X
Page 182 of 224

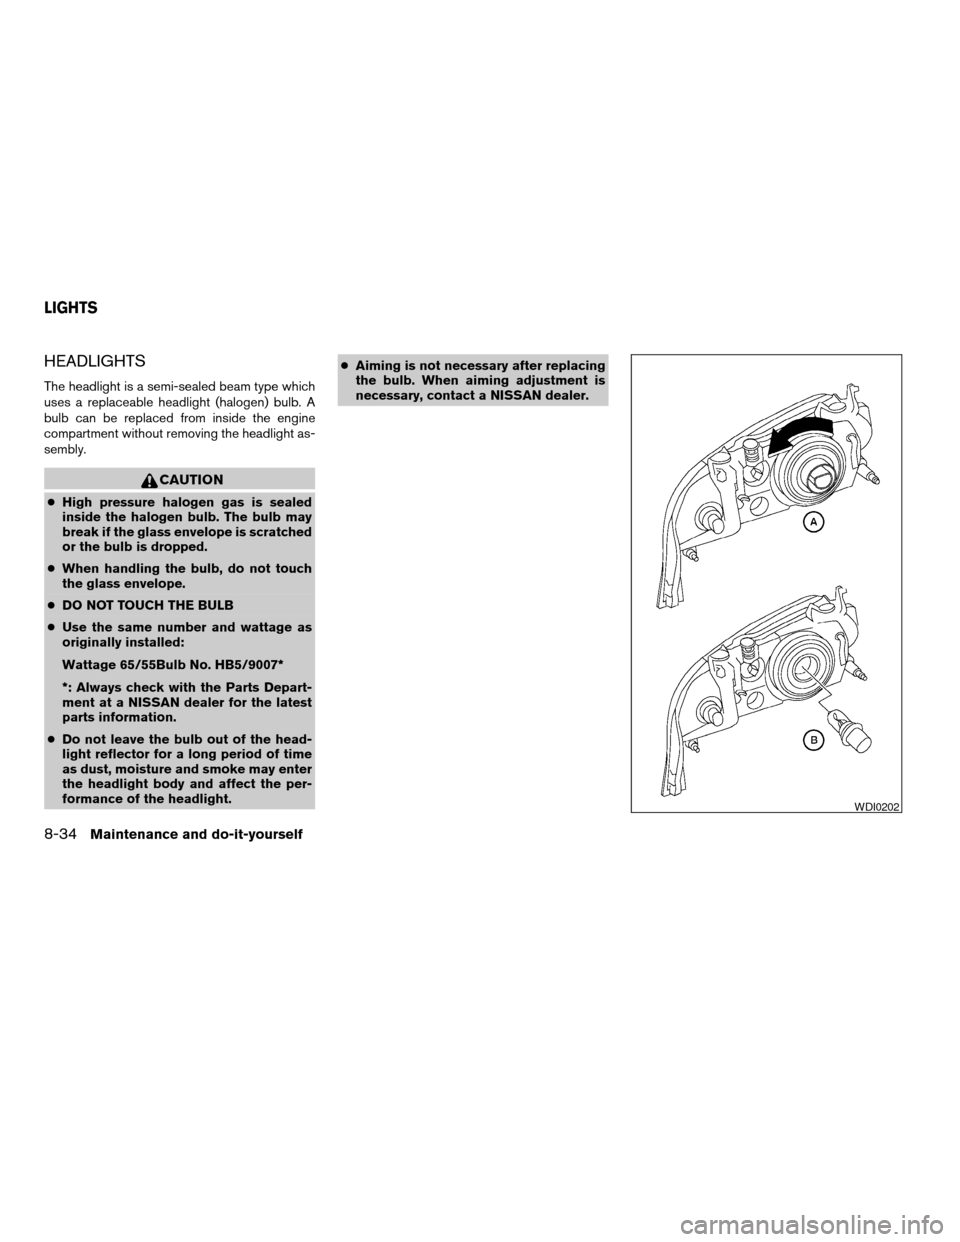
HEADLIGHTS
The headlight is a semi-sealed beam type which
uses a replaceable headlight (halogen) bulb. A
bulb can be replaced from inside the engine
compartment without removing the headlight as-
sembly.
CAUTION
cHigh pressure halogen gas is sealed
inside the halogen bulb. The bulb may
break if the glass envelope is scratched
or the bulb is dropped.
cWhen handling the bulb, do not touch
the glass envelope.
cDO NOT TOUCH THE BULB
cUse the same number and wattage as
originally installed:
Wattage 65/55Bulb No. HB5/9007*
*: Always check with the Parts Depart-
ment at a NISSAN dealer for the latest
parts information.
cDo not leave the bulb out of the head-
light reflector for a long period of time
as dust, moisture and smoke may enter
the headlight body and affect the per-
formance of the headlight.cAiming is not necessary after replacing
the bulb. When aiming adjustment is
necessary, contact a NISSAN dealer.
WDI0202
LIGHTS
8-34Maintenance and do-it-yourself
ZREVIEW COPY:Ð2003 Sentra(b15)
Owners Manual(owners)ÐUSA English(nna)
12/20/02Ðcathy
X
Page 183 of 224

Removing the headlight bulb
1. Open the engine hood.
2. Disconnect the negative (-) battery cable.
3. Disconnect the electrical connector from the
rear end of the bulb.
4. Rotate the bulb retaining ring counterclock-
wise and remove
sA.
5. Pull out the headlight bulb and socket as an
assembly. Do not shake or rotate the bulb
when removing it. Do not touch the glass
envelope
sB.
Replacing the headlight bulb
1. Insert the bulb and socket assembly into the
headlight.
DO NOT TOUCH THE BULB.
2. Install and tighten the bulb retaining ring.
3. Push the electrical connector into the bulb
plastic base until it snaps and stops.
4. Connect the negative (-) battery cable.
5. Close the hood.
CAUTION
Aiming is not necessary after replacing
the bulb. When aiming adjustment is nec-
essary, contact a NISSAN dealer.
Adjusting the headlight aim
If the headlights need aiming adjustment, please
see a NISSAN dealer.
FOG LIGHTS (if so equipped)
Replacing the fog light bulb
CAUTION
cHigh pressure halogen gas is sealed
inside the halogen bulb. The bulb may
break if the glass envelope is scratched
or the bulb is dropped.
cWhen handling the bulb, do not touch
the glass envelope.
Maintenance and do-it-yourself8-35
ZREVIEW COPY:Ð2003 Sentra(b15)
Owners Manual(owners)ÐUSA English(nna)
12/20/02Ðcathy
X