2003 NISSAN SENTRA service
[x] Cancel search: servicePage 116 of 224
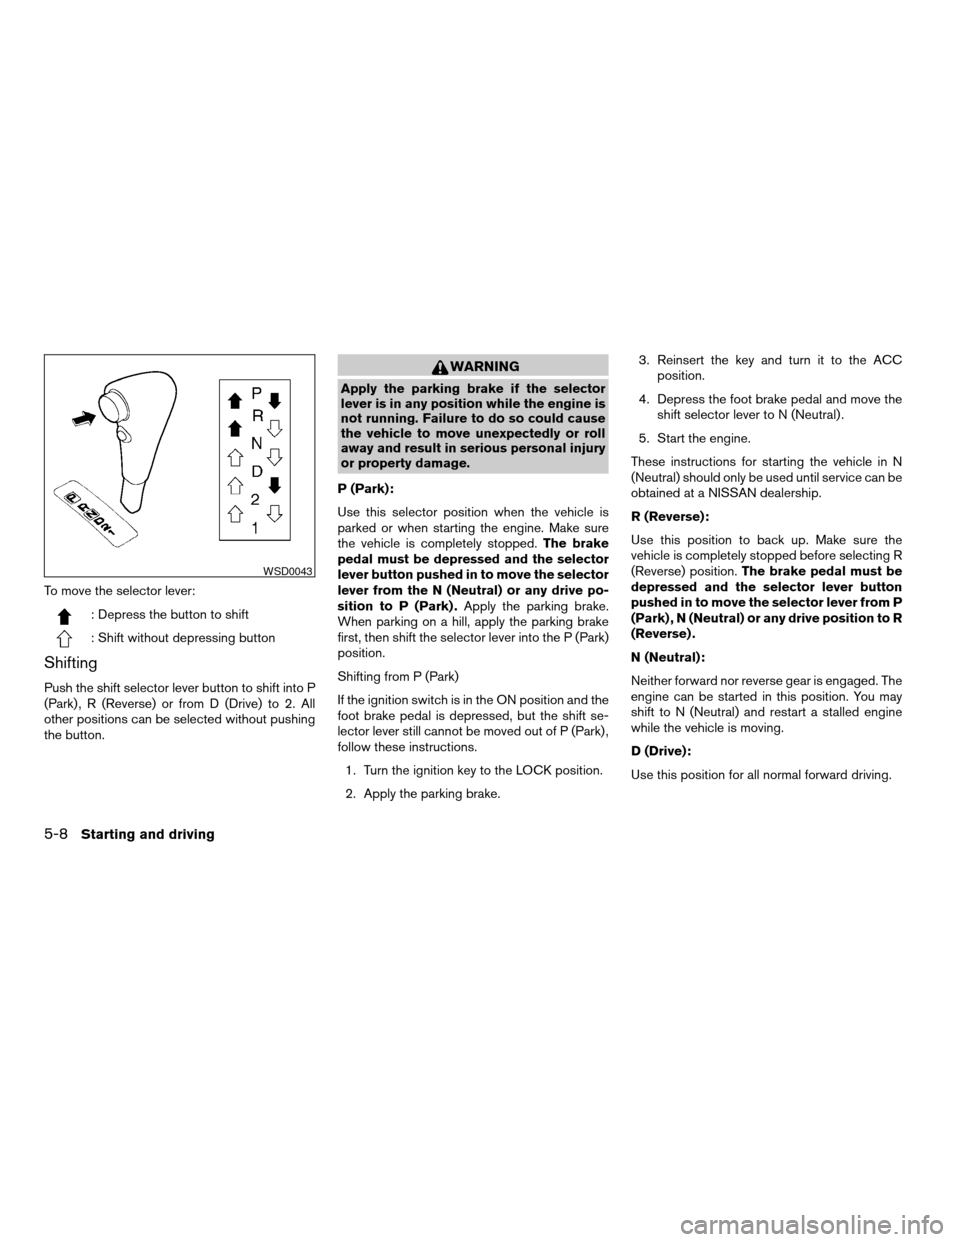
To move the selector lever:
: Depress the button to shift
: Shift without depressing button
Shifting
Push the shift selector lever button to shift into P
(Park) , R (Reverse) or from D (Drive) to 2. All
other positions can be selected without pushing
the button.
WARNING
Apply the parking brake if the selector
lever is in any position while the engine is
not running. Failure to do so could cause
the vehicle to move unexpectedly or roll
away and result in serious personal injury
or property damage.
P (Park):
Use this selector position when the vehicle is
parked or when starting the engine. Make sure
the vehicle is completely stopped.The brake
pedal must be depressed and the selector
lever button pushed in to move the selector
lever from the N (Neutral) or any drive po-
sition to P (Park) .Apply the parking brake.
When parking on a hill, apply the parking brake
first, then shift the selector lever into the P (Park)
position.
Shifting from P (Park)
If the ignition switch is in the ON position and the
foot brake pedal is depressed, but the shift se-
lector lever still cannot be moved out of P (Park) ,
follow these instructions.
1. Turn the ignition key to the LOCK position.
2. Apply the parking brake.3. Reinsert the key and turn it to the ACC
position.
4. Depress the foot brake pedal and move the
shift selector lever to N (Neutral) .
5. Start the engine.
These instructions for starting the vehicle in N
(Neutral) should only be used until service can be
obtained at a NISSAN dealership.
R (Reverse):
Use this position to back up. Make sure the
vehicle is completely stopped before selecting R
(Reverse) position.The brake pedal must be
depressed and the selector lever button
pushed in to move the selector lever from P
(Park) , N (Neutral) or any drive position to R
(Reverse) .
N (Neutral):
Neither forward nor reverse gear is engaged. The
engine can be started in this position. You may
shift to N (Neutral) and restart a stalled engine
while the vehicle is moving.
D (Drive):
Use this position for all normal forward driving.
WSD0043
5-8Starting and driving
ZREVIEW COPY:Ð2003 Sentra(b15)
Owners Manual(owners)ÐUSA English(nna)
12/10/02Ðdebbie
X
Page 141 of 224
When towing your vehicle, all State (Provincial in
Canada) and local regulations for towing must be
followed. Incorrect towing equipment could dam-
age your vehicle. Towing instructions are avail-
able from a NISSAN dealer. Local service opera-
tors are generally familiar with the applicable laws
and procedures for towing. To assure proper
towing and to prevent accidental damage to your
vehicle, NISSAN recommends having a service
operator tow your vehicle. It is advisable to have
the service operator carefully read the following
precautions:
WARNING
cNever ride in a vehicle that is being
towed.
cNever get under your vehicle after it has
been lifted by a tow truck.
CAUTION
cWhen towing, make sure that the trans-
mission, axles, steering system and
powertrain are in working condition. If
any unit is damaged, dollies must be
used.
cAlways attach safety chains before
towing.
TOWING RECOMMENDED BY
NISSAN
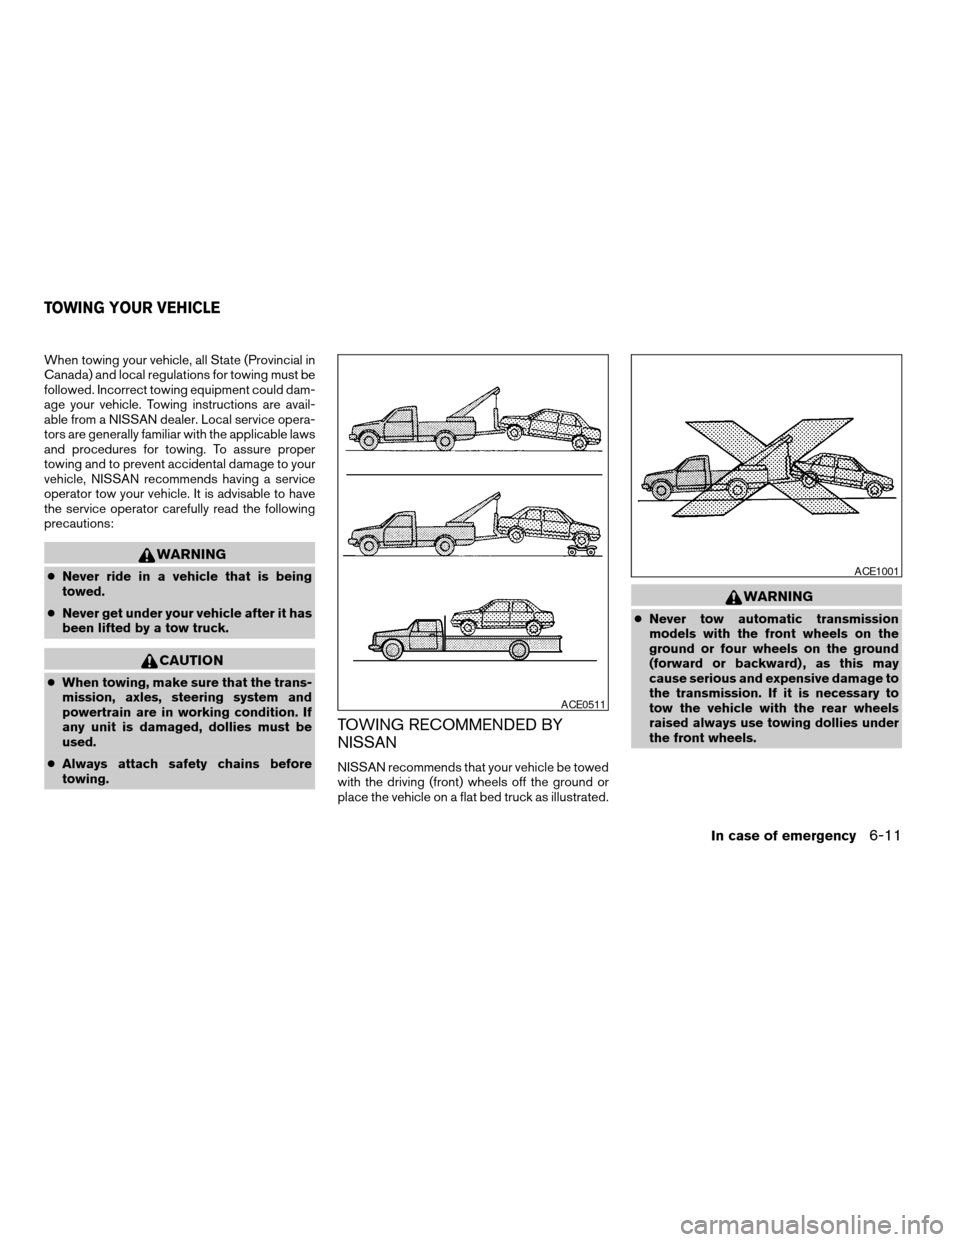
NISSAN recommends that your vehicle be towed
with the driving (front) wheels off the ground or
place the vehicle on a flat bed truck as illustrated.
WARNING
cNever tow automatic transmission
models with the front wheels on the
ground or four wheels on the ground
(forward or backward) , as this may
cause serious and expensive damage to
the transmission. If it is necessary to
tow the vehicle with the rear wheels
raised always use towing dollies under
the front wheels.
ACE0511
ACE1001
TOWING YOUR VEHICLE
In case of emergency6-11
ZREVIEW COPY:Ð2003 Sentra(b15)
Owners Manual(owners)ÐUSA English(nna)
12/20/02Ðcathy
X
Page 150 of 224

Your new NISSAN has been designed to have
minimum maintenance requirements with longer
service intervals to save you both time and
money. However, some day-to-day and regular
maintenance is essential to maintain your NIS-
SAN’s good mechanical condition, as well as its
emission and engine performance.
It is the owner’s responsibility to make sure that
the scheduled maintenance, as well as general
maintenance, is performed.
As the vehicle owner, you are the only one who
can ensure that your vehicle receives proper
maintenance. You are a vital link in the mainte-
nance chain.
Scheduled maintenance
For your convenience, both required and optional
scheduled maintenance items are described and
listed in your “NISSAN Service and Maintenance
Guide.” You must refer to that guide to ensure
that necessary maintenance is performed on your
NISSAN at regular intervals.
General maintenance
General maintenance includes those items which
should be checked during normal day-to-day op-
eration of the vehicle. They are essential if your
vehicle is to continue to operate properly. It is
your responsibility to perform these maintenance
procedures regularly as prescribed.Performing general maintenance checks requires
minimal mechanical skill and only a few general
automotive tools.
These checks or inspections can be done by you,
a qualified technician, or, if you prefer, a NISSAN
dealer.
Where to go for service
If maintenance service is required or your vehicle
appears to malfunction, have the systems
checked and corrected by a NISSAN dealer.
NISSAN technicians are well-trained specialists
who are kept up-to-date with the latest service
information through technical bulletins, service
tips, and in-dealership training programs. They
are completely qualified to work on NISSAN ve-
hiclesbeforethey work on your vehicle, rather
than after they have worked on it.
You can be confident that a NISSAN dealer’s
service department performs the best job to meet
the maintenance requirements on your vehicle —
in a reliable and economic way.During the normal day-to-day operation of the
vehicle, general maintenance should be per-
formed regularly as prescribed in this section. If
you detect any unusual sounds, vibrations or
smells, be sure to check for the cause or have a
NISSAN dealer do it promptly. In addition, you
should notify a NISSAN dealer if you think that
repairs are required.
When performing any checks or maintenance
work, closely observe the “Maintenance precau-
tions” later in this section.
EXPLANATION OF GENERAL
MAINTENANCE ITEMS
Additional information on the following
items with “*” is found later in this section.
Outside the vehicle
The maintenance items listed here should be
performed from time to time, unless otherwise
specified.
Tires*Check the pressure with a gauge at least
once a month and always prior to long distance
trips. If necessary, adjust the pressure in all tires,
including the spare, to the pressure specified.
Check carefully for damage, cuts or excessive
wear.
MAINTENANCE REQUIREMENTS GENERAL MAINTENANCE
8-2Maintenance and do-it-yourself
ZREVIEW COPY:Ð2003 Sentra(b15)
Owners Manual(owners)ÐUSA English(nna)
12/20/02Ðcathy
X
Page 153 of 224
When performing any inspection or maintenance
work on your vehicle, always take care to prevent
serious accidental injury to yourself or damage to
the vehicle. The following are general precau-
tions which should be closely observed.
WARNING
cPark the vehicle on a level surface, ap-
ply the parking brake securely and
block the wheels to prevent the vehicle
from moving. For manual transmission
models, move the shift lever to N (Neu-
tral) . For automatic transmission mod-
els, move the selector lever to P (Park) .
cBe sure the ignition key is in the OFF or
LOCK position when performing any
parts replacement or repairs.
cNever leave the engine or automatic
transmission related component har-
nesses disconnected while the ignition
switch is in the ON position.
cNever connect or disconnect the battery
or any transistorized component while
the ignition switch is in the ON position.cYour vehicle is equipped with an auto-
matic engine cooling fan. It may come
on at any time without warning, even if
the ignition key is in the OFF position
and the engine is not running. To avoid
injury, always disconnect the negative
battery cable before working near the
fan.
cIf you must work with the engine run-
ning, keep your hands, clothing, hair
and tools away from moving fans, belts
and any other moving parts.
cIt is advisable to secure or remove any
loose clothing and remove any jewelry,
such as rings, watches, etc. before
working on your vehicle.
cAlways wear eye protection whenever
you work on your vehicle.
cIf you must run the engine in an en-
closed space such as a garage, be sure
there is proper ventilation for exhaust
gases to escape.
cNever get under the vehicle while it is
supported only by a jack. If it is neces-
sary to work under the vehicle, support
it with safety stands.cKeep smoking materials, flame and
sparks away from the fuel tank and
battery.
cOn gasoline engine models with the
multiport fuel injection (MFI) system,
the fuel filter or fuel lines should be
serviced by a NISSAN dealer because
the fuel lines are under high pressure
even when the engine is off.
CAUTION
cDo not work under the hood while the
engine is hot. Turn the engine off and
wait until it cools down.
cAvoid contact with used engine oil and
coolant. Improperly disposed engine
oil, engine coolant and/or other vehicle
fluids can damage the environment. Al-
ways conform to local regulations for
disposal of vehicle fluid.
This “Maintenance and do-it-yourself” section
gives instructions regarding only those items
which are relatively easy for an owner to perform.
A genuine NISSAN service manual is also avail-
able. See “Owner’s Manual/Service Manual or-
der information” in the “Technical and consumer
information” section of this manual.
MAINTENANCE PRECAUTIONS
Maintenance and do-it-yourself8-5
ZREVIEW COPY:Ð2003 Sentra(b15)
Owners Manual(owners)ÐUSA English(nna)
12/20/02Ðcathy
X
Page 158 of 224
CHANGING ENGINE COOLANT
Major cooling system repairs should be per-
formed by a NISSAN dealer. The service proce-
dures can be found in the NISSAN Service
Manual.
Improper servicing can result in reduced
heater performance and engine overheat-
ing.
WARNING
cTo avoid the danger of being scalded,
never change the coolant when the en-
gine is hot.
cNever remove the radiator cap when the
engine is hot. Serious burns could be
caused by high pressure fluid escaping
from the radiator.
cAvoid direct skin contact with used
coolant. If skin contact is made, wash
thoroughly with soap or hand cleaner
as soon as possible.
cKeep coolant out of the reach of chil-
dren and pets.Engine coolant must be disposed of prop-
erly. Check your local regulations.
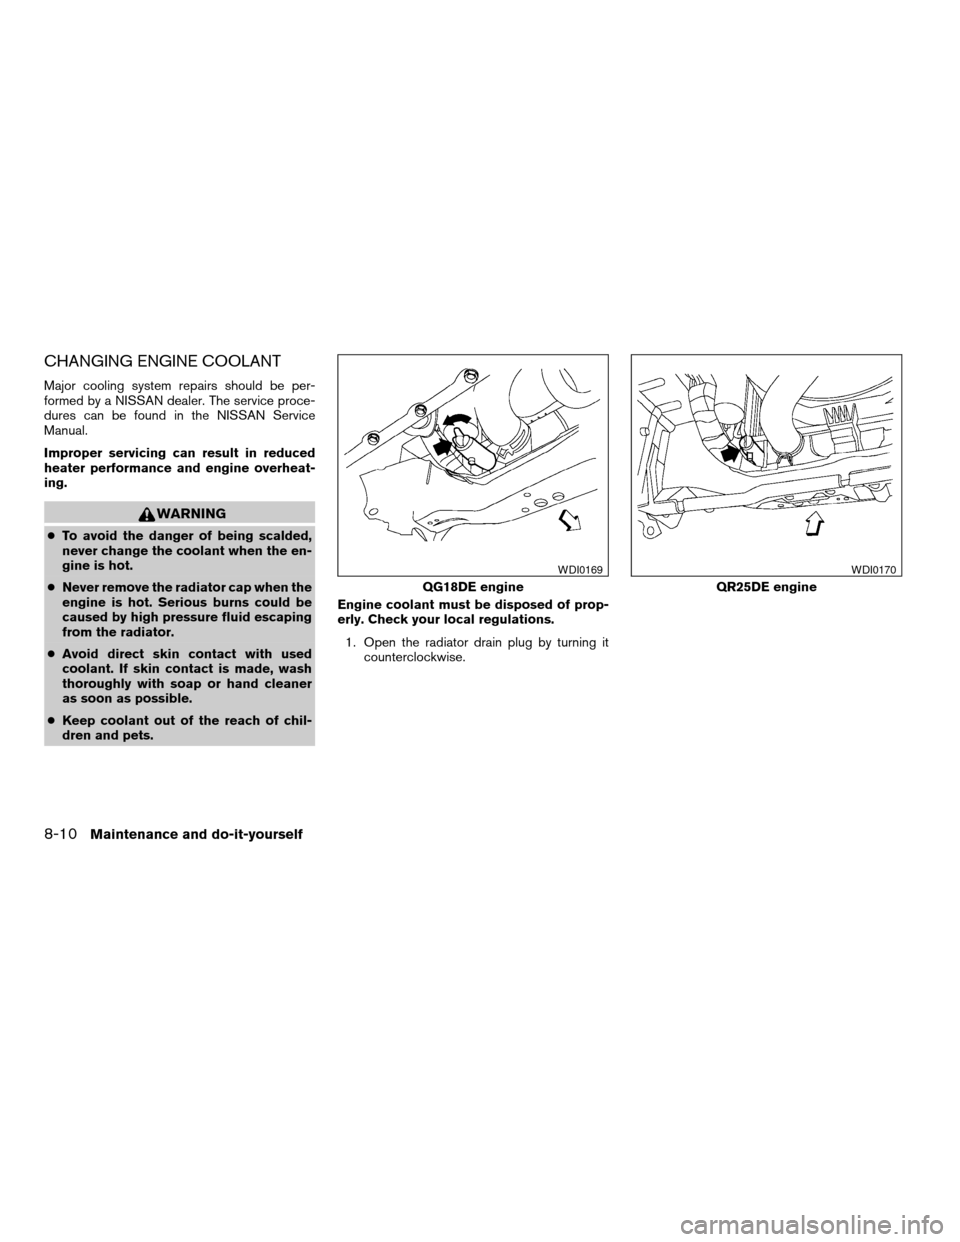
1. Open the radiator drain plug by turning it
counterclockwise.
QG18DE engine
WDI0169
QR25DE engine
WDI0170
8-10Maintenance and do-it-yourself
ZREVIEW COPY:Ð2003 Sentra(b15)
Owners Manual(owners)ÐUSA English(nna)
12/20/02Ðcathy
X
Page 171 of 224
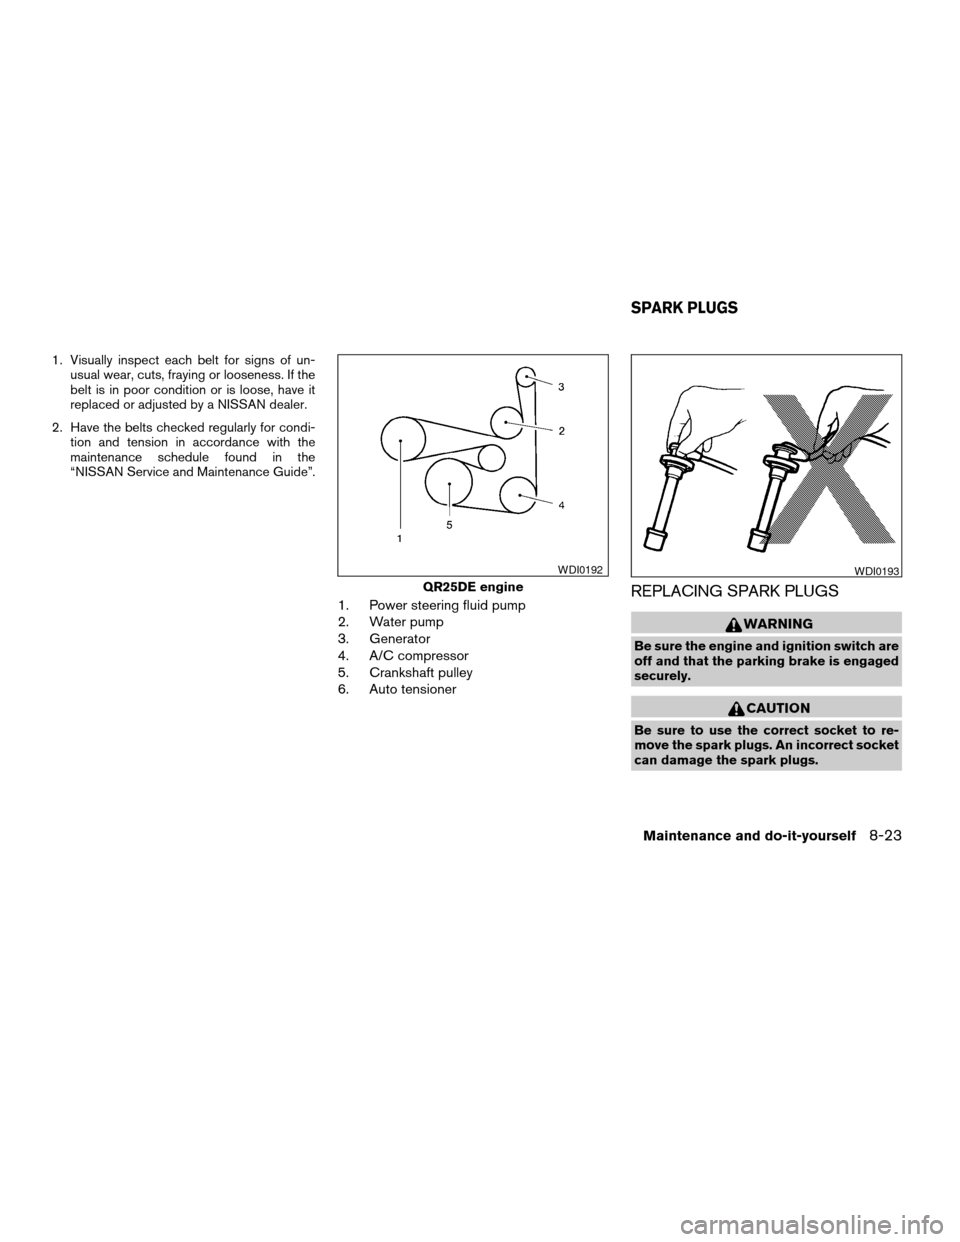
1. Visually inspect each belt for signs of un-
usual wear, cuts, fraying or looseness. If the
belt is in poor condition or is loose, have it
replaced or adjusted by a NISSAN dealer.
2. Have the belts checked regularly for condi-
tion and tension in accordance with the
maintenance schedule found in the
“NISSAN Service and Maintenance Guide”.
1. Power steering fluid pump
2. Water pump
3. Generator
4. A/C compressor
5. Crankshaft pulley
6. Auto tensionerREPLACING SPARK PLUGS
WARNING
Be sure the engine and ignition switch are
off and that the parking brake is engaged
securely.
CAUTION
Be sure to use the correct socket to re-
move the spark plugs. An incorrect socket
can damage the spark plugs.
QR25DE engine
WDI0192WDI0193
SPARK PLUGS
Maintenance and do-it-yourself8-23
ZREVIEW COPY:Ð2003 Sentra(b15)
Owners Manual(owners)ÐUSA English(nna)
12/20/02Ðcathy
X
Page 172 of 224

Platinum-tipped spark plugs
It is not necessary to replace platinum-tipped
spark plugs as frequently as conventional type
spark plugs because they last much longer. Fol-
low the maintenance schedule, but do not reuse
the spark plugs by cleaning or regapping.
cAlways replace spark plugs with recom-
mended or equivalent ones.
1. Remove the engine cover.
2. Disconnect the ignition coil connectors. Re-
move the ignition coil bolts.
3. Disconnect the spark plug cables from the
spark plugs.When disconnecting, always hold
the boots — not the cables. Mark all
cables to identify their original loca-
tions.
4. Remove the spark plugs with a spark plug
socket.
The plug socket has a rubber seal that holds
the spark plug so it does not fall when it is
pulled out. Make sure each spark plug is
snugly fitted into the spark plug socket.
5. Fit the new plugs, one at a time, into the
spark plug socket and install them.Use
only the specified spark plugs.Turn
each plug several full turns by hand, then
tighten with the spark plug socket to the
correct torque. Do not overtighten.
Spark plug tightening torque:
14 - 22 ft-lb (20 - 29 N·m)
6. Holding the boot, reconnect each high ten-
sion cable to its proper spark plug by push-
ing it on until you feel a snap.
7. Iinstall the ignition coil bolts.
Ignition coil bolt tightening torque:
33 - 44 in-lb (3.8 - 5.0 N·m)
Connect the ignition coil connector.
8. Install the engine cover.The air cleaner filter should not be cleaned and
reused. Replace it according to the maintenance
intervals shown in the “NISSAN Service and
Maintenance Guide.” When replacing the filter,
wipe the inside of the air cleaner filter housing
and the cover with a damp cloth.
WDI0005ADI0631
AIR CLEANER
8-24Maintenance and do-it-yourself
ZREVIEW COPY:Ð2003 Sentra(b15)
Owners Manual(owners)ÐUSA English(nna)
12/20/02Ðcathy
X
Page 173 of 224
WARNING
cOperating the engine with the air
cleaner removed can cause you or oth-
ers to be burned. The air cleaner not
only cleans the air, it stops the flame if
the engine backfires. If it isn’t there, and
the engine backfires, you could be
burned. Do not drive with the air cleaner
removed, and be careful when working
on the engine with the air cleaner
removed.
cNever pour fuel into the throttle body or
attempt to start the engine with the air
cleaner removed. Doing so could result
in serious injury.
IN-CABIN MICROFILTER (if so
equipped)
The in-cabin microfilter restricts the entry of air-
borne dust and pollen particles and reduces
some objectionable outside odors. The filter is
located behind the glove box. Refer to the
“NISSAN Service and Maintenance Guide” for
change intervals.
To change the filter, perform the following proce-
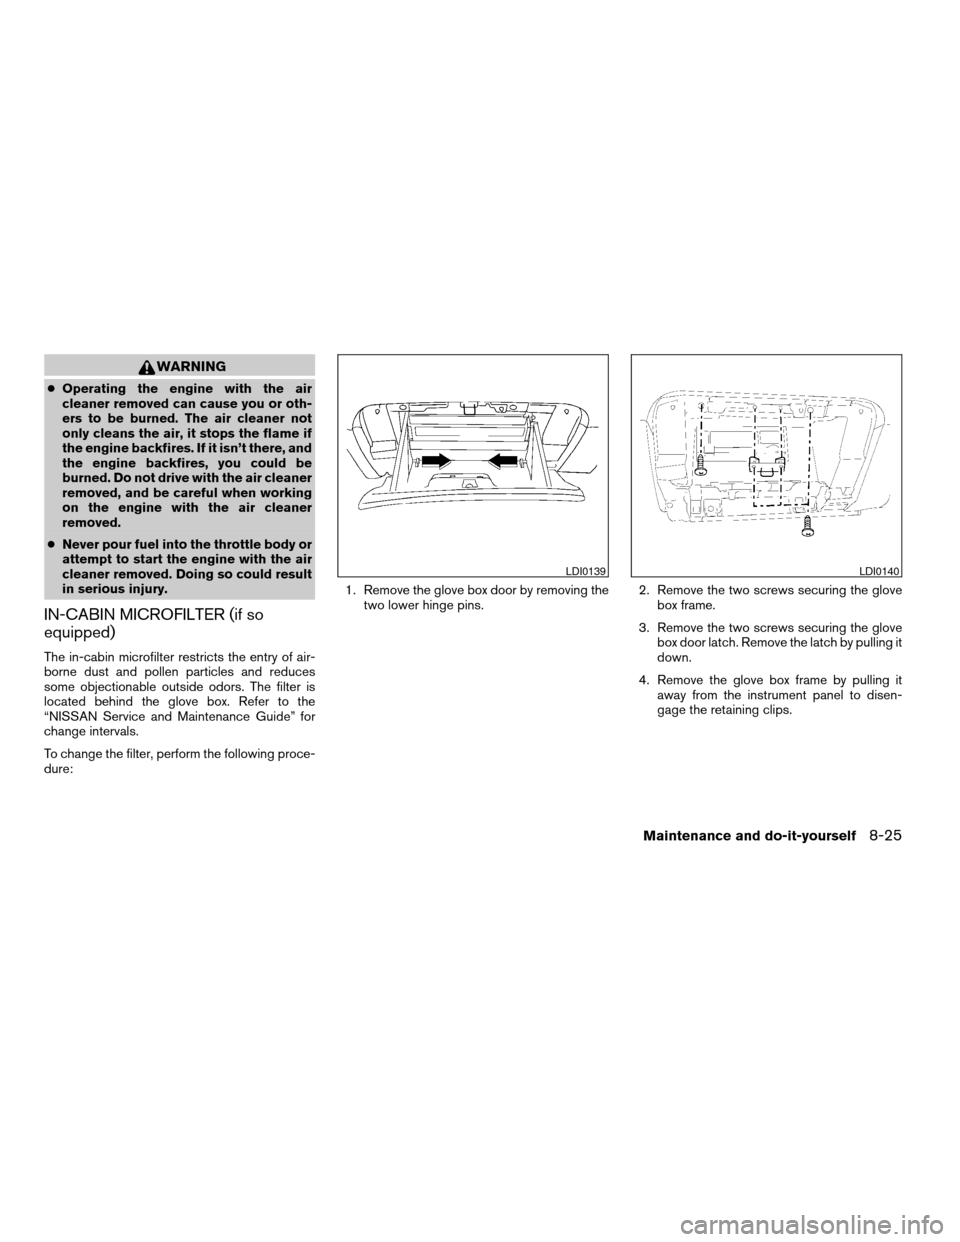
dure:1. Remove the glove box door by removing the
two lower hinge pins.2. Remove the two screws securing the glove
box frame.
3. Remove the two screws securing the glove
box door latch. Remove the latch by pulling it
down.
4. Remove the glove box frame by pulling it
away from the instrument panel to disen-
gage the retaining clips.
LDI0139LDI0140
Maintenance and do-it-yourself8-25
ZREVIEW COPY:Ð2003 Sentra(b15)
Owners Manual(owners)ÐUSA English(nna)
12/20/02Ðcathy
X