Page 11 of 247
IClosely supervise children when they
are around cars to prevent them from
playing and becoming locked in the
trunk where they could be seriously
injured. Keep the car locked with the
rear seatback securely latched when
not in use, and prevent children's
access to car keys.
HEAD RESTRAINT ADJUSTMENTTo raise the head restraint, just pull it up. To
lower, push the lock knob and push the head
restraint down.
WARNING
Head restraints should be adjusted
properly as they may provide significant
protection against injury in an accident.
Do not remove them. Check the adjust-ment after someone else uses the seat.
SSS0125
1-6
Seats, restraints and supplemental air bag systems
Z
02.7.12/A33-D/V5.0
X
Page 35 of 247
2. Route the seat belt tongue through the child
restraint and insert it into the buckle until
you hear and feel the latch engage.
Be sure to follow the child restraint manu-
facturer's instructions for belt routing.3. Pull on the shoulder belt until all of the belt
is fully extended. At this time, the belt
retractor is in the automatic locking mode
(child restraint mode). It reverts back to
emergency locking mode when the belt is
fully retracted.4. Allow the belt to retract. Pull up on the belt
to remove any slack in the belt.
SSS0043
SSS0107
SSS0062
1-30
Seats, restraints and supplemental air bag systems
Z
02.7.12/A33-D/V5.0
X
Page 36 of 247

5. Before placing the child in the child re-
straint, use force to tilt the child restraint
from side to side, and tug it forward to make
sure that it is securely held in place.
6. Check that the retractor is in the automatic
locking mode by trying to pull more belt out
of the retractor. If you cannot pull any more
belt webbing out of the retractor, the belt is
in the automatic locking mode.
7. Check to make sure that the child restraint
is properly secured prior to each use. If the
belt is not locked, repeat steps 3 through 6.
After the child restraint is removed and the
seat belt is allowed to wind back into theretractor, the automatic locking mode (child
restraint mode) is canceled; the seat belt only
locks during a sudden stop or impact.
Rear facingWhen you install a child restraint in a rear
outboard or center seat, follow these steps:
1. Position the child restraint on the seat. The
direction of the child restraint depends on
the type of the child restraint and the size of
the child. Always follow the restraint manu-
facturer's instructions.
SSS0108
SSS0155
Seats, restraints and supplemental air bag systems
1-31
Z
02.7.12/A33-D/V5.0
X
Page 38 of 247
4. Allow the belt to retract. Pull up on the belt
to remove any slack in the belt.5. Before placing the child in the child re-
straint, use force to tilt the child restraint
from side to side, and tug it forward to make
sure that it is securely held in place.
6. Check that the retractor is in the automatic
locking mode by trying to pull more belt out
of the retractor. If you cannot pull any more
belt webbing out of the retractor, the belt is
in the automatic locking mode.
7. Check to make sure that the child restraint
is properly secured prior to each use. If the
belt is not locked, repeat steps 3 through 6.
After the child restraint is removed and the
seat belt is allowed to wind back into theretractor, the automatic locking mode (child
restraint mode) is canceled; the seat belt only
locks during a sudden stop or impact.
SSS0109
SSS0110Seats, restraints and supplemental air bag systems
1-33
Z
02.7.12/A33-D/V5.0
X
Page 40 of 247

restraint will not be secured properly if
the LATCH system anchors are ob-
structed.
1. To install the LATCH system compat-
ible child restraint, insert the child
restraint LATCH system anchor at-
tachments into the anchor points on
the rear seat. If the child restraint is
equipped with a top tether, see ªTop
tether strap child restraintº later in
this section for installation instruc-
tions.
2. After attaching the child restraint and
before placing the child in it, use
force to tilt the child restraint from
side to side and tug it forward to
make sure that the child restraint is
securely held in place.
3. Check to make sure that the child
restraint is properly secured prior to
each use.
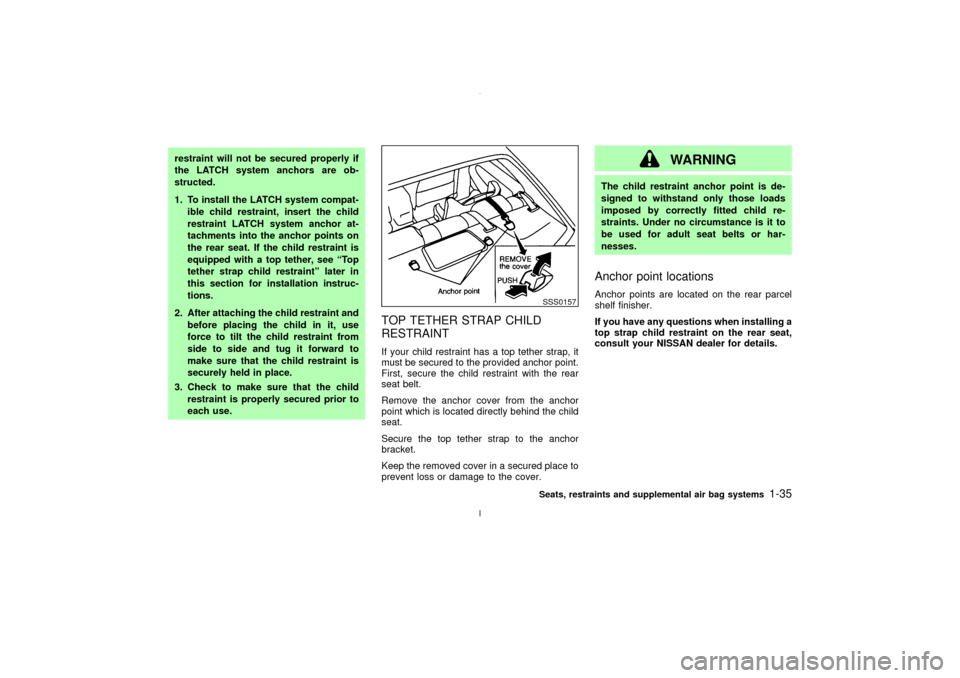
TOP TETHER STRAP CHILD
RESTRAINTIf your child restraint has a top tether strap, it
must be secured to the provided anchor point.
First, secure the child restraint with the rear
seat belt.
Remove the anchor cover from the anchor
point which is located directly behind the child
seat.
Secure the top tether strap to the anchor
bracket.
Keep the removed cover in a secured place to
prevent loss or damage to the cover.
WARNING
The child restraint anchor point is de-
signed to withstand only those loads
imposed by correctly fitted child re-
straints. Under no circumstance is it to
be used for adult seat belts or har-
nesses.Anchor point locationsAnchor points are located on the rear parcel
shelf finisher.
If you have any questions when installing a
top strap child restraint on the rear seat,
consult your NISSAN dealer for details.
SSS0157Seats, restraints and supplemental air bag systems
1-35
Z
02.7.12/A33-D/V5.0
X
Page 43 of 247
4. Allow the belt to retract. Pull up on the belt
to remove any slack in the belt.5. Before placing the child in the child re-
straint, use force to tilt the child restraint
from side to side, and tug it forward to make
sure that it is securely held in place.
6. Check that the retractor is in the automatic
locking mode by trying to pull more belt out
of the retractor. If you cannot pull any more
belt webbing out of the retractor, the belt is
in the automatic locking mode.
7. Check to make sure that the child restraint
is properly secured prior to each use. If the
lap belt is not locked, repeat steps 3
through 6.
After the child restraint is removed and theseat belt is allowed to wind back into the
retractor, the automatic locking mode (child
restraint mode) is canceled; the seat belt only
locks during a sudden stop or impact.
SSS0056
SSS0114
1-38
Seats, restraints and supplemental air bag systems
Z
02.7.12/A33-D/V5.0
X
Page 68 of 247

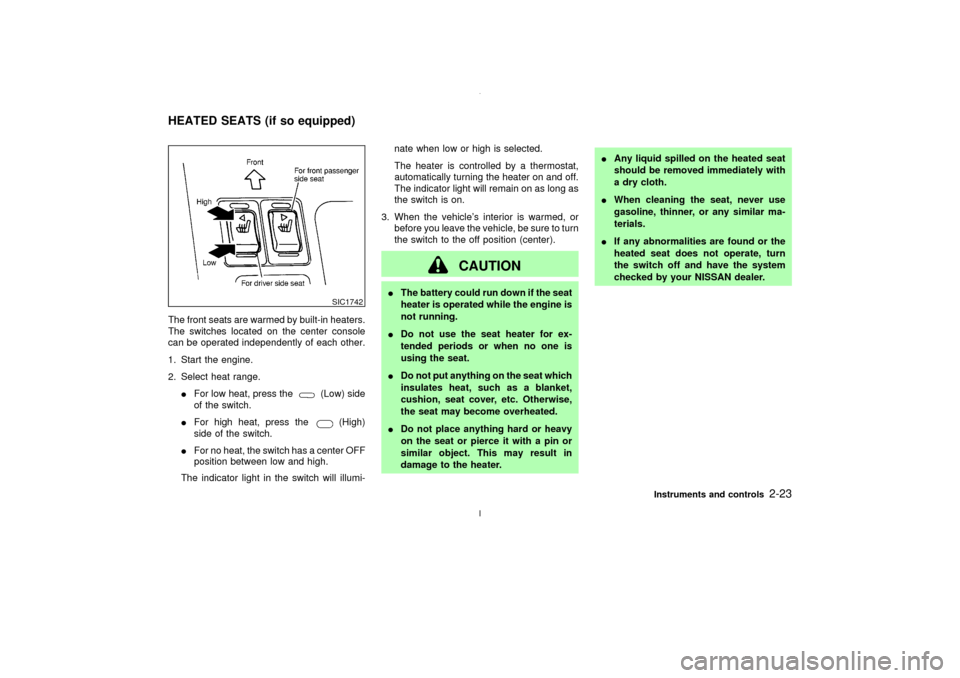
The front seats are warmed by built-in heaters.
The switches located on the center console
can be operated independently of each other.
1. Start the engine.
2. Select heat range.
IFor low heat, press the
(Low) side
of the switch.
IFor high heat, press the
(High)
side of the switch.
IFor no heat, the switch has a center OFF
position between low and high.
The indicator light in the switch will illumi-nate when low or high is selected.
The heater is controlled by a thermostat,
automatically turning the heater on and off.
The indicator light will remain on as long as
the switch is on.
3. When the vehicle's interior is warmed, or
before you leave the vehicle, be sure to turn
the switch to the off position (center).
CAUTION
IThe battery could run down if the seat
heater is operated while the engine is
not running.
IDo not use the seat heater for ex-
tended periods or when no one is
using the seat.
IDo not put anything on the seat which
insulates heat, such as a blanket,
cushion, seat cover, etc. Otherwise,
the seat may become overheated.
IDo not place anything hard or heavy
on the seat or pierce it with a pin or
similar object. This may result in
damage to the heater.IAny liquid spilled on the heated seat
should be removed immediately with
a dry cloth.
IWhen cleaning the seat, never use
gasoline, thinner, or any similar ma-
terials.
IIf any abnormalities are found or the
heated seat does not operate, turn
the switch off and have the system
checked by your NISSAN dealer.
SIC1742
HEATED SEATS (if so equipped)
Instruments and controls
2-23
Z
02.7.12/A33-D/V5.0
X
Page 102 of 247

AUTOMATIC SEAT POSITIONER
OPERATION (A/T models only)This system is designed so that the driver's
seat will automatically move when the auto-
matic transmission selector lever is in the P
(Park) position. This allows the driver to get in
and out of the driver's seat more easily.
When one of the following conditions is met,
the driver's seat will slide backward:
IWhen the key is removed from the ignition
switch.
IWhen the driver's door is opened with the
key turned to ACC or LOCK.
IWhen the key is turned from ON to ACC
with the driver's door open.
When one of the following conditions is met,
the driver's seat will return to the positions
before being set.
IWhen the key is inserted into the ignition
switch.
IWhen the driver's door is closed with the
key turned to LOCK.
PROCEDURE FOR STORING
MEMORYTwo positions can be stored in the automatic
driver's seat positioner memory.Follow these
procedures to use the memory system.
1. A/T models:
Set the automatic transmission selector
lever to the P (Park) position.
M/T models:
Apply the parking brake securely when the
vehicle is stopped.
2. Turn the ignition ON.
3. Adjust the driver's seat and steering column
to the desired positions by manually oper-
ating each adjusting switch. For additional
information, see ªSeatsº in the ª1. Seats,
restraints and supplemental air bag sys-
temsº section and ªSteering wheelº earlier
in this section.
SPA1385
AUTOMATIC SEAT POSITIONER
(if so equipped)
Pre-driving checks and adjustments
3-17
Z
02.7.12/A33-D/V5.0
X