2003 NISSAN MAXIMA license
[x] Cancel search: licensePage 64 of 247
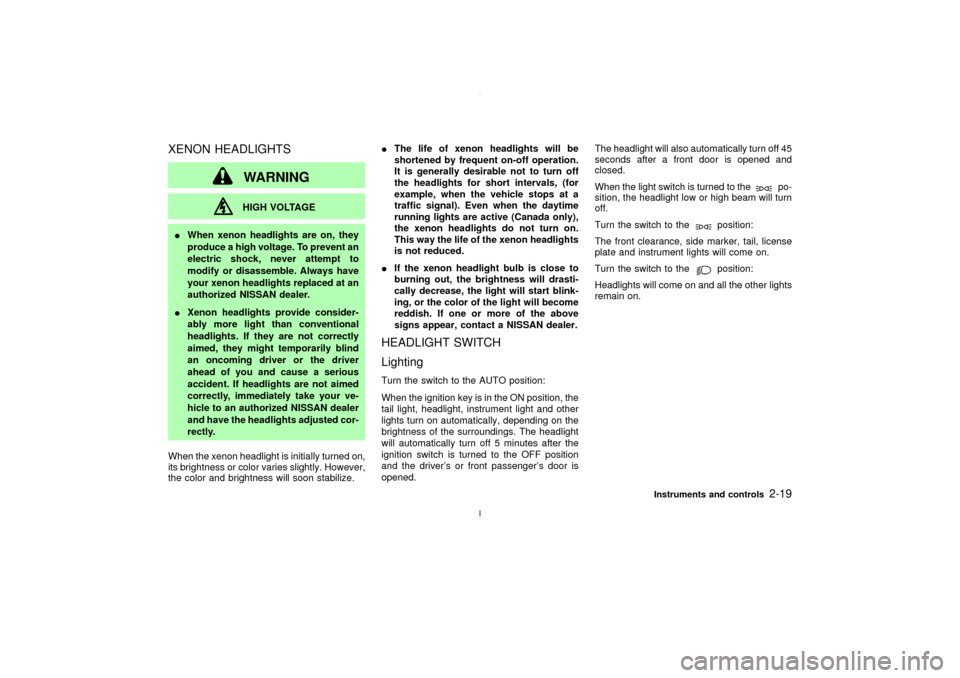
XENON HEADLIGHTS
WARNINGHIGH VOLTAGE
IWhen xenon headlights are on, they
produce a high voltage. To prevent an
electric shock, never attempt to
modify or disassemble. Always have
your xenon headlights replaced at an
authorized NISSAN dealer.
IXenon headlights provide consider-
ably more light than conventional
headlights. If they are not correctly
aimed, they might temporarily blind
an oncoming driver or the driver
ahead of you and cause a serious
accident. If headlights are not aimed
correctly, immediately take your ve-
hicle to an authorized NISSAN dealer
and have the headlights adjusted cor-
rectly.
When the xenon headlight is initially turned on,
its brightness or color varies slightly. However,
the color and brightness will soon stabilize.IThe life of xenon headlights will be
shortened by frequent on-off operation.
It is generally desirable not to turn off
the headlights for short intervals, (for
example, when the vehicle stops at a
traffic signal). Even when the daytime
running lights are active (Canada only),
the xenon headlights do not turn on.
This way the life of the xenon headlights
is not reduced.
IIf the xenon headlight bulb is close to
burning out, the brightness will drasti-
cally decrease, the light will start blink-
ing, or the color of the light will become
reddish. If one or more of the above
signs appear, contact a NISSAN dealer.
HEADLIGHT SWITCH
LightingTurn the switch to the AUTO position:
When the ignition key is in the ON position, the
tail light, headlight, instrument light and other
lights turn on automatically, depending on the
brightness of the surroundings. The headlight
will automatically turn off 5 minutes after the
ignition switch is turned to the OFF position
and the driver's or front passenger's door is
opened.The headlight will also automatically turn off 45
seconds after a front door is opened and
closed.
When the light switch is turned to the
po-
sition, the headlight low or high beam will turn
off.
Turn the switch to the
position:
The front clearance, side marker, tail, license
plate and instrument lights will come on.
Turn the switch to theposition:
Headlights will come on and all the other lights
remain on.
Instruments and controls
2-19
Z
02.7.12/A33-D/V5.0
X
Page 131 of 247
FF (fast forward), REW
(rewind):
Push either the FF or REW button for the
desired direction.
The FF or REW symbol illuminates in the
display.
To stop the FF or REW function, press the FF
or REW button again, or the TAPE/CD button.APS (automatic program
search) FF, APS REW:
Push either the APS FF or APS REW button
while the cassette tape is playing. The tape
runs quickly, stops, then plays the next selec-
tion. Either the FF or REW symbol flashes in
the display while searching for the selection.
This system searches at the blank intervals
between selections. If there is a blank interval
within one selection or there is no interval
between selections, the system may not stop
in the desired or expected location.
PROG (program):
Push the PROG button. The moving digital
squares illuminate on either the right or left
side of the display window to indicate the side
of program play.
If the PROG button is pushed during either theFF or REW function the tape enters the normal
play mode.
Dolby NR (Noise Reduction):
Push the Dolby NR
button for Dolby NR
encoded tapes to reduce high frequency tape
noise. The
indicator light comes on.
Dolby NR is manufactured under license from
Dolby Laboratories Licensing Corporation.
DOLBY NR and the double-D symbol
are trademarks of Dolby Laboratories
Licensing Corporation.
Metal or chrome tape usage:
The cassette player is automatically set to high
performance play when playing a metal or
chrome cassette tape.TAPE EJECT:
Push the EJECT button. The cassette tape
automatically comes out.
Compact disc (CD) player/changer
operationTurn the ignition key to the ACC or ON posi-
tion.
To play the CD, push the TAPE/CD button
after loading the disc.
If the disc loaded, the number of discs andtracks will appear on the display.
If the radio or tape is already operating, it will
automatically turn off and the CD will play.
CAUTION
Do not force the CD into the slot. This
could damage the player.
If the system has been turned off while the CD
was playing, pushing the ON×OFF/VOL control
knob will start the CD.
8 cm diameter CD can also be used without an
adapter.
PLAY:
IWhen the TAPE/CD button is pushed with
the CD loaded in the player or CD au-
tochanger (if so equipped):
a) If the TAPE player (if cassette tape is
inserted) is turn on, the mode (CD
player or CD autochanger) will turn on.
b) If the CD player turns on, the CD player
will automatically be turned off and the
CD autochanger will turn on.
c) If the CD autochanger turns on, the CD
autochanger will automatically be turned
4-26
Heater, air conditioner and audio systems
Z
02.7.12/A33-D/V5.0
X
Page 203 of 247
CAUTION
IDo not touch the bulb.
IUse the same number and wattage as
originally installed:
Wattage 60
Bulb no. HB3
IDo not leave the bulb out of the head-
light reflector for a long period of time
as dust, moisture, and smoke may
enter the headlight body and affect
the performance of the headlight.
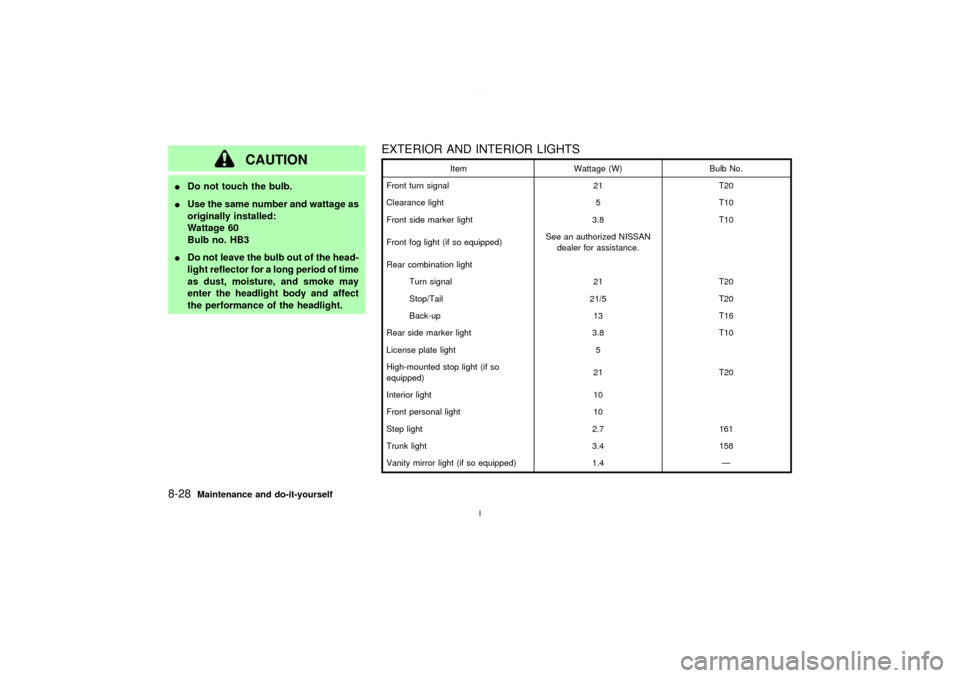
EXTERIOR AND INTERIOR LIGHTS
Item Wattage (W) Bulb No.
Front turn signal 21 T20
Clearance light 5 T10
Front side marker light 3.8 T10
Front fog light (if so equipped)See an authorized NISSAN
dealer for assistance.
Rear combination light
Turn signal 21 T20
Stop/Tail 21/5 T20
Back-up 13 T16
Rear side marker light 3.8 T10
License plate light 5
High-mounted stop light (if so
equipped)21 T20
Interior light 10
Front personal light 10
Step light 2.7 161
Trunk light 3.4 158
Vanity mirror light (if so equipped) 1.4 Ð
8-28
Maintenance and do-it-yourself
Z
02.7.12/A33-D/V5.0
X
Page 216 of 247

9 Technical and consumer informationCapacities and recommended fuel/lubricants ........... 9-2
Fuel recommendation........................................... 9-3
Engine oil and oil filter recommendation .............. 9-5
Recommended SAE viscosity number ................. 9-6
Air conditioning system refrigerant and lubricant
recommendations ................................................. 9-6
Specifications ............................................................ 9-7
Engine .................................................................. 9-7
Wheels and tires .................................................. 9-9
Dimensions and weights ...................................... 9-9
When traveling or registering your vehicle in
another country ....................................................... 9-10
Vehicle identification ............................................... 9-10
Vehicle identification number (VIN) plate ........... 9-10
Vehicle identification number
(Chassis number) ............................................... 9-10
Engine serial number ......................................... 9-11
F.M.V.S.S. certification label .............................. 9-11
Emission control information label ..................... 9-11Tire placard ........................................................ 9-12
Air conditioner specification label ....................... 9-12
Installing front license plate..................................... 9-13
Vehicle loading information ..................................... 9-14
Terms ................................................................. 9-14
Determining vehicle load capacity...................... 9-14
Loading tips ........................................................ 9-15
Towing a trailer ....................................................... 9-15
Maximum load limits ........................................... 9-16
Towing safety ..................................................... 9-17
Uniform tire quality grading ..................................... 9-19
Emission control system warranty .......................... 9-20
Reporting safety defects (US only) ......................... 9-20
Readiness for inspection/maintenance (I/M) test
(US only) ................................................................. 9-21
Owner's Manual/Service Manual order
information............................................................... 9-22
In the event of a collision ........................................ 9-22
Z
02.7.12/A33-D/V5.0
X
Page 228 of 247
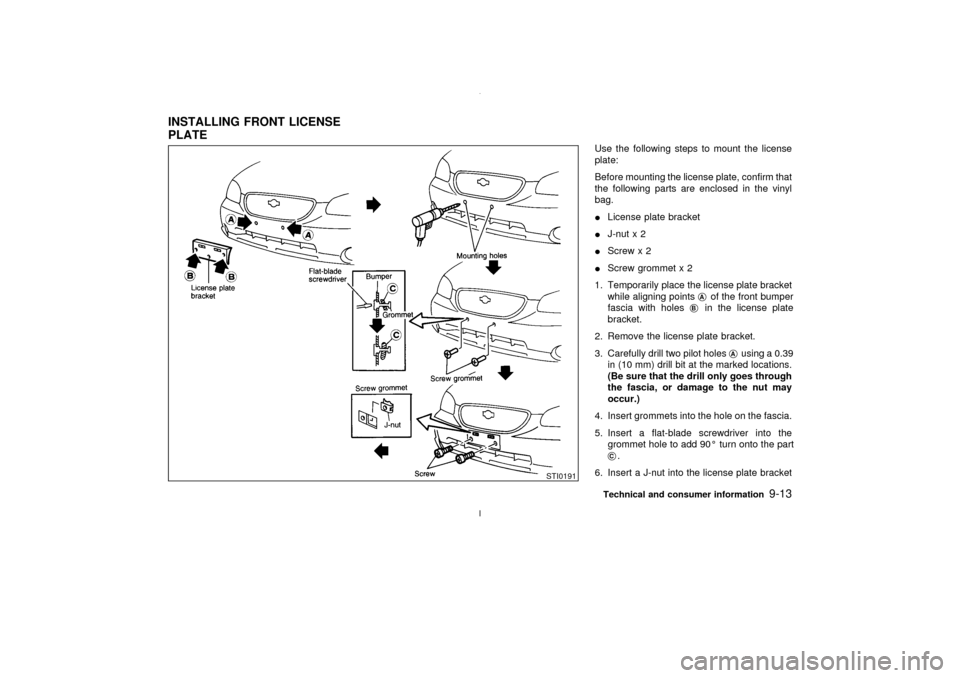
Use the following steps to mount the license
plate:
Before mounting the license plate, confirm that
the following parts are enclosed in the vinyl
bag.
ILicense plate bracket
IJ-nut x 2
IScrew x 2
IScrew grommet x 2
1. Temporarily place the license plate bracket
while aligning points
qAof the front bumper
fascia with holes
qB
in the license plate
bracket.
2. Remove the license plate bracket.
3. Carefully drill two pilot holes
qAusing a 0.39
in (10 mm) drill bit at the marked locations.
(Be sure that the drill only goes through
the fascia, or damage to the nut may
occur.)
4. Insert grommets into the hole on the fascia.
5. Insert a flat-blade screwdriver into the
grommet hole to add 90É turn onto the part
qC.
6. Insert a J-nut into the license plate bracket
STI0191
INSTALLING FRONT LICENSE
PLATE
Technical and consumer information
9-13
Z
02.7.12/A33-D/V5.0
X
Page 229 of 247
before placing the license plate bracket on
the fascia.
7. Install the license plate bracket with screws.
8. Install the license plate with bolts that are
no longer than 0.55 in (14 mm).
WARNING
IIt is extremely dangerous to ride in a
cargo area inside of a vehicle. In a
collision, people riding in these areas
are more likely to be seriously injured
or killed
IDo not allow people to ride in any
area of your vehicle that is not
equipped with seats and seat belts.
IBe sure everyone in your vehicle is in
a seat and using a seat belt properly.TERMSIt is important to familiarize yourself with the
following terms before loading your vehicle:
ICurb Weight (actual weight of your vehicle)
- vehicle weight including: standard and
optional equipment, fluids, emergency
tools, and spare tire assembly. This weight
does notinclude passengers and cargo.
IGVW (Gross Vehicle Weight) - curb weight
plus the combined weight of passengers
and cargo.IGVWR (Gross Vehicle Weight Rating) -
maximum total weight (load) limit specified
for the vehicle.
IGAWR (Gross Axle Weight Rating) - maxi-
mum weight (load) limit specified for the
front or rear axle.
DETERMINING VEHICLE LOAD
CAPACITYThe load capacity of this vehicle is determined
by weight, not by available cargo space. For
example, a luggage rack, bike carrier, cartop
carrier or similar equipment does not increase
load carrying capacity of your vehicle.
To determine vehicle load capacity:
Vehicle weight can be determined by using a
commercial-grade scale, found at places such
as a truck stop, gravel quarry, grain elevator,
or a scrap metal recycling facility.
1. Determine the curb weight of your vehicle.
2. Compare the curb weight amount to the
GVWR specified for your vehicle to deter-
mine how much more weight your vehicle
can carry.
3. After loading (cargo and passengers), re-
weigh your vehicle to determine if either
GVWR or GAWR for your vehicle is ex-
VEHICLE LOADING
INFORMATION
9-14
Technical and consumer information
Z
02.7.12/A33-D/V5.0
X
Page 242 of 247
Gas cap .......................................................... 3-12
Gauge ............................................................... 2-3
Engine coolant temperature gauge ............. 2-5
Fuel gauge .................................................. 2-5
Odometer..................................................... 2-4
Speedometer ............................................... 2-4
Tachometer ................................................. 2-4
General maintenance ....................................... 8-2
Glove box........................................................ 2-27
Glove box lock ................................................ 2-27
H
Hazard warning flasher switch........................ 2-22
Head restraints ................................................. 1-6
Headlights
Bulb replacement ...................................... 8-27
Headlight switch ........................................ 2-19
Xenon headlights....................................... 2-19
Heated seats................................................... 2-23
Heated steering wheel (if so equipped).......... 2-24
Heater
Engine coolant heater ............................... 5-21
Heater and air conditioner controls ............. 4-3
Heater operation.......................................... 4-3
Heater operation, Semiautomatic air
conditioner ........................................................ 4-4
HomeLink
Universal Transceiver .................. 2-37
Hood, release ................................................. 3-10
Horn ................................................................ 2-22
How to stop alarm, Vehicle security ............... 2-15I
Ignition switch ................................................... 5-4
Automatic transmission models ........... 5-4, 5-8
Key positions ............................................... 5-6
Manual transmission models ............. 5-5, 5-11
Immobilizer system ......................................... 2-15
Indicator lights................................................. 2-12
Inspection/maintenance (I/M) test................... 9-21
Instrument panel ............................................... 2-2
Interior light ..................................................... 2-34
Interior light replacement ................................ 8-28
Interior trunk lid release .................................. 3-12
ISOFIX child restraint ..................................... 1-34
J
Jump starting .................................................... 6-6
K
Keyless entry .................................................... 3-4
Keys .................................................................. 3-2
L
Label, Air conditioner specification label ........ 9-12
Label, Emission control information label ....... 9-11
Label, F.M.V.S.S. certification label................ 9-11
Labels
Air bag warning labels............................... 1-18
Engine serial number ................................ 9-11Vehicle identification number (VIN)........... 9-10
LATCH system................................................ 1-34
License plate, Installing front license plate..... 9-13
Light
Air bag warning light ................................. 1-18
Bulb replacement ...................................... 8-26
Fog light switch ......................................... 2-21
Headlight switch ........................................ 2-19
Headlights Bulb replacement .................... 8-27
Interior light................................................ 2-34
Personal light............................................. 2-35
Replacement ............................................. 8-26
Trunk light.................................................. 2-36
Vanity mirror light ...................................... 2-36
Warning/indicator lights and audible
reminders ........................................... 2-9, 2-12
Xenon headlights....................................... 2-19
Lights, Exterior and interior light
replacement .................................................... 8-28
Loading information (See vehicle loading
information) ..................................................... 9-14
Lock
Door locks ................................................... 3-2
Glove box lock........................................... 2-27
Power door lock .......................................... 3-2
Trunk lid lock opener lever........................ 3-10
Low fuel warning light ..................................... 2-11
M
Maintenance
Battery ....................................................... 8-15
General maintenance .................................. 8-2
Inside the vehicle ........................................ 8-3
Z
02.7.12/A33-D/V5.0
X
10-3