Page 194 of 272
KA24DE engine
1. Power steering fluid reservoir
2. Automatic transmission fluid dipstick
(A/T model)
3. Air cleaner
4. Engine oil filler cap
5. Engine oil dipstick
6. Brake fluid reservoir
7. Clutch fluid reservoir (M/T model)
8. Windshield washer fluid reservoir
9. Radiator cap
10. Coolant reservoir
11. Battery
WDI0087
ENGINE COMPARTMENT CHECK
LOCATIONS
8-6Maintenance and do-it-yourself
ZREVIEW COPY:Ð2003 Truck/Frontier(d22)
Owners Manual(owners)ÐUSA English(nna)
01/15/03Ðarosenma
X
Page 195 of 272
VG33E engine
1. Fuse/fusible link holder
2. Power steering fluid reservoir
3. Automatic transmission fluid dipstick
(A/T model)
4. Brake fluid reservoir
5. Clutch fluid reservoir (M/T model)
6. Air cleaner
7. Windshield washer fluid reservoir
8. Engine oil dipstick
9. Radiator cap
10. Engine oil filler cap
11. Coolant reservoir
12. Battery
WDI0269
Maintenance and do-it-yourself8-7
ZREVIEW COPY:Ð2003 Truck/Frontier(d22)
Owners Manual(owners)ÐUSA English(nna)
01/15/03Ðarosenma
X
Page 196 of 272
VG33ER engine
1. Fuse/fusible link holder
2. Power steering fluid reservoir
3. Automatic transmission fluid dipstick
(A/T model)
4. Supercharger
5. Brake fluid reservoir
6. Air cleaner
7. Windshield washer fluid reservoir
8. Engine oil dipstick
9. Radiator cap
10. Engine oil filler cap
11. Coolant reservoir
12. Battery
WDI0270
8-8Maintenance and do-it-yourself
ZREVIEW COPY:Ð2003 Truck/Frontier(d22)
Owners Manual(owners)ÐUSA English(nna)
01/15/03Ðarosenma
X
Page 206 of 272

Refill the reservoir more frequently when driving
conditions require an increased amount of win-
dow washer fluid.
CAUTION
cDo not substitute engine anti-freeze
coolant for window washer solution.
This may result in damage to the paint.
cDo not fill the window washer reservoir
tank with washer fluid concentrates at
full strength. Some methyl alcohol
based washer fluid concentrates may
permanently stain the grille if spilled
while filling the window washer reser-
voir tank.
cPre-mix washer fluid concentrates with
water to the manufacturer’s recom-
mended levels before pouring the fluid
into the window washer reservoir tank.
Do not use the window washer reservoir
tank to mix the washer fluid concen-
trate and water.cKeep the battery surface clean and dry. Any
corrosion should be washed off with a solution
of baking soda and water.
cMake certain the terminal connections are
clean and securely tightened.
cIf the vehicle is not to be used for 30 days or
longer, disconnect the negative (-) battery ter-
minal cable to prevent discharge.
WARNING
cDo not expose the battery to flames or
electrical sparks. Hydrogen gas gener-
ated by the battery is explosive. Do not
allow battery fluid to contact your skin,
eyes, fabrics or painted surfaces. After
touching a battery or battery cap, do not
touch or rub your eyes. Thoroughly
wash your hands. If the acid contacts
your eyes, skin or clothing, immediately
flush with water for at least 15 minutes
and seek medical attention.
cDo not operate the vehicle if the fluid in
the battery is low. Low battery fluid can
cause a higher load on the battery
which can generate heat, reduce bat-
tery life, and in some cases lead to an
explosion.cWhen working on or near a battery, al-
ways wear suitable eye protection and
remove all jewelry.
cBattery posts, terminals and related ac-
cessories contain lead and lead com-
pounds. Wash hands after handling.
cKeep battery out of the reach of
children.
BATTERY
8-18Maintenance and do-it-yourself
ZREVIEW COPY:Ð2003 Truck/Frontier(d22)
Owners Manual(owners)ÐUSA English(nna)
01/15/03Ðarosenma
X
Page 207 of 272
1. Remove the battery caps with a screwdriver
as shown. Use a cloth to protect the battery
case.
2. Check the fluid level in each cell If it is
necessary to add fluid, add only distilled
water to bring the level up to the bottom of
the filler opening.Do not overfill.Vehicles operated in high temperatures or under
severe conditions require frequent checks of the
battery fluid level.
JUMP STARTING
If jump starting is necessary, see “Jump starting”
in the “In case of emergency” section of this
manual. If the engine does not start by jump
starting, the battery may have to be replaced.
Contact a NISSAN dealer.
WDI0224
LDI0302
Maintenance and do-it-yourself8-19
ZREVIEW COPY:Ð2003 Truck/Frontier(d22)
Owners Manual(owners)ÐUSA English(nna)
01/15/03Ðarosenma
X
Page 218 of 272
4. If the fuse is open, replace it with a known
good fuse.
5. Push the fuse box cover to install.
6. If a new fuse also opens, have the electrical
system checked and repaired by a NISSAN
dealer.
Replace the battery in the keyfob as follows:
s1Open the lid using a coin.
s2Remove the battery.
s3Install a new battery with the “+” facing
down.
Recommended battery: Toshiba CR2025 or
equivalent.
s4Close the lid securely.
WDI0200
WPD0160
KEYFOB BATTERY REPLACEMENT
8-30Maintenance and do-it-yourself
ZREVIEW COPY:Ð2003 Truck/Frontier(d22)
Owners Manual(owners)ÐUSA English(nna)
01/15/03Ðarosenma
X
Page 219 of 272

5. Press thebutton, then thebutton two or three times to check the key-
fob operation.
If the battery is removed for any reason
other than replacement, perform step 5.
cAn improperly disposed battery can hurt
the environment. Always confirm local
regulations for battery disposal.
cThe keyfob is water-resistant; however,
if it does get wet, immediately wipe com-
pletely dry.
cThe operational range of the keyfob ex-
tends to approximately 33 ft (10 m) from
the vehicle. This range may vary with
conditions.
FCC Notice:
Changes or modifications not expressly ap-
proved by the manufacturer for compliance
could void the user’s authority to operate
the equipment.
This device complies with Part 15 of the FCC
Rules and RSS-210 of Industry Canada.
Operation is subject to the following two
conditions: (1) This device may not cause
harmful interference, and (2) this device
must accept any interference received, in-
cluding interference that may cause undes-
ired operation of the device.
HEADLIGHTS
The headlight is a semi-sealed beam type which
uses a replaceable headlight (halogen) bulb. A
bulb can be replaced from inside the engine
compartment without removing the headlight as-
sembly.
CAUTION
cHigh pressure halogen gas is sealed
inside the halogen bulb. The bulb may
break if the glass envelope is scratched
or the bulb is dropped.
cWhen handling the bulb, do not touch
the glass envelope.
cDO NOT TOUCH THE BULB
cUse the same number and wattage as
originally installed:
Wattage 65/55Bulb No. HB5/9007*
*: Always check with the Parts Depart-
ment at a NISSAN dealer for the latest
parts information.
cDo not leave the bulb out of the head-
light reflector for a long period of time
as dust, moisture and smoke may enter
the headlight body and affect the per-
formance of the headlight.cAiming is not necessary after replacing
the bulb. When aiming adjustment is
necessary, contact a NISSAN dealer.
LIGHTS
Maintenance and do-it-yourself8-31
ZREVIEW COPY:Ð2003 Truck/Frontier(d22)
Owners Manual(owners)ÐUSA English(nna)
01/15/03Ðarosenma
X
Page 220 of 272

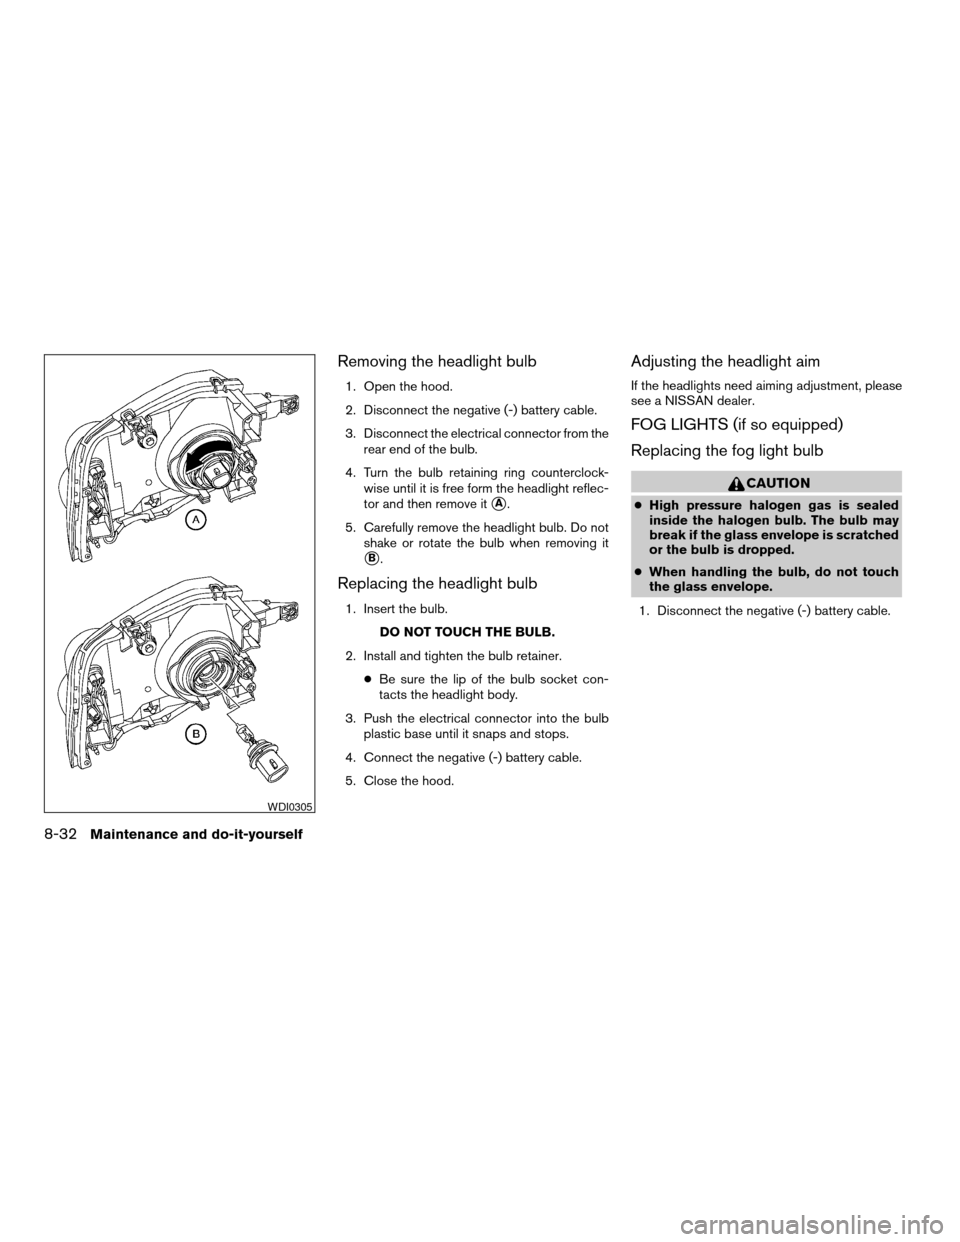
Removing the headlight bulb
1. Open the hood.
2. Disconnect the negative (-) battery cable.
3. Disconnect the electrical connector from the
rear end of the bulb.
4. Turn the bulb retaining ring counterclock-
wise until it is free form the headlight reflec-
tor and then remove it
sA.
5. Carefully remove the headlight bulb. Do not
shake or rotate the bulb when removing it
sB.
Replacing the headlight bulb
1. Insert the bulb.
DO NOT TOUCH THE BULB.
2. Install and tighten the bulb retainer.
cBe sure the lip of the bulb socket con-
tacts the headlight body.
3. Push the electrical connector into the bulb
plastic base until it snaps and stops.
4. Connect the negative (-) battery cable.
5. Close the hood.
Adjusting the headlight aim
If the headlights need aiming adjustment, please
see a NISSAN dealer.
FOG LIGHTS (if so equipped)
Replacing the fog light bulb
CAUTION
cHigh pressure halogen gas is sealed
inside the halogen bulb. The bulb may
break if the glass envelope is scratched
or the bulb is dropped.
cWhen handling the bulb, do not touch
the glass envelope.
1. Disconnect the negative (-) battery cable.
WDI0305
8-32Maintenance and do-it-yourself
ZREVIEW COPY:Ð2003 Truck/Frontier(d22)
Owners Manual(owners)ÐUSA English(nna)
01/15/03Ðarosenma
X