2003 NISSAN FRONTIER tow
[x] Cancel search: towPage 141 of 272
AUTOMATIC TRANSMISSION
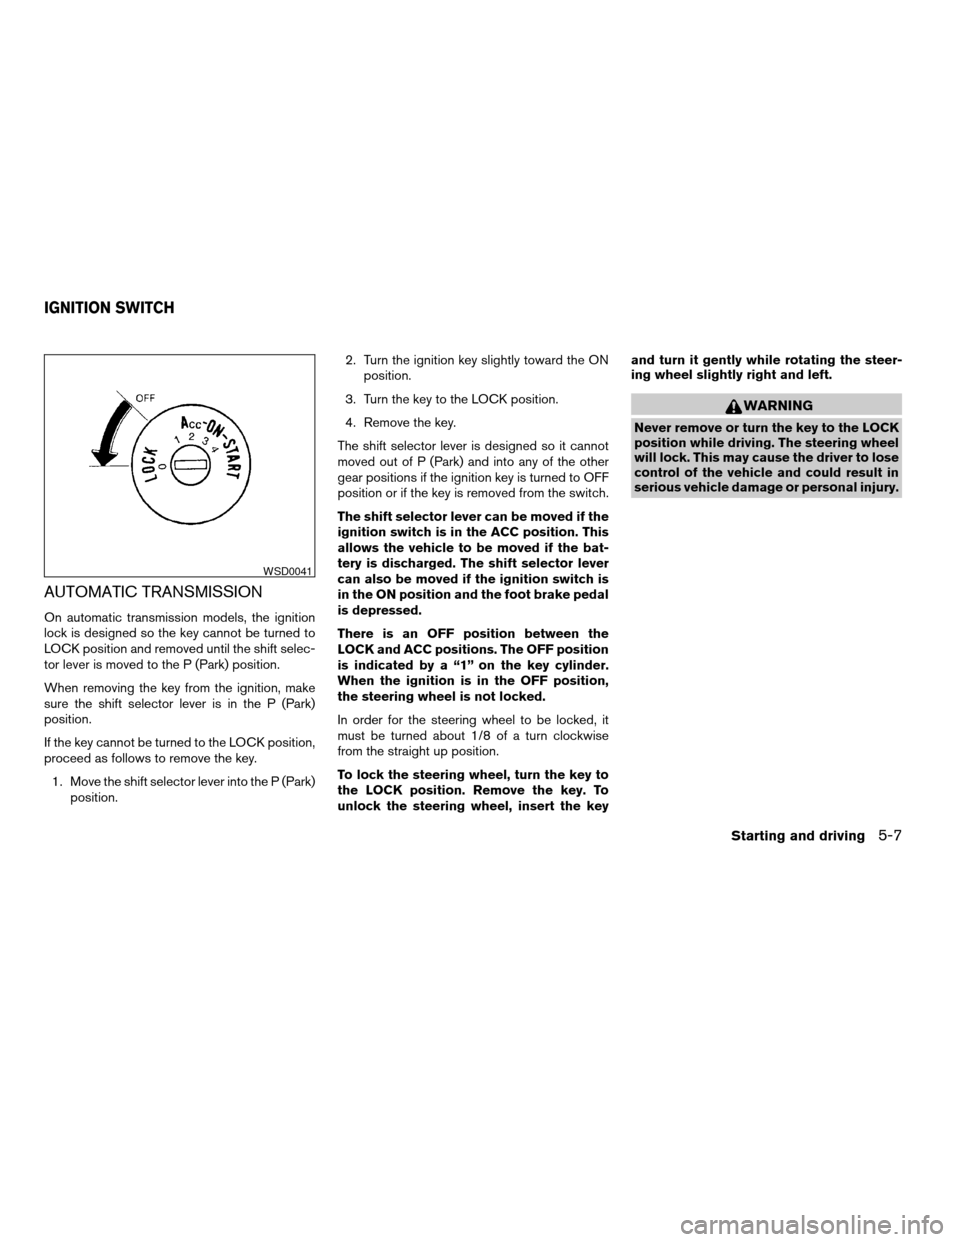
On automatic transmission models, the ignition
lock is designed so the key cannot be turned to
LOCK position and removed until the shift selec-
tor lever is moved to the P (Park) position.
When removing the key from the ignition, make
sure the shift selector lever is in the P (Park)
position.
If the key cannot be turned to the LOCK position,
proceed as follows to remove the key.
1. Move the shift selector lever into the P (Park)
position.2. Turn the ignition key slightly toward the ON
position.
3. Turn the key to the LOCK position.
4. Remove the key.
The shift selector lever is designed so it cannot
moved out of P (Park) and into any of the other
gear positions if the ignition key is turned to OFF
position or if the key is removed from the switch.
The shift selector lever can be moved if the
ignition switch is in the ACC position. This
allows the vehicle to be moved if the bat-
tery is discharged. The shift selector lever
can also be moved if the ignition switch is
in the ON position and the foot brake pedal
is depressed.
There is an OFF position between the
LOCK and ACC positions. The OFF position
is indicated by a “1” on the key cylinder.
When the ignition is in the OFF position,
the steering wheel is not locked.
In order for the steering wheel to be locked, it
must be turned about 1/8 of a turn clockwise
from the straight up position.
To lock the steering wheel, turn the key to
the LOCK position. Remove the key. To
unlock the steering wheel, insert the keyand turn it gently while rotating the steer-
ing wheel slightly right and left.
WARNING
Never remove or turn the key to the LOCK
position while driving. The steering wheel
will lock. This may cause the driver to lose
control of the vehicle and could result in
serious vehicle damage or personal injury.
WSD0041
IGNITION SWITCH
Starting and driving5-7
ZREVIEW COPY:Ð2003 Truck/Frontier(d22)
Owners Manual(owners)ÐUSA English(nna)
01/15/03Ðarosenma
X
Page 145 of 272
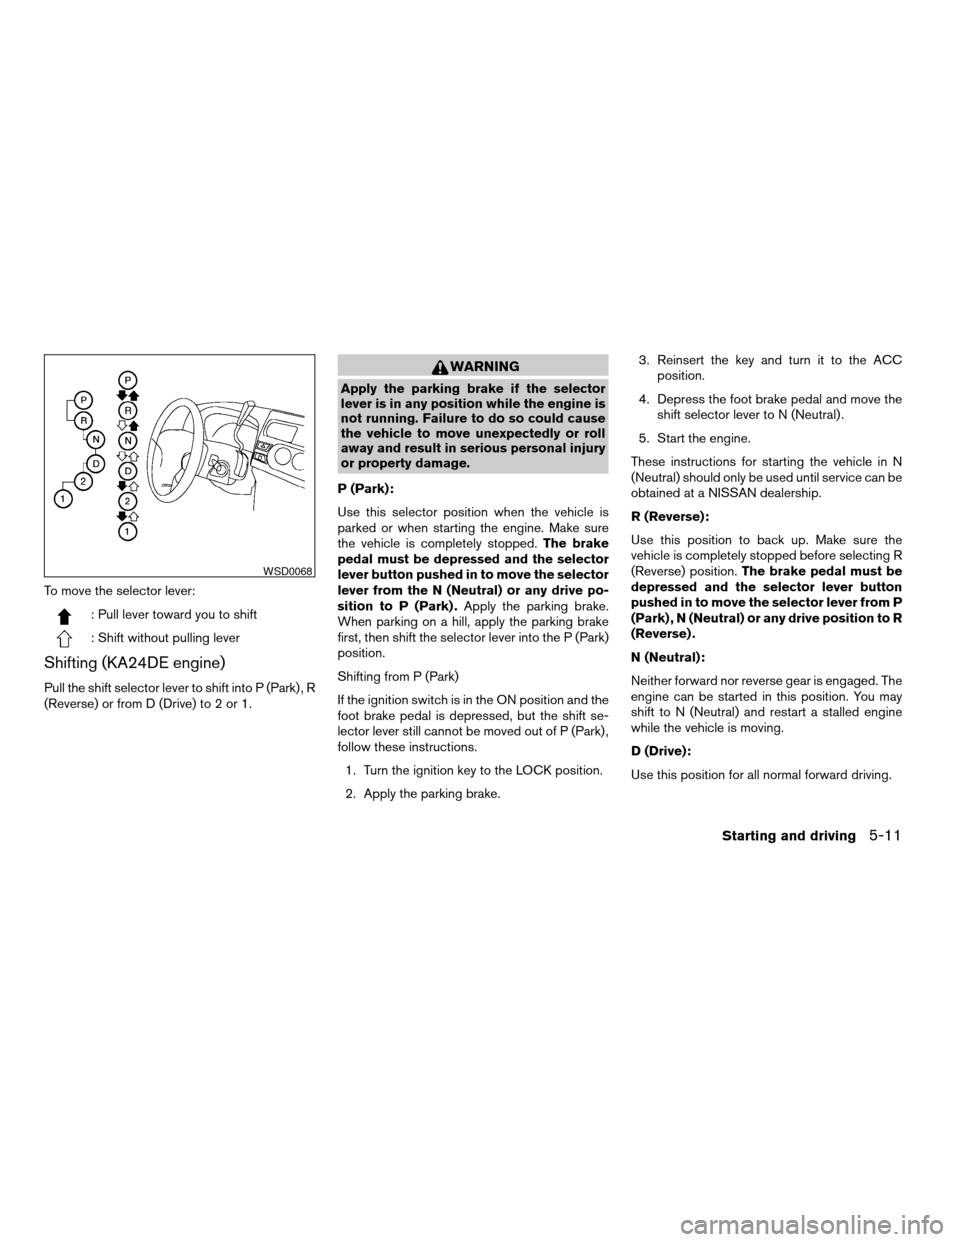
To move the selector lever:
: Pull lever toward you to shift
: Shift without pulling lever
Shifting (KA24DE engine)
Pull the shift selector lever to shift into P (Park) , R
(Reverse) or from D (Drive) to 2 or 1.
WARNING
Apply the parking brake if the selector
lever is in any position while the engine is
not running. Failure to do so could cause
the vehicle to move unexpectedly or roll
away and result in serious personal injury
or property damage.
P (Park):
Use this selector position when the vehicle is
parked or when starting the engine. Make sure
the vehicle is completely stopped.The brake
pedal must be depressed and the selector
lever button pushed in to move the selector
lever from the N (Neutral) or any drive po-
sition to P (Park) .Apply the parking brake.
When parking on a hill, apply the parking brake
first, then shift the selector lever into the P (Park)
position.
Shifting from P (Park)
If the ignition switch is in the ON position and the
foot brake pedal is depressed, but the shift se-
lector lever still cannot be moved out of P (Park) ,
follow these instructions.
1. Turn the ignition key to the LOCK position.
2. Apply the parking brake.3. Reinsert the key and turn it to the ACC
position.
4. Depress the foot brake pedal and move the
shift selector lever to N (Neutral) .
5. Start the engine.
These instructions for starting the vehicle in N
(Neutral) should only be used until service can be
obtained at a NISSAN dealership.
R (Reverse):
Use this position to back up. Make sure the
vehicle is completely stopped before selecting R
(Reverse) position.The brake pedal must be
depressed and the selector lever button
pushed in to move the selector lever from P
(Park) , N (Neutral) or any drive position to R
(Reverse) .
N (Neutral):
Neither forward nor reverse gear is engaged. The
engine can be started in this position. You may
shift to N (Neutral) and restart a stalled engine
while the vehicle is moving.
D (Drive):
Use this position for all normal forward driving.
WSD0068
Starting and driving5-11
ZREVIEW COPY:Ð2003 Truck/Frontier(d22)
Owners Manual(owners)ÐUSA English(nna)
01/15/03Ðarosenma
X
Page 154 of 272

To cancel the preset speed,use one of the
following three methods.
cPush the CANCEL button; the SET indicator
light in the instrument panel goes out.
cTap the brake pedal; the SET indicator light
goes out.
cTurn the main switch off. Both the CRUISE
indicator light and SET indicator light in the
instrument panel go out.
The cruise control is automatically canceled and
the SET light in the instrument panel goes out if:
cyou depress the brake or clutch pedal while
pushing the RES/ACCEL or
COAST/SETswitch. The preset speed is de-
leted from memory.
cthe vehicle slows down more than 8 MPH (13
km/h) below the set speed.
cyou depress the clutch pedal (manual trans-
mission) , or move the shift selector lever to N
(Neutral) (automatic transmission) .
To reset at a faster cruising speed,use one
of the following three methods.
cDepress the accelerator pedal. When the ve-
hicle attains the desired speed, push and re-
lease the COAST/SET switch.cPush and hold the RES/ACCEL switch. When
the vehicle attains the speed you desire, re-
lease the switch.
cPush and release the RES/ACCEL switch.
Each time you do this, the set speed increases
by about 1 MPH (1.6 km/h) .
To reset at a slower cruising speed,use one
of the following three methods.
cLightly tap the brake pedal. When the vehicle
attains the desired speed, push the
COAST/SET switch and release it.
cPush and hold the COAST/SET switch. Re-
lease the switch when the vehicle slows to the
desired speed.
cPush and release the COAST/SET switch.
Each time you do this, the set speed de-
creases by about 1 MPH (1.6 km/h) .
To resume the preset speed,push and re-
lease the RES/ACCEL switch. The vehicle re-
turns to the last set cruising speed when the
vehicle speed is over 25 MPH (40 km/h) .During the first 1,200 miles (2,000 km) , follow
these recommendations to obtain maximum en-
gine performance and ensure the future reliability
and economy of your new vehicle. Failure to
follow these recommendations may result in
shortened engine life and reduced engine perfor-
mance.
cAvoid driving for long periods at constant
speed, either fast or slow, and do not run the
engine over 4,000 rpm.
cDo not accelerate at full throttle in any gear.
cAvoid quick starts.
cAvoid hard braking as much as possible.
cDo not tow a trailer for the first 500 miles (800
km) .
BREAK-IN SCHEDULE
5-20Starting and driving
ZREVIEW COPY:Ð2003 Truck/Frontier(d22)
Owners Manual(owners)ÐUSA English(nna)
01/16/03Ðskoniecz
X
Page 160 of 272
2.Manual transmission models:
Place the shift lever in the R (Reverse) posi-
tion. When parking on an uphill grade, place
the shift lever in 1st gear.
Automatic transmission models:
Move the shift selector lever to the P (Park)
position.
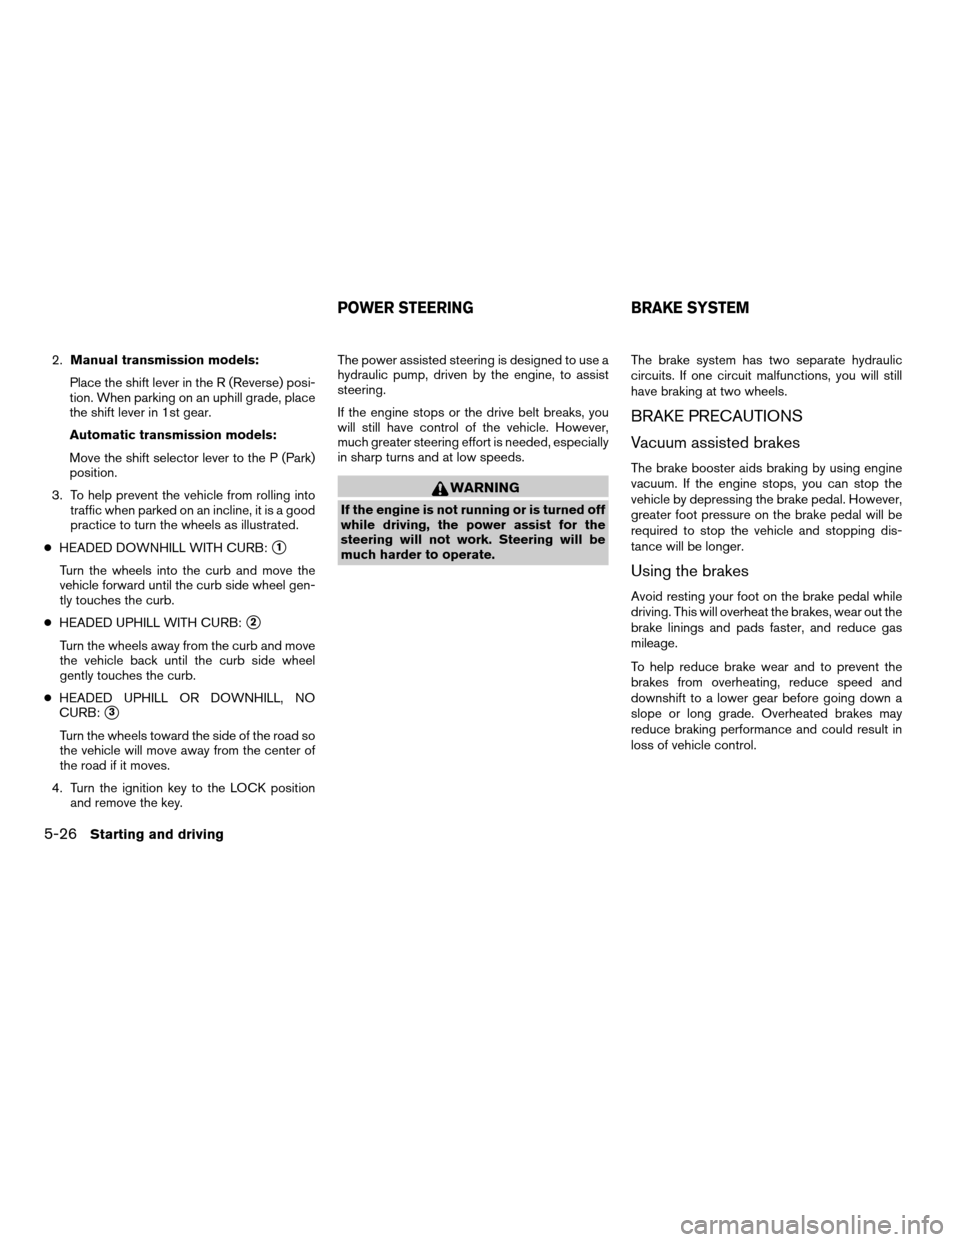
3. To help prevent the vehicle from rolling into
traffic when parked on an incline, it is a good
practice to turn the wheels as illustrated.
cHEADED DOWNHILL WITH CURB:
s1
Turn the wheels into the curb and move the
vehicle forward until the curb side wheel gen-
tly touches the curb.
cHEADED UPHILL WITH CURB:
s2
Turn the wheels away from the curb and move
the vehicle back until the curb side wheel
gently touches the curb.
cHEADED UPHILL OR DOWNHILL, NO
CURB:
s3
Turn the wheels toward the side of the road so
the vehicle will move away from the center of
the road if it moves.
4. Turn the ignition key to the LOCK position
and remove the key.The power assisted steering is designed to use a
hydraulic pump, driven by the engine, to assist
steering.
If the engine stops or the drive belt breaks, you
will still have control of the vehicle. However,
much greater steering effort is needed, especially
in sharp turns and at low speeds.
WARNING
If the engine is not running or is turned off
while driving, the power assist for the
steering will not work. Steering will be
much harder to operate.The brake system has two separate hydraulic
circuits. If one circuit malfunctions, you will still
have braking at two wheels.
BRAKE PRECAUTIONS
Vacuum assisted brakes
The brake booster aids braking by using engine
vacuum. If the engine stops, you can stop the
vehicle by depressing the brake pedal. However,
greater foot pressure on the brake pedal will be
required to stop the vehicle and stopping dis-
tance will be longer.
Using the brakes
Avoid resting your foot on the brake pedal while
driving. This will overheat the brakes, wear out the
brake linings and pads faster, and reduce gas
mileage.
To help reduce brake wear and to prevent the
brakes from overheating, reduce speed and
downshift to a lower gear before going down a
slope or long grade. Overheated brakes may
reduce braking performance and could result in
loss of vehicle control.
POWER STEERING BRAKE SYSTEM
5-26Starting and driving
ZREVIEW COPY:Ð2003 Truck/Frontier(d22)
Owners Manual(owners)ÐUSA English(nna)
01/16/03Ðcathy
X
Page 167 of 272

6 In case of emergency
First aid kit (if so equipped).........................6-2
Flat tire...........................................6-2
Low tire pressure warning system
(if so equipped)................................6-2
Changing a flat tire.............................6-3
Jump starting.....................................6-9Push starting.....................................6-11
If your vehicle overheats...........................6-11
Towing your vehicle...............................6-12
Towing recommended by Nissan................6-13
Vehicle recovery (freeing a stuck vehicle).........6-14
Flat towing....................................6-15
ZREVIEW COPY:Ð2003 Truck/Frontier(d22)
Owners Manual(owners)ÐUSA English(nna)
01/15/03Ðarosenma
X
Page 170 of 272

Getting the spare tire and tools
For King Cab models:
cMove the driver’s seatback fully forward.
cRemove the jack and wheel nut wrench from
the tool case located behind the driver’s seat.
cRemove the jack rod located behind the driv-
er’s seat.For Crew Cab models:
cTilt the rear bench seat forward.
cRemove the jack, jack rod, and tool case lo-
cated behind the rear bench seat.
All models:
1. Fit the square end of the jack rod into the
square hole of the wheel nut wrench to form
a handle.
2. Find the oval-shaped opening under the
middle of the tailgate. Pass the T-shaped
end of the jack rod through the opening and
direct it toward the spare tire winch, located
directly above the spare tire.
Type A
WCE0064Type BLCE0069WCE0065
6-4In case of emergency
ZREVIEW COPY:Ð2003 Truck/Frontier(d22)
Owners Manual(owners)ÐUSA English(nna)
01/15/03Ðarosenma
X
Page 177 of 272
WARNING
cAutomatic transmission models cannot
be push-started or tow-started. This
may cause transmission or other ve-
hicle damage.
cThree-way catalyst equipped models
should not be started by pushing. The
three-way catalyst may be damaged.
cNever try to start the vehicle by towing
it. When the engine starts, the forward
surge could cause the vehicle to collide
with the tow vehicle.If your vehicle is overheating (indicated by an
extremely high temperature gauge reading) , or if
you feel a lack of engine power, detect abnormal
noise, etc. take the following steps.
WARNING
cDo not continue to drive if your vehicle
overheats. Doing so could cause a ve-
hicle fire.
cTo avoid the danger of being scalded,
never remove the radiator cap while the
engine is still hot. When the radiator
cap is removed, pressurized hot water
will spurt out, possibly causing serious
injury.
cDo not open the hood if steam is com-
ing out.
1. Move the vehicle safely off the road, apply
the parking brake and move the shift lever to
N (Neutral) (manual transmission) or to P
(Park) (automatic transmission) .
Do not stop the engine.
2. Turn off the air conditioner (if so equipped) .
Open all the windows, move the heater or air
conditioner temperature control to maximum
hot and fan control to high speed.3. If engine overheating is caused by climbing a
long hill on a hot day, run the engine at a fast
idle (approximately 1,500 r/min) until the
temperature gauge indicator returns to nor-
mal.
4. Get out of the vehicle. Look and listen for
steam or coolant escaping from the radiator
before opening the hood. Wait until no
steam or coolant can be seen before pro-
ceeding.
5. Open the engine hood.
WARNING
If steam or water is coming from the en-
gine, stand clear to prevent getting
burned.
6. Visually check drive belts for damage or
looseness. Also check if the cooling fan is
running. The radiator hoses and radiator
should not leak water. If coolant is leaking,
the water pump belt is missing or loose, or
the cooling fan does not run, stop the en-
gine.
PUSH STARTING IF YOUR VEHICLE OVERHEATS
In case of emergency6-11
ZREVIEW COPY:Ð2003 Truck/Frontier(d22)
Owners Manual(owners)ÐUSA English(nna)
01/15/03Ðarosenma
X
Page 178 of 272
WARNING
Be careful not to allow your hands, hair,
jewelry or clothing to come into contact
with, or get caught in, engine belts or the
engine cooling fan. The engine cooling
fan can start at any time when the coolant
temperature is high.
7. After the engine cools down, check the cool-
ant level in the reservoir tank with the engine
running. Add coolant to the reservoir tank if
necessary. Have your vehicle repaired at a
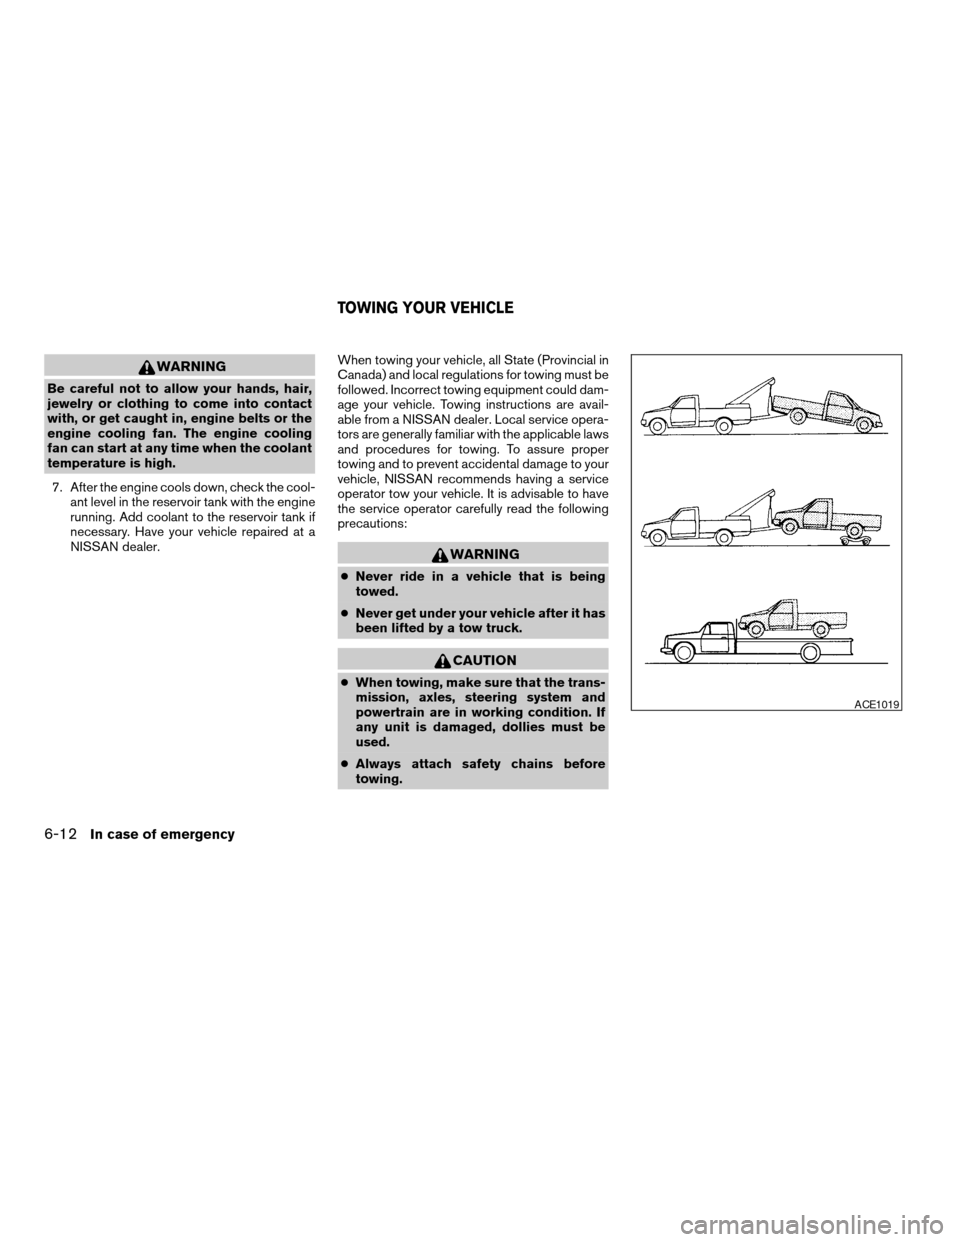
NISSAN dealer.When towing your vehicle, all State (Provincial in
Canada) and local regulations for towing must be
followed. Incorrect towing equipment could dam-
age your vehicle. Towing instructions are avail-
able from a NISSAN dealer. Local service opera-
tors are generally familiar with the applicable laws
and procedures for towing. To assure proper
towing and to prevent accidental damage to your
vehicle, NISSAN recommends having a service
operator tow your vehicle. It is advisable to have
the service operator carefully read the following
precautions:
WARNING
cNever ride in a vehicle that is being
towed.
cNever get under your vehicle after it has
been lifted by a tow truck.
CAUTION
cWhen towing, make sure that the trans-
mission, axles, steering system and
powertrain are in working condition. If
any unit is damaged, dollies must be
used.
cAlways attach safety chains before
towing.
ACE1019
TOWING YOUR VEHICLE
6-12In case of emergency
ZREVIEW COPY:Ð2003 Truck/Frontier(d22)
Owners Manual(owners)ÐUSA English(nna)
01/15/03Ðarosenma
X