2003 NISSAN FRONTIER headlight
[x] Cancel search: headlightPage 78 of 272
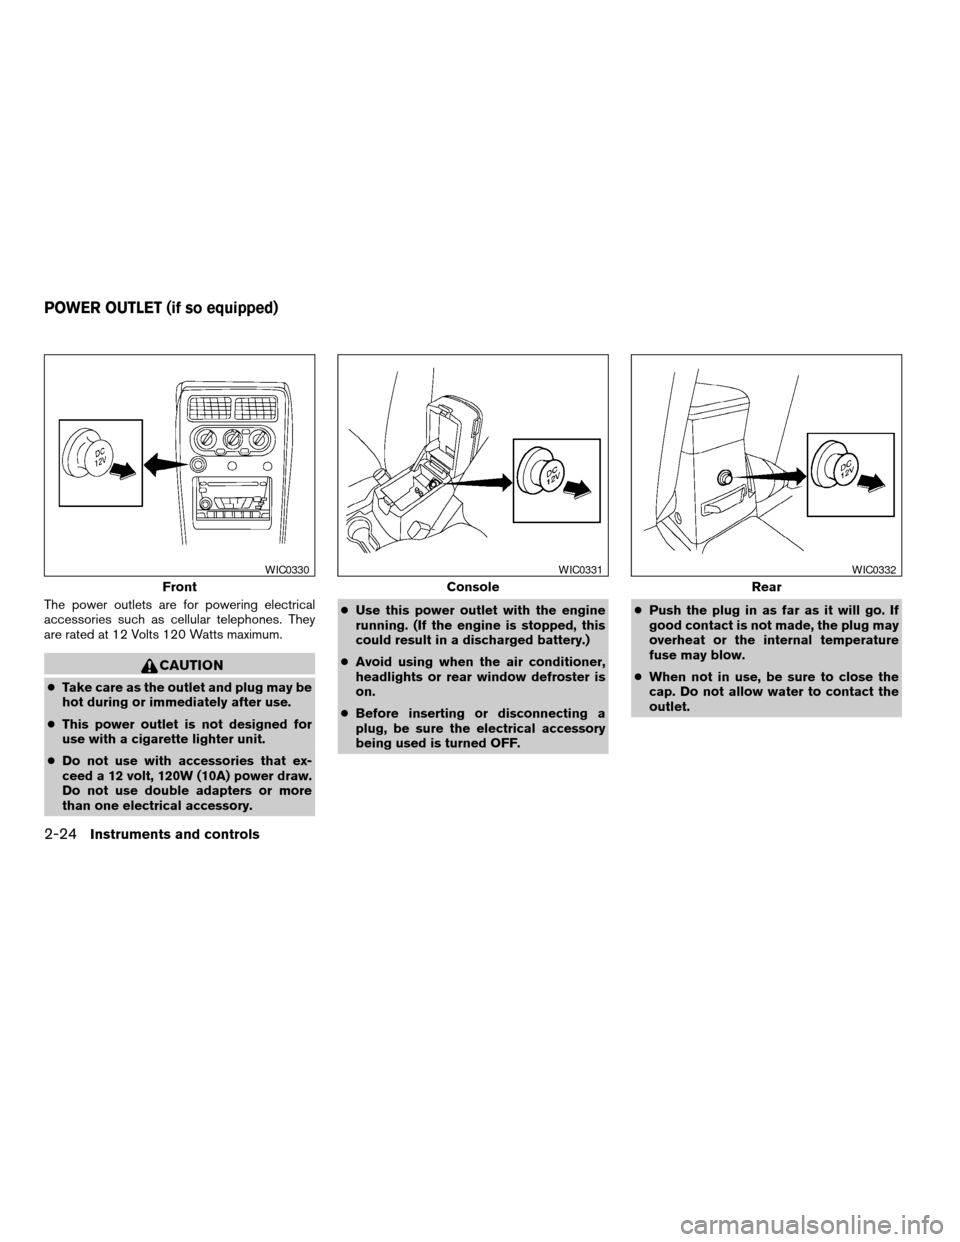
The power outlets are for powering electrical
accessories such as cellular telephones. They
are rated at 12 Volts 120 Watts maximum.
CAUTION
cTake care as the outlet and plug may be
hot during or immediately after use.
cThis power outlet is not designed for
use with a cigarette lighter unit.
cDo not use with accessories that ex-
ceed a 12 volt, 120W (10A) power draw.
Do not use double adapters or more
than one electrical accessory.cUse this power outlet with the engine
running. (If the engine is stopped, this
could result in a discharged battery.)
cAvoid using when the air conditioner,
headlights or rear window defroster is
on.
cBefore inserting or disconnecting a
plug, be sure the electrical accessory
being used is turned OFF.cPush the plug in as far as it will go. If
good contact is not made, the plug may
overheat or the internal temperature
fuse may blow.
cWhen not in use, be sure to close the
cap. Do not allow water to contact the
outlet.
Front
WIC0330
Console
WIC0331
Rear
WIC0332
POWER OUTLET (if so equipped)
2-24Instruments and controls
ZREVIEW COPY:Ð2003 Truck/Frontier(d22)
Owners Manual(owners)ÐUSA English(nna)
01/15/03Ðarosenma
X
Page 92 of 272

Using the panic alarm
If you are near your vehicle and feel threatened,
you may activate the panic alarm to call attention
by pushing and holding the
button on the
keyfob forlonger than 0.5 second.
The panic alarm and headlights will stay on for 30
seconds.
The panic alarm stops when:
cit has run for 30 seconds, or
cthe
orbutton is pushed on the
keyfob.
Silencing the horn beep feature
If desired, the horn beep feature can be deacti-
vated using the keyfob.
To deactivate:Press and hold the
andbuttonsfor at least 2 seconds.
The hazard lights will flash three times to confirm
that the horn beep feature has been deactivated.
To activate:Press and hold the
andbuttonsfor at least 2 seconds
once more.The hazard lights will flash once and the horn will
sound once to confirm that the horn beep feature
has been reactivated.
Deactivating the horn beep feature does not si-
lence the horn if the alarm is triggered.
WPD0159WIC0325
3-6Pre-driving checks and adjustments
ZREVIEW COPY:Ð2003 Truck/Frontier(d22)
Owners Manual(owners)ÐUSA English(nna)
01/15/03Ðarosenma
X
Page 99 of 272
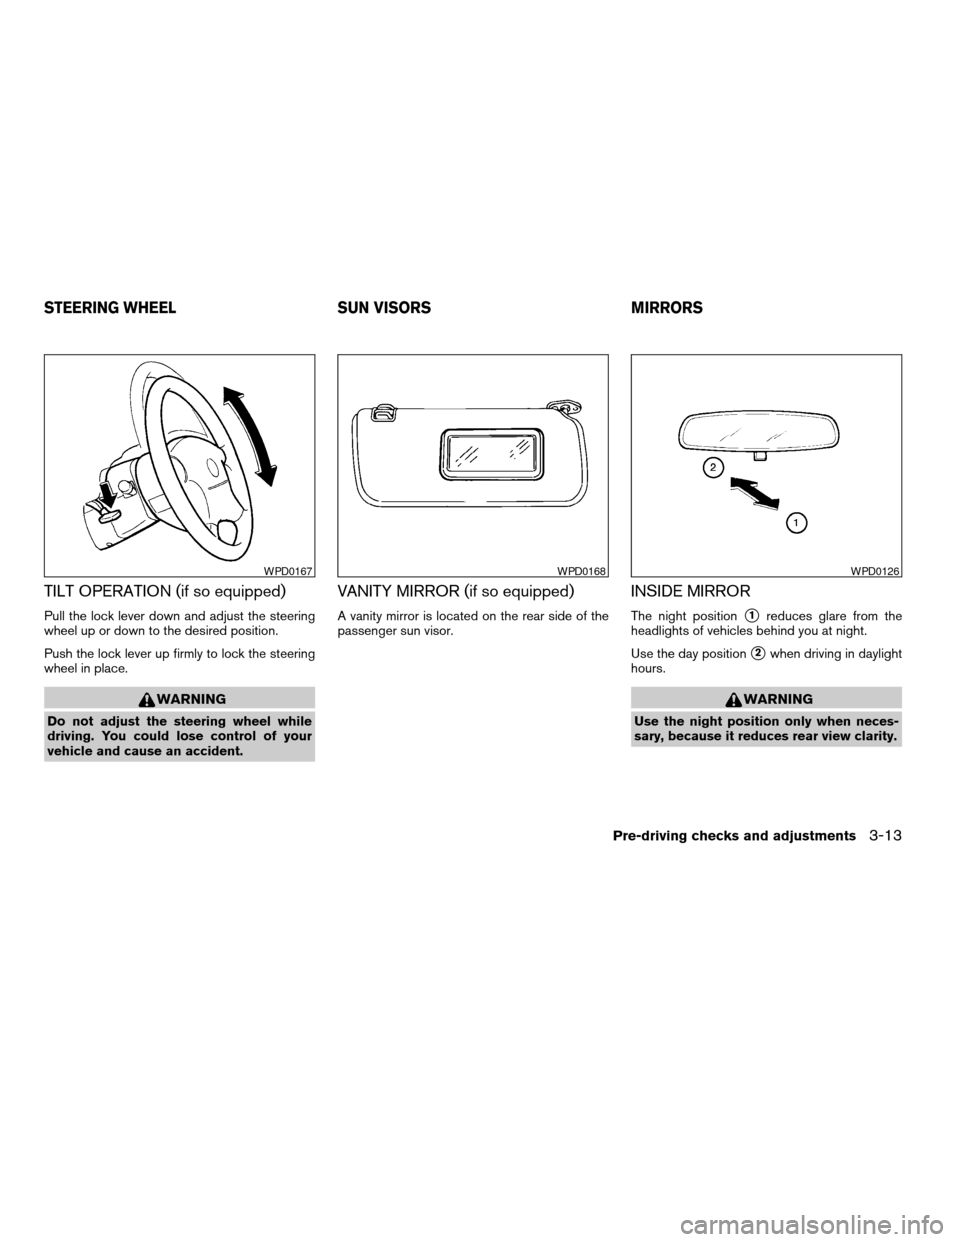
TILT OPERATION (if so equipped)
Pull the lock lever down and adjust the steering
wheel up or down to the desired position.
Push the lock lever up firmly to lock the steering
wheel in place.
WARNING
Do not adjust the steering wheel while
driving. You could lose control of your
vehicle and cause an accident.
VANITY MIRROR (if so equipped)
A vanity mirror is located on the rear side of the
passenger sun visor.
INSIDE MIRROR
The night positions1reduces glare from the
headlights of vehicles behind you at night.
Use the day position
s2when driving in daylight
hours.
WARNING
Use the night position only when neces-
sary, because it reduces rear view clarity.
WPD0167WPD0168WPD0126
STEERING WHEEL SUN VISORS MIRRORS
Pre-driving checks and adjustments3-13
ZREVIEW COPY:Ð2003 Truck/Frontier(d22)
Owners Manual(owners)ÐUSA English(nna)
01/15/03Ðarosenma
X
Page 189 of 272

8 Maintenance and do-it-yourself
Maintenance requirements..........................8-2
General maintenance..............................8-2
Explanation of general maintenance items.........8-2
Maintenance precautions...........................8-5
Engine compartment check locations................8-6
Engine cooling system.............................8-9
Checking engine coolant level...................8-9
Changing engine coolant.......................8-10
Engine oil........................................8-10
Checking engine oil level.......................8-10
Changing engine oil...........................8-11
Changing engine oil filter.......................8-13
Automatic transmission fluid.......................8-14
Temperature conditions for checking.............8-14
Power steering fluid...............................8-15
Brake and clutch fluid.............................8-16
Brake fluid....................................8-16
Clutch fluid...................................8-17
Window washer fluid.............................8-17
Window washer fluid reservoir..................8-17
Battery..........................................8-18
Jump starting.................................8-19
Drive belts.......................................8-20Spark plugs......................................8-21
Replacing spark plugs.........................8-21
Air cleaner.......................................8-23
In-cabin Microfilter (if so equipped)..............8-23
Windshield wiper blades..........................8-26
Cleaning.....................................8-26
Replacing....................................8-26
Parking brake and brake pedal.....................8-27
Checking parking brake........................8-27
Checking brake pedal..........................8-27
Brake booster.................................8-28
Fuses...........................................8-29
Passenger compartment.......................8-29
Keyfob battery replacement........................8-30
Lights...........................................8-31
Headlights....................................8-31
Fog lights (if so equipped)......................8-32
Exterior and interior lights.......................8-34
Wheels and tires.................................8-37
Tire pressure..................................8-37
Types of tires..................................8-37
Tire chains....................................8-38
Changing wheels and tires.....................8-39
ZREVIEW COPY:Ð2003 Truck/Frontier(d22)
Owners Manual(owners)ÐUSA English(nna)
01/15/03Ðarosenma
X
Page 191 of 272

Wheel nuts*When checking the tires, make
sure no wheel nuts are missing, and check for any
loose wheel nuts. Tighten if necessary.
Tire rotation*Tires should be rotated every
7,500 miles (12,000 km) .
Wheel alignment and balanceIf the vehicle
should pull to either side while driving on a
straight and level road, or if you detect uneven or
abnormal tire wear, there may be a need for wheel
alignment.
If the steering wheel or seat vibrates at normal
highway speeds, wheel balancing may be
needed.
cFor additional information regarding tires, refer
to “Important Tire Safety Information” (US) or
“Tire Safety Information” (Canada) in the War-
ranty Information Booklet .
WindshieldClean the windshield on a regular
basis. Check the windshield at least every six
months for cracks or other damage. Have a dam-
aged windshield repaired by a qualified repair
facility.
Windshield wiper blades*Check for cracks or
wear if they do not wipe properly.
Doors, hood and tailgateCheck that the
doors, hood and tailgate operate properly. Also
ensure that all latches lock securely. Lubricatehinges, latches, latch pins, rollers and links as
necessary. Make sure that the secondary latch
keeps the hood from opening when the primary
latch is released.
When driving in areas using road salt or other
corrosive materials, check lubrication frequently.
Lights*Clean the headlights on a regular basis.
Make sure that the headlights, stop lights, tail
lights, turn signal lights, and other lights are all
operating properly and installed securely. Also
check headlight aim.
Inside the vehicle
The maintenance items listed here should be
checked on a regular basis, such as when per-
forming periodic maintenance, cleaning the ve-
hicle, etc.
Additional information on the following
items with an “*” is found later in this sec-
tion.
Warning lights and chimesMake sure all
warning lights and chimes are operating properly.
Windshield wiper and washer*Check that
the wipers and washer operate properly and that
the wipers do not streak.Windshield defrosterCheck that the air
comes out of the defroster outlets properly and in
sufficient quantity when operating the heater or
air conditioner.
Steering wheelCheck for changes in the steer-
ing system, such as excessive freeplay, hard
steering or strange noises.
SeatsCheck seat position controls such as seat
adjusters, seatback recliner, etc. to ensure they
operate smoothly and all latches lock securely in
every position. Check that the head restraints
move up and down smoothly and the locks (if so
equipped) hold securely in all latched positions.
Seat beltsCheck that all parts of the seat belt
system (for example, buckles, anchors, adjusters
and retractors) operate properly and smoothly,
and are installed securely. Check the belt web-
bing for cuts, fraying, wear or damage.
Accelerator pedalCheck the pedal for smooth
operation and make sure the pedal does not bind
or require uneven effort. Keep the floor mat away
from the pedal.
Clutch pedal*Make sure the pedal operates
smoothly and check that it has the proper free
travel.
BrakesCheck that the brakes do not pull the
vehicle to one side when applied.
Maintenance and do-it-yourself8-3
ZREVIEW COPY:Ð2003 Truck/Frontier(d22)
Owners Manual(owners)ÐUSA English(nna)
01/15/03Ðarosenma
X
Page 217 of 272
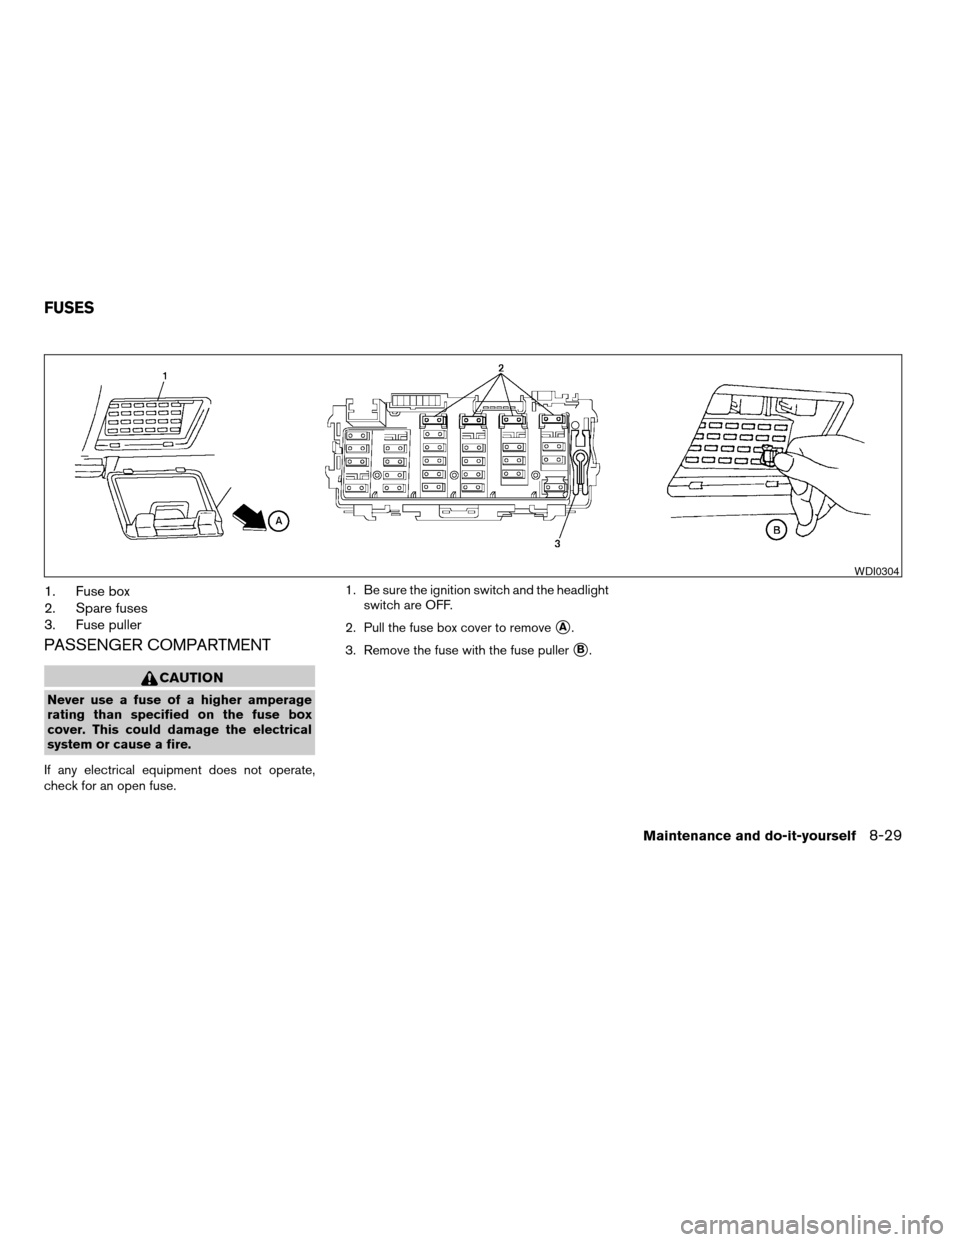
1. Fuse box
2. Spare fuses
3. Fuse puller
PASSENGER COMPARTMENT
CAUTION
Never use a fuse of a higher amperage
rating than specified on the fuse box
cover. This could damage the electrical
system or cause a fire.
If any electrical equipment does not operate,
check for an open fuse.1. Be sure the ignition switch and the headlight
switch are OFF.
2. Pull the fuse box cover to remove
sA.
3. Remove the fuse with the fuse puller
sB.
WDI0304
FUSES
Maintenance and do-it-yourself8-29
ZREVIEW COPY:Ð2003 Truck/Frontier(d22)
Owners Manual(owners)ÐUSA English(nna)
01/15/03Ðarosenma
X
Page 219 of 272
5. Press thebutton, then thebutton two or three times to check the key-
fob operation.
If the battery is removed for any reason
other than replacement, perform step 5.
cAn improperly disposed battery can hurt
the environment. Always confirm local
regulations for battery disposal.
cThe keyfob is water-resistant; however,
if it does get wet, immediately wipe com-
pletely dry.
cThe operational range of the keyfob ex-
tends to approximately 33 ft (10 m) from
the vehicle. This range may vary with
conditions.
FCC Notice:
Changes or modifications not expressly ap-
proved by the manufacturer for compliance
could void the user’s authority to operate
the equipment.
This device complies with Part 15 of the FCC
Rules and RSS-210 of Industry Canada.
Operation is subject to the following two
conditions: (1) This device may not cause
harmful interference, and (2) this device
must accept any interference received, in-
cluding interference that may cause undes-
ired operation of the device.
HEADLIGHTS
The headlight is a semi-sealed beam type which
uses a replaceable headlight (halogen) bulb. A
bulb can be replaced from inside the engine
compartment without removing the headlight as-
sembly.
CAUTION
cHigh pressure halogen gas is sealed
inside the halogen bulb. The bulb may
break if the glass envelope is scratched
or the bulb is dropped.
cWhen handling the bulb, do not touch
the glass envelope.
cDO NOT TOUCH THE BULB
cUse the same number and wattage as
originally installed:
Wattage 65/55Bulb No. HB5/9007*
*: Always check with the Parts Depart-
ment at a NISSAN dealer for the latest
parts information.
cDo not leave the bulb out of the head-
light reflector for a long period of time
as dust, moisture and smoke may enter
the headlight body and affect the per-
formance of the headlight.cAiming is not necessary after replacing
the bulb. When aiming adjustment is
necessary, contact a NISSAN dealer.
LIGHTS
Maintenance and do-it-yourself8-31
ZREVIEW COPY:Ð2003 Truck/Frontier(d22)
Owners Manual(owners)ÐUSA English(nna)
01/15/03Ðarosenma
X
Page 220 of 272
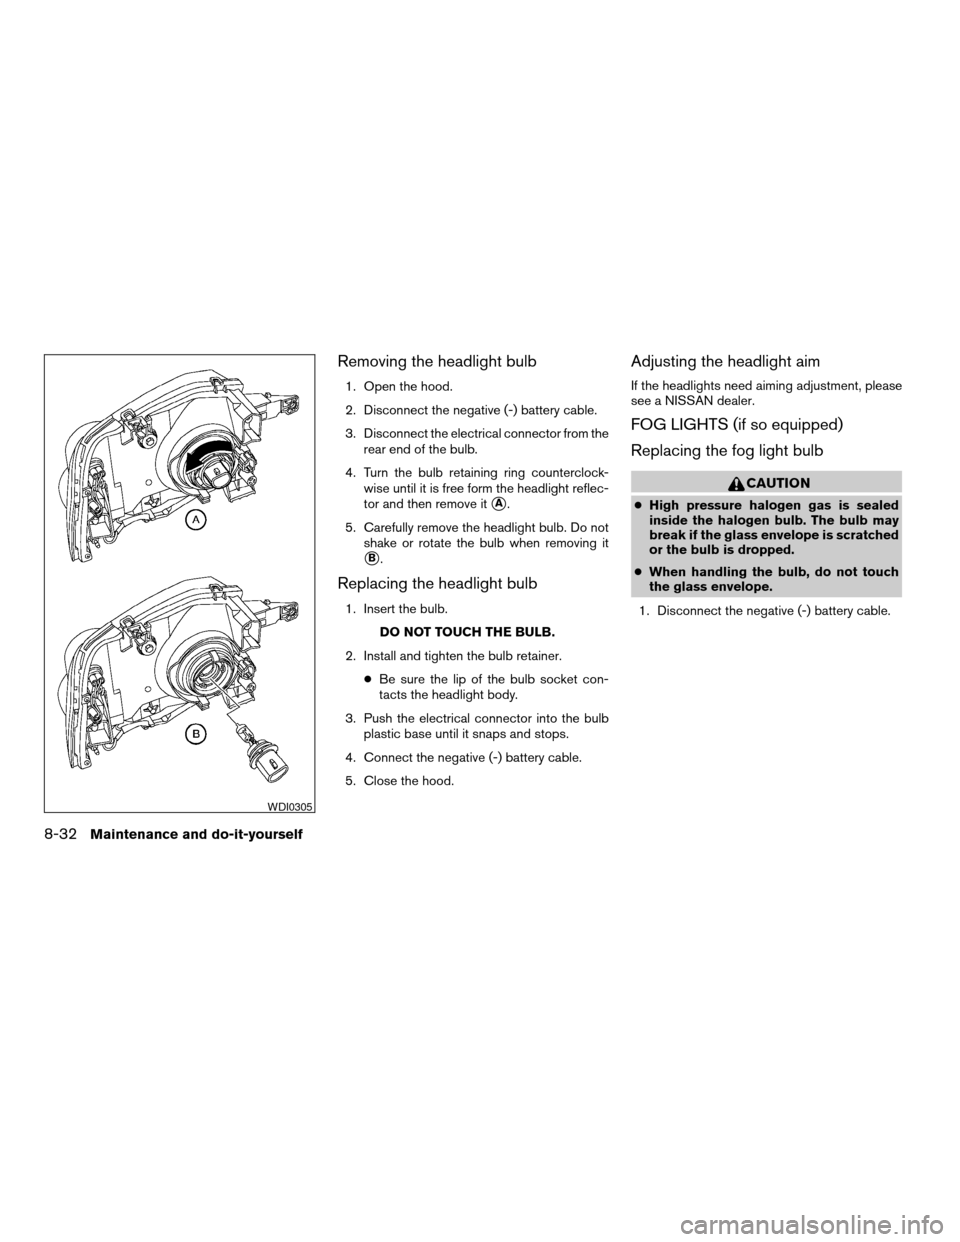
Removing the headlight bulb
1. Open the hood.
2. Disconnect the negative (-) battery cable.
3. Disconnect the electrical connector from the
rear end of the bulb.
4. Turn the bulb retaining ring counterclock-
wise until it is free form the headlight reflec-
tor and then remove it
sA.
5. Carefully remove the headlight bulb. Do not
shake or rotate the bulb when removing it
sB.
Replacing the headlight bulb
1. Insert the bulb.
DO NOT TOUCH THE BULB.
2. Install and tighten the bulb retainer.
cBe sure the lip of the bulb socket con-
tacts the headlight body.
3. Push the electrical connector into the bulb
plastic base until it snaps and stops.
4. Connect the negative (-) battery cable.
5. Close the hood.
Adjusting the headlight aim
If the headlights need aiming adjustment, please
see a NISSAN dealer.
FOG LIGHTS (if so equipped)
Replacing the fog light bulb
CAUTION
cHigh pressure halogen gas is sealed
inside the halogen bulb. The bulb may
break if the glass envelope is scratched
or the bulb is dropped.
cWhen handling the bulb, do not touch
the glass envelope.
1. Disconnect the negative (-) battery cable.
WDI0305
8-32Maintenance and do-it-yourself
ZREVIEW COPY:Ð2003 Truck/Frontier(d22)
Owners Manual(owners)ÐUSA English(nna)
01/15/03Ðarosenma
X