2003 NISSAN ALTIMA warning lights
[x] Cancel search: warning lightsPage 86 of 256
The interior lights illuminate when a front or rear
door is opened. Once the doors are closed,
these lights turn off in 30 seconds or turn off
immediately when the key is turned to the ON
position.
BATTERY SAVER
If the vehicle doors are not fully closed and the
interior lights remain illuminated, they eventually
turn off automatically to prevent the battery from
becoming discharged. Interior lights that illumi-
nate when doors are opened turn off after ap-
proximately 30 minutes.The HomeLinkTUniversal Transceiver provides a
convenient way to consolidate the functions of up
to three individual hand-held transmitters into
one built-in device.
HomeLinkTUniversal Transceiver:
cWill operate most Radio Frequency (RF)
devices such as garage doors, gates, home
and office lighting, entry door locks and se-
curity systems.
cIs powered by your vehicle’s battery. No
separate batteries are required. If the vehi-
cle’s battery is discharged or is discon-
nected, HomeLinkTwill retain all program-
ming.
Once the HomeLinkTUniversal Transceiver
is programmed, retain the original trans-
mitter for future programming procedures
(i.e., new vehicle purchases) . Upon sale of
the vehicle, the programmed HomeLinkT
Universal Transceiver buttons should be
erased for security purposes. For addi-
tional information refer to “Programming
the HomeLinkTUniversal Transceiver” later
in this section.
WARNING
cDo not use the HomeLinkTUniversal
Transceiver with any garage door
opener that lacks safety stop and re-
verse features as required by federal
safety standards. (These standards be-
came effective for opener models
manufactured after April 1, 1982) . A ga-
rage door opener which cannot detect
an object in the path of a closing garage
door and then automatically stop and
reverse, does not meet current federal
safety standards. Using a garage door
opener without these features in-
creases the risk of serious injury or
death.
cDuring the programming procedure
your garage door or security gate will
open and close (if the transmitter is
within range) . Make sure that people or
objects are clear of the garage door,
gate, etc. that you are programming.
cYour vehicle’s engine should be turned
off while programming the HomeLinkT
Universal Transceiver.
ILLUMINATED ENTRY SYSTEM HOMELINKTUNIVERSAL
TRANSCEIVER (if so equipped)
2-38Instruments and controls
ZREVIEW COPY:Ð2003 Altima(l30)
Owners Manual(owners)ÐUSA English(nna)
04/21/03Ðdebbie
X
Page 106 of 256
INSIDE MIRROR
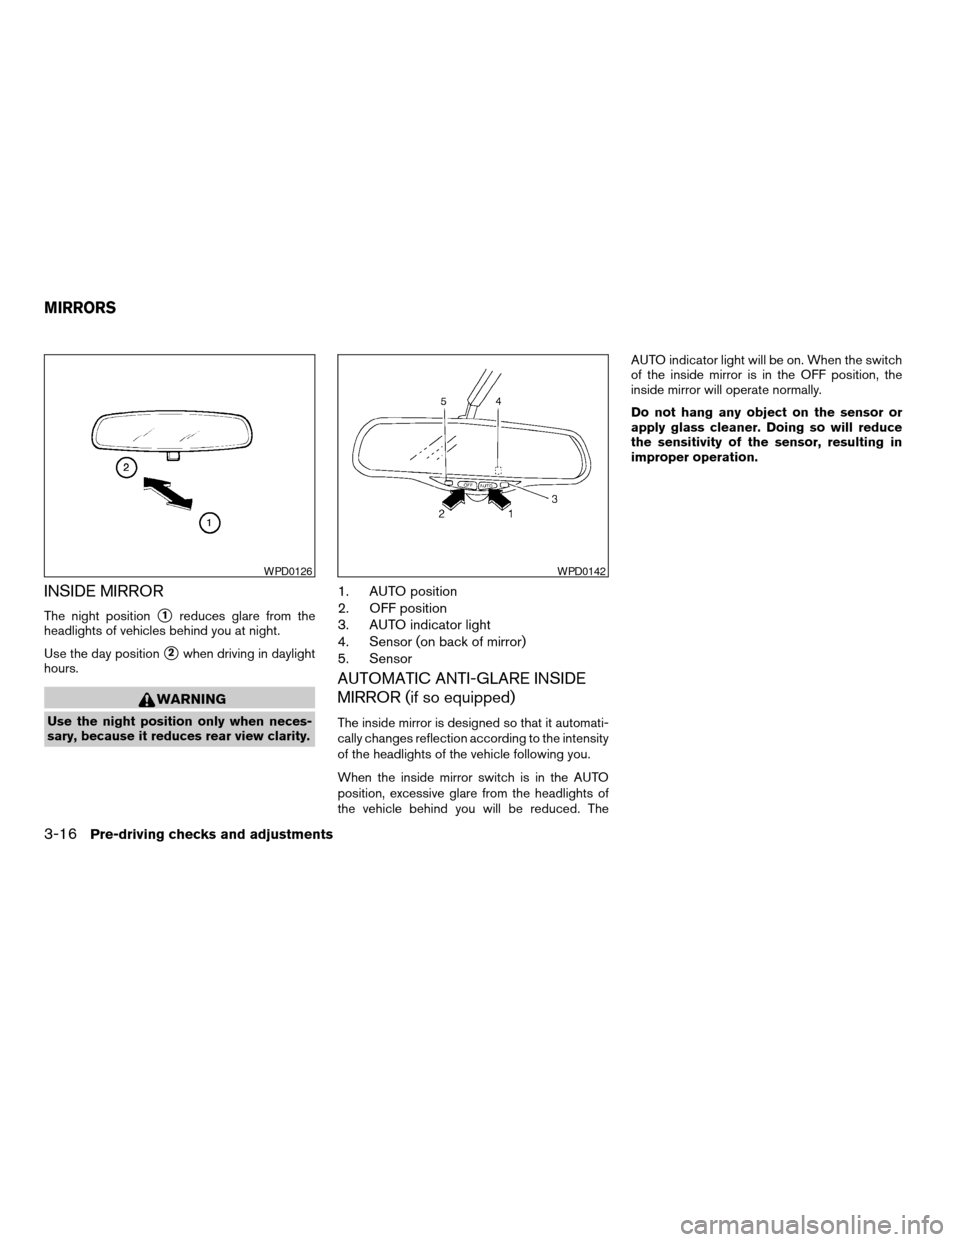
The night positions1reduces glare from the
headlights of vehicles behind you at night.
Use the day position
s2when driving in daylight
hours.
WARNING
Use the night position only when neces-
sary, because it reduces rear view clarity.
1. AUTO position
2. OFF position
3. AUTO indicator light
4. Sensor (on back of mirror)
5. Sensor
AUTOMATIC ANTI-GLARE INSIDE
MIRROR (if so equipped)
The inside mirror is designed so that it automati-
cally changes reflection according to the intensity
of the headlights of the vehicle following you.
When the inside mirror switch is in the AUTO
position, excessive glare from the headlights of
the vehicle behind you will be reduced. TheAUTO indicator light will be on. When the switch
of the inside mirror is in the OFF position, the
inside mirror will operate normally.
Do not hang any object on the sensor or
apply glass cleaner. Doing so will reduce
the sensitivity of the sensor, resulting in
improper operation.
WPD0126WPD0142
MIRRORS
3-16Pre-driving checks and adjustments
ZREVIEW COPY:Ð2003 Altima(l30)
Owners Manual(owners)ÐUSA English(nna)
04/21/03Ðdebbie
X
Page 142 of 256
cMake sure the area around the vehicle is
clear.
cCheck fluid levels such as engine oil, cool-
ant, brake and clutch fluid, and window
washer fluid as frequently as possible, or at
least whenever you refuel.
cCheck that all windows and lights are clean.
cVisually inspect tires for their appearance
and condition. Also check tires for proper
inflation.
cLock all doors.
cPosition seat and adjust head restraints.
cAdjust inside and outside mirrors.
cFasten seat belts and ask all passengers to
do likewise.
cCheck the operation of warning lights when
the key is turned to the ON (3) position. See
“Warning/indicator lights and audible re-
minders” in the “Instruments and controls”
section of this manual.1. Apply the parking brake.
2.Automatic transmission:
Move the shift selector lever to P (Park) or N
(Neutral) . P (Park) is recommended.
The shift selector lever cannot be
moved out of P (Park) and into any of
the other gear positions if the ignition
key is turned to the OFF position or if
the key is removed from the ignition
switch.
The starter is designed not to operate if
the shift selector lever is in any of the
driving positions.
Manual transmission:
Move the shift lever to N (Neutral) . Depress
the clutch pedal to the floor while cranking
the engine.
The starter is designed not to operate
unless the clutch pedal is fully de-
pressed.
3. Crank the enginewith your foot off the
accelerator pedalby turning the ignition
key to START. Release the key when the
engine starts. If the engine starts, but fails to
run, repeat the above procedure.cWhen the engine is very hard to start in
extremely cold weather or when restart-
ing, depress the accelerator pedal a little
(approximately 1/5 to the floor) and hold it
and then crank the engine. Release the
key and the accelerator pedal when the
engine starts.
cWhen the engine is very hard to start
because it is flooded, depress the accel-
erator pedal all the way to the floor and
hold it. Crank the engine for 5-6 seconds.
After cranking the engine, release the ac-
celerator pedal. Crank the enginewith
your foot off the accelerator pedalby
turning the ignition key to START. Release
the key when the engine starts. If the
engine starts, but fails to run, repeat the
above procedure.
CAUTION
Do not operate the starter for more than
15 seconds at a time. If the engine does
not start, turn the key off and wait 10
seconds before cranking again, otherwise
the starter could be damaged.
4. Allow the engine to idle for at least 30 sec-
onds after starting. Drive at moderate speed
for a short distance first, especially in cold
weather.
BEFORE STARTING THE ENGINE STARTING THE ENGINE
5-6Starting and driving
ZREVIEW COPY:Ð2003 Altima(l30)
Owners Manual(owners)ÐUSA English(nna)
04/21/03Ðdebbie
X
Page 145 of 256
1 (Low gear):
Use this position when climbing steep hills slowly
or slow driving through deep snow, sand or mud,
or for maximum engine braking on steep downhill
grades.
Do not shift into the 1 position at speeds above
37 MPH (60 km/h) . Do not exceed 37 MPH (60
km/h) in the 1 position.
Shift lock release
If the battery is discharged, the shift selector lever
may not be moved from the P (Park) position even
with the brake pedal depressed.
To move the shift selector lever, release the shift
lock. The shift selector lever can be moved to N
(Neutral) . However, the steering wheel will be
locked unless the ignition switch is turned to the
ON position. This allows the vehicle to be moved
if the battery is discharged.
To push the shift lock release, complete the fol-
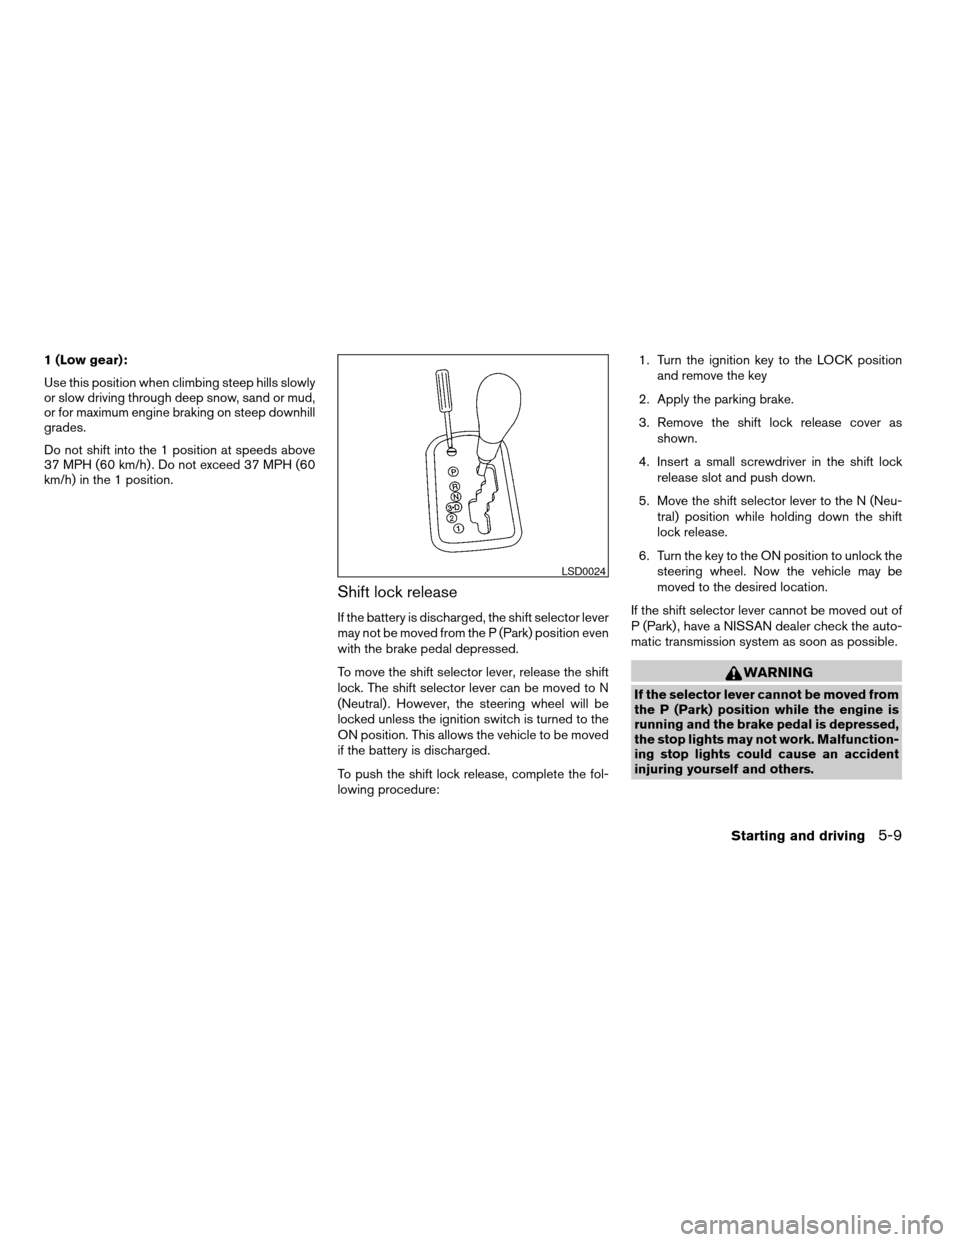
lowing procedure:1. Turn the ignition key to the LOCK position
and remove the key
2. Apply the parking brake.
3. Remove the shift lock release cover as
shown.
4. Insert a small screwdriver in the shift lock
release slot and push down.
5. Move the shift selector lever to the N (Neu-
tral) position while holding down the shift
lock release.
6. Turn the key to the ON position to unlock the
steering wheel. Now the vehicle may be
moved to the desired location.
If the shift selector lever cannot be moved out of
P (Park) , have a NISSAN dealer check the auto-
matic transmission system as soon as possible.
WARNING
If the selector lever cannot be moved from
the P (Park) position while the engine is
running and the brake pedal is depressed,
the stop lights may not work. Malfunction-
ing stop lights could cause an accident
injuring yourself and others.
LSD0024
Starting and driving5-9
ZREVIEW COPY:Ð2003 Altima(l30)
Owners Manual(owners)ÐUSA English(nna)
04/21/03Ðdebbie
X
Page 155 of 256
If a malfunction occurs in the system, the anti-
lock function will not operate, but the standard
vehicle brake system will continue to operate
normally. The ABS brake warning light will then
come on.
If the light comes on during the self-test or while
driving, take the vehicle to a NISSAN dealer for
repair.
WARNING
cThe anti-lock brake system is a sophis-
ticated device, but it cannot prevent ac-
cidents resulting from careless or dan-
gerous driving techniques. It can help
maintain vehicle control during braking
on slippery surfaces, but remember that
the stopping distance on slippery sur-
faces will be longer than on normal
surfaces even with the anti-lock brake
system. Stopping distances may also
be longer on rough, gravel or snow cov-
ered roads, or if you are using tire
chains. Tire type and condition may also
affect braking effectiveness. Always
maintain a safe distance from the ve-
hicle in front of you. Ultimately, the re-
sponsibility for safety of self and others
rests in the hands of the driver.cTire type and condition of tires may also
affect braking effectiveness.
cWhen replacing tires, install the speci-
fied size of tires on all four wheels.
cWhen installing a spare tire, make sure
it is the proper size and type as speci-
fied on the tire placard. For tire placard
location information, refer to “Tire plac-
ard” in the “Technical and consumer
information” section of this manual.
cRefer to “Wheels and tires” in the
“Maintenance and do-it-yourself” sec-
tion of this manual.When driving on slippery surfaces or suddenly
avoiding obstacles on roads, the vehicle might
swerve or slip. With the vehicle traction control
system, sensors detect these movements and
control the braking and engine output to help
improve vehicle stability while driving.
cWhen the traction control system is operat-
ing, the slip indicator in the instrument panel
blinks.
cIf the slip indicator blinks, the vehicle is un-
der slippery conditions. Be sure to drive
carefully. See “Slip indicator light” and “Trac-
tion control off indicator light” in the “Instru-
ments and controls” section of this manual.
cIf a malfunction occurs in the system,
the
andindicator lights
come on in the meter panel.
As long as these warning lights are on, the trac-
tion control function is canceled. The vehicle will
behave like a vehicle without the system.
TRACTION CONTROL SYSTEM (TCS)
(if so equipped)
Starting and driving5-19
ZREVIEW COPY:Ð2003 Altima(l30)
Owners Manual(owners)ÐUSA English(nna)
04/21/03Ðdebbie
X
Page 165 of 256
cWhenever working on or near a battery,
always wear suitable eye protectors (for
example, goggles or industrial safety
spectacles) and remove rings, metal
bands, or any other jewelry. Do not lean
over the battery when jump starting.
cDo not attempt to jump start a frozen
battery. It could explode and cause se-
rious injury.
cYour vehicle has an automatic engine
cooling fan. It could come on at any
time. Keep hands and other objects
away from it.
WARNING
Always follow the instructions below.
Failure to do so could result in damage to
the charging system and cause personal
injury.
1. If the booster battery is in another vehicle,
position the two vehicles to bring their bat-
teries near each other.
Do not allow the two vehicles to touch.2. Apply the parking brake. Move the shift lever
to N (Neutral) (manual transmission) or to P
(Park) (automatic transmission) . Switch off
all unnecessary electrical systems (lights,
heater, air conditioner, etc.) .
3. Remove vent caps on the battery (if so
equipped) . Cover the battery with an old
cloth to reduce explosion hazard.
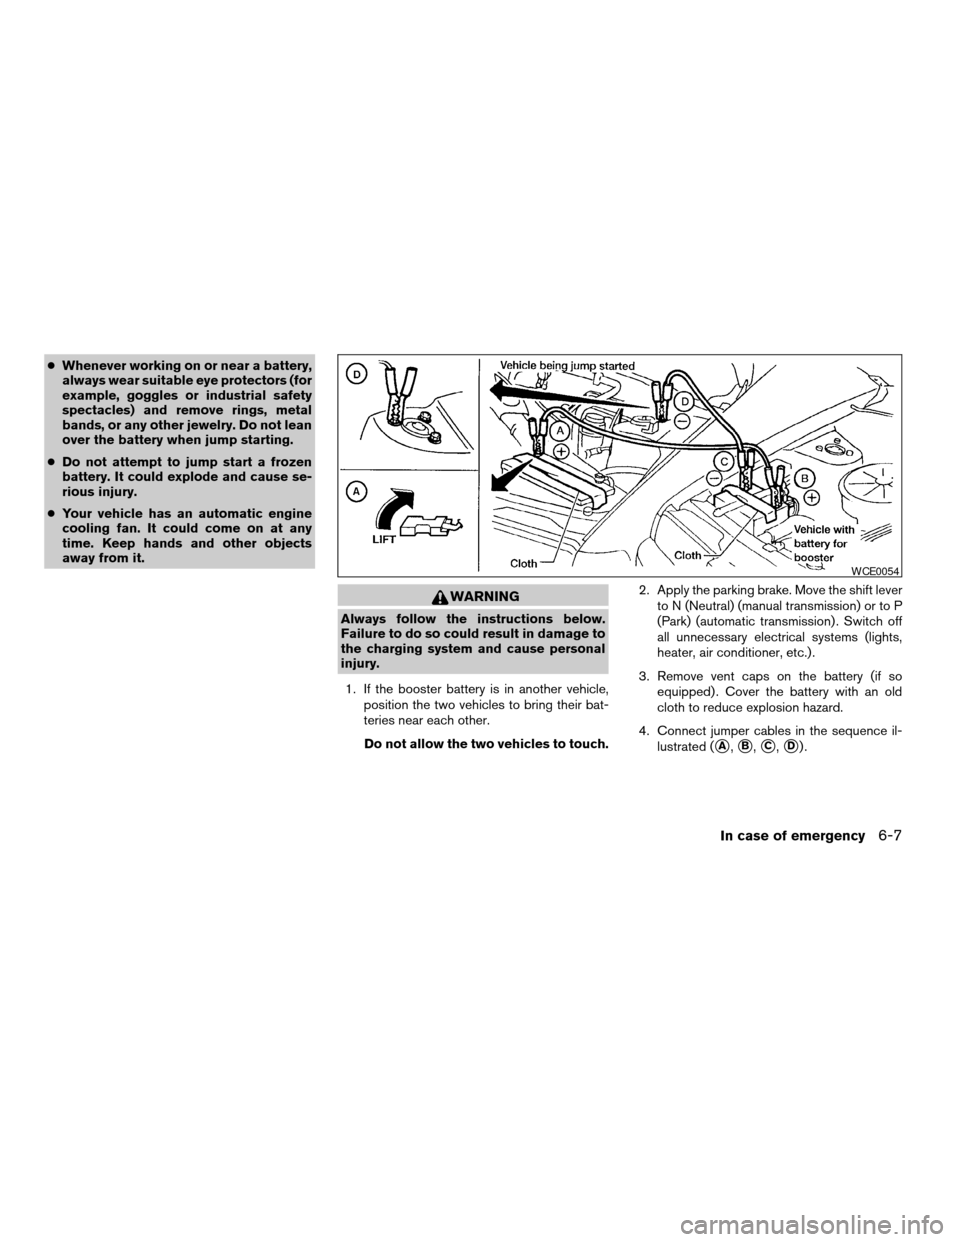
4. Connect jumper cables in the sequence il-
lustrated (
sA,sB,sC,sD).
WCE0054
In case of emergency6-7
ZREVIEW COPY:Ð2003 Altima(l30)
Owners Manual(owners)ÐUSA English(nna)
04/21/03Ðdebbie
X
Page 180 of 256

Warning lights and chimesMake sure all
warning lights and chimes are operating properly.
Windshield wiper and washer*Check that
the wipers and washer operate properly and that
the wipers do not streak.
Windshield defrosterCheck that the air
comes out of the defroster outlets properly and in
sufficient quantity when operating the heater or
air conditioner.
Under the hood and vehicle
The maintenance items listed here should be
checked periodically (for example, each time you
check the engine oil or refuel) .
Automatic transmission fluid level*Check
the level after putting the selector lever in P with
the engine idling at operating temperature.
Battery*Check the fluid level in each cell. It
should be between the MAX and MIN lines. Ve-
hicles operated in high temperatures or under
severe conditions require frequent checks of the
battery fluid level.
Brake and clutch fluid levels*Make sure that
the brake and clutch fluid level is between the
MIN and MAX lines on the reservoir.
Engine coolant level*Check the coolant level
when the engine is cold.Engine drive belts*Make sure the drive belts
are not frayed, worn, cracked or oily.
Engine oil level*Check the level after parking
the vehicle on a level surface with the engine off.
Wait more than 10 minutes for the oil to drain
back into the oil pan.
Exhaust systemMake sure there are no loose
supports, cracks or holes. If the sound of the
exhaust seems unusual or there is a smell of
exhaust fumes, immediately have the exhaust
system inspected by a NISSAN dealer. See the
carbon monoxide warning in the “Starting and
driving” section of this manual.
Fluid leaksCheck under the vehicle for fuel, oil,
water or other fluid leaks after the vehicle has
been parked for a while. Water dripping from the
air conditioner after use is normal. If you should
notice any leaks or if gasoline fumes are evident,
check for the cause and have it corrected imme-
diately.
Power steering fluid level* and linesCheck
the level when the fluid is cold, with the engine
off. Check the lines for proper attachment, leaks,
cracks, etc.
Radiator and hosesCheck the front of the
radiator and clean off any dirt, insects, leaves,etc., that may have accumulated. Make sure the
hoses have no cracks, deformation, rot or loose
connections.
UnderbodyThe underbody is frequently ex-
posed to corrosive substances such as those
used on icy roads or to control dust. It is very
important to remove these substances from the
underbody, otherwise rust may form on the floor
pan, frame, fuel lines and exhaust system. At the
end of winter, the underbody should be thor-
oughly flushed with plain water, in those areas
where mud and dirt may have accumulated. See
the “Appearance and care” section of this
manual.
Windshield washer fluid*Check that there is
adequate fluid in the reservoir.
8-4Maintenance and do-it-yourself
ZREVIEW COPY:Ð2003 Altima(l30)
Owners Manual(owners)ÐUSA English(nna)
04/21/03Ðdebbie
X
Page 207 of 256
HEADLIGHTS
Replacing the xenon headlight bulb
WARNING
cHIGH VOLTAGE
When xenon headlights are on, they pro-
duce a high voltage. To prevent an electric
shock, never attempt to modify or disas-
semble. Always have your xenon head-
lights replaced at a NISSAN dealer. For
additional information, see “Headlight
and turn signal switch” in the “Instru-
ments and controls” section.
Replacing the halogen headlight bulb
The headlight is a semi-sealed beam type which
uses a replaceable headlight (halogen) bulb. Be-
cause the headlight assembly must be removed
from the vehicle for bulb replacement, see your
NISSAN dealer.
CAUTION
cAiming is not necessary after replacing
the bulb. When aiming adjustment is
necessary, contact a NISSAN dealer.cDo not leave the headlight assembly
open without a bulb installed for a long
period of time. Dust, moisture, smoke,
etc. entering the headlight body may
affect bulb performance. Remove the
bulb from the headlight assembly just
before a replacement bulb is installed.
cOnly touch the plastic base when han-
dling the bulb. Never touch the glass
envelope. Touching the glass could sig-
nificantly affect bulb life and/or head-
light performance.
cHigh pressure halogen gas is sealed
inside the halogen bulb. The bulb may
break if the glass envelope is scratched
or the bulb is dropped.
cUse the same number and wattage as
originally installed:
Low beam:
Wattage: 55
Bulb no.: H1*
High beam:
Wattage: 60
Bulb no.: HB3 (9005)*
*: Always check with the Parts Depart-
ment at a NISSAN dealer for the latest
parts information.
FRONT PARK/TURN/SIDEMARKER
LIGHT
Bulb replacement requires the removal of the
headlight assembly. If replacement is required,
see your NISSAN dealer.
FOG LIGHTS (if so equipped)
Replacing the fog light bulb
CAUTION
cHigh pressure halogen gas is sealed
inside the halogen bulb. The bulb may
break if the glass envelope is scratched
or the bulb is dropped.
cWhen handling the bulb, do not touch
the glass envelope.
LIGHTS
Maintenance and do-it-yourself8-31
ZREVIEW COPY:Ð2003 Altima(l30)
Owners Manual(owners)ÐUSA English(nna)
04/21/03Ðdebbie
X