2003 NISSAN ALMERA N16 EL-
[x] Cancel search: EL-Page 16 of 3189
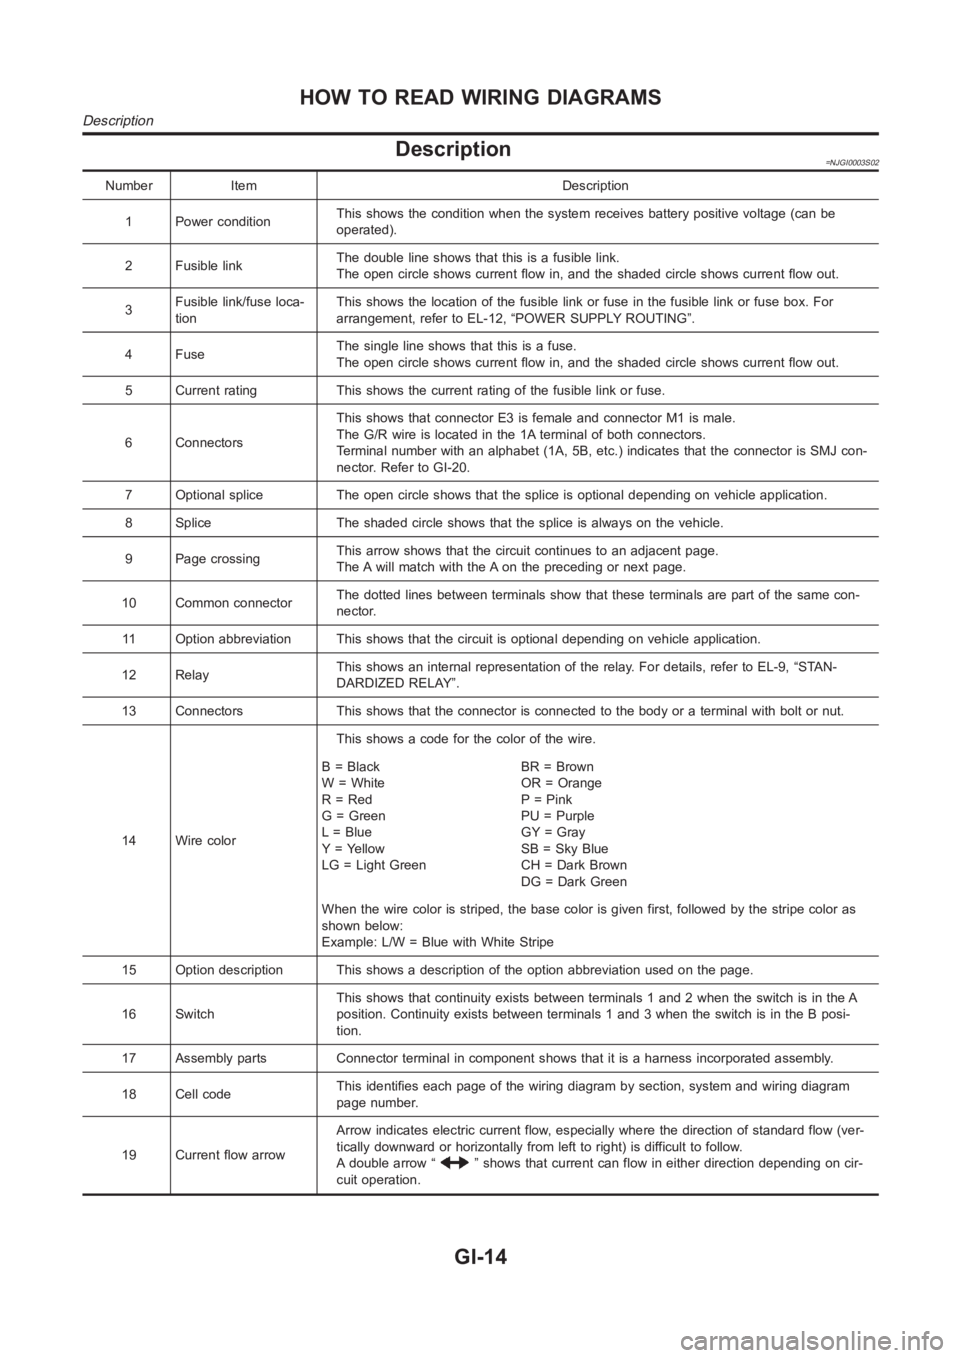
Description=NJGI0003S02
Number Item Description
1 Power conditionThis shows the condition when the system receives battery positive voltage (can be
operated).
2 Fusible linkThe double line shows that this is a fusible link.
The open circle shows current flow in, and the shaded circle shows current flow out.
3Fusible link/fuse loca-
tionThis shows the location of the fusible link or fuse in the fusible link or fusebox.For
arrangement, refer to EL-12, “POWER SUPPLY ROUTING”.
4FuseThe single line shows that this is a fuse.
The open circle shows current flow in, and the shaded circle shows current flow out.
5 Current rating This shows the current rating of the fusible link or fuse.
6 ConnectorsThis shows that connector E3 is female and connector M1 is male.
The G/R wire is located in the 1A terminal of both connectors.
Terminal number with an alphabet (1A, 5B, etc.) indicates that the connector is SMJ con-
nector. Refer to GI-20.
7 Optional splice The open circle shows that the splice is optional depending on vehicle application.
8 Splice The shaded circle shows that the splice is always on the vehicle.
9 Page crossingThis arrow shows that the circuit continues to an adjacent page.
The A will match with the A on the preceding or next page.
10 Common connectorThe dotted lines between terminals show that these terminals are part of thesamecon-
nector.
11 Option abbreviation This shows that the circuit is optional depending on vehicle application.
12 RelayThis shows an internal representation of the relay. For details, refer to EL-9, “STAN-
DARDIZED RELAY”.
13 Connectors This shows that the connector is connected to the body or a terminal with bolt or nut.
14 Wire colorThis shows a code for the color of the wire.
B=Black
W = White
R = Red
G = Green
L = Blue
Y = Yellow
LG = Light GreenBR = Brown
OR = Orange
P = Pink
PU = Purple
GY = Gray
SB = Sky Blue
CH = Dark Brown
DG=DarkGreen
When the wire color is striped, the base color is given first, followed by the stripe color as
shown below:
Example: L/W = Blue with White Stripe
15 Option description This shows a description of the option abbreviationused on the page.
16 SwitchThis shows that continuity exists between terminals 1 and 2 when the switchis in the A
position. Continuity exists between terminals 1 and 3 when the switch is inthe B posi-
tion.
17 Assembly parts Connector terminal in component shows that it is a harness incorporated assembly.
18 Cell codeThis identifies each page of the wiring diagram by section, system and wiring diagram
page number.
19 Current flow arrowArrow indicates electric current flow, especially where the direction ofstandard flow (ver-
tically downward or horizontally from left to right) is difficult to follow.
A double arrow “
” shows that current can flow in either direction depending on cir-
cuit operation.
HOW TO READ WIRING DIAGRAMS
Description
GI-14
Page 17 of 3189
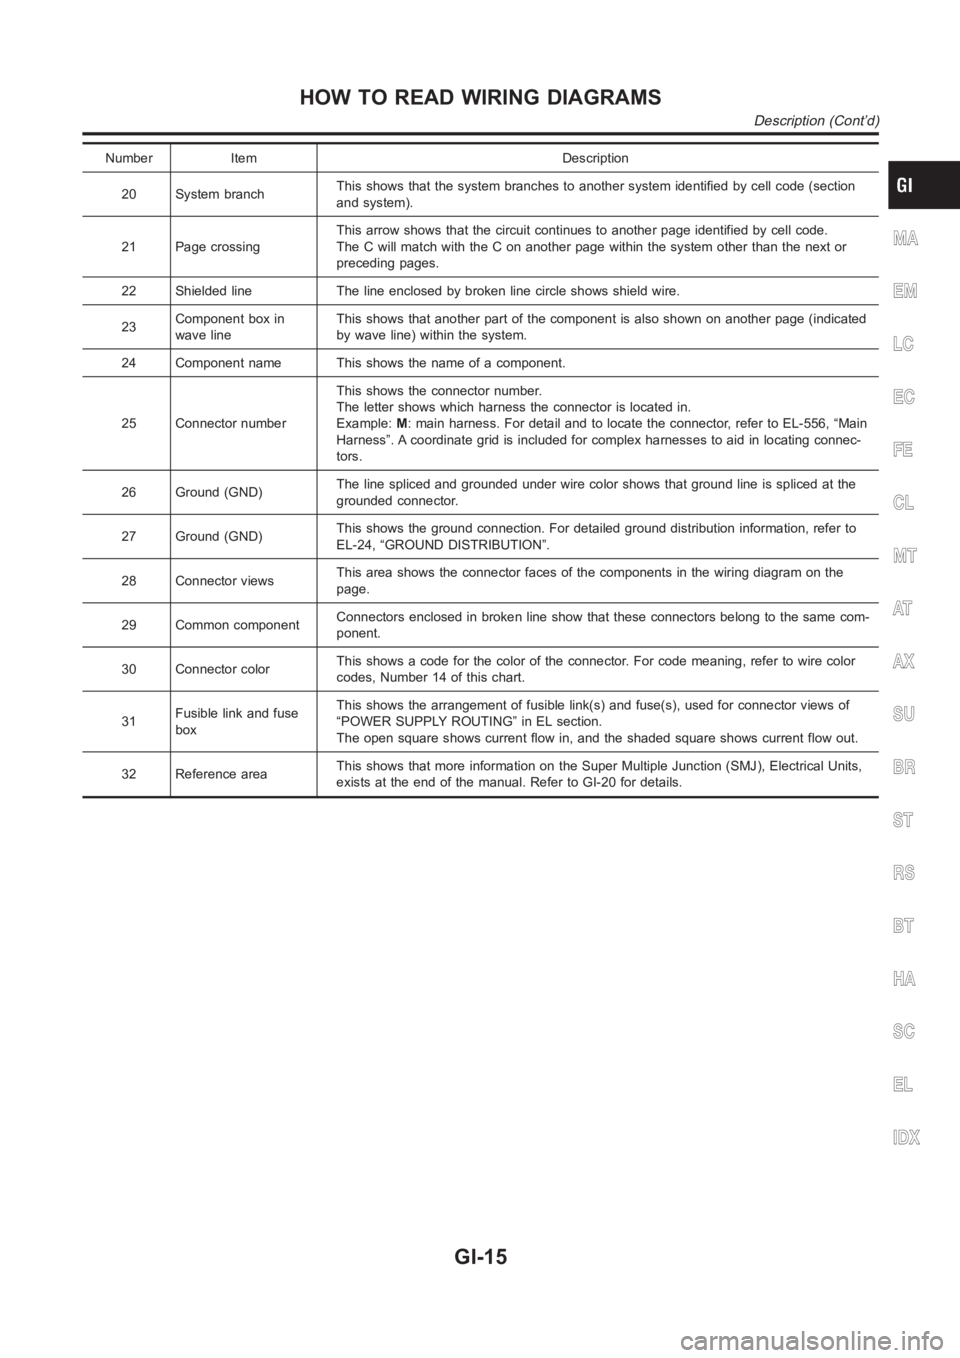
Number Item Description
20 System branchThis shows that the system branches to another system identified by cell code (section
and system).
21 Page crossingThis arrow shows that the circuit continues to another page identified by cell code.
The C will match with the C on another page within the system other than the next or
preceding pages.
22 Shielded line The line enclosed by broken line circle shows shield wire.
23Component box in
wave lineThis shows that another part of the component is also shown on another page (indicated
by wave line) within the system.
24 Component name This shows the name of a component.
25 Connector numberThis shows the connector number.
The letter shows which harness the connector is located in.
Example:M: main harness. For detail and to locate the connector, refer to EL-556, “Main
Harness”. A coordinate grid is included for complex harnesses to aid in locating connec-
tors.
26 Ground (GND)The line spliced and grounded under wire color shows that ground line is spliced at the
grounded connector.
27 Ground (GND)This shows the ground connection. For detailed ground distribution information, refer to
EL-24, “GROUND DISTRIBUTION”.
28 Connector viewsThis area shows the connector faces of the components in the wiring diagramon the
page.
29 Common componentConnectors enclosed in broken line show that these connectors belong to thesamecom-
ponent.
30 Connector colorThis shows a code for the color of the connector. For code meaning, refer to wire color
codes, Number 14 of this chart.
31Fusible link and fuse
boxThis shows the arrangement of fusible link(s) and fuse(s), used for connector views of
“POWER SUPPLY ROUTING” in EL section.
The open square shows current flow in, and the shaded square shows current flow out.
32 Reference areaThis shows that more information on the Super Multiple Junction (SMJ), Electrical Units,
exists at the end of the manual. Refer to GI-20 for details.
MA
EM
LC
EC
FE
CL
MT
AT
AX
SU
BR
ST
RS
BT
HA
SC
EL
IDX
HOW TO READ WIRING DIAGRAMS
Description (Cont’d)
GI-15
Page 18 of 3189
SGI364
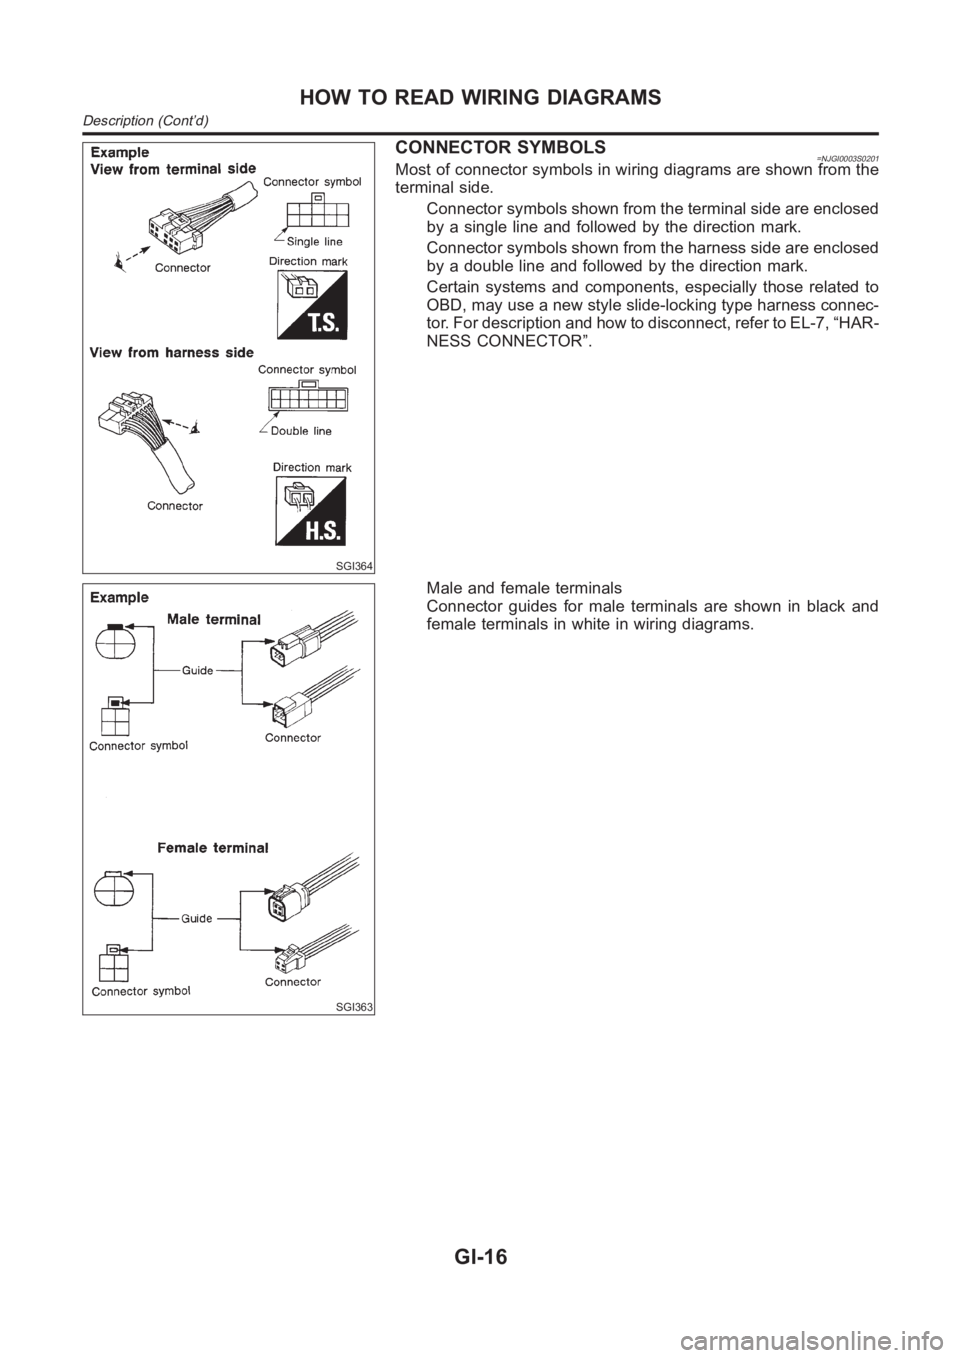
CONNECTOR SYMBOLS=NJGI0003S0201Most of connector symbols in wiring diagrams are shown from the
terminal side.
Connector symbols shown from the terminal side are enclosed
by a single line and followed by the direction mark.
Connector symbols shown from the harness side are enclosed
by a double line and followed by the direction mark.
Certain systems and components, especially those related to
OBD, may use a new style slide-locking type harness connec-
tor. For description and how to disconnect, refer to EL-7, “HAR-
NESS CONNECTOR”.
SGI363
Male and female terminals
Connector guides for male terminals are shown in black and
female terminals in white in wiring diagrams.
HOW TO READ WIRING DIAGRAMS
Description (Cont’d)
GI-16
Page 64 of 3189

CHASSIS AND BODY MAINTENANCE=NJMA0043S0102Abbreviations: R = Replace I = Inspect: Correct or replace if necessary
MAINTENANCE OPERATIONMAINTENANCE INTERVAL
Refer-
ence
pages Perform on a kilometer basis, but on
an annual basis when driving less than
15,000 km (9,000 miles) in a year.kmx1,000
(miles x 1,000)
Months15
(9)
1230
(18)
2445
(27)
3660
(36)
4875
(45)
6090
(54)
72105
(63)
84120
(72)
96
Underhood and under vehicle
Headlamp aimingIIIIIIIIEL-44
Wheel alignment (if necessary, balance
& rotate wheels)IIIIIIIISU-6/
SU-18
Brake pads, rotors & other brake com-
ponents★IIIIIIIIBR-27/
BR-28
Foot brake, parking brake & clutch (for
free play, stroke & operation)IIIIIIIIBR-12/
BR-44/
CL-9
Brake booster vacuum hoses,
connections, check valveIIIIBR-21
Brake & clutch, systems and fluid (for
level and leaks)IIIIIIIIBR-7
Brake fluid★RRRRBR-7
Power steering fluid and lines (for level
and leaks)IIIIIIIIST-7
Supplemental air bag systems See NOTE (1) RS-25
Ventilation air filter★RRRRHA-95 or
AT C - 1 2 8
Manual transaxle gear oil (check for
leakage. Use genuine NISSAN XZ
gear oil or exact equivalent)IIIIIIIIMT-14
MT-15
Automatic transaxle fluid (for level and
leaks)★IIIIIIIIAT-13
Steering gear & linkage, axle & sus-
pension parts, drive shafts, exhaust
system★IIIIST-7/
SU-6/
SU-18/
FE-10
NISSAN Mobility System See NOTE (2)IIIIIII —
Body corrosion See NOTE (3) BT-6
NOTE:
(1) Inspect after 10 years, then every 2 years.
(2) Check expiration date of the tyre sealant bottle. Replace if necessary.
(3) Inspect once per year.
★Maintenance items with “★” should be performed more frequently according to “Maintenance Under Severe Driving Con-
ditions”.
PERIODIC MAINTENANCE (FOR EUROPE)
Maintenance Schedule for Petrol Engines (Annual Mileage < 30,000 km/year) (Cont’d)
MA-8
Page 66 of 3189

CHASSIS AND BODY MAINTENANCE=NJMA0043S0202Abbreviations: R = Replace I = Inspect: Correct or replace if necessary
MAINTENANCE OPERATIONMAINTENANCE INTERVAL
Reference pages Perform on a kilometer basis, but on
an annual basis when driving less
than 20,000 km (12,000 miles) per
year.kmx1,000
(miles x 1,000)
Months20
(12)
1240
(24)
2460
(36)
3680
(48)
48100
(60)
60120
(72)
72
Underhood and under vehicle
Headlamp aimingIIIIII EL-44
Wheel alignment (if necessary, bal-
ance & rotate wheels)IIIIIISU-14
SU-7
Brake pads, rotors & other brake
components★IIIIIIBR-27
BR-28
Foot brake, parking brake & clutch
(for free play, stroke & operation)IIIIIIBR-12
BR-44
CL-9
Brake booster vacuum hoses,
connections, check valveI I I BR-21
Brake & clutch, systems and fluid
(for level and leaks)IIIIII BR-7
Brake fluid★R R R BR-7
Power steering fluid and lines (for
level and leaks)IIIIII ST-7
Supplemental air bag systems See NOTE (1) RS-25
Ventilation air filter★RRRRRR HA-95orATC-128
Manual transaxle gear oil (check for
leakage. Use genuine NISSAN XZ
gear oil or exact equivalent)IIIIIIMT-14
MT-15
Steering gear & linkage, axle & sus-
pension parts, drive shafts, exhaust
system★IIIST-7
SU-6
SU-18
FE-26
NISSAN Mobility System See NOTE (2)IIIII —
Body corrosion See NOTE (3) BT-6
NOTE:
(1) Inspect after 10 years, then every 2 years.
(2) Check expiration date of the tyre sealant bottle. Replace if necessary.
(3) Inspect once per year.
★Maintenance items with “★” should be performed more frequently according to “Maintenance Under Severe Driving Con-
ditions”.
PERIODIC MAINTENANCE (FOR EUROPE)
Maintenance Schedule for Diesel Engines (Annual Mileage < 30,000 km/year) (Cont’d)
MA-10
Page 70 of 3189

CHASSIS AND BODY MAINTENANCE=NJMA0043S0402Abbreviations: R = Replace I = Inspect: Correct or replace if necessary
MAINTENANCE OPERATIONMAINTENANCE INTERVAL
Refer-
ence
pages Perform on a kilometer basis only.kmx1,000
(miles x 1,000)15
(9)30
(18)45
(27)60
(36)75
(45)90
(54)105
(63)120
(72)
Underhood and under vehicle
Headlamp aimingIIIIEL-44
Wheel alignment (if necessary, balance
& rotate wheels)IIIISU-6/
SU-18
Brake pads, rotors & other brake com-
ponents★IIIIBR-27
BR-28
Foot brake, parking brake & clutch (for
free play, stroke & operation)IIIIBR-12/
BR-44/
CL-9
Brake booster vacuum hoses,
connections, check valveI I BR-21
Brake & clutch, systems and fluid (for
level and leaks)IIIIBR-7
Brake fluid★R R BR-7
Power steering fluid and lines (for level
and leaks)IIIIST-7
Supplemental air bag systems See NOTE (1) RS-25
Ventilation air filter★RRRRHA-95 or
AT C - 1 2 8
Manual transaxle gear oil (check for
leakage. Use genuine NISSAN XZ
gear oil or exact equivalent)IIIIMT-14
MT-15
Automatic transaxle fluid (for level and
leaks)★IIIIAT-13
Steering gear and linkage, axle & sus-
pension parts, drive shafts, exhaust
system★IIST-7/
SU-6/
SU-18/
FE-10
NISSAN Mobility System See NOTE (2)IIIIIII —
Body corrosion See NOTE (3) BT-6
NOTE:
(1) Inspect after 10 years, then every 2 years.
(2) Check expiration date of the tyre sealant bottle. Replace if necessary.
(3) Inspect once per year.
★Maintenance items with “★” should be performed more frequently according to “Maintenance Under Severe Driving Con-
ditions”.
PERIODIC MAINTENANCE (FOR EUROPE)
Maintenance Schedule for Petrol Engines (Annual Mileage > 30,000 km/year) (Cont’d)
MA-14
Page 72 of 3189
CHASSIS AND BODY MAINTENANCE=NJMA0043S0502Abbreviations: R = Replace I = Inspect: Correct or replace if necessary
MAINTENANCE OPERATIONMAINTENANCE INTERVAL
Refer-
ence
pages Perform on a kilometer basis
only.kmx1,000
(miles x
1,000)10
(6)20
(12)30
(18)40
(24)50
(30)60
(36)70
(42)80
(48)90
(54)100
(60)11 0
(66)120
(72)
Underhood and under vehicle
Headlamp aiming I I I EL-44
Wheel alignment (if necessary,
balance & rotate wheels)IIISU-6
SU-18
Brake pads, rotors & other
brake components★IIIIIIBR-27
BR-28
Foot brake, parking brake &
clutch (for free play, stroke &
operation)IIIIIIBR-12
BR-44
CL-9
Brake booster vacuum hoses,
connections, check valveI I BR-21
Brake & clutch, systems and
fluid (for level and leaks)IIIIIIBR-7
Brake fluid★R R BR-7
Power steering fluid and lines
(for level and leaks)IIIIIIST-7
Supplemental air bag systemsSee NOTE
(1)RS-25
Ventilation air filter★RRRRRRHA-95
or ATC-
128
Manual transaxle gear oil
(check for leakage. Use genu-
ine NISSAN XZ gear oil or
exact equivalent)IIIMT-14
MT-15
Steering gear & linkage, axle &
suspension parts, drive shafts,
exhaust system★IIST-7
SU-6
SU-18
FE-26
NISSAN Mobility SystemSee NOTE
(2)IIIIIII —
Body corrosionSee NOTE
(3)BT-6
NOTE:
(1) Inspect after 10 years, then every 2 years.
(2) Check expiration date of the tyre sealant bottle. Replace if necessary.
(3) Inspect once per year.
★Maintenance items with “★” should be performed more frequently according to “Maintenance Under Severe Driving Con-
ditions”.
PERIODIC MAINTENANCE (FOR EUROPE)
Maintenance Schedule for Diesel Engines (Annual Mileage > 30,000 km/year) (Cont’d)
MA-16
Page 120 of 3189

EM-42
[QG]
CAMSHAFT
Valve Lifter Hole Diameter
●Using inside micrometer, measure diameter of valve lifter hole of
cylinder head.
Calculation of Valve Lifter Clearance
(Valve lifter clearance) = (hole diameter of valve lifter) – (outer diam-
eter of valve lifter).
●When out of specified range, referring to each specification of outer and inner diameter, replace either or
both valve lifter and cylinder head.
Valve ClearanceEBS00LQC
INSPECTION
●The following procedure is applicable when: Components related to camshafts or valves are removed,
installed, or replaced. Drivability concerns (poor starting, poor idling, noise) are caused by valve clearance
aging.
1. Warm up engine, and stop.
2. Remove RH splash cover (integrated with undercover).
3. Remove rocker cover. Refer to EM-29, "
ROCKER COVER" .
4. Turn crankshaft pulley clockwise (viewed from front) to align yel-
low paint with timing indicator.
5. At this point, confirm that both intake and exhaust cam noses on
No. 1 cylinder face outward. (No. 1 cylinder is at TDC of its com-
pression stroke.)
●If not, turn crankshaft pulley more.
NOTE:
Or, valves to be checked when No. 4 cylinder is at TDC of its
compression stroke can be checked first following step 8.
6. Referring to figure, measure valve clearances of valves with × in
table below using a thickness gauge.Standard (Intake and exhaust)
: 30.000 - 30.021 mm (1.1811 - 1.1819 in) dia.
Standard (Intake and exhaust)
: 0.025 - 0.061 mm (0.0010 - 0.0024 in)
SEM867E
MBIB0222E
Cylinder No.1 No.2 No.3 No.4
Valve INT EXH INT EXH INT EXH INT EXH
No. 1 cylinder at
TDC of its compres-
sion stroke××× ×
MBIB0223E
MBIB0224E